概述
Consul是一套开源的分布式服务发现和配置管理系统,由HashiCorp公司用go语言开发。
官方网站:https://www.consul.io/
Github:https://github.com/hashicorp/consul
下载地址:https://www.consul.io/downloads
下载&安装
下载
$ wget https://releases.hashicorp.com/consul/1.9.3/consul_1.9.3_linux_amd64.zip$ sudo unzip consul_1.9.3_linux_amd64.zip -d /usr/local/bin/Archive: consul_1.9.3_linux_amd64.zipinflating: /usr/local/bin/consul
docker-compose
参考 https://github.com/hashicorp/consul/tree/master/demo/docker-compose-cluster
version: '3'services:consul-agent-1: &consul-agentimage: consul:latestnetworks:- consul-democommand: "agent -retry-join consul-server-bootstrap -client 0.0.0.0"consul-agent-2:<<: *consul-agentconsul-agent-3:<<: *consul-agentconsul-server-1: &consul-server<<: *consul-agentcommand: "agent -server -retry-join consul-server-bootstrap -client 0.0.0.0"consul-server-2:<<: *consul-serverconsul-server-bootstrap:<<: *consul-agentports:- "8400:8400"- "8500:8500"- "8600:8600"- "8600:8600/udp"command: "agent -server -bootstrap-expect 3 -ui -client 0.0.0.0"networks:consul-demo:
基础架构
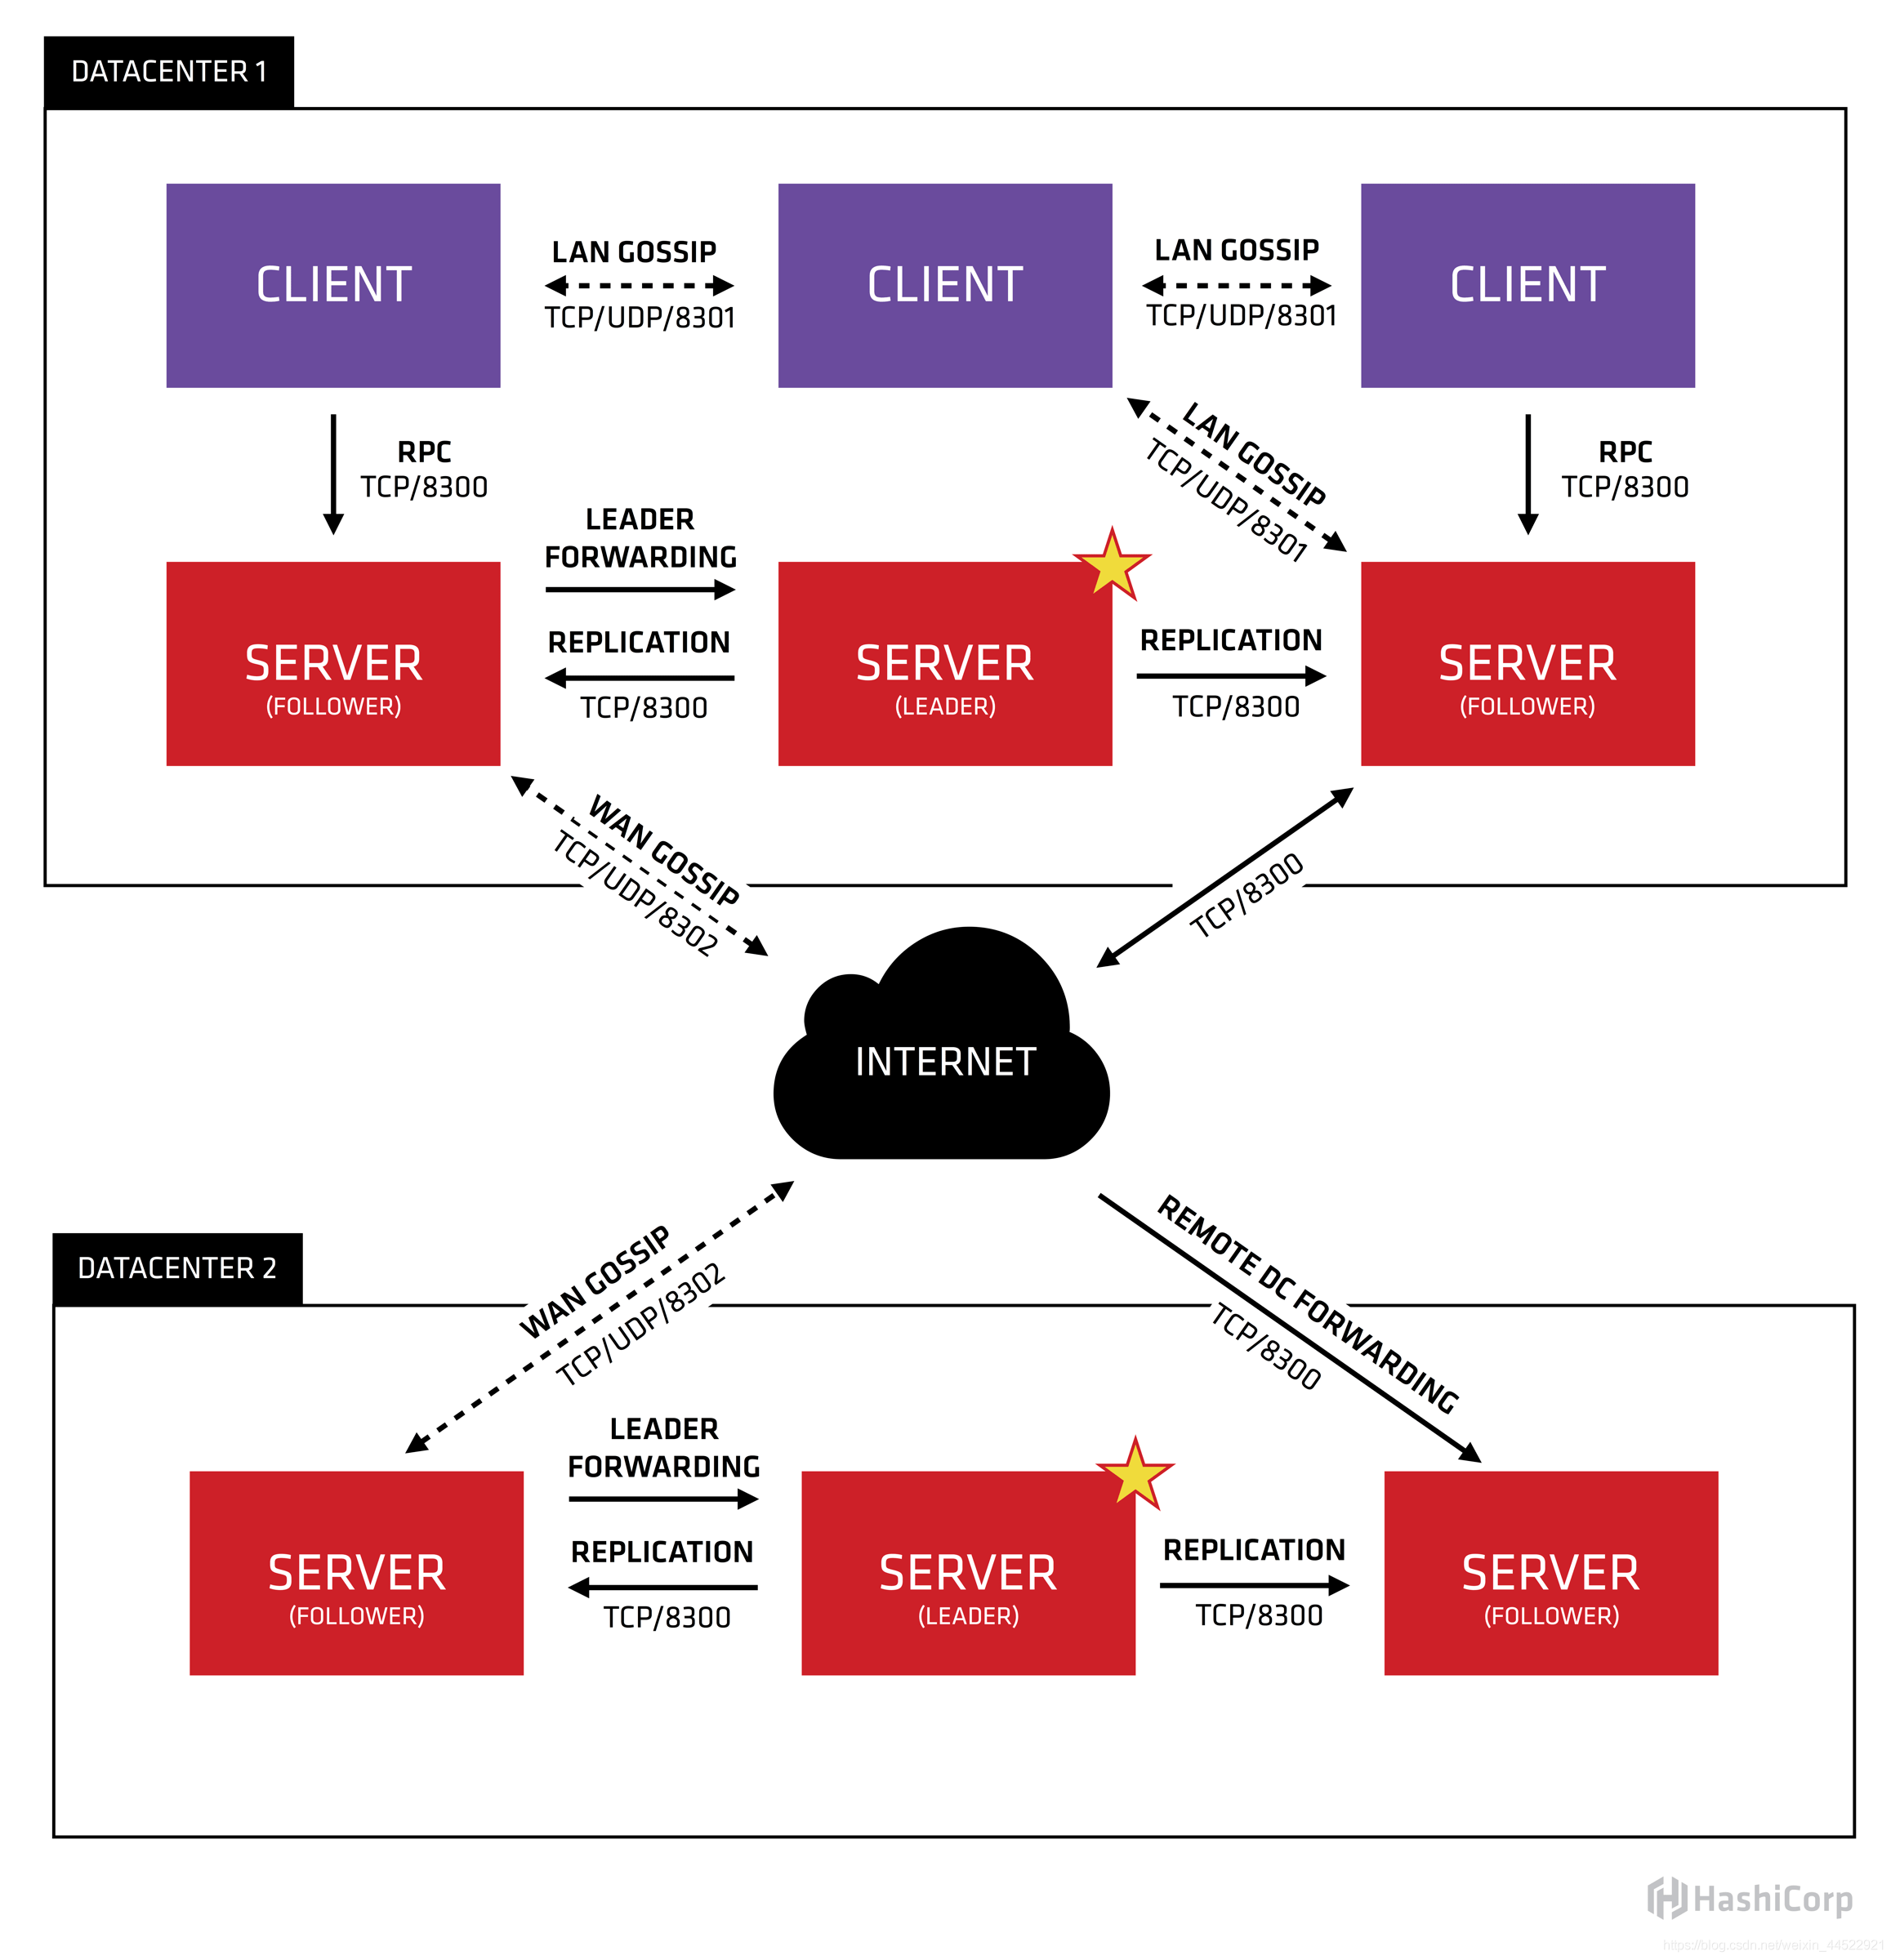
- Server :
- 是consul服务端高可用集群
- 保存配置信息, 持久化数据
- 在局域网内与本地客户端通讯, 通过广域网(WAN Gossip)与其它数据中心通讯,转发请求给Server-Leader
- 每个数据中心的 Server 数量推荐为 3 个或是 5 个。
- Client
- 是consul客户端
- 无状态,不持久化数据
- 将 HTTP 和 DNS 接口请求转发给局域网内的服务端集群。
- Agent
- 是一个守护线程
- Agent与一个和多个Consul Server 进行交互,跟随Consul应用启动而启动
- 负责检查、维护节点同步
- Server-Leader
- 响应RPC请求
- 服务列表数据同步给Server
每个数据中运行了一个Consul server集群.当一个跨数据中心的服务发现和配置请求创建时.本地Consul Server转发请求到远程的数据中心并返回结果.
常用命令
consul --helpUsage: consul [--version] [--help] <command> [<args>]Available commands are:acl Interact with Consul's ACLsagent Runs a Consul agentcatalog Interact with the catalogconfig Interact with Consul's Centralized Configurationsconnect Interact with Consul Connectdebug Records a debugging archive for operatorsevent Fire a new eventexec Executes a command on Consul nodesforce-leave Forces a member of the cluster to enter the "left" stateinfo Provides debugging information for operators.intention Interact with Connect service intentionsjoin Tell Consul agent to join clusterkeygen Generates a new encryption keykeyring Manages gossip layer encryption keyskv Interact with the key-value storeleave Gracefully leaves the Consul cluster and shuts downlock Execute a command holding a locklogin Login to Consul using an auth methodlogout Destroy a Consul token created with loginmaint Controls node or service maintenance modemembers Lists the members of a Consul clustermonitor Stream logs from a Consul agentoperator Provides cluster-level tools for Consul operatorsreload Triggers the agent to reload configuration filesrtt Estimates network round trip time between nodesservices Interact with servicessnapshot Saves, restores and inspects snapshots of Consul server statetls Builtin helpers for creating CAs and certificatesvalidate Validate config files/directoriesversion Prints the Consul versionwatch Watch for changes in Consul
本地开发模式
consul agent -dev
重要参数信息
# consul agent -dev==> Starting Consul agent...Version: '1.9.3'Node ID: 'c38f5521-c4b0-ce5e-20c7-b47b8b44e675'Node name: 'iZhp3f2wn461rak5gw97qmZ'Datacenter: 'dc1' (Segment: '<all>')Server: true (Bootstrap: false)Client Addr: [127.0.0.1] (HTTP: 8500, HTTPS: -1, gRPC: 8502, DNS: 8600)Cluster Addr: 127.0.0.1 (LAN: 8301, WAN: 8302)Encrypt: Gossip: false, TLS-Outgoing: false, TLS-Incoming: false, Auto-Encrypt-TLS: false
consul agent 输出的几个重要信息:
Node name:代理的唯一名称,默认是机器的hostname,可以通过-node标志自定义,例如:consul agent -dev -node myNodeDatacenter:数据中心,Consul支持多个数据中心,为了有效的工作,每个节点必须被配置且上报到数据中心,-datacenter标志用来设置数据中心,对于单一的DC配置,这个代理默认为dc1Server:表示代理是以服务器还是客户端的模式来运行。Client Addr:用于代理的客户端接口地址。Cluster Addr:用于集群中的Consul代理之间通信的地址和端口集,改地址必须可供其它节点访问。
或者启动单节点
consul agent -server -ui -bootstrap-expect 1 -data-dir=/data/consul/ -bind=172.24.154.53 -client=0.0.0.0
查看成员信息
# consul membersNode Address Status Type Build Protocol DC SegmentiZhp3f2wn461rak5gw97qmZ 127.0.0.1:8301 alive server 1.9.3 2 dc1 <all>
停止服务
Stop Agent
Agent两种停止方式: gracefully 或 forcefully gracefully 方式停止,则是发送中断信号到Agent进程两种方法: Ctrl+C 、 kill -INT consul_pid
docker 开发模式
参考https://hub.docker.com/_/consul/ 关于开发版本的创建方式
快速部署一个单节点的Consul,单节点开发模式的不会持久化数据,只会保存在内存中docker开发模式设置,同时需要设置绑定0.0.0.0
docker run --name dev-consul -d -p 8500:8500 consul agent -dev -ui -client=0.0.0.0 -bind=0.0.0.0
本地ui界面http://127.0.0.1:8500/
配置
执行 consul agent -dev ,启动开发模式,这个模式会快速启动一个单节点的Consul。注意,这个模式不能数据持久化,因此,不能用于生产环境
启动命令简介:
-server:定义agent运行在server模式,每个数据中心的Server建议在3~5个避免失败情况下数据的丢失-client:定义agent运行在client模式-bootstrap-expect:在一个datacenter中期望提供的server节点数目,当该值提供的时候,consul一直等到达到指定sever数目的时候才会引导整个集群-bind:节点的ip地址一般是0.0.0.0或云服务内网地址,用于被集群中的其他节点所访问-node:指定节点在集群中的唯一名称,默认为机器的hostname-config-dir:配置文件目录,里面所有以.json结尾的文件都会被加载- 更多可选参数参考 https://www.consul.io/docs/agent/options
健康检查
consul对注册的服务都支持健康检查。方法是在service下面再嵌套一个check配置即可。
{"service": {"name": "service_name","check": {}}}
具体配置请参照:Check配置
consul支持5种check方式:
- Script + Interval: 周期性运行某个可执行程序,根据程序退出码确定服务是否存活
- HTTP + Interval: 周期性访问某个http地址,根据返回码是否为2xx确定服务是否存活。
- TCP + Interval: 周期性发起TCP请求,根据是否成功建立连接TCP连接确定服务是否存活
- Time to Live (TTL): 类似于心跳检测。服务状态是用过周期性向HTTP接口发起PUT请求确定的。超期没有更新数据就判断服务挂了
- Docker + Interval: 通过docker的api检测docker内服务的状态
kv存储
package mainimport ("github.com/hashicorp/consul/api""log")func main() {var client, err = api.NewClient(&api.Config{Address: "127.0.0.1:8500",})if err != nil {log.Fatal(err)}kv := client.KV()p := &api.KVPair{Key: "hello", Value: []byte("consul")}_, err = kv.Put(p, nil)if err != nil {log.Fatal(err)}pair, _, err := kv.Get("hello", nil)if err != nil {log.Fatal(err)}log.Printf("KV: %v %s\n", pair.Key, pair.Value)}
输出结果
KV: hello consul

若有收获,就点个赞吧
0 人点赞
