系统中有很多与时间相关的程序(比如定期执行的任务,某一时间执行的任务,推迟一段时间执行的任务),因此,时间的管理对于 linux 来说非常重要。系统中管理的时间有 2 种:实际时间和定时器。
1 实际时间
实际时间就是现实中钟表上显示的时间,其实内核中并不常用这个时间,主要是用户空间的程序有时需要获取当前时间,所以内核中也管理着这个时间。
实际时间的获取是在开机后,内核初始化时从 RTC 读取的。内核读取这个时间后就将其放入内核中的 xtime 变量中,并且在系统的运行中不断更新这个值。
注:RTC 就是实时时钟的缩写,它是用来存放系统时间的设备。一般和 BIOS 一样,由主板上的电池供电的,所以即使关机也可将时间保存。
实际时间存放的变量 xtime 在文件 kernel/time/timekeeping.c中。
/* 按照16位对齐,其实就是2个long型的数据 */struct timespec xtime __attribute__ ((aligned (16)));/* timespec结构体的定义如下, 参考 <linux/time.h> */struct timespec {__kernel_time_t tv_sec; /* seconds */long tv_nsec; /* nanoseconds */};/* _kernel_time_t 定义如下 */typedef long __kernel_time_t;
系统读写 xtime 时用的就是顺序锁。
/* 写入 xtime 参考 do_sometimeofday 方法 */int do_settimeofday(struct timespec *tv){/* 省略 。。。。 */write_seqlock_irqsave(&xtime_lock, flags); /* 获取写锁 *//* 更新 xtime */write_sequnlock_irqrestore(&xtime_lock, flags); /* 释放写锁 *//* 省略 。。。。 */return 0;}/* 读取 xtime 参考 do_gettimeofday 方法 */void do_gettimeofday(struct timeval *tv){struct timespec now;getnstimeofday(&now); /* 就是在这个方法中获取读锁,并读取 xtime */tv->tv_sec = now.tv_sec;tv->tv_usec = now.tv_nsec/1000;}void getnstimeofday(struct timespec *ts){/* 省略 。。。。 *//* 顺序锁中读锁来循环获取 xtime,直至读取过程中 xtime 没有被改变过 */do {seq = read_seqbegin(&xtime_lock);*ts = xtime;nsecs = timekeeping_get_ns();/* If arch requires, add in gettimeoffset() */nsecs += arch_gettimeoffset();} while (read_seqretry(&xtime_lock, seq));/* 省略 。。。。 */}
上述场景中,写锁必须要优先于读锁 (因为 xtime 必须及时更新),而且写锁的使用者很少 (一般只有系统定期更新 xtime 的线程需要持有这个锁)。这正是顺序锁的应用场景。
2 定时器
定时器是内核中主要使用的时间管理方法,通过定时器,可以有效的调度程序的执行。动态定时器是内核中使用比较多的定时器,下面重点讨论的也是动态定时器。内核中的定时器有 2 种,静态定时器和动态定时器。
静态定时器一般执行了一些周期性的固定工作:
- 更新系统运行时间
- 更新实际时间
- 在 SMP 系统上,平衡各个处理器上的运行队列
- 检查当前进程是否用尽了自己的时间片,如果用尽,需要重新调度。
- 更新资源消耗和处理器时间统计值
动态定时器顾名思义,是在需要时(一般是推迟程序执行)动态创建的定时器,使用后销毁(一般都是只用一次)。一般我们在内核代码中使用的定时器基本都是动态定时器,下面重点讨论动态定时器相关的概念和使用方法。
2.1 定时器相关概念
定时器的使用中,下面 3 个概念非常重要:
- HZ
- jiffies
- 时间中断处理程序
HZ
节拍率 (HZ) 是时钟中断的频率,表示的一秒内时钟中断的次数。比如 HZ=100 表示一秒内触发 100 次时钟中断程序。HZ 的值一般与体系结构有关,x86 体系结构一般定义为 100,参考文件include/asm-generic/param.h。HZ 值的大小的设置过程其实就是平衡精度和性能的过程,并不是 HZ 值越高越好。
| HZ 值 | 优势 | 劣势 |
|---|---|---|
| 高 HZ | 时钟中断程序运行的更加频繁,依赖时间执行的程序更加精确,对资源消耗和系统运行时间的统计更加精确。 | 时钟中断执行的频繁,增加系统负担时钟中断占用的 CPU 时间过多 |
此外,有一点需要注意,内核中使用的 HZ 可能和用户空间中定义的 HZ 值不一致,为了避免用户空间取得错误的时间,内核中也定义了 USER_HZ,即用户空间使用的 HZ 值。
一般来说,USER_HZ 和 HZ 都是相差整数倍,内核中通过函数 jiffies_to_clock_t来将内核来将内核中的 jiffies 转为 用户空间 jiffies
/* 参见文件: kernel/time.c *//** Convert jiffies/jiffies_64 to clock_t and back.*/clock_t jiffies_to_clock_t(unsigned long x){#if (TICK_NSEC % (NSEC_PER_SEC / USER_HZ)) == 0if HZ < USER_HZreturn x * (USER_HZ / HZ);elsereturn x / (HZ / USER_HZ);endif#elsereturn div_u64((u64)x * TICK_NSEC, NSEC_PER_SEC / USER_HZ);#endif}EXPORT_SYMBOL(jiffies_to_clock_t);
jiffies
jiffies 用来记录自系统启动以来产生的总节拍数。比如系统启动了 N 秒,那么 jiffies 就为 N×HZ。jiffies 的相关定义参考头文件
/* 64bit和32bit的jiffies定义如下 */extern u64 __jiffy_data jiffies_64;extern unsigned long volatile __jiffy_data jiffies;
Linux 内核提供了几个 jiffies 和 ms、 us、 ns 之间的转换函数:
使用定时器时一般都是以 jiffies 为单位来延迟程序执行的,比如延迟 5 个节拍后执行的话,执行时间就是 jiffies+532 位的 jiffies 的最大值为 2^32-1,在使用时有可能会出现回绕的问题。比如下面的代码:
unsigned long timeout = jiffies + HZ/2; /* 设置超时时间为 0.5秒 */while (timeout < jiffies){/* 还没有超时,继续执行任务 */}/* 执行超时后的任务 */
正常情况下,上面的代码没有问题。当 jiffies 接近最大值的时候,就会出现回绕问题。由于是 unsinged long 类型,所以 jiffies 达到最大值后会变成 0 然后再逐渐变大,如下图所示:
所以在上述的循环代码中,会出现如下情况:
- 循环中第一次比较时,jiffies = J1,没有超时
- 循环中第二次比较时,jiffies = J2,实际已经超时了,但是由于 jiffies 超过的最大值后又从 0 开始,所以 J2 远远小于 timeout
- while 循环会执行很长时间 (> 2^32-1 个节拍) 不会结束,几乎相当于死循环了
为了回避回扰的问题,可以使用
#define time_after(a,b) \(typecheck(unsigned long, a) && \typecheck(unsigned long, b) && \((long)(b) - (long)(a) < 0))#define time_before(a,b) time_after(b,a)#define time_after_eq(a,b) \(typecheck(unsigned long, a) && \typecheck(unsigned long, b) && \((long)(a) - (long)(b) >= 0))#define time_before_eq(a,b) time_after_eq(b,a)
上述代码的原理其实就是将 unsigned long 类型转换为 long 类型来避免回扰带来的错误,利用 time_after 宏就可以巧妙的避免回绕带来的超时判断问题,将之前的代码改成如下代码即可:
unsigned long timeout = jiffies + HZ/2; /* 设置超时时间为 0.5秒 */while (time_after(jiffies, timeout)){/* 还没有超时,继续执行任务 */}/* 执行超时后的任务 */
2.2 时钟中断处理程序
时钟中断处理程序作为系统定时器而注册到内核中,体系结构的不同,可能时钟中断处理程序中处理的内容不同。但是以下这些基本的工作都会执行:
- 获得 xtime_lock 锁,以便对访问 jiffies_64 和墙上时间 xtime 进行保护
- 需要时应答或重新设置系统时钟
- 周期性的使用墙上时间更新实时时钟
- 调用 tick_periodic()
tick_periodic 函数位于: kernel/time/tick-common.c 中
static void tick_periodic(int cpu){if (tick_do_timer_cpu == cpu) {write_seqlock(&xtime_lock);/* Keep track of the next tick event */tick_next_period = ktime_add(tick_next_period, tick_period);do_timer(1);write_sequnlock(&xtime_lock);}update_process_times(user_mode(get_irq_regs()));profile_tick(CPU_PROFILING);}void do_timer(unsigned long ticks){/* jiffies_64 增加指定ticks */jiffies_64 += ticks;/* 更新实际时间 */update_wall_time();/* 更新系统的平均负载值 */calc_global_load();}void update_process_times(int user_tick){struct task_struct *p = current;int cpu = smp_processor_id();/* 更新当前进程占用CPU的时间 */account_process_tick(p, user_tick);/* 同时触发软中断,处理所有到期的定时器 */run_local_timers();rcu_check_callbacks(cpu, user_tick);printk_tick();/* 减少当前进程的时间片数 */scheduler_tick();run_posix_cpu_timers(p);}
2.3 定时器的定义
定时器在内核中用一个链表来保存的,链表的每个节点都是一个定时器。参见头文件
struct timer_list {struct list_head entry;unsigned long expires; //超时时间void (*function)(unsigned long); //超时后的回调函数unsigned long data;struct tvec_base *base;#ifdef CONFIG_TIMER_STATSvoid *start_site;char start_comm[16];int start_pid;#endif#ifdef CONFIG_LOCKDEPstruct lockdep_map lockdep_map;#endif};
通过加入条件编译的参数,可以追加一些调试信息。
2.4 定时器的生命周期
一个动态定时器的生命周期中,一般会经过下面的几个步骤: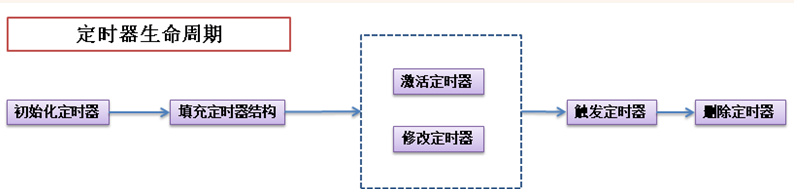
1 初始化定时器:
struct timer_list my_timer; /* 定义定时器 */init_timer(&my_timer); /* 初始化定时器 */
2 填充定时器:
my_timer.expires = jiffies + delay; /* 定义超时的节拍数 */my_timer.data = 0; /* 给定时器函数传入的参数 */my_timer.function = my_function; /* 定时器超时时,执行的自定义函数 *//* 从定时器结构体中,我们可以看出这个函数的原型应该如下所示: */void my_function(unsigned long data);
3 激活定时器和修改定时器:激活定时器之后才会被触发,否则定时器不会执行。修改定时器主要是修改定时器的延迟时间,修改定时器后,不管原先定时器有没有被激活,都会处于激活状态。
填充定时器结构之后,可以只激活定时器,也可以只修改定时器,也可以激活定时器后再修改定时器。所以填充定时器结构和触发定时器之间的步骤,也就是虚线框中的步骤是不确定的。
add_timer(&my_timer); /* 注册到内核,激活定时器 */mod_timer(&my_timer, jiffies + new_delay); /* 修改定时器,设置新的延迟时间 */
4 触发定时器:每次时钟中断处理程序会检查已经激活的定时器是否超时,如果超时就执行定时器结构中的自定义函数。
5 删除定时器:激活和未被激活的定时器都可以被删除,已经超时的定时器会自动删除,不用特意去删除。
/** 删除激活的定时器时,此函数返回1* 删除未激活的定时器时,此函数返回0*/del_timer(&my_timer);
在多核处理器上用 del_timer 函数删除定时器时,可能在删除时正好另一个 CPU 核上的时钟中断处理程序正在执行这个定时器,于是就形成了竞争条件。为了避免竞争条件,建议使用 del_timer_sync 函数来删除定时器。
del_timer_sync 函数会等待其他处理器上的定时器处理程序全部结束后,才删除指定的定时器。
/** 和del_timer 不同,del_timer_sync 不能在中断上下文中执行*/del_timer_sync(&my_timer);
3 delayed_work
对于周期性的任务,除了定时器以外,在Linux内核中还可以利用一套封装得很好的快捷机制,其本质是利用工作队列和定时器实现,这套快捷机制就是delayed_work:
#include <linux/workqueue.h>struct delayed_work {struct work_struct work;//work_func_t类型成员函数func()会在延时后被执行struct timer_list timer;/* target workqueue and CPU ->timer uses to queue ->work */struct workqueue_struct *wq;int cpu;};//函数,用于指定内核延时任务static inline bool schedule_delayed_work(struct delayed_work *dwork,unsigned long delay);//取消函数int cancel_delayed_work(struct delayed_work *work);int cancel_delayed_work_sync(struct delayed_work *work);
4 内核延时与唤醒
4.1 短延迟
Linux内核中提供了下列3个函数以分别进行纳秒、微秒和毫秒延迟:
#include <include/asm/delay.h>#include <include/delay.h>void ndelay(unsigned long nsecs);void udelay(unsigned long usecs);void mdelay(unsigned long msecs);//忙等待,时间太长不建议使用
毫秒时延(以及更大的秒时延)已经比较大了,在内核中,最好不要直接使用mdelay()函数,这将耗费CPU资源,对于毫秒级以上的时延,内核提供了下述函数:
void msleep(unsigned int millisecs);unsigned long msleep_interruptible(unsigned int millisecs);void ssleep(unsigned int seconds);
通过这些宏,可以简单的实现延迟,比如延迟 5ns,只需 ndelay(5); 即可。这些短延迟的实现原理并不复杂:
- 首先,内核在启动时就计算出了当前处理器 1 秒能执行多少次循环,即 loops_per_jiffy (loops_per_jiffy 的计算方法参见
init/main.c文件中的 calibrate_delay 方法)。 - 然后算出延迟 5ns 需要循环多少次,执行那么多次空循环即可达到延迟的效果。
loops_per_jiffy的值可以在启动信息中看到:
[root@vbox ~] dmesg | grep delayCalibrating delay loop (skipped), value calculated using timer frequency.. 6387.58 BogoMIPS (lpj=3193792)
4.2 长延迟
在内核中进行延迟的一个很直观的方法是比较当前的jiffies和目标jiffies(设置为当前jiffies加上时间间隔的jiffies),直到未来的jiffies达到目标jiffies。
内核提供的方法如下:
#define time_after(a,b) \(typecheck(unsigned long, a) && \typecheck(unsigned long, b) && \((long)(b) - (long)(a) < 0))#define time_before(a,b) time_after(b,a)
使用示例如下:
/* 延迟 100 个 jiffies */unsigned long delay = jiffies + 100;while(time_before(jiffies, delay)); //等待期间一直在循环,忙等待/* 再延迟 2s */unsigned long delay = jiffies + 2*Hz;while(time_before(jiffies, delay));
4.3 睡着延迟
睡着延迟无疑是比忙等待更好的方式,睡着延迟是在等待的时间到来之前进程处于睡眠状态,CPU资源被其他
进程使用。内核中有个利用定时器实现延迟的函数schedule_timeout。这个函数会将当前的任务睡眠到指定时间后唤醒,所以等待时不会占用 CPU 时间。
/* 将任务设置为可中断睡眠状态 */set_current_state(TASK_INTERRUPTIBLE);/* 小睡一会儿,“s“秒后唤醒 */schedule_timeout(s*HZ);
查看 schedule_timeout 函数的实现方法,可以看出是如何使用定时器的。
signed long __sched schedule_timeout(signed long timeout){/* 定义一个定时器 */struct timer_list timer;unsigned long expire;switch (timeout){case MAX_SCHEDULE_TIMEOUT:/** These two special cases are useful to be comfortable* in the caller. Nothing more. We could take* MAX_SCHEDULE_TIMEOUT from one of the negative value* but I' d like to return a valid offset (>=0) to allow* the caller to do everything it want with the retval.*/schedule();goto out;default:/** Another bit of PARANOID. Note that the retval will be* 0 since no piece of kernel is supposed to do a check* for a negative retval of schedule_timeout() (since it* should never happens anyway). You just have the printk()* that will tell you if something is gone wrong and where.*/if (timeout < 0) {printk(KERN_ERR "schedule_timeout: wrong timeout ""value %lx\n", timeout);dump_stack();current->state = TASK_RUNNING;goto out;}}/* 设置超时时间 */expire = timeout + jiffies;/* 初始化定时器,超时处理函数是 process_timeout,后面再补充说明一下这个函数 */setup_timer_on_stack(&timer, process_timeout, (unsigned long)current);/* 修改定时器,同时会激活定时器 */__mod_timer(&timer, expire, false, TIMER_NOT_PINNED);/* 将本任务睡眠,调度其他任务 */schedule();/* 删除定时器,其实就是 del_timer_sync 的宏del_singleshot_timer_sync(&timer);/* Remove the timer from the object tracker */destroy_timer_on_stack(&timer);timeout = expire - jiffies;out:return timeout < 0 ? 0 : timeout;}EXPORT_SYMBOL(schedule_timeout);/** 超时处理函数 process_timeout 里面只有一步操作,唤醒当前任务。* process_timeout 的参数其实就是 当前任务的地址*/static void process_timeout(unsigned long __data){wake_up_process((struct task_struct *)__data);}
schedule_timeout一般用于延迟时间较长的程序。这里的延迟时间较长是对于计算机而言的,其实也就是延迟大于 1 个节拍 (jiffies)。对于某些极其短暂的延迟,比如只有 1ms,甚至 1us,1ns 的延迟,必须使用上面的短延迟方法。
4.3 定时器和延迟的例子
下面的例子测试了短延迟,自定义定时器以及 schedule_timeout 的使用:
#include <linux/sched.h>#include <linux/timer.h>#include <linux/jiffies.h>#include <asm/param.h>#include <linux/delay.h>#include "kn_common.h"MODULE_LICENSE("Dual BSD/GPL");static void test_short_delay(void);static void test_delay(void);static void test_schedule_timeout(void);static void my_delay_function(unsigned long);static int testdelay_init(void){printk(KERN_ALERT "HZ in current system: %dHz\n", HZ);/* test short delay */test_short_delay();/* test delay */test_delay();/* test schedule timeout */test_schedule_timeout();return 0;}static void testdelay_exit(void){printk(KERN_ALERT "*************************\n");print_current_time(0);printk(KERN_ALERT "testdelay is exited!\n");printk(KERN_ALERT "*************************\n");}static void test_short_delay(){printk(KERN_ALERT "jiffies [b e f o r e] short delay: %lu", jiffies);ndelay(5);printk(KERN_ALERT "jiffies [a f t e r] short delay: %lu", jiffies);}static void test_delay(){/* 初始化定时器 */struct timer_list my_timer;init_timer(&my_timer);/* 填充定时器 */my_timer.expires = jiffies + 1*HZ; /* 2秒后超时函数执行 */my_timer.data = jiffies;my_timer.function = my_delay_function;/* 激活定时器 */add_timer(&my_timer);}static void my_delay_function(unsigned long data){printk(KERN_ALERT "This is my delay function start......\n");printk(KERN_ALERT "The jiffies when init timer: %lu\n", data);printk(KERN_ALERT "The jiffies when timer is running: %lu\n", jiffies);printk(KERN_ALERT "This is my delay function end........\n");}static void test_schedule_timeout(){printk(KERN_ALERT "This sample start at : %lu", jiffies);/* 睡眠2秒 */set_current_state(TASK_INTERRUPTIBLE);printk(KERN_ALERT "sleep 2s ....\n");schedule_timeout(2*HZ);printk(KERN_ALERT "This sample end at : %lu", jiffies);}module_init(testdelay_init);module_exit(testdelay_exit);
Makefile 如下:
obj-m := mydelay.omydelay-objs := testdelay.o kn_common.o#generate the pathCURRENT_PATH:=$(shell pwd)#the absolute pathLINUX_KERNEL_PATH:=/usr/src/linux-source-4.15.0 #直接用发行版中的linux源码,不用再下载linux内核源码。注意,每个linux发行版的目录不一定一样#complie objectall:make -C $(LINUX_KERNEL_PATH) M=$(CURRENT_PATH) modulesclean:make -C $(LINUX_KERNEL_PATH) M=$(CURRENT_PATH) clean
执行测试命令及查看结果的方法如下:(Ubuntu 18.04编译不过,kernel已经改变)
[root@vbox chap11] make[root@vbox chap11] insmod mydelay.ko[root@vbox chap11] rmmod mydelay.ko[root@vbox chap11] dmesg | tail -14HZ in current system: 1000Hzjiffies [b e f o r e] short delay: 4296079617jiffies [a f t e r] short delay: 4296079617This sample start at : 4296079619sleep 2s ....This is my delay function start......The jiffies when init timer: 4296079619The jiffies when timer is running: 4296080621This is my delay function end........This sample end at : 4296081622*************************2013-5-9 23:7:20testdelay is exited!*************************
结果说明:
1 短延迟只延迟了 5ns,所以执行前后的 jiffies 是一样的。
jiffies [b e f o r e] short delay: 4296079617jiffies [a f t e r] short delay: 4296079617
2 自定义定时器延迟了 1 秒后执行自定义函数,由于我的系统 HZ=1000,所以 jiffies 应该相差 1000
The jiffies when init timer: 4296079619The jiffies when timer is running: 4296080621
实际上 jiffies 相差了 1002,多了 2 个节拍
3 schedule_timeout 延迟了 2 秒,jiffies 应该相差 2000
This sample start at : 4296079619This sample end at : 4296081622
实际上 jiffies 相差了 2003,多了 3 个节拍
以上结果也说明了定时器的延迟并不是那么精确,差了 2,3 个节拍其实就是误差 2,3 毫秒 (因为 HZ=1000)
如果 HZ=100 的话,一个节拍是 10 毫秒,那么定时器的误差可能就发现不了了 (误差只有 2,3 毫秒,没有超多 1 个节拍)。

若有收获,就点个赞吧
0 人点赞
