Connect to hardware
连接到硬件
This lesson teach you to
这一部分内容将让您学会
Connect a button to GPIO
将一个按键连接到 GPIO
Connect an LED to GPIO
将一个 LED 连接到 GPIO
You should also read
您还需要阅读
Before writing any code, you need to connect peripherals from your development kit to your board.
在开始写代码之前,您需要将外设从开发者套件中连接至开发板上。
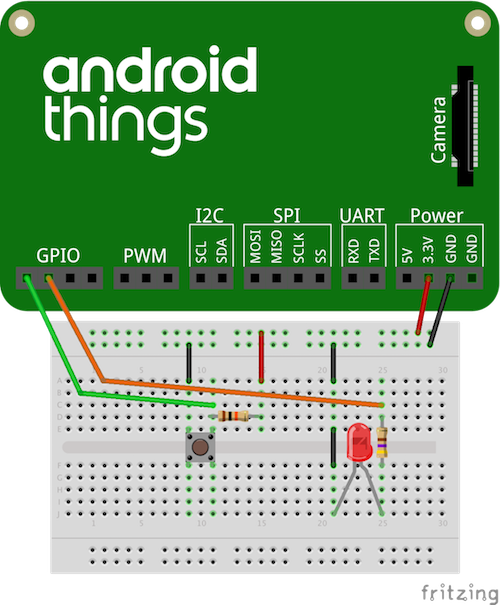
In this lesson, you will learn to wire a pushbutton switch and LED from a breadboard to your device. To connect the peripherals to your board:
在这节课中,您将学会怎样将一个按键开关和 LED 从线路板上连接到设备。为了将外设连接到您的开发板上,您需要做如下一些事情:
Connect one side of the button to the chosen GPIO input pin, and the other side to ground.
将按键的一端连接到选择好的 GPIO 输入引脚上,另一端接 GND 。
Connect the same GPIO input pin to +3.3V through a pull-up resistor.
用一个上拉电阻将这个 GPIO 引脚连接到 +3.3V 的 VCC 上。
Connect the chosen GPIO output pin to one side of a series resistor.
将选择好的 GPIO 输出端口连接到一个串联电阻的一端。
Connect the other side of the resistor to the anode side (longer lead) of the LED.
电阻的另一端连接到 LED 的正极上(更长的一侧)。
Connect the cathode side (shorter lead) of the LED to ground.
将 LED 的负极(较短的一侧)的一侧接 GND。
See Hardware 101 for more detail on connecting input and output components.
请参看 硬件 101 获取更多连接输入输出设备的信息。
For this lesson, the following GPIO pins are assumed on each board:
在这节课中,我们假定每个开发板上都存在 GPIO 引脚:
NXP Pico i.MX7D ` Raspberry Pi

若有收获,就点个赞吧
0 人点赞
