Implement a Doorbell Button
实现一个门铃按钮
This lesson teaches you to
本节课您将学到
Connect hardware to GPIO
将硬件连接到 GPIO
Initialize a peripheral driver
初始化一个外部设备驱动
Manage peripheral connections
管理外部设备的连接
Try it out
试试看
A doorbell isn’t much to speak of without a button for visitors to press and announce their presence at the door.
毋庸置疑,门铃需要有一个按钮让来访者按下,并提示主人有客来访。
In this lesson, you will learn to connect a pushbutton to a GPIO input, initialize it using Peripheral I/O, and listen for state changes on that input.
通过这节课,您将学会将一个开关连接到 GPIO 的输入端口,使用外设 I/O API 初始化它,并且监听输入时的状态变化。
Connect the button
连接开关
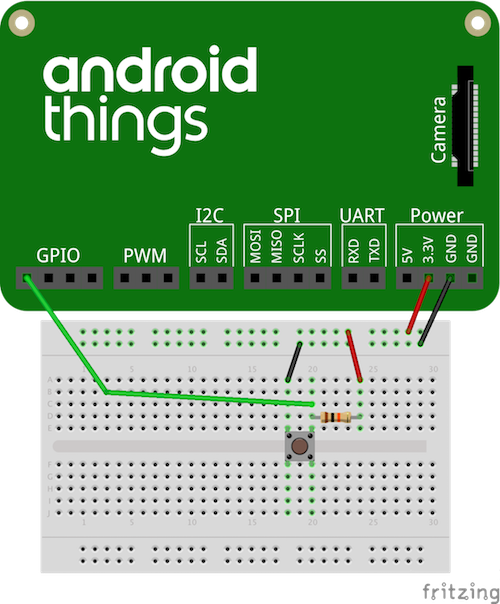
Using a breadboard, connect a pushbutton switch to the appropriate GPIO port on your board. To connect the button to your board:
将电路板上的按键开关连接到开发板中合适的 GPIO 接口上,为了将开关连接到开发板,您需要做如下一些事情:
- Connect one side of the button to the chosen GPIO input pin, and the other side to ground.
- 将开关的一端连接到您选择的 GPIO 的输入引脚,另一个端接地。
- Connect the same GPIO input pin to +3.3V through a pull-up resistor.
- 用一个上拉电阻将这个 GPIO 引脚连接到 +3.3V 的电源上。
For this lesson, the following GPIO pins are assumed on each board:
在本节中,我们假定每个开发板都有 GPIO 引脚:
| Board | Input Signal |
|---|---|
| NXP Pico i.MX7D | GPIO_39 |
| Raspberry Pi | BCM21 |
| 开发板 | 输入信号 |
|---|---|
| NXP Pico i.MX7D | GPIO_39 |
| Raspberry Pi | BCM21 |
Note: See Hardware 101 for more detail on connecting input and output components.
注意: 查看 Hardware 101 了解连接关于输入/输出元器件的一些更详细的信息。
Capture button press events
捕获按钮按下事件
The Button peripheral driver handles the low-level logic of listening for GPIO state changes. It also debounces the input port by default, to avoid multiple trigger events from a single button press. To add the button driver to your app:
Button 外设驱动处理监听 GPIO 状态更改的底层逻辑。为了避免按下按钮一次触发多次事件,驱动会将输入口状态重置至默认值。您需要做如下一些事来添加按键驱动到 您的应用中:
Add a button peripheral to your app project by connecting it to an available GPIO port.
通过将按钮连接到一个可用的 GPIO 接口来为您的工程添加一个按键外设。
Add the button driver dependency to your app-level
build.gradlefile:在您的应用下的
build.gradle文件中,添加按钮驱动依赖关系:
dependencies {...compile 'com.google.android.things.contrib:driver-button:0.3'}
Initialize a
ButtonInputDriverwith the connected GPIO port name, and the appropriate logic state indicating when the button is physically pressed.利用已连接的 GPIO 的端口名来初始化为一个
ButtonInputDriver,并根据按钮的按压状态显示对应的逻辑状态。
By using a
ButtonInputDriverinstead of aButton, you are associating Android key press/release events with the button connected to the GPIO. Specify whichKeyEventkey code will be generated in theButtonInputDriverconstructor.使用
ButtonInputDriver代替Button,您可以将 Andoird 按键按下/释放事件和连接在 GPIO 的按钮相关联。同时在ButtonInputDriver的构造函数中指定指定触发特定keyEvent键码值。
Capture the key up or down events, as if they were being generated by a keyboard, by overriding the
Activity.onKeyUporonKeyDownmethod:通过重写
Activity.onKeyUp或者onKeyDown方法来捕捉按钮按下或释放事件,就像他们是用键盘产生的事件一样:public class DoorbellActivity extends Activity {/** Driver for the doorbell button;*/private ButtonInputDriver mButton;/*** The GPIO pin to activate for button presses.*/private final String BUTTON_GPIO_PIN = ...;@Overridepublic void onCreate(Bundle savedInstanceState) {super.onCreate(savedInstanceState);Log.d(TAG, "Doorbell Activity created.");...// Initialize the doorbell button drivertry {mButton = new ButtonInputDriver(BUTTON_GPIO_PIN,Button.LogicState.PRESSED_WHEN_LOW, KeyEvent.KEYCODE_ENTER); // The keycode to send} catch (IOException e) {Log.e(TAG, "button driver error", e);}}/*** Override key event callbacks.*/@Overridepublic boolean onKeyUp(int keyCode, KeyEvent event) {if (keyCode == KeyEvent.KEYCODE_ENTER) {// Doorbell rang!Log.d(TAG, "button pressed");return true;}return super.onKeyUp(keyCode, event);}}
Manage the connection
管理连接
You should manage the peripheral connection according to the application component lifecycle. You already initialized the ButtonInputDriver component when the parent Activity was created. Now close the connection when the Activity is stopped or destroyed.
您应该根据应用程序组件的生命周期来管理外设的连接。在 Activity 被创建的时候您已经初始化了 ButtonInputDriver 。当 Activity 被停止使用或者被销毁时关闭连接。
public class DoorbellActivity extends Activity {...private ButtonInputDriver mButton;@Overrideprotected void onDestroy() {super.onDestroy();...try {mButton.close();} catch (IOException e) {Log.e(TAG, "button driver error", e);}}}

若有收获,就点个赞吧
0 人点赞
