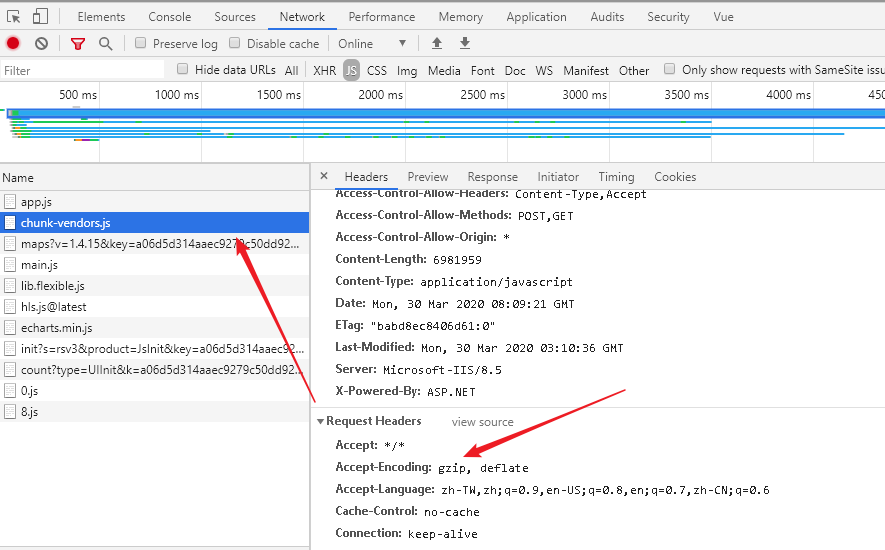
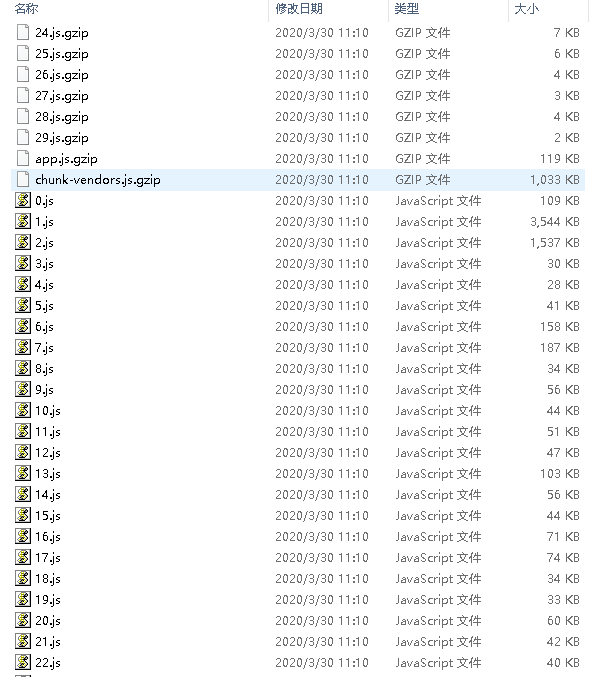
1.开启gzip压缩
安装
npm ``install--save-dev compression-webpack-plugin
配置
const path = require("path");const CompressionWebpackPlugin = require('compression-webpack-plugin')const productionGzipExtensions = ['js', 'css', 'json', 'txt'];const env = process.env.NODE_ENV;const isTrue = env === 'development';module.exports = {productionSourceMap: false,configureWebpack: config => {console.log('======' + env + '========');if (env === 'production') {config.plugins.push(new CompressionWebpackPlugin({test: new RegExp('\\.(' + productionGzipExtensions.join('|') + ')$'),threshold: 10240, // 对超过10k的数据压缩deleteOriginalAssets: false, // 不删除源文件}),);}},};
打包
网上说打包后是.gz结尾,但我打包后是.gzip这两个不影响使用
服务器
我们把打包后的dis文件夹放到服务器中,看加载的文件发现,速度该慢还是慢,没有任何改变,这是因为我们需要开启服务器的gzip功能,
nginx 配置,其他服务也可开启,具体方法自行百度
## 开启gaip nginx安装的时候,这个地方默认是被注释掉的,搜索一下,打开就行gzip on;## 上面是开启,这段是加载类型一定要有gzip_types text/plain application/x-javascript application/javascript text/css application/xml text/javascript application/x-httpd-php image/jpeg image/gif image/png;
2.删除console
配置
const path = require('path');const TerserPlugin = require('terser-webpack-plugin');const env = process.env.NODE_ENV;const isTrue = env === 'development';module.exports = {configureWebpack: config => {console.log('======' + env + '========');if (env === 'production') {config.plugins.push(new TerserPlugin({extractComments: true,cache: true,parallel: true,sourceMap: true,terserOptions: {extractComments: 'all',compress: {drop_console: true,},},}));}},};
3. 三方库采用CDN
疑问:
vue在进行打包的时候,第三方库一般会使用cdn引入,减小打包体积.既然使用cdn引入了为什么还要配置externals呢?直接全局使用就行了,是为了可以继续使用import require语句吗?
解答:
配置 externals 是为了防止将某些 import 的包(package)打包到 bundle 中,而是在运行时(runtime)再去从外部获取这些扩展依赖(external dependencies)。它的主要作用是为了部署生成环境的时候可以将一些第三方库排除在打包的范围之外,可以通过引入CDN的方式减少文件体积,提升浏览速度。意思就是配置了 external 以后就算原来使已经npm安装依赖了,并且页面上也import引入了,打包的时候也会自动忽略这些包。
当你接手一个老项目,需要优化。里面有许多页面通过import的方式引入了某个第三方库,但是现在的需求是需要将这个第三方库从bundle里抽离出来,通过CDN的方式引入,这时候你就只需要在externals里配置一下就可以了,而不需要去每一个页面单独修改。
另外,也不排除有些无法通过CDN的方式来引入,并且只工作在开发环境用来测试的库,这时候external属性就是一个很好的解决办法
代码
index.html 引入
<!DOCTYPE html><html lang="en"><head><meta charset="utf-8" /><meta http-equiv="X-UA-Compatible" content="IE=edge" /><link rel="icon" href="<%= BASE_URL %>favicon.ico" /><title><%= htmlWebpackPlugin.options.title %></title><!-- 使用CDN的CSS文件 --><% for (var i in htmlWebpackPlugin.options.cdn && htmlWebpackPlugin.options.cdn.css) { %><link href="<%= htmlWebpackPlugin.options.cdn.css[i] %>" rel="external nofollow" rel="external nofollow" rel="preload" as="style" /><link href="<%= htmlWebpackPlugin.options.cdn.css[i] %>" rel="external nofollow" rel="external nofollow" rel="stylesheet" /><% } %><!-- 使用CDN的JS文件 --><% for (var i in htmlWebpackPlugin.options.cdn && htmlWebpackPlugin.options.cdn.js) { %><link href="<%= htmlWebpackPlugin.options.cdn.js[i] %>" rel="external nofollow" rel="preload" as="script" /><% } %></head><body><div id="app"></div><script src="https://webapi.amap.com/maps?v=1.4.15&key=a06d5d314aaec9279c50dd92d03b132c&plugin=AMap.Geocoder"></script><script src="//webapi.amap.com/ui/1.0/main.js"></script><script src="./js/lib.flexible.js"></script><!-- 内置文件将会自动注入 --><% for (var i in htmlWebpackPlugin.options.cdn && htmlWebpackPlugin.options.cdn.js) { %><script src="<%= htmlWebpackPlugin.options.cdn.js[i] %>"></script><% } %></body></html>
vue.config.js 配置
const isTrue = env === 'development';const cdn = {css: [],js: ['https://cdn.bootcss.com/vue/2.5.17/vue.runtime.min.js','https://cdn.bootcss.com/vue-router/3.0.1/vue-router.min.js','https://cdn.bootcss.com/vuex/3.0.1/vuex.min.js','https://cdn.bootcss.com/axios/0.18.0/axios.min.js','https://cdn.jsdelivr.net/npm/hls.js@latest','https://gallerybox.echartsjs.com/dep/echarts/3.8.0/echarts.min.js','https://cdn.bootcss.com/axios/0.19.2/axios.min.js','https://cdn.bootcdn.net/ajax/libs/xlsx/0.15.6/xlsx.mini.min.js',],};module.exports = {chainWebpack: config => {// 生产环境配置if (env === 'production') {// 生产环境注入cdnconfig.plugin('html').tap(args => {args[0].cdn = cdn;return args;});}},configureWebpack: config => {console.log('======' + env + '========');if (env === 'production') {console.log('生产环境');config.externals = {XLSX: 'XLSX',echarts: 'echarts',Hls: 'Hls',axios: 'axios',vue: 'Vue',vuex: 'Vuex','vue-router': 'VueRouter',axios: 'axios',};}},}
注意:
由于 webpack 打包后的文件是使用 link 标签引入的,且都在 header 中引入,所以使用cdn引入 vue vuex 等js的时候可能会报错,因为 mian.js 先加载这个时候你引入的 vue 还没有加载呢.我们这里使用 htmlWebpackPlugin 和 link 标签解决这个问题
4. dll 注入
优化前:
优化后:
优化步骤:
- 需要依赖
clean-webpack-plugin清除生成的文件add-asset-html-webpack-plugin把生成的js文件添加到首页中
根目录新建
webpack.dll.config.js,内容如下const path = require("path");const webpack = require("webpack");// dll文件存放的目录const dllPath = "public/vendor";module.exports = {entry: {// 需要引入的库vendor: ["vue", "vue-router", "vuex", "axios", "element-ui"],},output: {path: path.join(__dirname, "public/vendor"),filename: "[name].dll.js",library: "[name]_[hash]", // vendor.dll.js中暴露出的全局变量名},plugins: [// 清除之前的dll文件new CleanWebpackPlugin(["*.*"], {root: path.join(__dirname, dllPath),}),// 设置环境变量new webpack.DefinePlugin({"process.env": {NODE_ENV: "production",},}),// manifest.json 描述动态链接库包含了哪些内容new webpack.DllPlugin({path: path.join(__dirname, "public/vendor", "[name]-manifest.json"),name: "[name]_[hash]",context: process.cwd(),}),],};
在
package.json增加生成命令"scripts": {"serve": "vue-cli-service serve --mode serve","build": "vue-cli-service build --mode build",+ "dll": "webpack -p --progress --config ./build/webpack.dll.config.js"},
运行生成命令
npm dll会在pubilc文件夹中生成- 在
vue.config.js配置 ```javascript
const path = require(‘path’); const webpack = require(‘webpack’); const AddAssetHtmlPlugin = require(‘add-asset-html-webpack-plugin’); const env = process.env.NODE_ENV; const isTrue = env === ‘development’;
module.exports = { publicPath: ‘./‘, productionSourceMap: isTrue, assetsDir: ‘static’, configureWebpack: config => { console.log(‘======’ + env + ‘========’); if (env === ‘production’) { config.plugins.push( // 将 dll 注入到 生成的 html 模板中 new AddAssetHtmlPlugin({ // dll文件位置 filepath: path.resolve(__dirname, ‘./public/vendor/*.js’), // dll 引用路径 publicPath: ‘./vendor’, // dll最终输出的目录 outputPath: ‘./vendor’, }), new webpack.DllReferencePlugin({ context: process.cwd(), manifest: require(‘./public/vendor/vendor-manifest.json’), }) ); } }, };
<a name="1raKA"></a>## 5.设置别名<a name="wihDY"></a>### 配置```javascriptlet resolve = dir => {return path.resolve(__dirname, dir);};module.exports = {chainWebpack: config => {// 省略后缀名,vue-cli3默认配置config.resolve.extensions.add('.js').add('.vue');config.resolve.alias// vue-cli3自带.set('@', resolve('src')).set('@assets', resolve('src/assets')).set('@images', resolve('src/images')).set('@cmp', resolve('src/components')).set('@views', resolve('src/views'));}}
6.优化请求数
Prefetch
yarn build以后我们prefetch
prefetch
7.自适应
8.复制大文件
安装
yarn add copy-webpack-plugin -D
配置
const path = require('path');const cesiumBuild = './node_modules/cesium/Build/Cesium'; //cesium的目录const webpack = require('webpack');const CopywebpackPlugin = require('copy-webpack-plugin'); //复制文件module.exports={chainWebpack: config => {config.plugin('copy').use(CopywebpackPlugin, [[{ from: path.join(cesiumBuild, 'Workers'), to: 'resources/Workers' },{ from: path.join(cesiumBuild, 'Assets'), to: 'resources/Assets' },{ from: path.join(cesiumBuild, 'Widgets'), to: 'resources/Widgets' },{from: path.join(cesiumBuild, 'ThirdParty'),to: 'resources/ThirdParty'}]]);// 这句话我也不知道什么意思config.plugin('define').use(webpack.DefinePlugin, [{ CESIUM_BASE_URL: JSON.stringify('./resources/') }]);}}
9.打包分析
为优化vue项目性能,需要使用webpack-bundle-analyzer分析报文件,找出最占用空间的插件有哪些,对应做出优化
网上看了一些网站,有的写的太麻烦了,现将最简单的一种写出来供大家参考
安装:
yarn add webpack-bundle-analyzer -D
配置
module.exports = {chainWebpack: config => {config.plugin('webpack-bundle-analyzer').use(require('webpack-bundle-analyzer').BundleAnalyzerPlugin)}}
运行
npm run serve
访问 http://localhost:8888
注意8888端口是写死的,不可以更改,如果本地已经启动了8888端口,会报错
10.全局样式
安装
yarn add style-resources-loader vue-cli-plugin-style-resources-loader -D
配置
pluginOptions: {'style-resources-loader': {preProcessor: 'less',patterns: [path.resolve(__dirname, './src/assets/style/mixin.less'), path.resolve(__dirname, './src/assets/style/variable.less')]}},
11.devServer
devServer: {host: '0.0.0.0',open: true,hot: true,port: 3000,proxy: {'/baiduApi': {target: 'https://restapi.amap.com', //访问地址changeOrigin: true,secure: false, //只有代理https 地址需要次选项logLevel: 'debug', //可以打印出代理后请求的pathRewrite: {'^/baiduApi': ''}}}},


