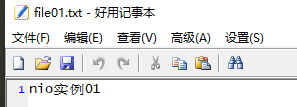
一、实例1-写入本地文件
实例要求:
- 使用前面学习后的 ByteBuffer(缓冲)和 FileChannel(通道),将 “hello,尚硅谷” 写入到 file01.txt 中
- 文件不存在就创建

package com.xiaomeng.netty.learnnetty;import java.io.FileOutputStream;import java.io.IOException;import java.nio.ByteBuffer;import java.nio.channels.FileChannel;/*** nio通道实例01* func:利用buffer和channel,将字符串“nio实例01”写入到文件file01.txt中* @author wmn* @date 2021-12-11*/public class NioFileChannel01 {public static void main(String[] args) throws IOException {//要写入的字符串String str = "nio实例01";//创建一个输出流 -> channelFileOutputStream fileOutputStream = new FileOutputStream("d:\\file01.txt");//通过 fileOutputStream 获取对应的 FileChannel//这个 fileChannel 真实类型是 FileChannelImplFileChannel fileChannel = fileOutputStream.getChannel();//创建一个缓冲区 ByteBufferByteBuffer byteBuffer = ByteBuffer.allocate(1024);//将 str 放入 byteBufferbyteBuffer.put(str.getBytes());byteBuffer.flip();fileChannel.write(byteBuffer);fileOutputStream.close();}}
二、实例2-从文件读取到控制台
实例要求:
- 使用前面学习后的 ByteBuffer(缓冲)和 FileChannel(通道),将 file01.txt 中的数据读入到程序,并显示在控制台屏幕
- 假定文件已经存在

package com.xiaomeng.netty.learnnetty.nio.fileChannel;import java.io.File;import java.io.FileInputStream;import java.io.IOException;import java.nio.ByteBuffer;import java.nio.channels.FileChannel;/*** nio通道实例02* 1. 使用前面学习后的 ByteBuffer(缓冲)和 FileChannel(通道),将 file01.txt 中的数据读入到程序,并显示在控制台屏幕* 2. 假定文件已经存在* @author wmn* @date 2021-12-11*/public class NioFileChannel02 {public static void main(String[] args) throws IOException {//创建文件的输入流File file = new File("d:\\file01.txt");FileInputStream fileInputStream = new FileInputStream(file);//通过 fileInputStream 获取对应的 FileChannel -> 实际类型 FileChannelImplFileChannel fileChannel = fileInputStream.getChannel();//创建缓冲区ByteBuffer byteBuffer = ByteBuffer.allocate((int)file.length());//将通道的数据读入到 BufferfileChannel.read(byteBuffer);//将 byteBuffer 的字节数据转成 StringSystem.out.println(new String(byteBuffer.array()));fileInputStream.close();}}
三、实例3-使用一个buffer完成文件拷贝
实例要求:
- 使用 FileChannel(通道)和方法 read、write,完成文件的拷贝
- 拷贝一个文本文件 1.txt,新文件2.txt

package com.xiaomeng.netty.learnnetty.nio.fileChannel;import java.io.*;import java.nio.ByteBuffer;import java.nio.channels.FileChannel;/*** nio通道实例03* 使用 FileChannel(通道)和方法 read、write,完成文件的拷贝* 拷贝一个文本文件 file01.txt* @author wmn* @date 2021-12-11*/public class NioFileChannel03 {public static void main(String[] args) throws IOException {File file1 = new File("d:\\file01.txt");File file2 = new File("d:\\file02.txt");//创建file01输入流,读出文件FileInputStream file1Input = new FileInputStream(file1);//创建file02输出流,写入文件FileOutputStream file2Output = new FileOutputStream(file2);//获取file01的通道FileChannel file1Channel = file1Input.getChannel();//创建一个缓冲区ByteBuffer byteBuffer = ByteBuffer.allocate((int)file1.length());//将file01文件内容从通道读出来,放到缓冲区file1Channel.read(byteBuffer);byteBuffer.flip();//获取file02的通道FileChannel file2Channel = file2Output.getChannel();//将缓冲区的内容,通过通道写入文件file2Channel.write(byteBuffer);//关闭流file1Input.close();file2Output.close();}}
四、实例4-使用transform完成文件拷贝
- 实例要求:
- 使用 FileChannel(通道)和方法 transferFrom,完成文件的拷贝
- 拷贝一张图片 ```java package com.xiaomeng.netty.learnnetty.nio.fileChannel;
import java.io.FileInputStream; import java.io.FileOutputStream; import java.nio.channels.FileChannel;
/**
- nio通道实例03
- 使用 FileChannel(通道)和方法 transferFrom,完成文件的拷贝
- 拷贝一张图片
- @author wmn
@date 2021-12-11 */ public class NioFileChannel04 {
public static void main(String[] args) throws Exception {
//创建相关流FileInputStream fileInputStream = new FileInputStream("d:\\a.jpg");FileOutputStream fileOutputStream = new FileOutputStream("d:\\a2.jpg");//获取各个流对应的 FileChannelFileChannel sourceCh = fileInputStream.getChannel();FileChannel destCh = fileOutputStream.getChannel();//使用 transferForm 完成拷贝destCh.transferFrom(sourceCh, 0, sourceCh.size());//关闭相关通道和流sourceCh.close();destCh.close();fileInputStream.close();fileOutputStream.close();
} }
总结
FileChannel 主要用来对本地文件进行 IO 操作,常见的方法有
- public int read(ByteBuffer dst),从通道读取数据并放到缓冲区中
- public int write(ByteBuffer src),把缓冲区的数据写到通道中
- public long transferFrom(ReadableByteChannel src, long position, long count),从目标通道中复制数据到当前通道
- public long transferTo(long position, long count, WritableByteChannel target),把数据从当前通道复制给目标通道


