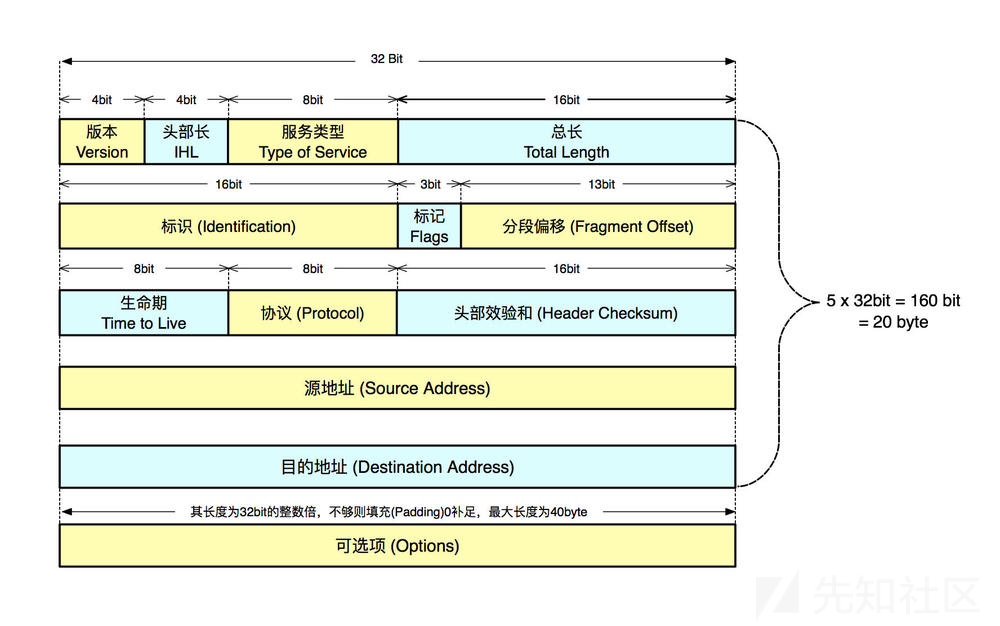
协议字段
流量特征
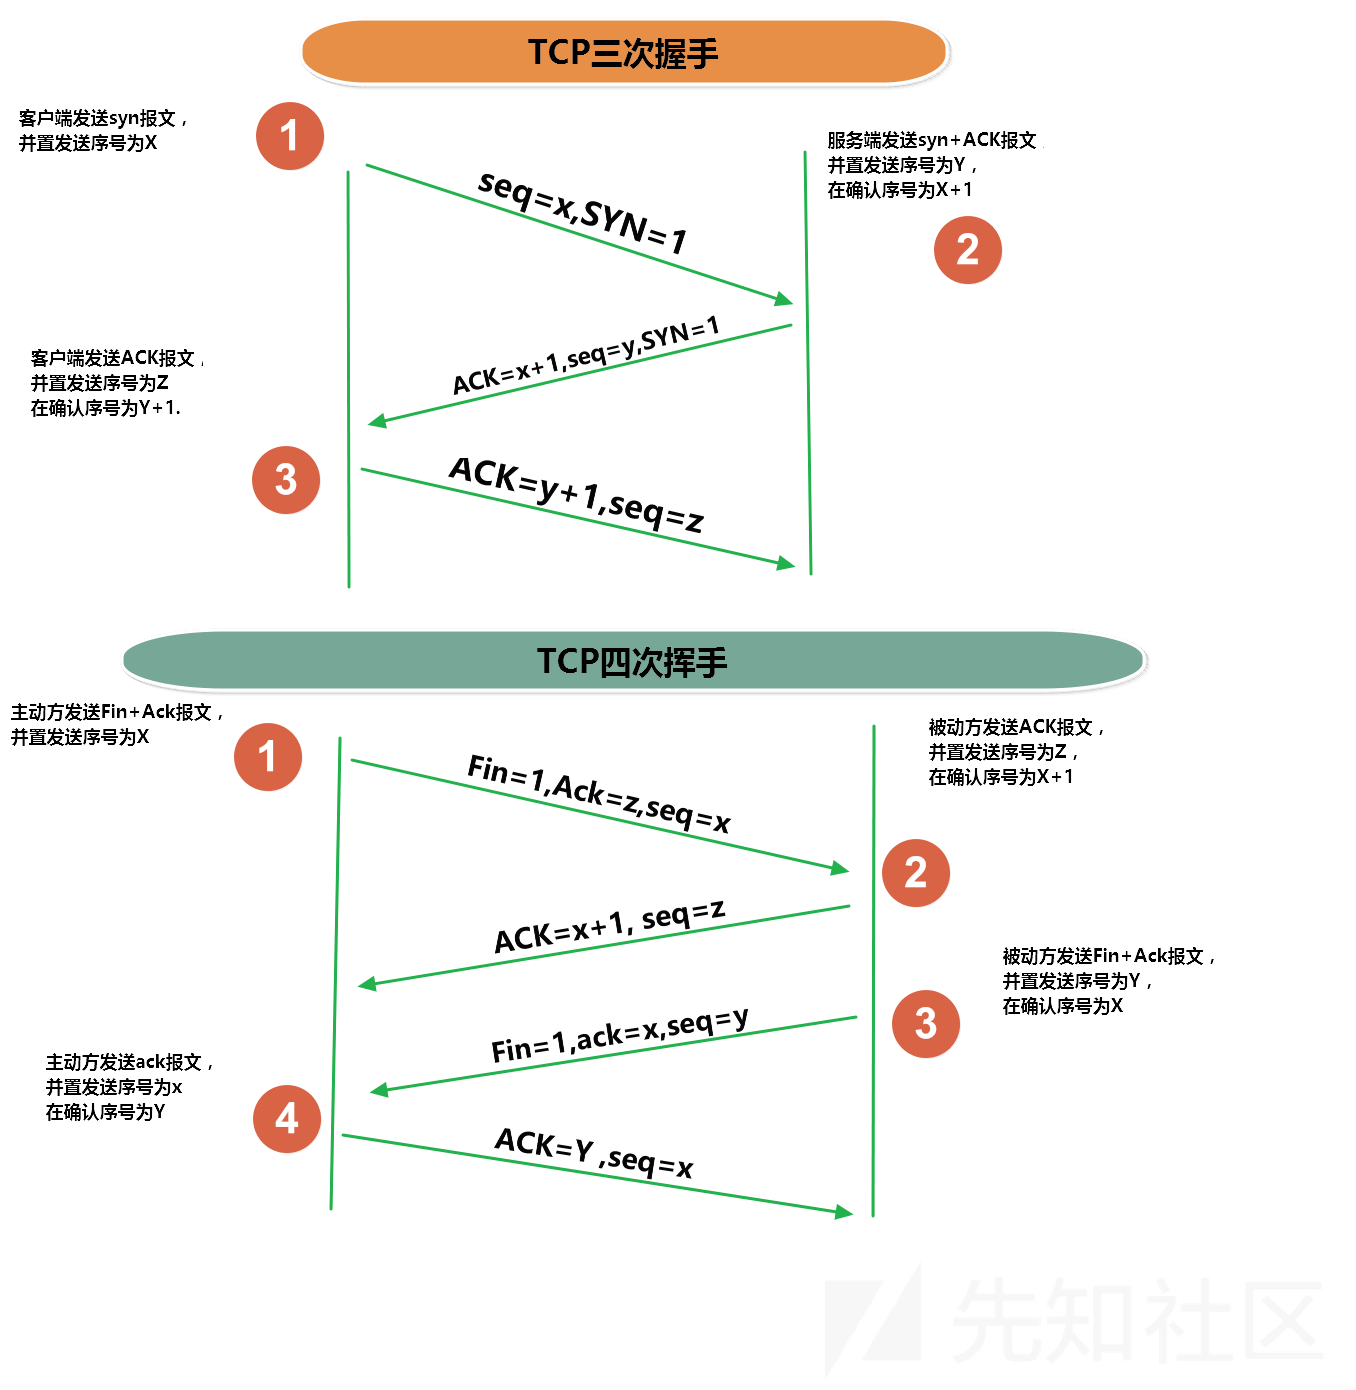
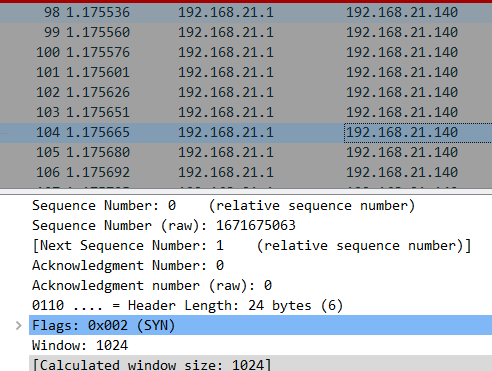
-sS扫描(SYN)
SYN扫描是nmap的默认端口扫描,半开放扫描,不完成全部TCP连接。只发送一个SYN=1,如果返回ack/syn=1
开放端口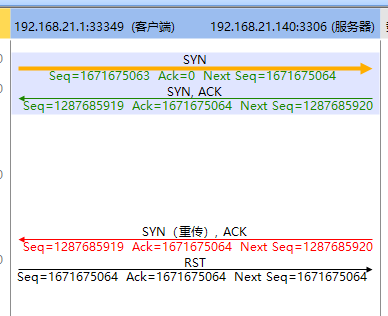
不开放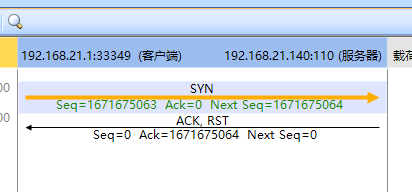
特征修改
-sV -sO
nmap使用-O参数扫描时会发送tcp,udp,icmp 然后在根据响应的tcp window,TTL,IPID等对比指纹库识别操作系统。
- ip_proto ip协议号 21
- content CCCCCCCCCCCCCCCCCCCC
osscan2.ccnbase\nbase_rnd.c有生成随机bytes的函数get_random_bytes,进行修改,随机生成填充
-sT (TCP connect()扫描)
创建connect() 系统调用进行扫描。
降速扫-sN; -sF; -sX (TCP Null,FIN,and Xmas扫描)
除了探测报文的标志位不同,这三种扫描在行为上完全一致。 如果收到一个RST报文,该端口被认为是 closed(关闭的),而没有响应则意味着 端口是open|filtered(开放或者被过滤的)。 如果收到ICMP不可到达错误(类型 3,代号 1,2,3,9,10,或者13),该端口就被标记为 被过滤的。 这些扫描的关键优势是它们能躲过一些无状态防火墙和报文过滤路由器。 另一个优势是这些扫描类型甚至比SYN扫描还要隐秘一些。但是别依赖它 — 多数 现代的IDS产品可以发现它们。一个很大的不足是并非所有系统都严格遵循RFC 793。
许多系统不管端口开放还是关闭,都响应RST。 这导致所有端口都标记为closed(关闭的)。 这样的操作系统主要有Microsoft Windows,许多Cisco设备,BSDI,以及IBM OS/400。 但是这种扫描对多数UNIX系统都能工作。这些扫描的另一个不足是 它们不能辨别open(开放的)端口和一些特定的 filtered(被过滤的)端口,从而返回 open|filtered(开放或者被过滤的)。ping 扫描
直接不用ping扫描dsize 检查包的数据部分大小 0itype 检测icmp type 值
nmap UA 修改
alert http $EXTERNAL_NET any -> $HOME_NET any (msg:"ET SCAN Nmap Scripting Engine User-Agent Detected (Nmap Scripting Engine)"; flow:to_server,established; content:"Mozilla/5.0 (compatible|3b| Nmap Scripting Engine"; nocase; http_user_agent; depth:46; reference:url,doc.emergingthreats.net/2009358; classtype:web-application-attack; sid:2009358; rev:5; metadata:created_at 2010_07_30, updated_at 2010_07_30;)
修改nselib/http.lua
USER_AGENT = stdnse.get_script_args(‘http.useragent’) or “Mozilla/5.0 (compatible; )”
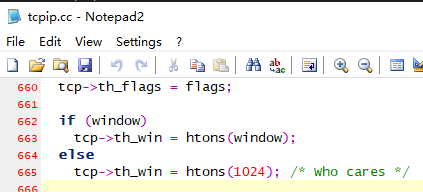
窗口大小值修改
window 关键字用于检查特定的TCP窗口大小,nmap默认为1024,但是要考虑已公开的规则,waf会过滤了2048 1024 3072 4096。需要修改为其他值
tcpip.cc
关键指纹修改
修改nmap-service-probes文件中关键词
发出包中会有nmap,nm@nm,nm2@nm2,nm@p,nm,0PT10NS sip,nmap,nm,nm@p,OR sqlspider ,等等字段,主要的就是SIP文件和一些常用的脚本文件。这些值酌情替换。
sip
去掉OPTIONS sip
nmap 系统识别绕过ids检测
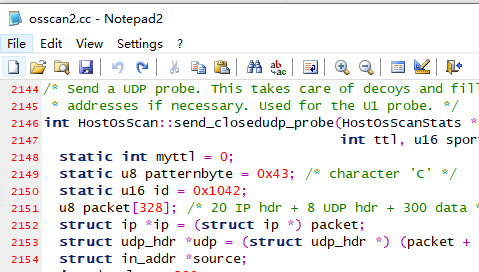
nmap使用-O参数扫描时会发送tcp,udp,icmp 然后在根据响应的tcp window,TTL,IPID等对比指纹库识别操作系统,IDS识别nmap扫描一般都是根据UDP data区域填充的’C’字符串,ICMP填充的是0(正常windows下是a-z,Linux下是0-9)
- 调整 static u8 patternbyte = 0x43; / character ‘C’ / 填充
- 调整u8 packet[328]; / 20 IP hdr + 8 UDP hdr + 300 data / 长度 ```powershell osscan2.cc
<a name="pOgR9"></a>## 修改脚本中的值- nselib/http.lua- USER_AGENT = stdnse.get_script_args('http.useragent')- nselib/mssql.lua搜索Nmap NSE然后替换- nselib/sip.lua- sip ua 设置为 FreeSWITCH-mod_sofia搜索Nmap NSE然后替换- scripts/http-sql-injection.nse- 搜索sqlspider然后替换- scripts/ssl-heartbleed.nse- 搜索Nmap ssl-heartbleed替换- nselib/rdp.lualocal cookie = "mstshash=nmap"```powershellnmap-service-probesProbe TCP TerminalServerCookie q|\x03\0\0*%\xe0\0\0\0\0\0Cookie: mstshash=nmap\r\n\x01\0\x08\0\x03\0\0\0|nselib/rdp.lualocal cookie = "mstshash=nmap"
zmap
很多网络扫描器会使用固定的tcp window或者ipid,这些都可以作为特征识别的一部分。
例如在使用zmap扫描时,通过抓包分析发现zmap使用了固定的IPID 54321以及固定的window值 65535
修改绕过src/probe_modules/packet.ctcp_header->th_win = htons(65535);iph->ip_id = htons(54321);
重编译
apt install flex bison libssl-dev./configure --without-zenmapmake && make install
参考
https://github.com/al0ne/Nmap_Bypass_IDS
https://xz.aliyun.com/t/6002
https://redmine.openinfosecfoundation.org/projects/suricata/wiki/Suricata_Rules
http://manual-snort-org.s3-website-us-east-1.amazonaws.com/node33.html
https://nmap.org/man/zh/man-port-scanning-techniques.html
https://www.cnblogs.com/liun1994/p/6986544.html
https://nmap.org/book/vscan-fileformat.html

若有收获,就点个赞吧
0 人点赞
