如何使用 GridBagLayout
原文: https://docs.oracle.com/javase/tutorial/uiswing/layout/gridbag.html
Note: This lesson covers writing layout code by hand, which can be challenging. If you are not interested in learning all the details of layout management, you might prefer to use the GroupLayout layout manager combined with a builder tool to lay out your GUI. One such builder tool is the NetBeans IDE. Otherwise, if you want to code by hand and do not want to use GroupLayout, then GridBagLayout is recommended as the next most flexible and powerful layout manager.
如果您对使用 JavaFX 创建 GUI 感兴趣,请参阅在 JavaFX 中使用布局。
这是使用 GridBagLayout 的示例图片。

单击“启动”按钮以使用 Java™Web Start (下载 JDK 7 或更高版本)运行 GridBagLayoutDemo。或者,要自己编译并运行示例,请参考示例索引。

GridBagDemo 的代码位于 GridBagLayoutDemo.java 中。
GridBagLayout是 Java 平台提供的最灵活,最复杂的布局管理器之一。 GridBagLayout将组件放置在行和列的网格中,允许指定的组件跨越多个行或列。并非所有行都必须具有相同的高度。同样,并非所有列都必须具有相同的宽度。基本上,GridBagLayout将组件放置在网格中的矩形(单元格)中,然后使用组件的首选大小来确定单元格应该有多大。
下图显示了前一个 applet 的网格。如您所见,网格有三行三列。第二行中的按钮跨越所有列;第三行中的按钮跨越两个右列。
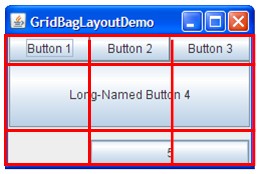
如果放大窗口,如下图所示,您会注意到包含 Button 5 的底行获取了所有新的垂直空间。新的水平空间在所有列之间均匀分配。此调整大小行为基于程序分配给GridBagLayout中各个组件的权重。您还会注意到每个组件占用了所有可用的水平空间 - 但没有(如您在按钮 5 中看到的那样)所有可用的垂直空间。此行为也由程序指定。

程序指定其组件的大小和位置特征的方式是通过为每个组件指定约束。设置组件约束的首选方法是使用Container.add变量,将GridBagConstraints对象传递给它,如下一节所示。
以下部分介绍了您可以设置的约束并提供示例。
以下代码是使用 GridBagLayout 的容器中的典型代码。您将在下一节中看到更详细的示例。
JPanel pane = new JPanel(new GridBagLayout());GridBagConstraints c = new GridBagConstraints();//For each component to be added to this container://...Create the component...//...Set instance variables in the GridBagConstraints instance...pane.add(theComponent, c);
正如您可能从上面的示例中猜到的那样,即使组件具有不同的约束,也可以为多个组件重用相同的GridBagConstraints实例。但是,建议您不要重复使用GridBagConstraints,因为如果您忘记重置每个新实例的字段,这很容易导致您引入细微的错误。
Note: The following discussion assumes that the GridBagLayout controls a container that has a left-to-right component orientation.
您可以设置以下 GridBagConstraints 实例变量:
gridx, gridy
Specify the row and column at the upper left of the component. The leftmost column has address gridx=0 and the top row has address gridy=0. Use GridBagConstraints.RELATIVE (the default value) to specify that the component be placed just to the right of (for gridx) or just below (for gridy) the component that was added to the container just before this component was added. We recommend specifying the gridx and gridy values for each component rather than just using GridBagConstraints.RELATIVE; this tends to result in more predictable layouts.
gridwidth, gridheight
Specify the number of columns (for gridwidth) or rows (for gridheight) in the component’s display area. These constraints specify the number of cells the component uses, not the number of pixels it uses. The default value is 1. Use GridBagConstraints.REMAINDER to specify that the component be the last one in its row (for gridwidth) or column (for gridheight). Use GridBagConstraints.RELATIVE to specify that the component be the next to last one in its row (for gridwidth) or column (for gridheight). We recommend specifying the gridwidth and gridheight values for each component rather than just using GridBagConstraints.RELATIVE and GridBagConstraints.REMAINDER; this tends to result in more predictable layouts.
注意: GridBagLayout不允许组件跨越多行,除非组件位于最左侧的列中,或者您已为组件指定了正gridx和gridy值。
fill
Used when the component’s display area is larger than the component’s requested size to determine whether and how to resize the component. Valid values (defined as GridBagConstraints constants) include NONE (the default), HORIZONTAL (make the component wide enough to fill its display area horizontally, but do not change its height), VERTICAL (make the component tall enough to fill its display area vertically, but do not change its width), and BOTH (make the component fill its display area entirely).
ipadx, ipady
Specifies the internal padding: how much to add to the size of the component. The default value is zero. The width of the component will be at least its minimum width plus ipadx*2 pixels, since the padding applies to both sides of the component. Similarly, the height of the component will be at least its minimum height plus ipady*2 pixels.
insets
Specifies the external padding of the component — the minimum amount of space between the component and the edges of its display area. The value is specified as an Insets object. By default, each component has no external padding.
anchor
Used when the component is smaller than its display area to determine where (within the area) to place the component. Valid values (defined as GridBagConstraints constants) are CENTER (the default), PAGE_START, PAGE_END, LINE_START, LINE_END, FIRST_LINE_START, FIRST_LINE_END, LAST_LINE_END, and LAST_LINE_START.
下面是如何在具有默认的从左到右的组件方向的容器中解释这些值的图片。
| FIRST_LINE_START | PAGE_START | FIRST_LINE_END | | LINE_START | 中央 | LINE_END | | LAST_LINE_START | PAGE_END | LAST_LINE_END |
Version note: The PAGE_* and *LINE_* constants were introduced in 1.4. Previous releases require values named after points of the compass. For example, NORTHEAST indicates the top-right part of the display area. We recommend that you use the new constants, instead, since they enable easier localization.
weightx, weighty
Specifying weights is an art that can have a significant impact on the appearance of the components a GridBagLayout controls. Weights are used to determine how to distribute space among columns (weightx) and among rows (weighty); this is important for specifying resizing behavior.
除非为weightx或weighty指定至少一个非零值,否则所有组件在其容器的中心聚集在一起。这是因为当权重为 0.0(默认值)时,GridBagLayout会在其单元格网格与容器边缘之间放置任何额外空间。
通常,权重指定为 0.0 和 1.0 作为极值:根据需要使用其间的数字。较大的数字表示组件的行或列应该获得更多空间。对于每列,权重与为该列中的组件指定的最高weightx相关,每个多列组件的权重在组件所在的列之间以某种方式分开。同样,每行的权重与最高weighty相关]为该行中的组件指定。额外的空间倾向于最右边的列和底行。
下一节将在解释示例程序如何工作的上下文中深入讨论约束。
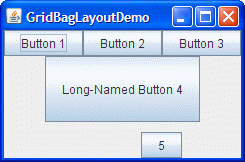
这里再次是 GridBagLayout Demo 应用程序的图片。
单击“启动”按钮以使用 Java™Web Start (下载 JDK 7 或更高版本)运行 GridBagLayoutDemo。或者,要自己编译并运行示例,请参考示例索引。
以下代码创建GridBagLayout及其管理的组件。您可以在 GridBagLayoutDemo.java 中找到整个源文件。
JButton button;pane.setLayout(new GridBagLayout());GridBagConstraints c = new GridBagConstraints();if (shouldFill) {//natural height, maximum widthc.fill = GridBagConstraints.HORIZONTAL;}button = new JButton("Button 1");if (shouldWeightX) {c.weightx = 0.5;}c.fill = GridBagConstraints.HORIZONTAL;c.gridx = 0;c.gridy = 0;pane.add(button, c);button = new JButton("Button 2");c.fill = GridBagConstraints.HORIZONTAL;c.weightx = 0.5;c.gridx = 1;c.gridy = 0;pane.add(button, c);button = new JButton("Button 3");c.fill = GridBagConstraints.HORIZONTAL;c.weightx = 0.5;c.gridx = 2;c.gridy = 0;pane.add(button, c);button = new JButton("Long-Named Button 4");c.fill = GridBagConstraints.HORIZONTAL;c.ipady = 40; //make this component tallc.weightx = 0.0;c.gridwidth = 3;c.gridx = 0;c.gridy = 1;pane.add(button, c);button = new JButton("5");c.fill = GridBagConstraints.HORIZONTAL;c.ipady = 0; //reset to defaultc.weighty = 1.0; //request any extra vertical spacec.anchor = GridBagConstraints.PAGE_END; //bottom of spacec.insets = new Insets(10,0,0,0); //top paddingc.gridx = 1; //aligned with button 2c.gridwidth = 2; //2 columns widec.gridy = 2; //third rowpane.add(button, c);
此示例对GridBagLayout管理的所有组件使用一个GridBagConstraints实例,但在实际情况下,建议您不要重复使用GridBagConstraints,因为这很容易导致您在忘记时引入细微错误重置每个新实例的字段。在将每个组件添加到容器之前,代码将GridBagConstraints对象中的相应实例变量设置(或重置为默认值)。然后将组件添加到其容器中,将GridBagConstraints对象指定为add方法的第二个参数。
例如,要使按钮 4 超高,示例中包含以下代码:
c.ipady = 40;
在设置下一个组件的约束之前,代码会将ipady的值重置为默认值:
c.ipady = 0;
如果组件的显示区域大于组件本身,则可以使用GridBagConstraints.anchor约束在显示区域中指定组件的显示位置。 anchor约束的值可以是绝对的(北,南,东,西等),也可以是方向相对的(在页面开头,行尾,第一行的开头,依此类推) ,或相对于组件的基线。有关anchor约束的可能值的完整列表,包括基线相对值,请参阅 GridBagConstraints.anchor 的 API 文档。您可以在上面的代码提取中看到,按钮 5 通过在GridBagConstraints.PAGE_END处设置锚点来指定它应显示在显示区域的末尾。
Note: The Tutorial’s examples used to specify the constraints object a different way, which you might see in other programs as well. Rather than specifying the constraints with the add method, our examples used to invoke the setConstraints method on the GridBagLayout object. For example:
GridBagLayout gridbag = new GridBagLayout();pane.setLayout(gridbag);...gridbag.setConstraints(button, c);pane.add(button);
However, we recommend you use the Container.add method since it makes for cleaner code than if you were to use setConstraints.
这是一个表格,显示 GridBagLayoutDemo 内容窗格中每个组件的所有约束。非默认值以粗体标记。与上一个表条目中的值不同的值标记在斜体中。
| 零件 | 约束 |
|---|---|
| 所有组件 |
ipadx = 0 fill = GridBagConstraints.HORIZONTAL
| | 按钮 1 |
ipady = 0 weightx = 0.5 weighty = 0.0 gridwidth = 1 anchor = GridBagConstraints.CENTER insets = new Insets(0,0,0,0) gridx = 0 gridy = 0
| | 按钮 2 |
weightx = 0.5 ** gridx = 1 ** gridy = 0
| | 按钮 3 |
weightx = 0.5 ** gridx = 2 ** gridy = 0
| | 按钮 4 |
** ipady = 40 ** 重量 x = 0.0 **网格宽度= 3 ** ** gridx = 0 ** **网格= 1 **
| | 按钮 5 |
ipady = 0 weightx = 0.0 **重量= 1.0 ** **锚= GridBagConstraints.PAGE_END ** ** insets =新的 Insets(10,0,0,0)** ** gridwidth = 2 ** ** gridx = 1 ** **网格= 2 **
|
GridBagLayoutDemo 有两个跨越多列的组件(按钮 4 和 5)。为了使按钮 4 变高,我们为其添加了内部填充(ipady)。为了在按钮 4 和 5 之间放置空格,我们使用插图在按钮 5 上方添加至少 10 个像素,并且我们使按钮 5 拥抱其单元格的底部边缘。
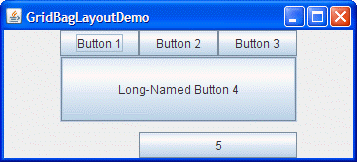
考虑到它们占据的单元格,pane容器中的所有组件都尽可能宽。程序通过将GridBagConstraints fill实例变量设置为GridBagConstraints.HORIZONTAL来完成此操作,将其保留在所有组件的设置中。如果程序没有指定填充,则按钮将处于其自然宽度,如下所示:
当您放大 GridBagLayoutDemo 的窗口时,列会按比例增长。这是因为第一行中的每个组件(每个组件是一列宽)都具有weightx = 0.5。这些组件weightx的实际价值并不重要。重要的是,所有组件,以及所有列,具有大于 0 的相同权重。如果GridBagLayout管理的组件没有设置weightx,那么当组件的容器变宽时,组件将在容器的中心保持聚集在一起,如下所示:
如果容器的尺寸小于或大于优选尺寸,则根据GridBagContainer重量分配任何空间。
请注意,如果放大窗口,最后一行是唯一一个变得更高的行。这是因为只有按钮 5 的weighty大于零。
GridBagLayout和GridBagConstraints类每个只有一个构造器,没有参数。您可以操作其实例变量,而不是在GridBagConstraints对象上调用方法,如指定约束中所述。通常,您在GridBagLayout对象上调用的唯一方法是setConstraints,如示例说明中所示。
的示例
您可以在本教程中找到使用GridBagLayout的示例。下表列出了一些。
| 例 | 在哪里描述 | 笔记 |
|---|---|---|
GridBagLayoutDemo |
这个部分 | 使用许多功能 - 重量,插入,内部填充,水平填充,精确单元定位,多列单元格和锚定(单元内的组件定位)。 |
TextSamplerDemo |
使用文本组件 | 对齐两对标签和文本字段,并在容器的整个宽度上添加标签。 |
ContainerEventDemo |
如何编写容器监听器 | 使用权重,填充和相对定位将五个组件放置在容器中。 |

若有收获,就点个赞吧
0 人点赞
