一、环境搭建
1.1 环境要求
- JDK 1.8
- maven
-
1.2 源码下载
git clone https://github.com/apache/rocketmq.git
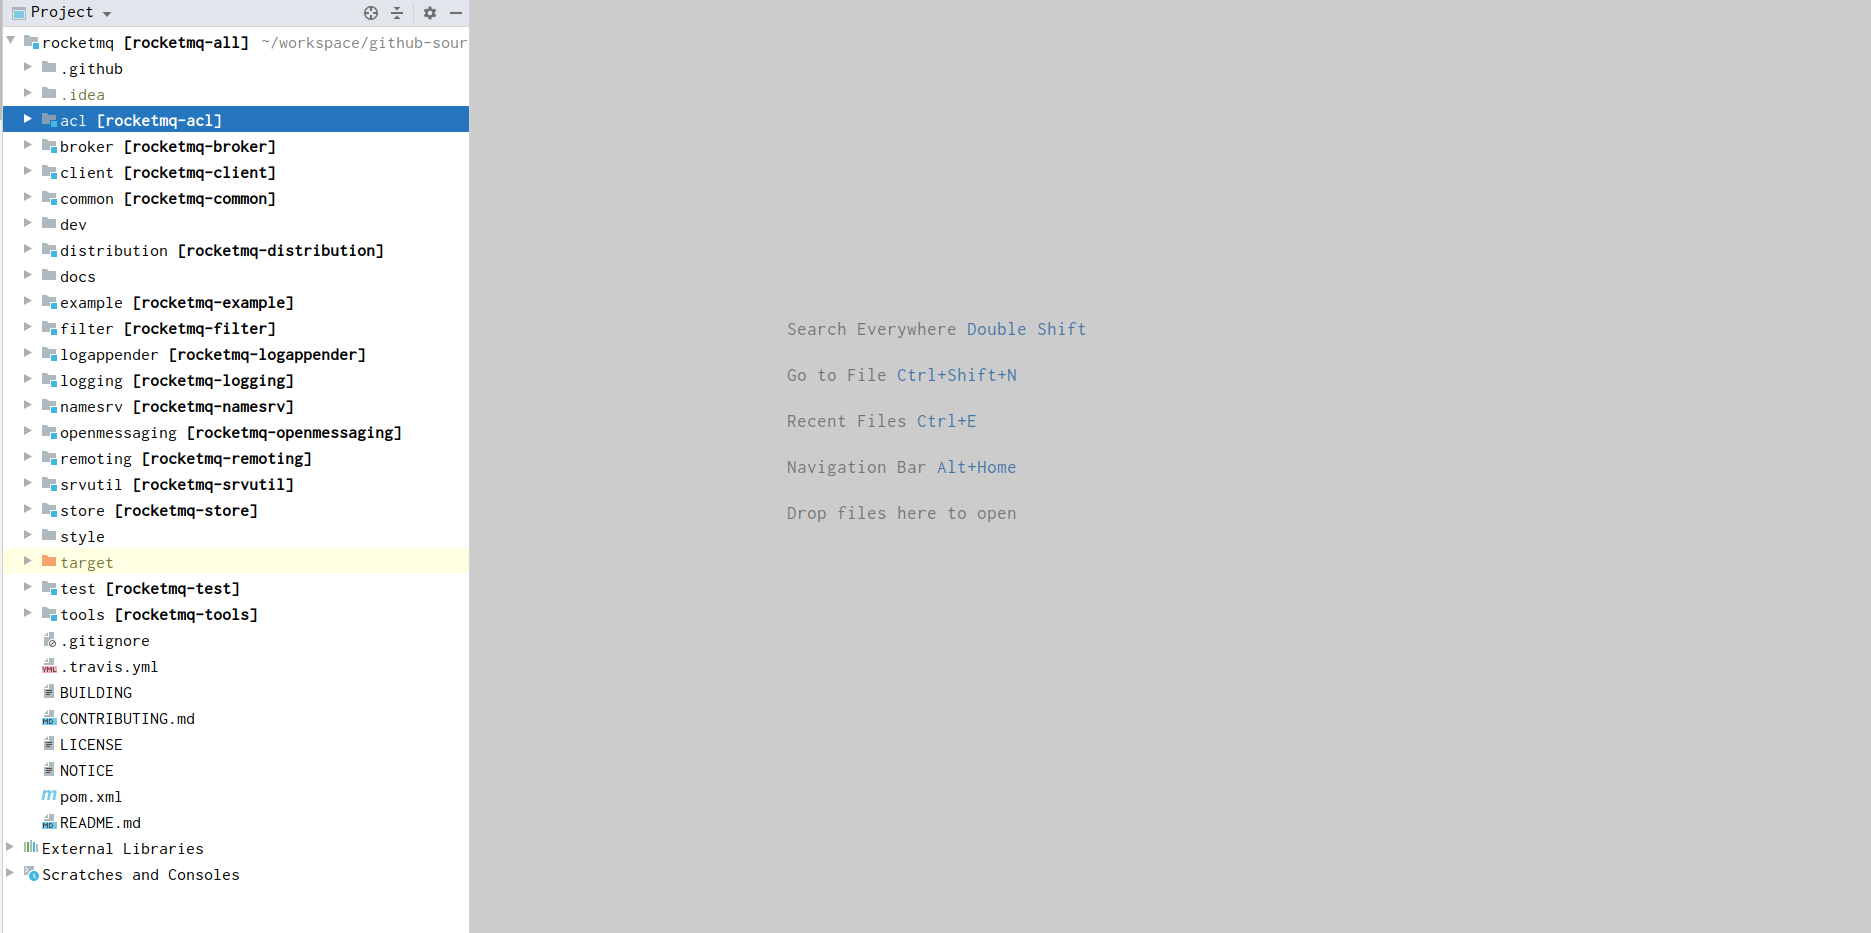
目录结构
broker: broker 模块(broke 启动进程)
- client :消息客户端,包含消息生产者、消息消费者相关类
- common :公共包
- dev :开发者信息(非源代码)
- distribution :部署实例文件夹(非源代码)
- example: RocketMQ 例代码
- filter :消息过滤相关基础类
- filtersrv:消息过滤服务器实现相关类(Filter启动进程)
- logappender:日志实现相关类
- namesrv:NameServer实现相关类(NameServer启动进程)
- openmessageing:消息开放标准
- remoting:远程通信模块,给予Netty
- srcutil:服务工具类
- store:消息存储实现相关类
- style:checkstyle相关实现
- test:测试相关类
- tools:工具类,监控命令相关实现类
使用idea打开项目
进行安装,在命令行运行如下命令
mvn clean package -DskipTests=true
1.3 调试准备
创建conf文件夹,从distribution下的conf目录下,复制 broker.conf、logback_broker.xml、logback_namesrv.xml 三个文件到新建的conf目录下,最终效果如图所示。
启动Namesrv
首先,先添加环境变量,如下图,添加名为 ROCKETMQ_HOME 的环境变量,值为当前的项目路径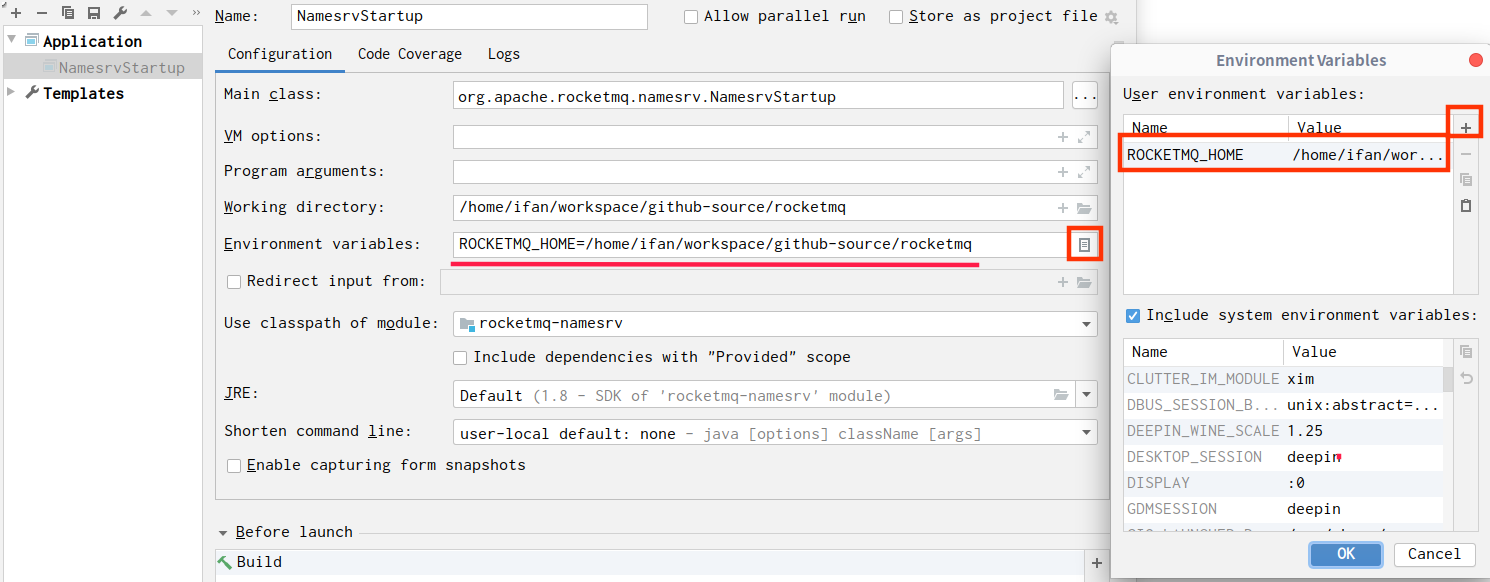
如果不做如上的操作,运行NamesrvStartup的话,会报如下的错误
添加完环境变量之后,运行NamesrvStartup,看到控制台打印如下结果,即Namesrv运行成功The Name Server boot success. serializeType=JSON
启动Broker
首先,BrokerStartup中,也要像NamesrvStartup一样,添加ROCKETMQ_HOME这个环境变量,并且,需要指定broker.conf所在的位置。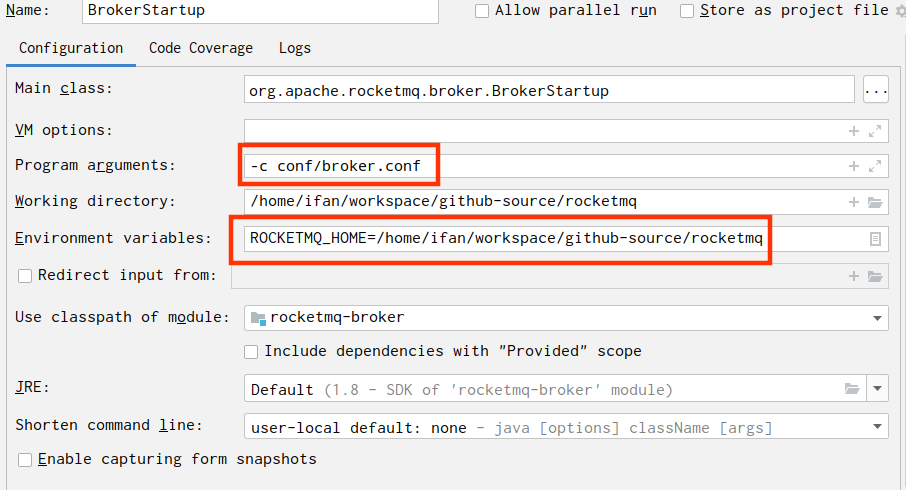
然后再修改 调试准备阶段中,复制到conf目录下的broker.conf配置文件,完整的broker.conf内容如下。 ```shell brokerClusterName = DefaultCluster brokerName = broker-a brokerId = 0 deleteWhen = 04 fileReservedTime = 48 brokerRole = ASYNC_MASTER flushDiskType = ASYNC_FLUSH
namesrvAddr=127.0.0.1:9876 authCreateTopicEnable = true #开启自动创建topic的功能 storePathRootDir=/home/ifan/workspace/github-source/rocketmq/data enablePropertyFilter=true storePathCommitLog=/home/ifan/workspace/github-source/rocketmq/data/commitlog
看到如下的打印,证明broker启动成功```shellThe broker[broker-a, 172.17.0.1:10911] boot success. serializeType=JSON and name server is 127.0.0.1:9876
1.4 源码调试
生产者测试
使用rocketmq自带的测试用例进行测试(example Modules下的org.apache.rocketmq.example.quickstart.Producer),在其中添加namesrv的地址,运行main方法
消费者测试
使用rocketmq自带的测试用例进行测试(example Modules下的org.apache.rocketmq.example.quickstart.Consumer),在其中添加namesrv的地址,运行main方法
到这,源码的环境搭建就完成了
二、源码解析
2.1 Namesrv 源码分析
NamesrvStartup#main -> 调用main0
NamesrvStartup#main0
createNamesrvController(args) 第一步,创建NamesrvController
public static NamesrvController createNamesrvController(String[] args) throws IOException, JoranException {// 1. 设置 ROCKETMQ 的服务端版本System.setProperty(RemotingCommand.REMOTING_VERSION_KEY, Integer.toString(MQVersion.CURRENT_VERSION));// 创建一个命令行的选项,用于mqnamesrv命令的一些选项输出// 在方法内部,创建出 -h -n -c -p的选项Options options = ServerUtil.buildCommandlineOptions(new Options());commandLine = ServerUtil.parseCmdLine("mqnamesrv", args, buildCommandlineOptions(options), new PosixParser());if (null == commandLine) {System.exit(-1);return null;}// 创建一个Namesrv的配置类final NamesrvConfig namesrvConfig = new NamesrvConfig();// 创建一个Netty服务端的配置final NettyServerConfig nettyServerConfig = new NettyServerConfig();// 设置Netty服务端的监听端口nettyServerConfig.setListenPort(9876);// 如果启动参数中,包含 -c参数,说明指定了配置文件if (commandLine.hasOption('c')) {String file = commandLine.getOptionValue('c');if (file != null) {// 指定了-c参数,就通过 InputStream读取这个配置文件的内容InputStream in = new BufferedInputStream(new FileInputStream(file));// 并将这个内容,存储到一个Properties文件中properties = new Properties();properties.load(in);// 然后,通过反射,将properties文件中的内容,存储到上面创建的两个配置类中MixAll.properties2Object(properties, namesrvConfig);MixAll.properties2Object(properties, nettyServerConfig);// 设置配置文件的路径namesrvConfig.setConfigStorePath(file);// 然后关闭文件流System.out.printf("load config properties file OK, %s%n", file);in.close();}}// 有 -p 参数,打印可配置的参数,到console中,然后System.exit退出程序if (commandLine.hasOption('p')) {InternalLogger console = InternalLoggerFactory.getLogger(LoggerName.NAMESRV_CONSOLE_NAME);MixAll.printObjectProperties(console, namesrvConfig);MixAll.printObjectProperties(console, nettyServerConfig);System.exit(0);}// 将命令行中的参数,设置到namesrvconfig中MixAll.properties2Object(ServerUtil.commandLine2Properties(commandLine), namesrvConfig);// 如果没有设置 ROCKETMQ_HOME 这个环境变量的话,就在这打印日志,然后报错异常退出if (null == namesrvConfig.getRocketmqHome()) {System.out.printf("Please set the %s variable in your environment to match the location of the RocketMQ installation%n", MixAll.ROCKETMQ_HOME_ENV);System.exit(-2);}// 获取日志上下文LoggerContext lc = (LoggerContext) LoggerFactory.getILoggerFactory();JoranConfigurator configurator = new JoranConfigurator();configurator.setContext(lc);lc.reset();// 设置日志的配置文件所在地configurator.doConfigure(namesrvConfig.getRocketmqHome() + "/conf/logback_namesrv.xml");// 获取日志对象log = InternalLoggerFactory.getLogger(LoggerName.NAMESRV_LOGGER_NAME);// 将这个配置,打印在日志文件中MixAll.printObjectProperties(log, namesrvConfig);MixAll.printObjectProperties(log, nettyServerConfig);// 初始化NamesrvController,将两个配置类传入final NamesrvController controller = new NamesrvController(namesrvConfig, nettyServerConfig);// 将properties中的内容,以及Configuration中的内容进行合并,方法内部调用 mergecontroller.getConfiguration().registerConfig(properties);return controller;}
new NamesrvController();
将传入的配置类啊,NamesrvController中的一些属性进行赋值以及创建
public NamesrvController(NamesrvConfig namesrvConfig, NettyServerConfig nettyServerConfig) {this.namesrvConfig = namesrvConfig;this.nettyServerConfig = nettyServerConfig;this.kvConfigManager = new KVConfigManager(this);this.routeInfoManager = new RouteInfoManager();this.brokerHousekeepingService = new BrokerHousekeepingService(this);this.configuration = new Configuration(log,this.namesrvConfig, this.nettyServerConfig);this.configuration.setStorePathFromConfig(this.namesrvConfig, "configStorePath");}
start(controller) 第二步,启动NamesrvController
public static NamesrvController start(final NamesrvController controller) throws Exception {// 如果Controller创建失败了,则抛出异常if (null == controller) {throw new IllegalArgumentException("NamesrvController is null");}// 初始化NamesrvController,详见下文boolean initResult = controller.initialize();// 如果初始化失败了,则调用shutdown进行收尾if (!initResult) {controller.shutdown();System.exit(-3);}// 注册一个Hook,在Java程序关闭的之后,将会执行这个钩子函数,执行controller的shutdown方法// 进行收尾Runtime.getRuntime().addShutdownHook(new ShutdownHookThread(log, new Callable<Void>() {@Overridepublic Void call() throws Exception {controller.shutdown();return null;}}));// 启动NamesrvControllercontroller.start();return controller;}
controller.initialize()
public boolean initialize() {// 加载 ${user.home}/namesrv/kvConfig.json中的内容,// 将其读取出来,最终序列号保存到configTable属性中this.kvConfigManager.load();// 创建Netty远程服务器,创建出Netty中的BossGroup以及WorkerGroup,// 还有ServerBootstrap这些,但是,还没有启动Server监听端口this.remotingServer = new NettyRemotingServer(this.nettyServerConfig, this.brokerHousekeepingService);// 创建一个线程池this.remotingExecutor =Executors.newFixedThreadPool(nettyServerConfig.getServerWorkerThreads(), new ThreadFactoryImpl("RemotingExecutorThread_"));// 注册处理器,内部根据是否集群,创建出不同的处理器,// 集群:ClusterTestRequestProcessor// 非集群:DefaultRequestProcessorthis.registerProcessor();// 开启一个定时的线程池,定时扫描不活跃的Broker(scanNotActiveBroker)this.scheduledExecutorService.scheduleAtFixedRate(new Runnable() {@Overridepublic void run() {NamesrvController.this.routeInfoManager.scanNotActiveBroker();}}, 5, 10, TimeUnit.SECONDS);// 开启一个线程池,定时打印一些东西this.scheduledExecutorService.scheduleAtFixedRate(new Runnable() {@Overridepublic void run() {NamesrvController.this.kvConfigManager.printAllPeriodically();}}, 1, 10, TimeUnit.MINUTES);// 这是监测SSL的变化if (TlsSystemConfig.tlsMode != TlsMode.DISABLED) {// Register a listener to reload SslContexttry {fileWatchService = new FileWatchService(new String[] {TlsSystemConfig.tlsServerCertPath,TlsSystemConfig.tlsServerKeyPath,TlsSystemConfig.tlsServerTrustCertPath},new FileWatchService.Listener() {boolean certChanged, keyChanged = false;@Overridepublic void onChanged(String path) {if (path.equals(TlsSystemConfig.tlsServerTrustCertPath)) {log.info("The trust certificate changed, reload the ssl context");reloadServerSslContext();}if (path.equals(TlsSystemConfig.tlsServerCertPath)) {certChanged = true;}if (path.equals(TlsSystemConfig.tlsServerKeyPath)) {keyChanged = true;}if (certChanged && keyChanged) {log.info("The certificate and private key changed, reload the ssl context");certChanged = keyChanged = false;reloadServerSslContext();}}private void reloadServerSslContext() {((NettyRemotingServer) remotingServer).loadSslContext();}});} catch (Exception e) {log.warn("FileWatchService created error, can't load the certificate dynamically");}}return true;}
controller.start()
// 启动NettyRemotingServer,remotingServer.start()的详细,详见附录this.remotingServer.start();if (this.fileWatchService != null) {// 如果需要监听SSL的变化的话,启动这个线程this.fileWatchService.start();}
打印日志,NamesrvController启动成功
Netty NamesrvController的分析到这。。。
附录:
附录一:remotingServer.start()
@Overridepublic void start() {// 创建一个线程组this.defaultEventExecutorGroup = new DefaultEventExecutorGroup(nettyServerConfig.getServerWorkerThreads(),new ThreadFactory() {private AtomicInteger threadIndex = new AtomicInteger(0);@Overridepublic Thread newThread(Runnable r) {return new Thread(r, "NettyServerCodecThread_" + this.threadIndex.incrementAndGet());}});// 预先创建好编解码,以及Netty服务端的处理器/*** handshakeHandler = new HandshakeHandler(TlsSystemConfig.tlsMode);* encoder = new NettyEncoder();* connectionManageHandler = new NettyConnectManageHandler();* serverHandler = new NettyServerHandler();*/prepareSharableHandlers();// channel 设置Netty的通道实现类型// option 设置Netty的参数// localAddress 设置Netty的本地地址// childHandler 设置Netty workerGroup的处理器链// 其中,在这,添加了如下的几种: 1. 名字:handshakeHandler,握手处理器// 2. NettyDecoder 实现了 LengthFieldBasedFrameDecoder,通过协议上的开头包长度,来拼包拆包// 3. IdleStateHandler 心跳包// 4. NettyConnectManageHandler 链接管理处理器(ChannelDuplexHandler 双向处理器)// 5. NettyServerHandler -> processMessageReceivedServerBootstrap childHandler =this.serverBootstrap.group(this.eventLoopGroupBoss, this.eventLoopGroupSelector).channel(useEpoll() ? EpollServerSocketChannel.class : NioServerSocketChannel.class).option(ChannelOption.SO_BACKLOG, 1024).option(ChannelOption.SO_REUSEADDR, true).option(ChannelOption.SO_KEEPALIVE, false).childOption(ChannelOption.TCP_NODELAY, true).childOption(ChannelOption.SO_SNDBUF, nettyServerConfig.getServerSocketSndBufSize()).childOption(ChannelOption.SO_RCVBUF, nettyServerConfig.getServerSocketRcvBufSize()).localAddress(new InetSocketAddress(this.nettyServerConfig.getListenPort())).childHandler(new ChannelInitializer<SocketChannel>() {@Overridepublic void initChannel(SocketChannel ch) throws Exception {ch.pipeline().addLast(defaultEventExecutorGroup, HANDSHAKE_HANDLER_NAME, handshakeHandler).addLast(defaultEventExecutorGroup,encoder,new NettyDecoder(),new IdleStateHandler(0, 0, nettyServerConfig.getServerChannelMaxIdleTimeSeconds()),connectionManageHandler,serverHandler);}});if (nettyServerConfig.isServerPooledByteBufAllocatorEnable()) {childHandler.childOption(ChannelOption.ALLOCATOR, PooledByteBufAllocator.DEFAULT);}try {// 启动NettyChannelFuture sync = this.serverBootstrap.bind().sync();InetSocketAddress addr = (InetSocketAddress) sync.channel().localAddress();this.port = addr.getPort();} catch (InterruptedException e1) {throw new RuntimeException("this.serverBootstrap.bind().sync() InterruptedException", e1);}if (this.channelEventListener != null) {this.nettyEventExecutor.start();}// 定时器、this.timer.scheduleAtFixedRate(new TimerTask() {@Overridepublic void run() {try {NettyRemotingServer.this.scanResponseTable();} catch (Throwable e) {log.error("scanResponseTable exception", e);}}}, 1000 * 3, 1000);}

若有收获,就点个赞吧
0 人点赞
