- 一、从Servlet 3.0 规范说起
- 1.1 在Servlet 3.0 之前,我们都是通过XML的方式来进行Web三大组件的注册
- 1.2 在Servlet3.0 规范之后,支持通过 @WebSerlvet,@WebFilter,@WebListener这种方式来注册三大组件
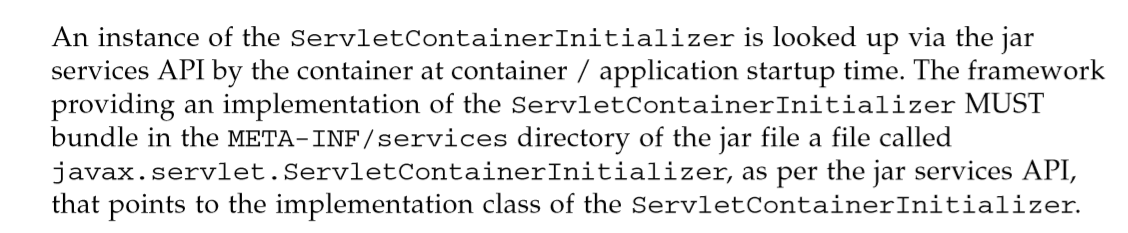
- 1.3 除了通过注解的方式来注册三大组件之外,还支持,通过在META-INF/services 下,创建一个名为 javax.servlet.ServletContainerInitializer 的文件,文件内容为 ServletContainerInitializer 实现类的全限定类名
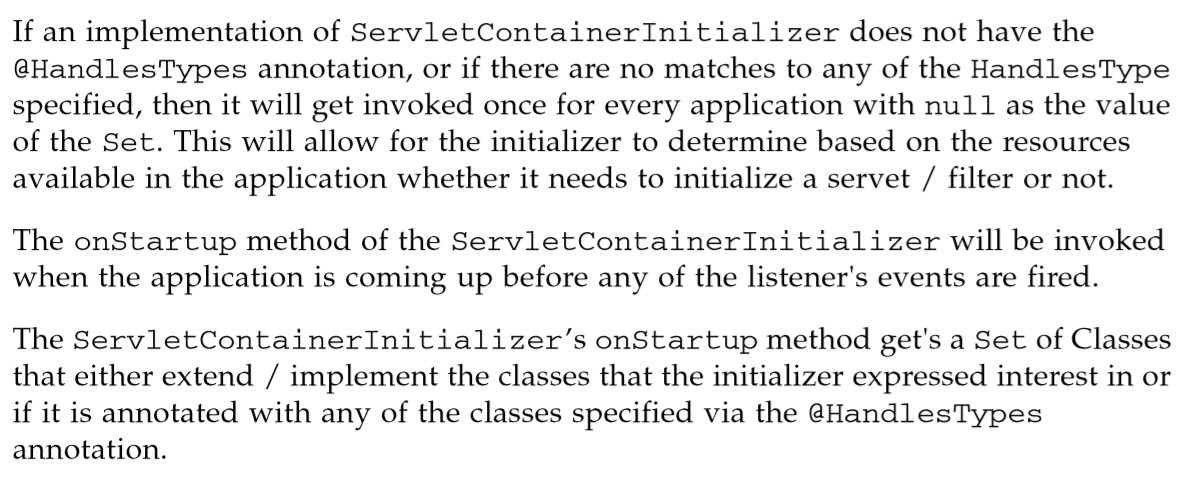
- 1.4 并且可以在这个实现类上添加@HandlesTypes 来指定感兴趣的类型,对应的实现类,将会传入到onStartup() 中的Set中
- 二、那么,在spring-mvc中,就实现了上述的操作,在org.springframework:spring-web.jar 中,就指定了SerlvetContainerInitializer的实现类: SpringServletContainerInitializer
- 三、当Serlvet上下文进行初始化时,将会调用 ContextLoaderListener 的 contextInitialized()
- 四、在第一个访问DispatcherServlet的时候,将会执行Serlvet的生命周期方法
- 最后附上Spring 与SpringMVC的整合原理图
- 在FrameworkServlet中,有一个小坑,在SpringBoot 整合 web的时候,在DispatcherServletAutoConfiguration 中,
- 注入DispatcherServlet时,是通过空参传入的。
一、从Servlet 3.0 规范说起
1.1 在Servlet 3.0 之前,我们都是通过XML的方式来进行Web三大组件的注册
<servlet><servlet-name>springmvc</servlet-name><servlet-class>org.springframework.web.servlet.DispatcherServlet</servlet-class><init-param><param-name>contextConfigLocation</param-name><param-value>classpath*:config</param-value></init-param><load-on-startup>1</load-on-startup></servlet><servlet-mapping><servlet-name>springmvc</servlet-name><url-pattern>*.do</url-pattern></servlet-mapping><filter></filter><listener></listener>
1.2 在Servlet3.0 规范之后,支持通过 @WebSerlvet,@WebFilter,@WebListener这种方式来注册三大组件
@WebServletpublic class MyServlet implements HttpServlet {public void doGet(HttpServletRequest request, HttpServletResponse response){response.getWriter().write("hello world");}}
1.3 除了通过注解的方式来注册三大组件之外,还支持,通过在META-INF/services 下,创建一个名为 javax.servlet.ServletContainerInitializer 的文件,文件内容为 ServletContainerInitializer 实现类的全限定类名
1.4 并且可以在这个实现类上添加@HandlesTypes 来指定感兴趣的类型,对应的实现类,将会传入到onStartup() 中的Set中
二、那么,在spring-mvc中,就实现了上述的操作,在org.springframework:spring-web.jar 中,就指定了SerlvetContainerInitializer的实现类: SpringServletContainerInitializer
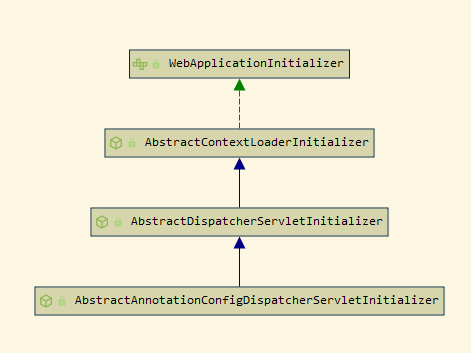
2.1 紧接着我们就转向 SpringServletContainerInitializer ,这个类,标注了 HandlesTypes,指定了 类型为 WebApplicationInitializer
@HandlesTypes(WebApplicationInitializer.class)public class SpringServletContainerInitializer implements ServletContainerInitializer {}
通过类的继承图谱可以看出,在WebApplicationInitializer 中,主要有三个子类(接口)
tomcat启动时,将会调用onStartup()方法
- 首先判断 不是接口,不是抽象类才能进来 !waiClass.isInterface() && !Modifier.isAbstract(waiClass.getModifiers()) && WebApplicationInitializer.class.isAssignableFrom(waiClass)
- 对其进行排序之后,循环调用WebApplicationInitializer的onStartup() 方法
2.2 分别看看这三个类都实现了什么东西
- 首先第一个类为 AbstractContextLoaderInitializer
在其onStartup()方法中调用了 registerContextLoaderListener(servletContext),从名字可以得出,这是注册Context-loader-listener的
分为三步:
- createRootApplicationContext() 由子类实现
- ContextLoaderListener listener = new ContextLoaderListener(rootAppContext); 创建了ContextLoaderListener
- servletContext.addListener(listener); 将其注册到Servlet上下文中,将Serlvet上下文中有变化时,将会调用监听器的相应方法。
- 第一个类为 AbstractDispatcherServletInitializer
- super.onStartup(); 调用父类的onStartup(); 创建监听器以及父容器
- registerDispatcherServlet(servletContext); 创建DispatcherServlet,主要分为三步:
- createServletApplicationContext(); 创建子容器,由子类具体自己实现
- createDispatcherServlet(servletAppContext); 根据子容器,创建DispatcherServlet
- new DispatcherServlet(servletAppContext); 将子容器保存到 DispatcherServlet对象中
- servletContext.addServlet(servletName, dispatcherServlet); 第三步,将DispatcherServlet添加到Serlvet上下文中,默认的Serlvet名称为 dispatcher
- 然后设置一个Serlvet的启动参数
- registration.setLoadOnStartup(1); 设置启动级别
- registration.addMapping(getServletMappings()); 设置映射路径, getSerlvetMappings() 由子类实现
- registration.setAsyncSupported(isAsyncSupported()); 设置是否支持异步,默认为true
- 第三个类为 AbstractAnnotationConfigDispatcherServletInitializer
这个实现类中,没有重写onStartup() 方法,所以延照父类的onStartup()
这个类主要实现了 createRootApplicationContext() ,和createServletApplicationContext()
- createRootApplicationContext()
- getRootConfigClasses(); 获取 父容器的配置类,由具体的实现类进行指定
- AnnotationConfigWebApplicationContext context = new AnnotationConfigWebApplicationContext(); 创建一个父容器
- context.register(configClasses); 指定 父容器的配置类
- 注意,此时的容器中还没有任何组件,还没有调用refresh()
- createServletApplicationContext()
- AnnotationConfigWebApplicationContext context = new AnnotationConfigWebApplicationContext(); 创建一个子容器
- getServletConfigClasses(); 获取子容器的配置类
- context.register(configClasses); 指定 子容器的配置类
- 注意,此时的容器中还没有任何组件,还没有调用refresh()
三、当Serlvet上下文进行初始化时,将会调用 ContextLoaderListener 的 contextInitialized()
- initWebApplicationContext(event.getServletContext()); 初始化web容器
- cwac.isActive() 判断容器是否活着
- 活着的话 loadParentContext(servletContext),加载父容器(因为这是父容器,所以这个方法直接return null);
- cwac.setParent(parent); 设置父容器(设置了个null,设了个寂寞)
- configureAndRefreshWebApplicationContext(cwac, servletContext); 调用父容器的刷新方法
- wac.setId() 设置容器id
- wac.setServletContext(sc); 设置Servlet上下文
- wac.refresh(); 调用父容器进行刷新,此时getRootConfigClasses配置的配置类中的扫描组件,就在父容器当中了
- servletContext.setAttribute(WebApplicationContext.ROOT_WEB_APPLICATION_CONTEXT_ATTRIBUTE, this.context); 将父容器设置到Serlvet上下文中,以便后续子容器进行获取
四、在第一个访问DispatcherServlet的时候,将会执行Serlvet的生命周期方法
首先先看DispatcherServlet的继承图谱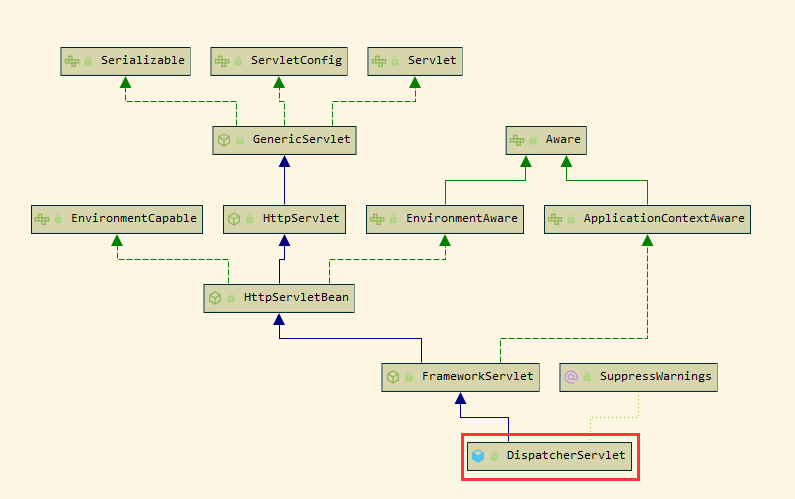
在HttpServletBean中有Serlvet的生命周期方法(init() Servlet的初始化方法)
其中init最主要的逻辑在于调用 initServletBean();
这个方法在 FrameworkServlet 类中进行了重写
主要分为如下几步:
- initWebApplicationContext(); 初始化web容器
- WebApplicationContextUtils.getWebApplicationContext(getServletContext());
- getWebApplicationContext(sc, WebApplicationContext.ROOT_WEB_APPLICATION_CONTEXT_ATTRIBUTE); 第一步,从Serlvet上下文中取出在三.6中设置到上下文中的父容器
- this.webApplicationContext != null, 判断子容器是否为空,在 2.2 的第二步中,已经将子容器传入,所以这里肯定不为null
- !cwac.isActive() 判断子容器是否活着
- cwac.setParent(rootContext); 活着,把子容器的parent属性设置为 从Servlet上下文中取出的父容器
- configureAndRefreshWebApplicationContext(cwac); 最后刷新 子容器,把getServletConfigClasses(); 中配置的扫描组件,扫描到了子组件中。
- WebApplicationContextUtils.getWebApplicationContext(getServletContext());
- initFrameworkServlet(); 初始化FrameworkServlet(空方法,不用管)
最后附上Spring 与SpringMVC的整合原理图

在FrameworkServlet中,有一个小坑,在SpringBoot 整合 web的时候,在DispatcherServletAutoConfiguration 中,
注入DispatcherServlet时,是通过空参传入的。
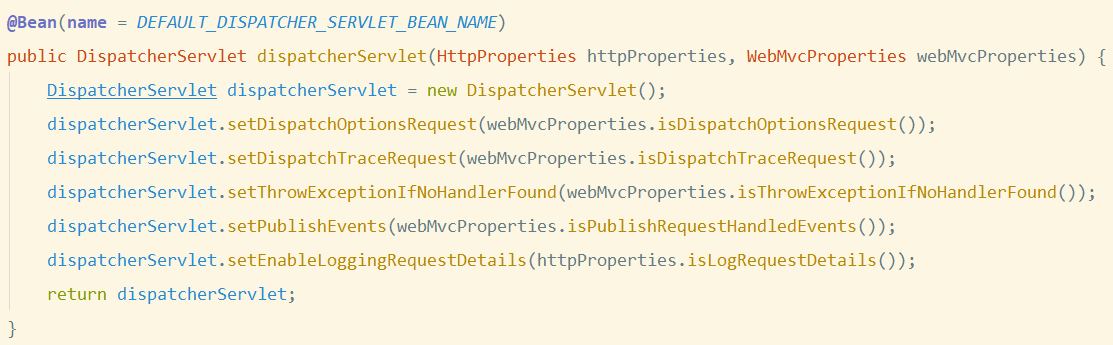
而FrameworkServlet实现了ApplicationContextAware 这个接口,这个接口,会在Spring容器启动的时候,将当前的ApplicationContext传入,执行setApplicationContext()
在FrameworkServlet中的实现如下,因为SpringBoot启动时是通通扫描,而没有像自定义的RootConfig一样,排除一些组件,所以,此时的DispatcherServlet这个组件是
被父容器扫描的,那么,此时传入的applicationContext就也是父容器,且父容器在web环境下,创建的是AnnotationConfigServletWebServerApplicationContext 这个类型,
这个类型实现了WebApplicationContext,所以会导致判断成立,那,在4大点中的 initWebApplicationContext,父子容器相同,会导致1.a.iii 的判断为false,
就没有了所谓的父子容器的概念。
@Overridepublic void setApplicationContext(ApplicationContext applicationContext) {if (this.webApplicationContext == null && applicationContext instanceof WebApplicationContext) {this.webApplicationContext = (WebApplicationContext) applicationContext;this.webApplicationContextInjected = true;}}

若有收获,就点个赞吧
0 人点赞
