Seata
Seata 是一款开源的分布式事务解决方案,致力于提高性能和简单易用的分布式事务服务;Seata 将为用户提供 AT(阿里首推的模式)、TCC、SAGA 和 XA 事务模式,为用户打造一站式的分布式解决方案;
官网 源码 官方 demo
Seata的三大角色
- TC(Transaction Coordinator)——事务协调者:维护全局和分支事务的状态,驱动全局事务提交或回滚
- TM(Transaction Manager)——事务管理器:定义全局事务的范围;开启全局事务、提交或回滚全局事务
- RM(Resource Manager)——资源管理器:管理分支事务处理的资源,与 TC 交谈以注册分支事务和报告分支事务的状态,并驱动分支事务提交或回滚
其中,TC 为单独部署的 Server 服务端,TM 和 RM 为嵌入到应用中的 Client 客户端
在 Seata 中,一个分布式事务的生命周期如下: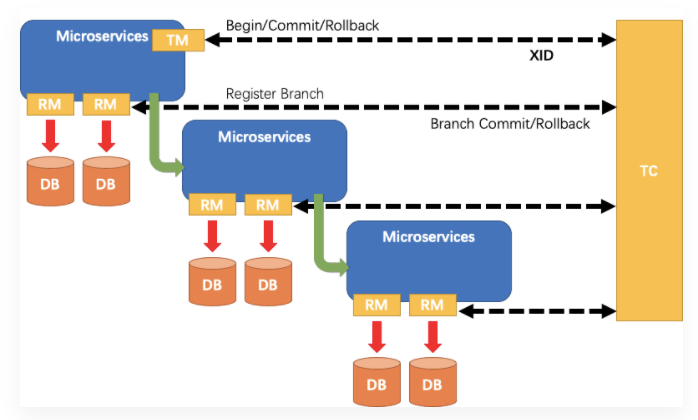
- TM 请求 TC 开启一个全局事务;TC 会生成一个 XID 作为该全局事务的编号;XID 会在微服务的调用链路中传播,保证将多个微服务的子事务关联在一起
- RM 请求 TC 将本地事务注册为全局事务的分支事务,通过全局事务的 XID 进行关联
- TM 请求 TC 告诉 XID 对应的全局事务是进行提交还是回滚
- TC 驱动 RM 将 XID 对应的自己的本地事务进行提交还是回滚
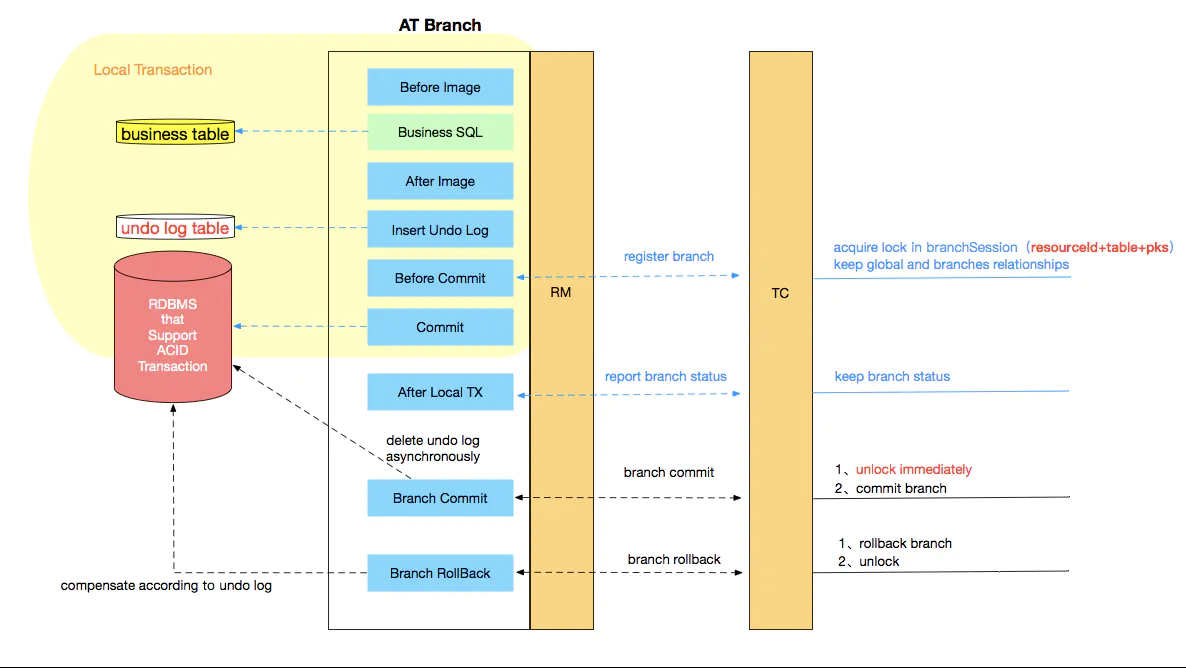
设计思路
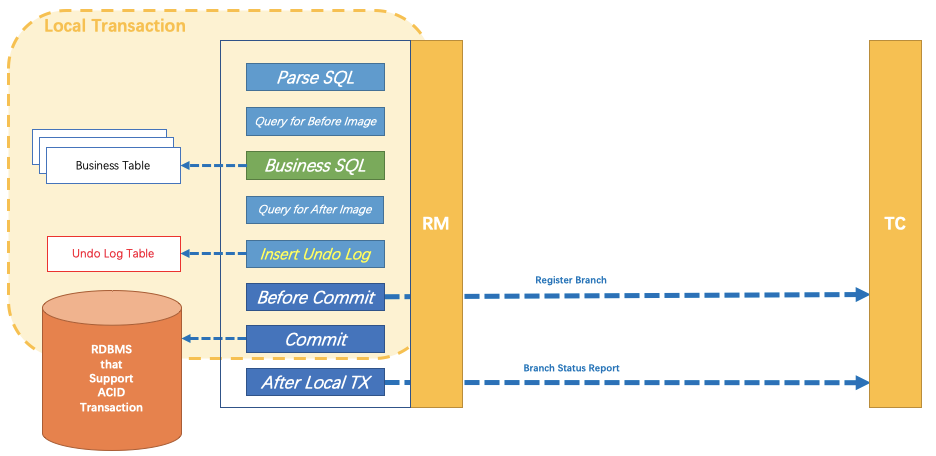
第一阶段
业务数据和回滚日志记录在同一个本地事务中提交,释放本地锁和连接资源;核心在于对业务 sql 进行解析,转换成 undolog,并同时入库;
这是怎样做的呢?
第二阶段
分布式事务操作成功,则 TC 通知 RM 异步删除 undolog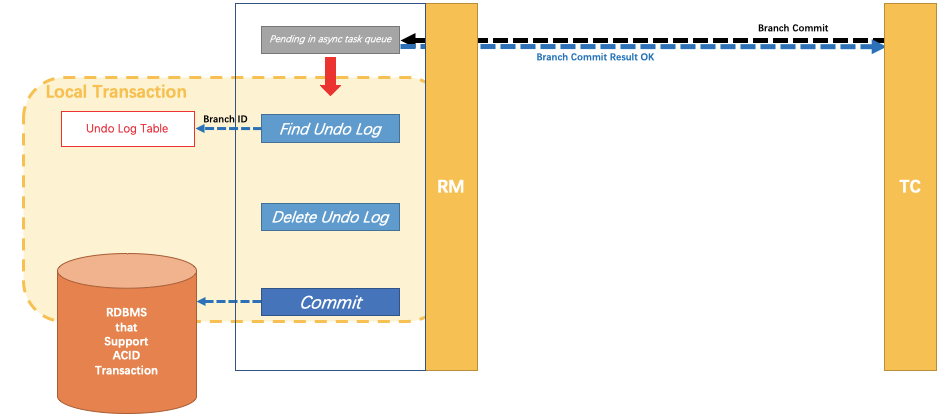
分布式事务操作失败,TM 向 TC 发送回滚请求,RM 收到协调器 TC 发来的回滚请求,通过 XID 和 Branch ID 找到相应的回滚日志记录,通过回滚记录生成反向的更新 sql 并执行,以完成分支的回滚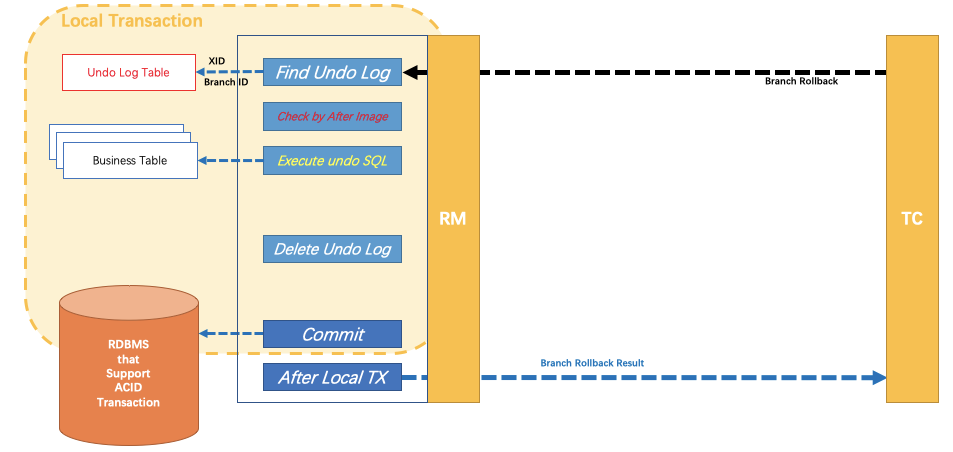
整体执行流程
设计亮点
- 应用层基于 sql 解析实现了自动补偿,从而最大程度的降低业务侵入性
- 将分布式事务中 TC(事务协调者)独立部署,负责事务的注册、回滚
- 通过全局锁实现了写隔离与读隔离
存在的问题
性能损耗
一条 update 的 sql,则需要全局事务 XID 获取(与 TC 通讯)、before image(解析 sql,查询一次数据库)、after image(查询一次数据库)、insert undo log(写一次数据库)、before commit(与 TC 通讯,判断锁冲突),这些操作都需要一次远程通讯 RPC,而且是同步的;另外 undo log 写入时 blob 字段的插入性能也是不高的;每条写 sql 都会增加很多开销,粗略估计会增加 5 倍响应时间
性价比
为了进行自动补偿,需要对所有交易生成前后镜像并持久化
全局锁
热点数据
相比 XA,Seata 虽然在一阶段成功后会释放数据库锁,但一阶段在 commit 前全局锁的判定也拉长了对数据锁的占有时间,这个开销比 XA 的 prepare 低多少需要根据实际业务场景进行测试;全局锁的引入实现了隔离性,但带来的问题就是阻塞,降低并发性,尤其是热点数据,问题会更加严重
回滚锁释放时间
Seata 在回滚时,需先删除各个节点的 undo log,然后才能释放 TC 内存中的锁,所以若第二阶段是回滚,释放锁的时间会更长
死锁问题
Seata 的引入全局锁会额外增加死锁的风险,但若出现死锁,会不断进行重试,最后靠等待全局锁超时,这种方式并不优雅,也延长了对数据库锁的占有时间
Seata 快速开始
Seata Server(TC)环境搭建
https://seata.io/zh-cn/docs/ops/deploy-guide-beginner.html
Server 端存储模式支持三种:
- file:单机模式,全局事务会话信息内存中读写并持久化本地文件 root.data,性能较高
- db:高可用模式,全局事务会话信息通过 db 共享,相应性能差些
- redis:Seata-Server 1.3 及以上版本支持,性能较高,存在事务信息丢失风险,需提前配置合适当前场景的 redis 持久化配置
资源目录:https://github.com/seata/seata/tree/1.4.0/script
- client:存放 client 端 sql 脚本,参数配置
- config-center:各个配置中心参数导入脚本,config.txt(包含 server 和 client,)为通用参数文件
- server:server 端数据库脚本及各个容器配置
db 存储模式+Nacos(注册&配置中心)部署
下载安装包
https://github.com/seata/seata/releases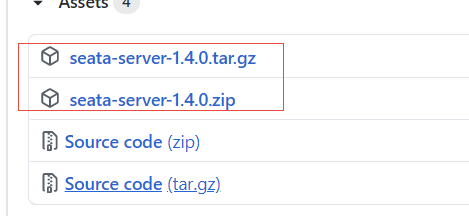
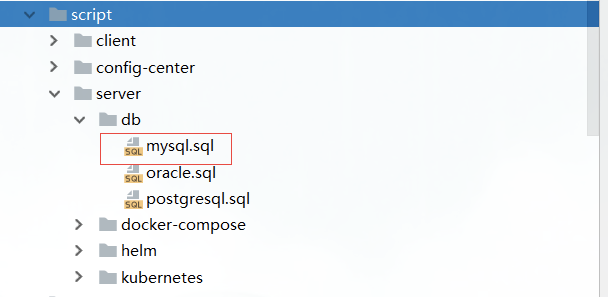
建表(仅 db 模式)
全局事务会话信息由 3 块内容构成,全局事务—分支事务—全局锁,对应表 global_table、branch_rable、lock_table 创建数据库 seata,执行 sql 脚本,文件在 script/server/db/mysql.sql
修改 store.mode
启动包:seata—conf—file.conf,修改 store.mode=”db” 源码:根目录—seata-server—resources—file.conf,修改 store.mode=”db”

修改数据库连接
启动包:seata—conf—file.conf,修改store.db 相关属性 源码:根目录—seata-server—resources—file.conf,修改store.db 相关属性

配置 Nacos 注册中心
将 Seata Server 注册到 Nacos,修改 conf 目录下的 registry.conf 配置

启动注册中心 Nacos Server
#进入Nacos安装目录,linux单机启动bin/startup.sh -m standalone# windows单机启动bin/startup.bat

注:若配置了 seata server 使用 nacos 作为配置中心,则配置信息会从 nacos 读取,file.conf 可以不用配置;客户端配置 registry.conf 使用 nacos 时也要注意 group 要和 seata server 中的 group 一致,默认”DEFAULT_GROUP”
获取 /seata/script/config-center/config.txt,修改配置信息
配置事务分组, 要与客户端配置的事务分组一致(客户端properties配置:spring.cloud.alibaba.seata.tx‐service‐group=my_test_tx_group)
配置参数同步到 Nacos:
## shell
## 参数说明   // -h host,默认 localhost  // -p port,默认 8848  // -g 配置分组,默认'SEATA_GROUP'  // -t 租户信息,对应 Nacos 命名空间 ID 字段
sh ${SEATAPATH}/script/config-center/nacos/nacos-config.sh -h localhost -p 8848 -g SEATA_GROUP -t 5a3c7d6c-f497-4d68-a71a-2e5e3340b3ca
精简配置:
service.vgroupMapping.my_test_tx_group=default
service.default.grouplist=127.0.0.1:8091
service.enableDegrade=false
service.disableGlobalTransaction=false
store.mode=db
store.db.datasource=druid
store.db.dbType=mysql
store.db.driverClassName=com.mysql.jdbc.Driver
store.db.url=jdbc:mysql://127.0.0.1:3306/seata?useUnicode=true
store.db.user=root
store.db.password=root
store.db.minConn=5
store.db.maxConn=30
store.db.globalTable=global_table
store.db.branchTable=branch_table
store.db.queryLimit=100
store.db.lockTable=lock_table
store.db.maxWait=5000
启动 Seata Server
源码启动: 执行server模块下io.seata.server.Server.java的main方法 命令启动: bin/seata-server.sh -h 127.0.0.1 -p 8091 -m db -n 1 -e test
支持的启动参数:
| 参数 | 全写 | 作用 | 备注 |
|---|---|---|---|
| -h | —host | 指定在注册中心注册的 IP | 不指定时获取当前 IP,外部访问部署在云环境和容器中 server 建议指定 |
| -p | —port | 指定 server 启动的端口 | 默认 8091 |
| -m | —storeMode | 事务日志存储方式 | 支持file``db``redis默认file,redis 需 seata-server 1.3 版本及以上 |
| -n | —serverNode | 指定 seata-server 节点 ID | es:1,2,3…默认 1 |
| -e | —seataEnv | 指定 seata-server 运行环境 | es:dev、test 等,服务启动时会使用registry-dev.conf这样的配置 |
启动 Seata Server:
bin/seata-server.sh
bin/seata-server.sh -p 80
在注册中心中可以查看到 seata-server 注册成功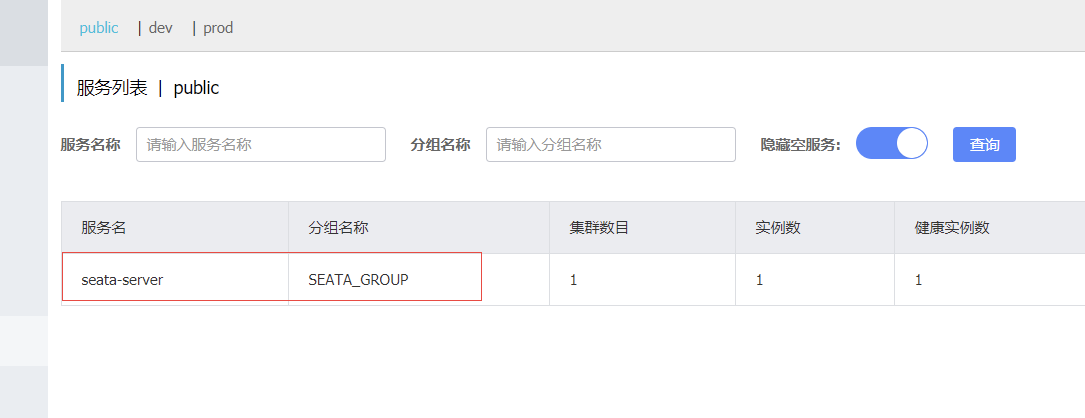
Seata Client 快速开始
编程式事务实现(GlobalTransaction api)
demo:seata-samples/api
客户端环境配置
- 修改 jdbc.properties 配置
- registry.conf 中指定 registry.type=”file”,config.type=”file”
基于 GlobalTransaction api 的实现:
public static void main(String[] args) throws SQLException, TransactionException, InterruptedException {

    String userId = "U100001";
    String commodityCode = "C00321";
    int commodityCount = 100;
    int money = 999;
    AccountService accountService = new AccountServiceImpl();
    StorageService storageService = new StorageServiceImpl();
    OrderService orderService = new OrderServiceImpl();
    orderService.setAccountService(accountService);

    //reset data  重置数据
    accountService.reset(userId, String.valueOf(money));
    storageService.reset(commodityCode, String.valueOf(commodityCount));
    orderService.reset(null, null);

    //init seata; only once
    String applicationId = "api";
    String txServiceGroup = "my_test_tx_group";
    TMClient.init(applicationId, txServiceGroup);
    RMClient.init(applicationId, txServiceGroup);

    //trx  开启全局事务
    GlobalTransaction tx = GlobalTransactionContext.getCurrentOrCreate();
    try {
        tx.begin(60000, "testBiz");
        System.out.println("begin trx, xid is " + tx.getXid());

        //biz operate 3 dataSources
        //set >=5 will be rollback(200*5>999) else will be commit
        int opCount = 5;
        // 扣减库存
        storageService.deduct(commodityCode, opCount);
        // 创建订单 ,扣款 money = opCount * 200
        orderService.create(userId, commodityCode, opCount);

        //check data if negative
        boolean needCommit = ((StorageServiceImpl)storageService).validNegativeCheck("count", commodityCode)
            && ((AccountServiceImpl)accountService).validNegativeCheck("money", userId);

        //if data negative rollback else commit
        if (needCommit) {
            tx.commit();
        } else {
            System.out.println("rollback trx, cause: data negative, xid is " + tx.getXid());
            tx.rollback();
        }
    } catch (Exception exx) {
        System.out.println("rollback trx, cause: " + exx.getMessage() + " , xid is " + tx.getXid());
        tx.rollback();
        throw exx;
    }
    TimeUnit.SECONDS.sleep(10);
}
声明式事务实现(@GlobalTransactional)
es:用户下单,整个业务逻辑由三个服务构成: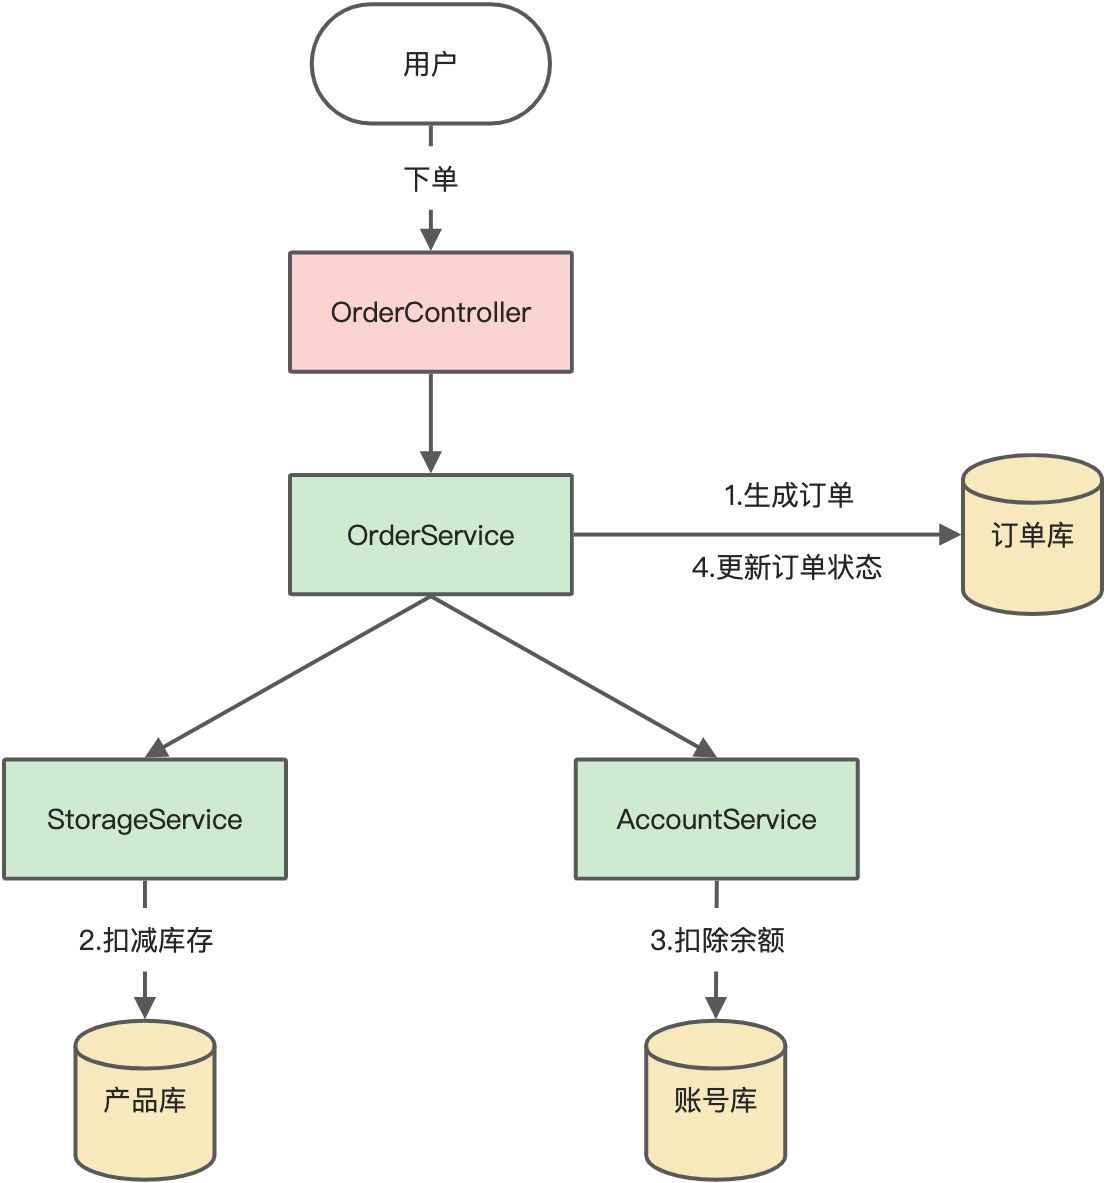
多数据源场景
启动 seata server 服务,指定 registry.type=”file”,config.type=”file”
客户端应用接入 seata 配置,yml 中添加多数据源配置:
# Order
spring.datasource.order.url=jdbc:mysql://localhost:3306/seata_order?useUnicode=true&characterEncoding=utf8&allowMultiQueries=true&useSSL=false&serverTimezone=UTC
spring.datasource.order.username=root
spring.datasource.order.password=root
spring.datasource.order.driver-class-name=com.mysql.cj.jdbc.Driver
# Storage
spring.datasource.storage.url=jdbc:mysql://localhost:3306/seata_storage?useUnicode=true&characterEncoding=utf8&allowMultiQueries=true&useSSL=false&serverTimezone=UTC
spring.datasource.storage.username=root
spring.datasource.storage.password=root
spring.datasource.storage.driver-class-name=com.mysql.cj.jdbc.Driver
# Account
spring.datasource.account.url=jdbc:mysql://localhost:3306/seata_account?useUnicode=true&characterEncoding=utf8&allowMultiQueries=true&useSSL=false&serverTimezone=UTC
spring.datasource.account.username=root
spring.datasource.account.password=root
spring.datasource.account.driver-class-name=com.mysql.cj.jdbc.Driver
配置多数据源代理,并支持动态切换数据源:
@Configuration
@MapperScan("com.tuling.mutiple.datasource.mapper")
public class DataSourceProxyConfig {

    @Bean("originOrder")
    @ConfigurationProperties(prefix = "spring.datasource.order")
    public DataSource dataSourceMaster() {
        return new DruidDataSource();
    }

    @Bean("originStorage")
    @ConfigurationProperties(prefix = "spring.datasource.storage")
    public DataSource dataSourceStorage() {
        return new DruidDataSource();
    }

    @Bean("originAccount")
    @ConfigurationProperties(prefix = "spring.datasource.account")
    public DataSource dataSourceAccount() {
        return new DruidDataSource();
    }

    @Bean(name = "order")
    public DataSourceProxy masterDataSourceProxy(@Qualifier("originOrder") DataSource dataSource) {
        return new DataSourceProxy(dataSource);
    }

    @Bean(name = "storage")
    public DataSourceProxy storageDataSourceProxy(@Qualifier("originStorage") DataSource dataSource) {
        return new DataSourceProxy(dataSource);
    }

    @Bean(name = "account")
    public DataSourceProxy payDataSourceProxy(@Qualifier("originAccount") DataSource dataSource) {
        return new DataSourceProxy(dataSource);
    }

    @Bean("dynamicDataSource")
    public DataSource dynamicDataSource(@Qualifier("order") DataSource dataSourceOrder,
                                        @Qualifier("storage") DataSource dataSourceStorage,
                                        @Qualifier("account") DataSource dataSourcePay) {

        DynamicRoutingDataSource dynamicRoutingDataSource = new DynamicRoutingDataSource();

        // 数据源的集合
        Map<Object, Object> dataSourceMap = new HashMap<>(3);
        dataSourceMap.put(DataSourceKey.ORDER.name(), dataSourceOrder);
        dataSourceMap.put(DataSourceKey.STORAGE.name(), dataSourceStorage);
        dataSourceMap.put(DataSourceKey.ACCOUNT.name(), dataSourcePay);

        dynamicRoutingDataSource.setDefaultTargetDataSource(dataSourceOrder);
        dynamicRoutingDataSource.setTargetDataSources(dataSourceMap);

        DynamicDataSourceContextHolder.getDataSourceKeys().addAll(dataSourceMap.keySet());

        return dynamicRoutingDataSource;
    }

    @Bean
    @ConfigurationProperties(prefix = "mybatis")
    public SqlSessionFactoryBean sqlSessionFactoryBean(@Qualifier("dynamicDataSource") DataSource dataSource) {
        SqlSessionFactoryBean sqlSessionFactoryBean = new SqlSessionFactoryBean();
        sqlSessionFactoryBean.setDataSource(dataSource);
        return sqlSessionFactoryBean;
    }
}


@Slf4j
public class DynamicRoutingDataSource extends AbstractRoutingDataSource {

    @Override
    protected Object determineCurrentLookupKey() {
        log.info("当前数据源 [{}]", DynamicDataSourceContextHolder.getDataSourceKey());
        return DynamicDataSourceContextHolder.getDataSourceKey();
    }
}

public class DynamicDataSourceContextHolder {

    private static final ThreadLocal<String> CONTEXT_HOLDER = ThreadLocal.withInitial(DataSourceKey.ORDER::name);

    private static List<Object> dataSourceKeys = new ArrayList<>();

    public static void setDataSourceKey(DataSourceKey key) {
        CONTEXT_HOLDER.set(key.name());
    }

    public static String getDataSourceKey() {
        return CONTEXT_HOLDER.get();
    }

    public static void clearDataSourceKey() {
        CONTEXT_HOLDER.remove();
    }

    public static List<Object> getDataSourceKeys() {
        return dataSourceKeys;
    }
}
接入 seata 配置; registry.conf中指定registry.type=”file” , config.type=”file” ,对应seata-server的registry.conf配置相同
registry {
  # file 、nacos 、eureka、redis、zk、consul、etcd3、sofa
  type = "file"

  file {
    name = "file.conf"
  }
}

config {
  # file、nacos 、apollo、zk、consul、etcd3、springCloudConfig
  type = "file"

  file {
    name = "file.conf"
  }
}
指定 seata 事务分组,用于获取 seata server 服务实例
# Seata事务分组  从file.conf获取service.vgroupMapping.my_test_tx_group的集群名称default,用于确定seata server的服务实例
spring.cloud.alibaba.seata.tx-service-group=my_test_tx_group
OrderServiceImpl 作为发起者配置@GlobalTransactional注解
@Override
//@Transactional
@GlobalTransactional(name="createOrder")
public Order saveOrder(OrderVo orderVo){
    log.info("=============用户下单=================");
    //切换数据源
    DynamicDataSourceContextHolder.setDataSourceKey(DataSourceKey.ORDER);
    log.info("当前 XID: {}", RootContext.getXID());

    // 保存订单
    Order order = new Order();
    order.setUserId(orderVo.getUserId());
    order.setCommodityCode(orderVo.getCommodityCode());
    order.setCount(orderVo.getCount());
    order.setMoney(orderVo.getMoney());
    order.setStatus(OrderStatus.INIT.getValue());

    Integer saveOrderRecord = orderMapper.insert(order);
    log.info("保存订单{}", saveOrderRecord > 0 ? "成功" : "失败");

    //扣减库存
    storageService.deduct(orderVo.getCommodityCode(),orderVo.getCount());

    //扣减余额
    accountService.debit(orderVo.getUserId(),orderVo.getMoney());

    log.info("=============更新订单状态=================");
    //切换数据源
    DynamicDataSourceContextHolder.setDataSourceKey(DataSourceKey.ORDER);
    //更新订单
    Integer updateOrderRecord = orderMapper.updateOrderStatus(order.getId(),OrderStatus.SUCCESS.getValue());
    log.info("更新订单id:{} {}", order.getId(), updateOrderRecord > 0 ? "成功" : "失败");

    return order;
}
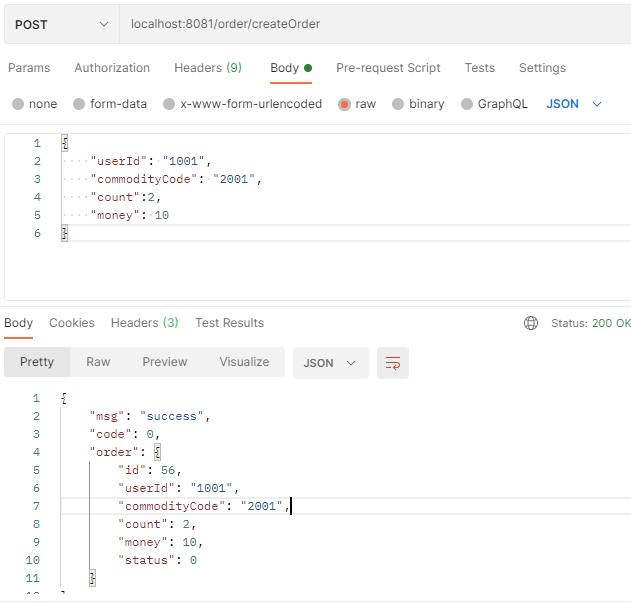
测试成功场景
调用 /order/createOrder 接口,将 money 设置为 10,此时余额为 20,可以下单成功
测试失败场景
设置 money 为 100,此时余额不足,会下单失败,account-service会抛出异常,事务会回滚

接入微服务应用
es:用户下单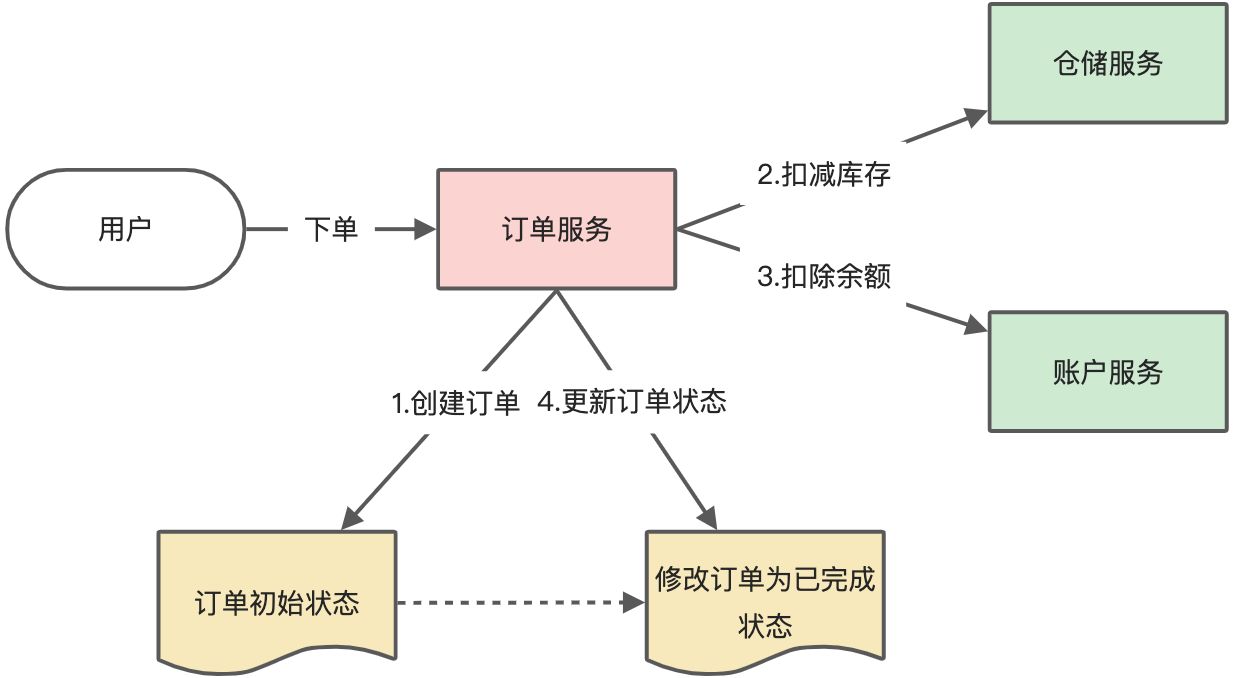
启动 Seata server 端,使用 nacos 作为配置中心和注册中心
配置微服务整合 seata,添加 pom 依赖:
<!-- seata-->
<dependency>
    <groupId>com.alibaba.cloud</groupId>
    <artifactId>spring-cloud-starter-alibaba-seata</artifactId>
    <exclusions>
        <exclusion>
            <groupId>io.seata</groupId>
            <artifactId>seata-all</artifactId>
        </exclusion>
    </exclusions>
</dependency>
<dependency>
    <groupId>io.seata</groupId>
    <artifactId>seata-all</artifactId>
    <version>1.4.0</version>
</dependency>
微服务对应数据库中添加 undo_log 表:
CREATE TABLE `undo_log` (
  `id` bigint(20) NOT NULL AUTO_INCREMENT,
  `branch_id` bigint(20) NOT NULL,
  `xid` varchar(100) NOT NULL,
  `context` varchar(128) NOT NULL,
  `rollback_info` longblob NOT NULL,
  `log_status` int(11) NOT NULL,
  `log_created` datetime NOT NULL,
  `log_modified` datetime NOT NULL,
  PRIMARY KEY (`id`),
  UNIQUE KEY `ux_undo_log` (`xid`,`branch_id`)
) ENGINE=InnoDB AUTO_INCREMENT=1 DEFAULT CHARSET=utf8;
添加代理数据源配置,配置 DataSourceProxy:
/**
 * 需要用到分布式事务的微服务都需要使用seata DataSourceProxy代理自己的数据源
 */
@Configuration
@MapperScan("com.tuling.datasource.mapper")
public class MybatisConfig {

    /**
     * 从配置文件获取属性构造datasource,注意前缀,这里用的是druid,根据自己情况配置,
     * 原生datasource前缀取"spring.datasource"
     *
     * @return
     */
    @Bean
    @ConfigurationProperties(prefix = "spring.datasource.druid")
    public DataSource druidDataSource() {
        DruidDataSource druidDataSource = new DruidDataSource();
        return druidDataSource;
    }

    /**
     * 构造datasource代理对象,替换原来的datasource
     * @param druidDataSource
     * @return
     */
    @Primary
    @Bean("dataSource")
    public DataSourceProxy dataSourceProxy(DataSource druidDataSource) {
        return new DataSourceProxy(druidDataSource);
    }

    @Bean(name = "sqlSessionFactory")
    public SqlSessionFactory sqlSessionFactoryBean(DataSourceProxy dataSourceProxy) throws Exception {
        SqlSessionFactoryBean factoryBean = new SqlSessionFactoryBean();
        //设置代理数据源
        factoryBean.setDataSource(dataSourceProxy);
        ResourcePatternResolver resolver = new PathMatchingResourcePatternResolver();
        factoryBean.setMapperLocations(resolver.getResources("classpath*:mybatis/**/*-mapper.xml"));

        org.apache.ibatis.session.Configuration configuration=new org.apache.ibatis.session.Configuration();
        //使用jdbc的getGeneratedKeys获取数据库自增主键值
        configuration.setUseGeneratedKeys(true);
        //使用列别名替换列名
        configuration.setUseColumnLabel(true);
        //自动使用驼峰命名属性映射字段,如userId ---> user_id
        configuration.setMapUnderscoreToCamelCase(true);
        factoryBean.setConfiguration(configuration);

        return factoryBean.getObject();
    }
}
启动类上剔除 DataSourceAutoConfiguration,用于解决数据源的循环依赖问题:
@SpringBootApplication(scanBasePackages = "com.tuling",exclude = DataSourceAutoConfiguration.class)
@EnableFeignClients
public class OrderServiceApplication {

    public static void main(String[] args) {
        SpringApplication.run(OrderServiceApplication.class, args);
    }
}
修改 register.conf,配置 nacos 作为 registry.type & config.type,对应 seata server 也使用 nacos
注意:需要指定group = “SEATA_GROUP”,因为Seata Server端指定了group = “SEATA_GROUP” ,必须保证一致
registry {
  # file 、nacos 、eureka、redis、zk、consul、etcd3、sofa
  type = "nacos"

  nacos {
      serverAddr = "localhost"
      namespace = ""
      cluster = "default"
      group = "SEATA_GROUP"
  }
}
config {
  # file、nacos 、apollo、zk、consul、etcd3、springCloudConfig
  type = "nacos"

  nacos {
    serverAddr = "localhost"
    namespace = ""
    group = "SEATA_GROUP"
  }
}
若出现这种问题:
一般大多数情况下都是因为配置不匹配导致的:
- 检查现在使用的seata服务和项目maven中seata的版本是否一致
- 检查tx-service-group,nacos.cluster,nacos.group参数是否和Seata Server中的配置一致
跟踪源码:seata/discover包下实现了RegistryService#lookup,用来获取服务列表
NacosRegistryServiceImpl#lookup
》String clusterName = getServiceGroup(key);  #获取seata server集群名称
》List<Instance> firstAllInstances = getNamingInstance().getAllInstances(getServiceName(), getServiceGroup(), clusters)
修改 application.yml 配置:
配置seata 服务事务分组,要与服务端nacos配置中心中service.vgroup_mapping的后缀对应
server:
  port: 8020

spring:
  application:
    name: order-service
  cloud:
    nacos:
      discovery:
        server-addr: 127.0.0.1:8848
    alibaba:
      seata:
        tx-service-group:
          my_test_tx_group # seata 服务事务分组

  datasource:
    type: com.alibaba.druid.pool.DruidDataSource
    druid:
      driver-class-name: com.mysql.cj.jdbc.Driver
      url: jdbc:mysql://localhost:3306/seata_order?useUnicode=true&characterEncoding=UTF-8&serverTimezone=Asia/Shanghai
      username: root
      password: root
      initial-size: 10
      max-active: 100
      min-idle: 10
      max-wait: 60000
      pool-prepared-statements: true
      max-pool-prepared-statement-per-connection-size: 20
      time-between-eviction-runs-millis: 60000
      min-evictable-idle-time-millis: 300000
      test-while-idle: true
      test-on-borrow: false
      test-on-return: false
      stat-view-servlet:
        enabled: true
        url-pattern: /druid/*
      filter:
        stat:
          log-slow-sql: true
          slow-sql-millis: 1000
          merge-sql: false
        wall:
          config:
            multi-statement-allow: true
微服务发起者(TM 方)需要添加@GlobalTransactional注解:
@Override
//@Transactional
@GlobalTransactional(name="createOrder")
public Order saveOrder(OrderVo orderVo){
    log.info("=============用户下单=================");
    log.info("当前 XID: {}", RootContext.getXID());

    // 保存订单
    Order order = new Order();
    order.setUserId(orderVo.getUserId());
    order.setCommodityCode(orderVo.getCommodityCode());
    order.setCount(orderVo.getCount());
    order.setMoney(orderVo.getMoney());
    order.setStatus(OrderStatus.INIT.getValue());

    Integer saveOrderRecord = orderMapper.insert(order);
    log.info("保存订单{}", saveOrderRecord > 0 ? "成功" : "失败");

    //扣减库存
    storageFeignService.deduct(orderVo.getCommodityCode(),orderVo.getCount());

    //扣减余额
    accountFeignService.debit(orderVo.getUserId(),orderVo.getMoney());

    //更新订单
    Integer updateOrderRecord = orderMapper.updateOrderStatus(order.getId(),OrderStatus.SUCCESS.getValue());
    log.info("更新订单id:{} {}", order.getId(), updateOrderRecord > 0 ? "成功" : "失败");

    return order;
}

若有收获,就点个赞吧
0 人点赞
