笔记内容选自慕课网《大数据开发工程师》体系课
6.1 什么是Flume?
- Flume是一个高可用,高可靠,分布式的海量日志采集、聚合和传输的系统
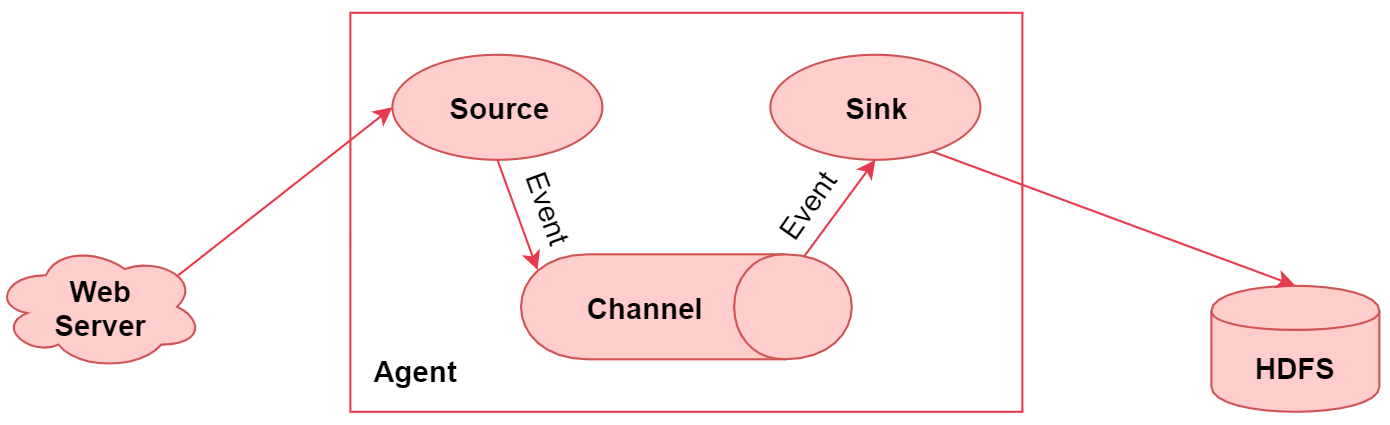
6.1.1 Flume执行流程图
- 左边的web server表示是一个web项目
- web项目会产生日志数据,通过中间的Agent把日志数据采集到 HDFS 中
- 中间的Agent就是我们使用Flume启动的一个代理
- 它是一个持续传输数据的服务,数据在Agent内部,这些组件之间传输的基本单位是Event
- Agent是由Source、Channel、Sink这三大组件组成的,这就是Flume中的三大核心组件
- source是数据源,负责读取数据
- channel是临时存储数据的,source会把读取到的数据临时存储到channel中
- sink是负责从channel中读取数据的,最终将数据写出去,写到指定的目的地中
- 右边的HDFS,就是数据的目的地
6.1.2 Flume的特性
- 它有一个简单、灵活的基于流的数据流结构,这个其实就是刚才说的Agent内部有三大组件,数据通 过这三大组件流动的
- 具有负载均衡机制和故障转移机制,这个后面我们会详细分析
- 一个简单可扩展的数据模型(Source、Channel、Sink),这几个组件是可灵活组合的
6.1.3 Flume高级应用场景
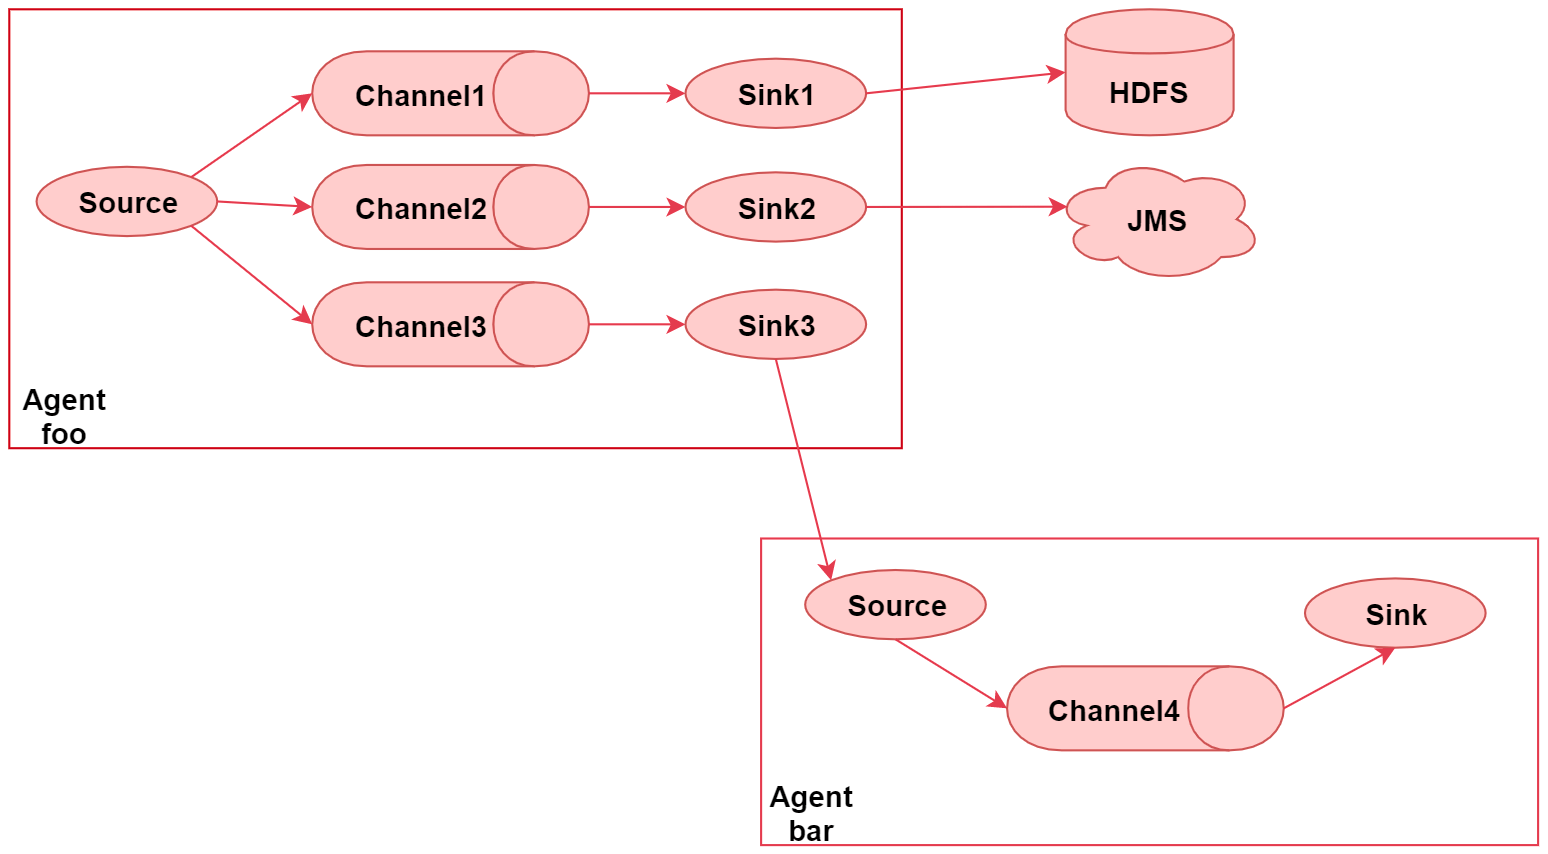
- 这个图里面主要演示了Flume的多路输出,就是可以将采集到的一份数据输出到多个目的地中,不同目的地的数据对应不同的业务场景
1、Flume的多路输出功能
- 左边这个agent,给他起个名字叫 foo
- 这里面有一个 source , source 后面接了 3 个 channel , 表示 source 读取到的数据会重复发送给每个channel,每个channel中的数据都是一样的
- 针对每个channel都接了一个sink,这三个sink负责读取对应channel中的数据,并且把数据输出到不同的目的地
- sink1负责把数据写到hdfs中
- sink2负责把数据写到一个Java消息服务数据队列中
- sink3负责把数据写给另一个Agent
「注意了,Flume中多个Agent之间是可以连通的,只需要让前面Agent的sink组件把数据写到下一 个Agent的source组件中即可」
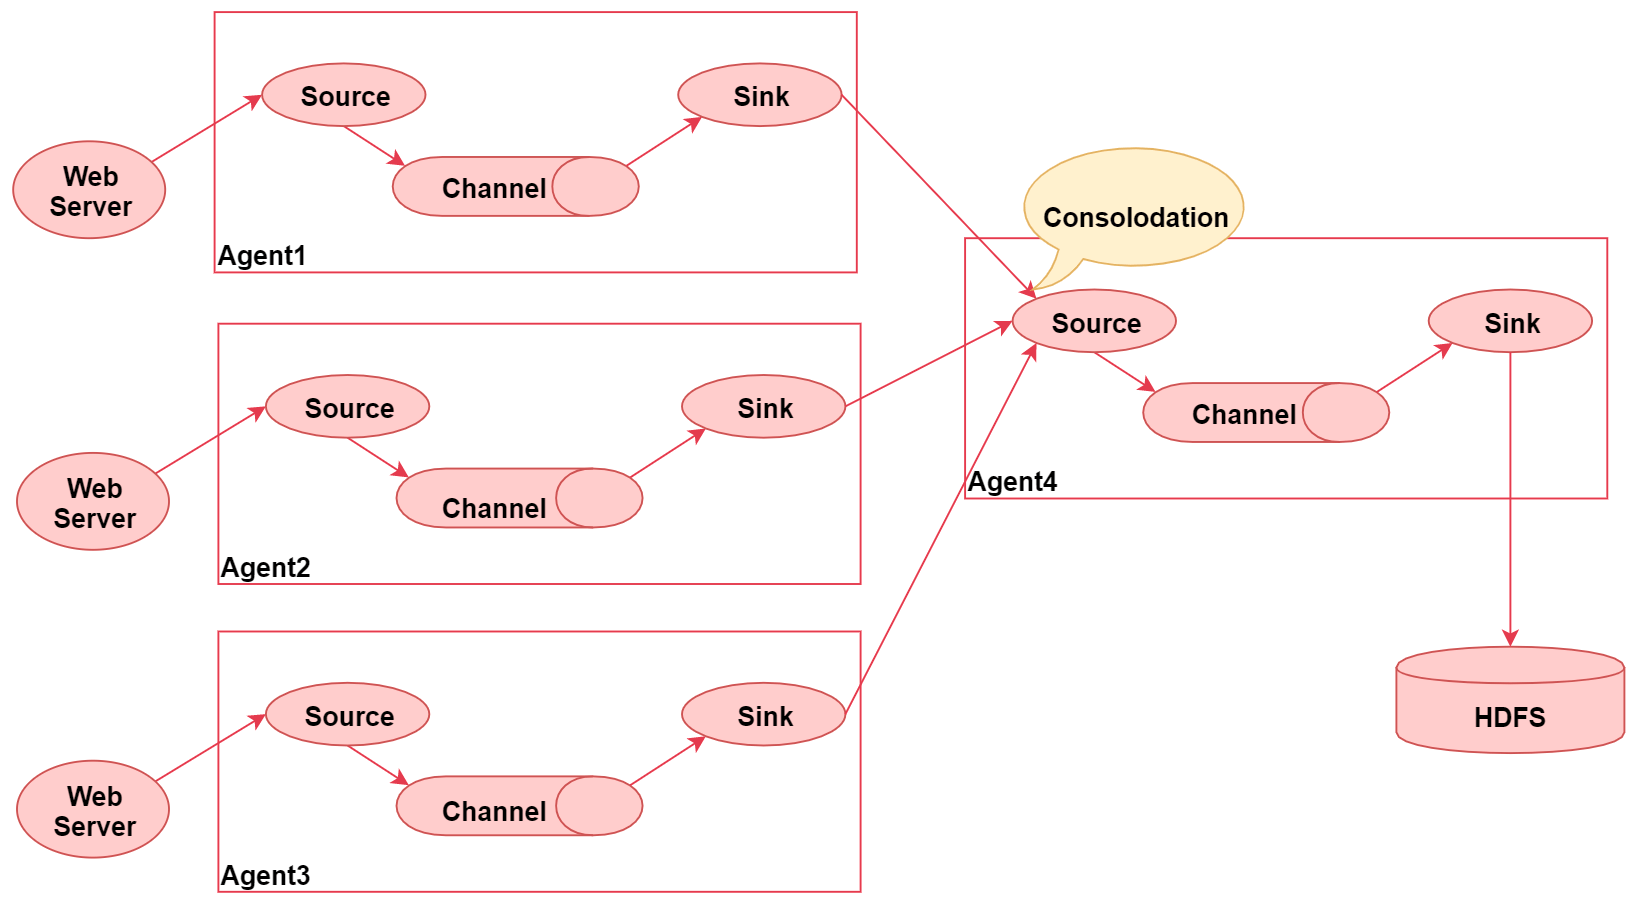
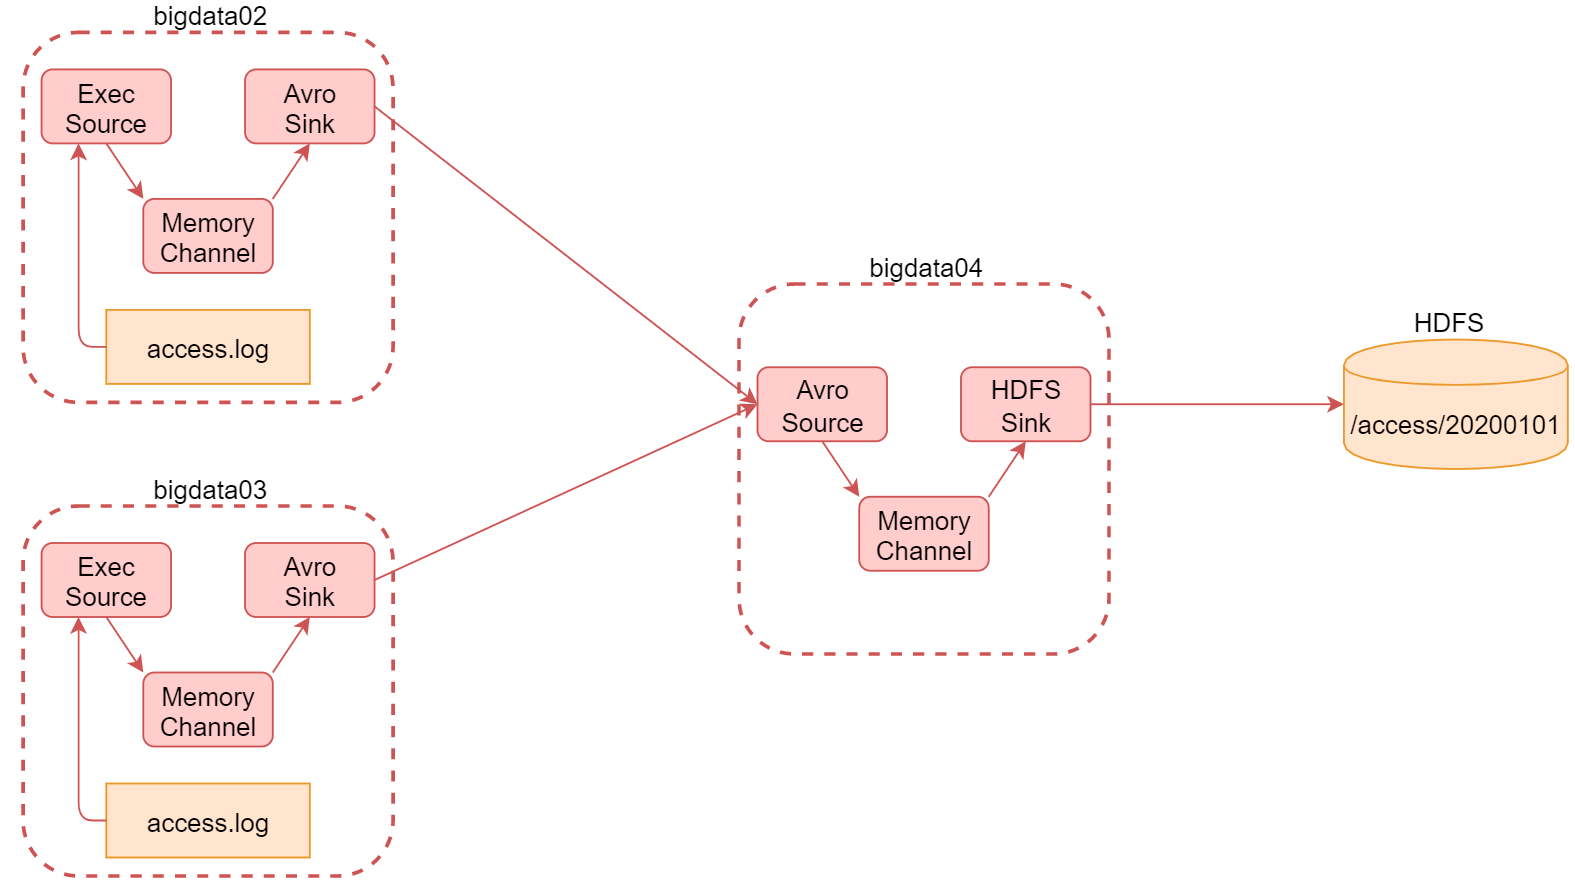
2、flume的汇聚功能
- 这个图里面一共启动了四个agent
- 左边的三个agent都是负责采集对应web服务器中的日志数据
- 数据采集过来之后统一发送给agent4,最后agent4进行统一汇总,最终写入hdfs
- 这种架构的好处是后期如果要修改最终数据的输出目的地,只需要修改agent4中的sink即可,不需要修改agent1、2、3
- 但是这种架构也有弊端
- 如果有很多个agent同时向agent4写数据,那么agent4会出现性能瓶颈,导致数据处理过慢
- 这种架构还存在单点故障问题,如果agent4挂了,那么所有的数据都断了
- 不过这些问题可以通过flume中的负载均衡和故障转移机制解决
6.1.4 Flume的三大核心组件
- Source:数据源
- Channel:临时存储数据的管道
- Sink:目的地
1、常用的Source组件
- Source
- 从外界采集各种类型数据,将数据传递给Channel
- 类型有很多:文件、目录、端口、Kafka等
- Exec Source「工作常见」
- 实现文件监控;注意 tail -F 和 tail-f 的区别
- -F
- 根据文件名进行追踪,并保持重试,即该文件被删除或改名后,如果再次创建相同的文件名,会继续追踪
- -f
- 根据文件描述符进行追踪,当文件改名或被删除,追踪停止
- -F
- 实现文件监控;注意 tail -F 和 tail-f 的区别
- NetCat TCP/UDP Source
- 采集指定端口(tcp、udp)的数据
- Spooling Directory Source
- 采集文件夹里新增的文件
- Kafka Source「工作常见」
- 从Kafka消息队列中采集数据
2、常用的Channel组件
- Channel
- 接受Source发出的数据,临时存储
- 类型有很多:内存、文件,内存+文件、JDBC等
- Memory Channel
- 使用内存作为数据的存储,Agent挂了,数据丢失
- File Channel「工作常用」
- 使用文件来作为数据的存储,效率没内存快,但数据不会丢失
Spillable Memory Channel
Sink
- Channel中读取数据并存储到指定目的地
- 表现形式:控制台、HDFS、Kafka等
- 注意
- Channel中的数据直到进入目的地才会被删除,当Sink写入失败后,可以自动重写,不会造成数据丢失
- Logger Sink「测试常用」
- 将数据作为日志处理
- HDFS Sink「工作常用」
- 将数据传输到HDFS中
- Kafka Sink「实时常用」
- 将数据发送到kafka消息队列中
6.1.5 Flume安装部署
想要使用Flume采集数据,那肯定要先安装Flume 在这里我重新克隆了一台Linux机器,主机名设置为bigdata04,ip设置为192.168.53.103 关闭防火墙,安装jdk并配置环境变量,因为Flume是java开发,所以需要依赖jdk环境,安装Hadoop,通过bigdata04作为Hadoop客户端来操作。
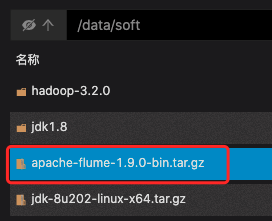
上传flume-1.9.0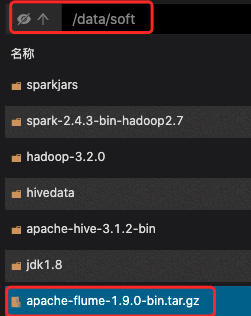
# 进入bigdata04解压flumecd /data/softtar -zxvf apache-flume-1.9.0-bin.tar.gz# 修改flume配置cd apache-flume-1.9.0-bin/confmv flume-env.sh.template flume-env.sh# 配置一个Agent,名为a1vi example.conf...# example.conf: A single-node Flume configuration# Name the components on this agenta1.sources = r1a1.sinks = k1a1.channels = c1# Describe/configure the sourcea1.sources.r1.type = netcata1.sources.r1.bind = 0.0.0.0a1.sources.r1.port = 44444# Describe the sinka1.sinks.k1.type = logger# Use a channel which buffers events in memorya1.channels.c1.type = memorya1.channels.c1.capacity = 1000a1.channels.c1.transactionCapacity = 100# Bind the source and sink to the channela1.sources.r1.channels = c1a1.sinks.k1.channel = c1# 启动flumecd /data/soft/apache-flume-1.9.0-binbin/flume-ng agent -n a1 -c conf -f conf/example.conf -Dflume.root.logger=INFO,console# 切换bigdata03连接bigdata04的flume[root@bigdata03 ~]# yum install -y telnet[root@bigdata03 ~]# telnet 192.168.53.103 44444# 把bigdata04的flume放到后台执行cd /data/soft/apache-flume-1.9.0-binnohup bin/flume-ng agent -n a1 -c conf -f conf/example.conf &# 查看后台里的flumejps -mps -ef|grep flume# 查看Agent输出的日志数据cd /data/soft/apache-flume-1.9.0-bin/logstail -F flume.log# 如果Agent进程没有,启动异常,则查看flume启动过程中的数据more flume.log# 停掉Agentjpskill 进程号
- Source、Channel、Sink的配置文档
http://flume.apache.org/releases/content/1.9.0/FlumeUserGuide.html
6.2 使用Flume
6.2.1 案例:采集文件内容上传至HDFS
- 需求
- 采集目录中已有的文件内容,存储到HDFS
1、上传数据
[root@bigdata04 ~]# mkdir -p /data/log/studentDir[root@bigdata04 ~]# cd /data/log/studentDir[root@bigdata04 studentDir]# more class1.datjack 18 malejessic 20 femaletom 17 male
2、配置Agent
# 切换目录
cd /data/soft/apache-flume-1.9.0-bin/conf

# 创建Agent
vi file-to-hdfs.conf
...
# Name the components on this agent
a1.sources = r1
a1.sinks = k1
a1.channels = c1

# Describe/configure the source
a1.sources.r1.type = spooldir
a1.sources.r1.spoolDir = /data/log/studentDir


# Use a channel which buffers events in memory
a1.channels.c1.type = file
a1.channels.c1.checkpointDir = /data/soft/apache-flume-1.9.0-bin/data/studentDir/checkpoint
a1.channels.c1.dataDirs = /data/soft/apache-flume-1.9.0-bin/data/studentDir/data


# Describe the sink
a1.sinks.k1.type = hdfs
a1.sinks.k1.hdfs.path = hdfs://192.168.53.100:9000/flume/studentDir
a1.sinks.k1.hdfs.filePrefix = stu-
a1.sinks.k1.hdfs.fileType = DataStream
a1.sinks.k1.hdfs.writeFormat = Text
a1.sinks.k1.hdfs.rollInterval = 3600
a1.sinks.k1.hdfs.rollSize = 134217728
a1.sinks.k1.hdfs.rollCount = 0

# Bind the source and sink to the channel
a1.sources.r1.channels = c1
a1.sinks.k1.channel = c1
3、启动测试
# bigdata01启动集群和日志记录
/data/soft/hadoop-3.2.0/sbin/start-all.sh

/data/soft/hadoop-3.2.0/bin/mapred --daemon start historyserver


# bigdata04启动flume
cd /data/soft/apache-flume-1.9.0-bin

bin/flume-ng agent -n a1 -c conf -f conf/file-to-hdfs.conf -Dflume.root.logger=INFO,console
4、查看文件
# 查看目录文件位置
[root@bigdata01 ~]# hdfs dfs -ls /flume/studentDir
Found 1 items
-rw-r--r--   2 root supergroup         42 2021-09-05 16:35 /flume/studentDir/stu-.1630830937698.tmp

# 查看文件具体数据
[root@bigdata01 ~]# hdfs dfs -cat /flume/studentDir/stu-.1630830937698.tmp
jack    18      male
jessic  20      female
tom     17      male

# Source:已上传的数据文件,会加个 .COMPLETED 后缀
[root@bigdata04 ~]# cd /data/log/studentDir
[root@bigdata04 studentDir]# ll
total 4
-rw-r--r--. 1 root root 41 Sep  5 16:27 class1.dat.COMPLETED

# Channel:log-1属于临时存的数据
[root@bigdata04 ~]# cd /data/soft/apache-flume-1.9.0-bin/data/studentDir/data
[root@bigdata04 data]# ll
total 1028
-rw-r--r--. 1 root root       0 Sep  5 16:35 in_use.lock
-rw-r--r--. 1 root root 1048576 Sep  5 16:35 log-1
-rw-r--r--. 1 root root      47 Sep  5 16:36 log-1.meta

# 当数据采集到Agent设定的3600秒,或者到指定容量时,日志则会把 .tmp 后缀去掉,从而采集完成
[root@bigdata01 ~]# hdfs dfs -ls /flume/studentDir
Found 1 items
-rw-r--r--   2 root supergroup         42 2021-09-05 16:48 /flume/studentDir/stu-.1630830937698
6.2.2 案例:采集网站日志上传至HDFS
- 将A和B两台机器实时产生的日志数据汇总到机器C中
- 通过机器C将数据统一上传至HDFS的指定目录中
「注意:HDFS中的目录是按天生成的,每天一个目录」
1、bigdata02和bigdata03安装部署flume
- 上传flume到服务器上
2、bigdata02配置
# 进入bigdata02进行解压
cd /data/soft
tar -zxvf apache-flume-1.9.0-bin.tar.gz

# 修改flume配置
cd apache-flume-1.9.0-bin/conf
mv flume-env.sh.template flume-env.sh

# 编写Agent
vi file-to-avro-101.conf
...
# agent的名称是a1

# 指定source组件、channel组件和Sink组件的名称
a1.sources = r1
a1.channels = c1
a1.sinks = k1

# 配置source组件
a1.sources.r1.type = exec
a1.sources.r1.command = tail -F /data/log/access.log


# 配置channel组件
a1.channels.c1.type = memory
a1.channels.c1.capacity = 1000
a1.channels.c1.transactionCapacity = 100


# 配置sink组件
a1.sinks.k1.type = avro
a1.sinks.k1.hostname = 192.168.53.103
a1.sinks.k1.port = 45454


# 把组件连接起来
a1.sources.r1.channels = c1
a1.sinks.k1.channel = c1

# 编写数据脚本
mkdir -p /data/log
cd /data/log/
vi generateAccessLog.sh
...
#!/bin/bash
# 循环向文件中生成数据
while [ "1" = "1" ]
do
    # 获取当前时间戳
    curr_time=`date +%s`
    # 获取当前主机名
    name=`hostname`
    echo ${name}_${curr_time} >> /data/log/access.log
    # 暂停1秒
    sleep 1
done
3、bigdata03配置
# 进入bigdata03进行解压
cd /data/soft
tar -zxvf apache-flume-1.9.0-bin.tar.gz

# 修改flume配置
cd apache-flume-1.9.0-bin/conf
mv flume-env.sh.template flume-env.sh

# 编写Agent
vi file-to-avro-102.conf
...
# agent的名称是a1

# 指定source组件、channel组件和Sink组件的名称
a1.sources = r1
a1.channels = c1
a1.sinks = k1

# 配置source组件
a1.sources.r1.type = exec
a1.sources.r1.command = tail -F /data/log/access.log


# 配置channel组件
a1.channels.c1.type = memory
a1.channels.c1.capacity = 1000
a1.channels.c1.transactionCapacity = 100


# 配置sink组件
a1.sinks.k1.type = avro
a1.sinks.k1.hostname = 192.168.53.103
a1.sinks.k1.port = 45454


# 把组件连接起来
a1.sources.r1.channels = c1
a1.sinks.k1.channel = c1


# 编写数据脚本
mkdir -p /data/log
cd /data/log/
vi generateAccessLog.sh
...
#!/bin/bash
# 循环向文件中生成数据
while [ "1" = "1" ]
do
    # 获取当前时间戳
    curr_time=`date +%s`
    # 获取当前主机名
    name=`hostname`
    echo ${name}_${curr_time} >> /data/log/access.log
    # 暂停1秒
    sleep 1
done
4、bigdata04配置
# 进入配置目录
cd /data/soft/apache-flume-1.9.0-bin/conf

# 编写Agent
vi avro-to-hdfs.conf
...
# agent的名称是a1

# 指定source组件、channel组件和Sink组件的名称
a1.sources = r1
a1.channels = c1
a1.sinks = k1

# 配置source组件
a1.sources.r1.type = avro
a1.sources.r1.bind = 0.0.0.0
a1.sources.r1.port = 45454

# 配置channel组件
a1.channels.c1.type = memory
a1.channels.c1.capacity = 1000
a1.channels.c1.transactionCapacity = 100


# 配置sink组件
a1.sinks.k1.type = hdfs
a1.sinks.k1.hdfs.path = hdfs://192.168.53.100:9000/access/%Y%m%d
a1.sinks.k1.hdfs.filePrefix = access
a1.sinks.k1.hdfs.fileType = DataStream
a1.sinks.k1.hdfs.writeFormat = Text
a1.sinks.k1.hdfs.rollInterval = 3600
a1.sinks.k1.hdfs.rollSize = 134217728
a1.sinks.k1.hdfs.rollCount = 0
a1.sinks.k1.hdfs.useLocalTimeStamp = true


# 把组件连接起来
a1.sources.r1.channels = c1
a1.sinks.k1.channel = c1


# bigdata04启动flume
cd /data/soft/apache-flume-1.9.0-bin

bin/flume-ng agent -n a1 -c conf -f conf/avro-to-hdfs.conf -Dflume.root.logger=INFO,console
5、启动bigdata02和bigdata03
# bigdata02启动flume
cd /data/soft/apache-flume-1.9.0-bin

bin/flume-ng agent -n a1 -c conf -f conf/file-to-avro-101.conf -Dflume.root.logger=INFO,console

# bigdata02启动数据脚本
cd /data/log/
sh -x generateAccessLog.sh


# bigdata03启动flume
cd /data/soft/apache-flume-1.9.0-bin

bin/flume-ng agent -n a1 -c conf -f conf/file-to-avro-102.conf -Dflume.root.logger=INFO,console

# bigdata03启动数据脚本
cd /data/log/
sh -x generateAccessLog.sh
6、在bigdata01查看数据
# bigdata01查看hdfs目录数据
[root@bigdata01 ~]# hdfs dfs -ls /access
Found 1 items
drwxr-xr-x   - root supergroup          0 2021-09-09 12:44 /access/20210909


[root@bigdata01 ~]# hdfs dfs -ls /access/20210909
Found 1 items
-rw-r--r--   2 root supergroup        147 2021-09-09 12:44 /access/20210909/access.1631162685104.tmp

# 查看数据内容
hdfs dfs -cat /access/20210909/access.1631162685104.tmp

# 查看数据总条数
hdfs dfs -cat /access/20210909/access.1631162685104.tmp | wc -l
「注意:为avrosink中有一个配置batch-size,它的默认值是100,也就是每次发送100条数据,如果数据 不够100条,则不发送。 具体这个值设置多少合适,要看你source数据源大致每秒产生多少数据,以及你希望的延迟要达到什么 程度,如果这个值设置太小的话,会造成sink频繁向外面写数据,这样也会影响性能。
最终,依次停止bigdata02、bigdata03中的服务,最后停止bigdata04中的服务」
6.3 Flume高级组件
- Event
- Event是Flume传输数据的基本单位,也是事务的基本单位
- 在文本文件中,通常一行记录就是一个Event
- Event里有header和body
- header类型为Map
- body为采集的原数据
- header类型为Map
- 在Source中可以增加header的
- 在Channel和Sink中使用header中的值
- Event是Flume传输数据的基本单位,也是事务的基本单位
- Source Interceptors
- Source可以指定一个或者多个拦截器按先后顺序依次对采集到的数据进行处理
- Channel Selectors
- Source发往多个Channel的策略设置
- Sink Processors
- Sink发送数据的策略设置
1、Source Interceptors
常见的 Source Interceptors 类型
- Timestamp Interceptor
- 向event中的header里面添加timestamp 时间戳信息
- Host Interceptor
- 向event中的header里面添加host属性,host的值为当前机器的主机名或者ip
- Search and Replace Interceptor
- 根据指定的规则查询Event中body里面的数据,然后进行替换, 这个拦截器会修改event中body的值,也就是会修改原始采集到的数据内容
- Static Interceptor
- 向event中的header里面添加固定的key和value
- Regex Extractor Interceptor
- 根据指定的规则从Event中的body里面抽取数据,生成key和value, 再把key和value添加到header中
- Timestamp Interceptor
案例:对采集数据的body进行修改并且以日期格式上传HDFS ```json
原数据
video_info
{“id”:”14943445328940974601”,”uid”:”840717325115457536”,”lat”:”53.530598”,”lnt”:”-2.5620373”,”hots”:0,”title”:”0”,”status”:”1”,”topicId”:”0”,”end_time”:”1494344570”,”watch_num”:0,”share_num”:”1”,”replay_url”:null,”replay_num”:0,”start_time”:”1494344544”,”timestamp”:1494344571,”type”:”video_info”}
user_info
{“uid”:”861848974414839801”,”nickname”:”mick”,”usign”:””,”sex”:1,”birthday”:””,”face”:””,”big_face”:””,”email”:”abc@qq.com”,”mobile”:””,”reg_type”:”102”,”last_login_time”:”1494344580”,”reg_time”:”1494344580”,”last_update_time”:”1494344580”,”status”:”5”,”is_verified”:”0”,”verified_info”:””,”is_seller”:”0”,”level”:1,”exp”:0,”anchor_level”:0,”anchor_exp”:0,”os”:”android”,”timestamp”:1494344580,”type”:”user_info”}
gift_record
{“send_id”:”834688818270961664”,”good_id”:”223”,”video_id”:”14943443045138661356”,”gold”:”10”,”timestamp”:1494344574,”type”:”gift_record”}
经过flume采集修改后的数据
video_info
{“id”:”14943445328940974601”,”uid”:”840717325115457536”,”lat”:”53.530598”,”lnt”:”-2.5620373”,”hots”:0,”title”:”0”,”status”:”1”,”topicId”:”0”,”end_time”:”1494344570”,”watch_num”:0,”share_num”:”1”,”replay_url”:null,”replay_num”:0,”start_time”:”1494344544”,”timestamp”:1494344571,”type”:”videoInfo”}
user_info
{“uid”:”861848974414839801”,”nickname”:”mick”,”usign”:””,”sex”:1,”birthday”:””,”face”:””,”big_face”:””,”email”:”abc@qq.com”,”mobile”:””,”reg_type”:”102”,”last_login_time”:”1494344580”,”reg_time”:”1494344580”,”last_update_time”:”1494344580”,”status”:”5”,”is_verified”:”0”,”verified_info”:””,”is_seller”:”0”,”level”:1,”exp”:0,”anchor_level”:0,”anchor_exp”:0,”os”:”android”,”timestamp”:1494344580,”type”:”userInfo”}
gift_record
{“send_id”:”834688818270961664”,”good_id”:”223”,”video_id”:”14943443045138661356”,”gold”:”10”,”timestamp”:1494344574,”type”:”giftRecord”}
输出目录位置
hdfs://192.168.53.100:9000/moreType/20200101/videoInfo hdfs://192.168.53.100:9000/moreType/20200101/userInfo hdfs://192.168.53.100:9000/moreType/20200101/giftRecord
- 创建日志数据
```basic
# 进入bigdata04
cd /data/log/
vi moreType.log
...
{"id":"14943445328940974601","uid":"840717325115457536","lat":"53.530598","lnt":"-2.5620373","hots":0,"title":"0","status":"1","topicId":"0","end_time":"1494344570","watch_num":0,"share_num":"1","replay_url":null,"replay_num":0,"start_time":"1494344544","timestamp":1494344571,"type":"video_info"}
{"uid":"861848974414839801","nickname":"mick","usign":"","sex":1,"birthday":"","face":"","big_face":"","email":"abc@qq.com","mobile":"","reg_type":"102","last_login_time":"1494344580","reg_time":"1494344580","last_update_time":"1494344580","status":"5","is_verified":"0","verified_info":"","is_seller":"0","level":1,"exp":0,"anchor_level":0,"anchor_exp":0,"os":"android","timestamp":1494344580,"type":"user_info"}
{"send_id":"834688818270961664","good_id":"223","video_id":"14943443045138661356","gold":"10","timestamp":1494344574,"type":"gift_record"}
vi file-to-hdfs-moreType.conf …
agent的名称是a1
指定source组件、channel组件和Sink组件的名称
a1.sources = r1 a1.channels = c1 a1.sinks = k1
配置source组件
a1.sources.r1.type = exec a1.sources.r1.command = tail -F /data/log/moreType.log
配置拦截器 [多个拦截器按照顺序依次执行]
a1.sources.r1.interceptors = i1 i2 i3 i4 a1.sources.r1.interceptors.i1.type = search_replace a1.sources.r1.interceptors.i1.searchPattern = “type”:”video_info” a1.sources.r1.interceptors.i1.replaceString = “type”:”videoInfo”
a1.sources.r1.interceptors.i2.type = search_replace a1.sources.r1.interceptors.i2.searchPattern = “type”:”user_info” a1.sources.r1.interceptors.i2.replaceString = “type”:”userInfo”
a1.sources.r1.interceptors.i3.type = search_replace a1.sources.r1.interceptors.i3.searchPattern = “type”:”gift_record” a1.sources.r1.interceptors.i3.replaceString = “type”:”giftRecord”
a1.sources.r1.interceptors.i4.type = regex_extractor a1.sources.r1.interceptors.i4.regex = “type”:”(\w+)” a1.sources.r1.interceptors.i4.serializers = s1 a1.sources.r1.interceptors.i4.serializers.s1.name = logType
配置channel组件
a1.channels.c1.type = file a1.channels.c1.checkpointDir = /data/soft/apache-flume-1.9.0-bin/data/moreType/checkpoint a1.channels.c1.dataDirs = /data/soft/apache-flume-1.9.0-bin/data/moreType/data
配置sink组件
a1.sinks.k1.type = hdfs a1.sinks.k1.hdfs.path = hdfs://192.168.182.100:9000/moreType/%Y%m%d/%{logType} a1.sinks.k1.hdfs.fileType = DataStream a1.sinks.k1.hdfs.writeFormat = Text a1.sinks.k1.hdfs.rollInterval = 3600 a1.sinks.k1.hdfs.rollSize = 134217728 a1.sinks.k1.hdfs.rollCount = 0 a1.sinks.k1.hdfs.useLocalTimeStamp = true
增加文件前缀和后缀
a1.sinks.k1.hdfs.filePrefix = data a1.sinks.k1.hdfs.fileSuffix = .log
把组件连接起来
a1.sources.r1.channels = c1 a1.sinks.k1.channel = c1
- 启动flume
```basic
# bigdata04启动flume
cd /data/soft/apache-flume-1.9.0-bin

bin/flume-ng agent -n a1 -c conf -f conf/file-to-hdfs-moreType.conf -Dflume.root.logger=INFO,console
- 在bigdata01查看hdfs
hdfs dfs -ls -R /moreType

若有收获,就点个赞吧
0 人点赞
