笔记内容选自慕课网《大数据开发工程师》体系课
7.1 什么是Hive
- Hive是建立在Hadoop上的数据仓库基础构架
- 它提供了一系列的工具,可以进行数据提取、转化、加载(ETL)
- Hive定义了简单的类 SQL查询语言,称为 HQL
- SQL的用户直接查询Hadoop中的数据
- Hive包含SQL解析引擎
- 它会将SQL语句转译成MapReduce任务,然后在Hadoop中执行
- Hive的数据存储
- Hive的数据存储基于Hadoop的HDFS
- Hive没有专门的数据存储格式,默认可以直接加载文本文件TextFile,还支持SequenceFile、RCFile等
7.2 Hive的系统架构
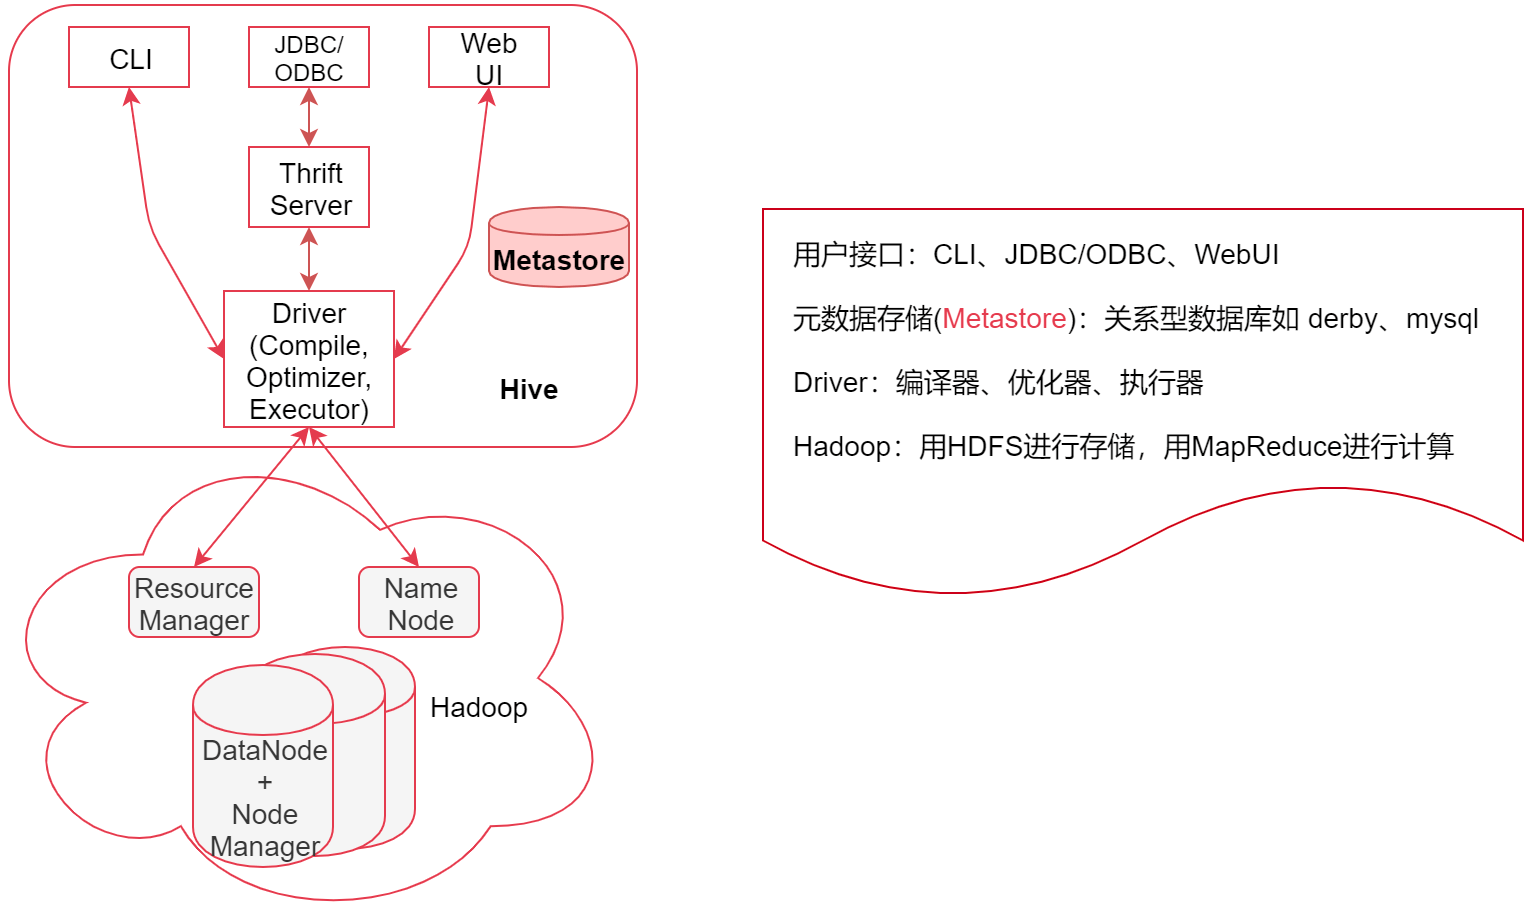
- 用户接口:包括 CLI、JDBC/ODBC、WebGUI
- CLI,即Shell命令行,表示我们可以通过shell命令行操作Hive
- JDBC/ODBC 是 Hive 的Java操作方式,与使用传统数据库JDBC的方式类似
- WebUI,通过网页来操作,底层也是基于JDBC
- 元数据存储(Metastore):Metastore表示是一个存储系统
- Hive中的元数据包括表的相关信息,Hive会将这些元数据存储在Metastore中,目前Metastore只支持 mysql、derby
- Driver:包含:编译器、优化器、执行器
- 编译器、优化器、执行器可以完成 Hive的查询语句从词法分析、语法分析、编译、优化以及查询计划的生成
- 生成的查询计划最终存储在HDFS中,并在随后由 MapReduce 调用执行
- 大部分的查询由 MapReduce 完成
- 特例 select from table 不会生成 MapRedcue 任务,如果在SQL语句后面再增加*where过滤条件就会生成MapReduce任务
- 大致流程
- 用户通过接口传递Hive SQL,然后经过Driver对SQL进行分析、编译,生成查询计划,查询计划会存储在 HDFS中,然后再通过MapReduce进行计算出结果
- 总结
- Hive这个哥们是既不存储数据,也不计算数据,这些脏活累活都给了Hadoop来干,Hive底层最核心的东西其实就是Driver这一块,将SQL语句解析为最终的查询计划
7.3 Metastore
- Metastore是Hive元数据的集中存放地
- 元数据包括表的名字,表的列和分区及其属性,表的数据所在目录等
- Metastore默认使用内嵌的Derby数据库作为存储引擎
- Derby数据库的缺点:
- 在同一个目录下一次只能打开一个会话
- 不支持多用户访问和元数据共享
- 使用Derby的话,Hive会在当前目录生成一个 derby.log 文件和一个 metastore_db 目录,metastore_db里面会存储具体的元数据信息
- 但是切换到另外一个目录使用Hive的话,就又会生成个 derby.log 文件和一个 metastore_db 目录
- 推荐使用MysqI数据库作为外置存储引擎
- 支持多用户同时访问以及元数据共享
- Derby数据库的缺点:
7.4 数据仓库和数据库的区别
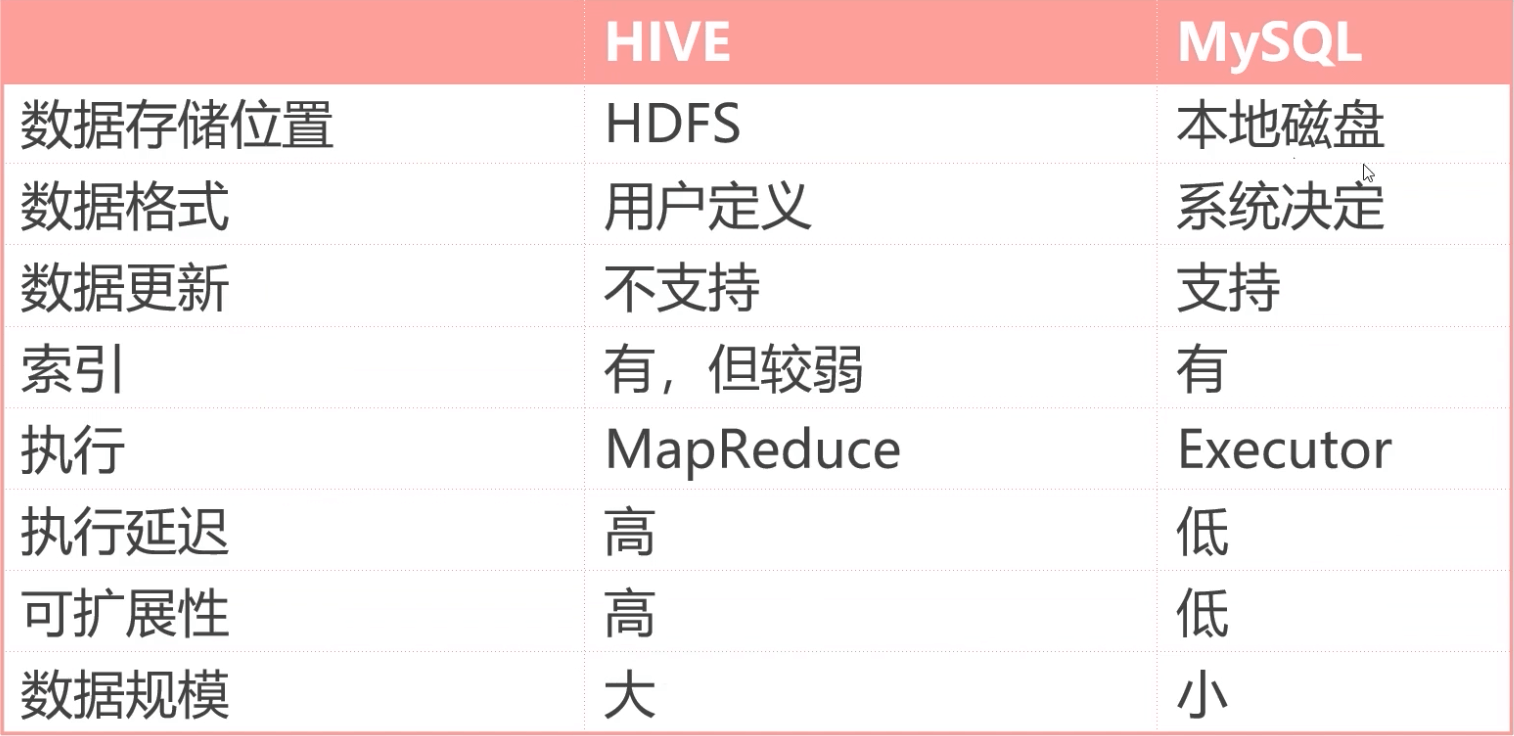
7.4.1 Hive VS MySQL
7.4.2 数据库 VS 数据仓库
- 数据库:
- 传统的关系型数据库主要应用在基本的事务处理,例如银行交易之类的场景
- 数据库支持增删改查这些常见的操作
- 数据仓库:
- 主要做一些复杂的分析操作,侧重决策支持,相对数据库而言,数据仓库分析的数据规模要大得多
- 但是数据仓库只支持查询操作,不支持修改和删除
7.4.3 OLTP VS OLAP
- OLTP(On-Line Transaction Processing):操作型处理,称为联机事务处理,也可以称为面向交易的处理系统,
- 它是针对具体业务在数据库联机的日常操作,通常对少数记录进行查询、修改
- 用户较为关心操作的响应时间、数据的安全性、完整性等问题
- OLAP(On-Line Analytical Processing):分析型处理,称为联机分析处理
- 一般针对某些主题历史数据进行分析
- 支持管理决策
- OLTP 和 OLAP 只有一个单词不一样
- OLTP侧重于事务
- OLAP侧重于分析
「注意:数据库和数据仓库的特性是不一样的,不过平时在使用的时候,可以把Hive作为一个数据库来操作,但是要知道它们两个是不一样的。数据仓库的概念是比数据库要大的,可以理解为数据仓库包含了数据库」
7.5 部署Hive
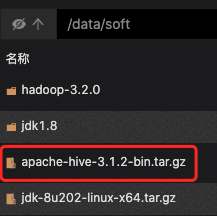
- 访问阿帕奇总库的归档:http://archive.apache.org/dist
- 下载 apache-hive-3.1.2-bin.tar.gz
7.5.1 上传hive到bigdata04
7.5.2 安装Hive
# 解压hivecd /data/softtar -zxvf apache-hive-3.1.2-bin.tar.gz# 改名hive配置文件cd apache-hive-3.1.2-bin/conf/mv hive-env.sh.template hive-env.shmv hive-default.xml.template hive-site.xml# hive-env.sh 底部追加三条环境内容[root@bigdata04 conf]# vi hive-env.sh.....export JAVA_HOME=/data/soft/jdk1.8export HIVE_HOME=/data/soft/apache-hive-3.1.2-binexport HADOOP_HOME=/data/soft/hadoop-3.2.0
1、vi hive-site.xml
<property><name>javax.jdo.option.ConnectionURL</name><value>jdbc:mysql://192.168.53.1:3306/hive?serverTimezone=Asia/Shanghai</value></property><property><name>javax.jdo.option.ConnectionDriverName</name><value>com.mysql.cj.jdbc.Driver</value></property><property><name>javax.jdo.option.ConnectionUserName</name><value>root</value></property><property><name>javax.jdo.option.ConnectionPassword</name><value>rootroot</value></property><property><name>hive.querylog.location</name><value>/data/hive_repo/querylog</value></property><property><name>hive.exec.local.scratchdir</name><value>/data/hive_repo/scratchdir</value></property><property><name>hive.downloaded.resources.dir</name><value>/data/hive_repo/resources</value></property>
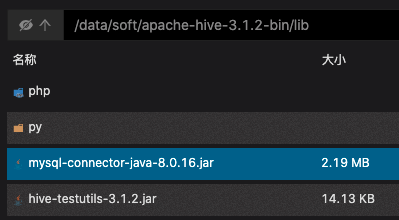
2、添加MySQL连接jar包
3、修改bigdata01里core-site.xml
如果不增加这个配置,使用beeline连接hive的时候会报错
[root@bigdata01 /]# cd /data/soft/hadoop-3.2.0/etc/hadoop
[root@bigdata01 hadoop]# vi core-site.xml
...
<property>
    <name>hadoop.proxyuser.root.hosts</name>
    <value>*</value>
</property>
<property>
    <name>hadoop.proxyuser.root.groups</name>
    <value>*</value>
</property>
4、bigdata01把配置传给其他两台子节点
# 传输配置
[root@bigdata01 /]# scp -rq core-site.xml bigdata02:/data/soft/hadoop-3.2.0/etc/hadoop/
[root@bigdata01 /]# scp -rq core-site.xml bigdata03:/data/soft/hadoop-3.2.0/etc/hadoop/

# 启动集群
[root@bigdata01 /]# cd /data/soft/hadoop-3.2.0/
[root@bigdata01 /]# sbin/start-all.sh
5、bigdata04修改hive的bug
# hive-site.xml的3215行有bug,需要删除一些
[root@bigdata04 /]# cd /data/soft/apache-hive-3.1.2-bin/conf
[root@bigdata04 conf]# vi hive-site.xml
...
<property>
    <name>hive.txn.xlock.iow</name>
    <value>true</value>
    <description>
        are not hidden by the INSERT OVERWRITE.
    </description>
</property>
6、创建MySQL数据
7、bigdata04初始化Hive的Metastore
[root@bigdata04 /]# cd /data/soft/apache-hive-3.1.2-bin
[root@bigdata04 apache-hive-3.1.2-bin]# bin/schematool -dbType mysql -initSchema
...
Initialization script completed
schemaTool completed
# 安装完成了,可以打开MySQL里hive库查看表
8、我遇到的特殊情况
# 如果遇到这个报错,就是数据库无法外部链接访问
Underlying cause: java.sql.SQLException : null,  message from server: "Host '192.168.53.103' is not allowed to connect to this MySQL server"
SQL Error code: 1130
Use --verbose for detailed stacktrace.
*** schemaTool failed ***

# 解决方法
update user set host = '%' where user = 'root'
FLUSH PRIVILEGES
7.6 使用hive
7.6.1 命令行操作
- bin目录里
- hive 命令
- 这是从hive 1.x就开始支持的使用方式
- beeline 命令
- 它是通过HiveServer2服务连接hive,它是一个轻量级的客户端工具,所以后来官方开始推荐使用这个
- hive 命令
- 配置环境变量
[root@bigdata04 ~]# vi /etc/profile
export JAVA_HOME=/data/soft/jdk1.8
export HADOOP_HOME=/data/soft/hadoop-3.2.0
export HIVE_HOME=/data/soft/apache-hive-3.1.2-bin
export PATH=.:$JAVA_HOME/bin:$HADOOP_HOME/bin:$HIVE_HOME/bin:$PATH
source /etc/profile
7.6.2 hive连接
# 用hive命令启动,在命令行操作
[root@bigdata04 ~]# hive
which: no hbase in (.:/data/soft/jdk1.8/bin:/usr/local/sbin:/usr/local/bin:/usr/sbin:/usr/bin:/root/bin)
SLF4J: Class path contains multiple SLF4J bindings.
SLF4J: Found binding in [jar:file:/data/soft/apache-hive-3.1.2-bin/lib/log4j-slf4j-impl-2.10.0.jar!/org/slf4j/impl/StaticLoggerBinder.class]
SLF4J: Found binding in [jar:file:/data/soft/hadoop-3.2.0/share/hadoop/common/lib/slf4j-log4j12-1.7.25.jar!/org/slf4j/impl/StaticLoggerBinder.class]
SLF4J: See http://www.slf4j.org/codes.html#multiple_bindings for an explanation.
SLF4J: Actual binding is of type [org.apache.logging.slf4j.Log4jLoggerFactory]
Hive Session ID = 8a8540b0-e9c8-40e0-8b27-b6bc4e98afe1
Logging initialized using configuration in jar:file:/data/soft/apache-hive-3.1.2-bin/lib/hive-common-3.1.2.jar!/hive-log4j2.properties Async: true

# 这里有一行信息提示,从Hive2开始Hive-on-MR就过时了,并且在以后的版本中可能就不维护了,建议 使用其它的计算引擎,例如:spark或者tez 如果你确实想使用MapReduce引擎,那建议你使用Hive1.x的版本
Hive-on-MR is deprecated in Hive 2 and may not be available in the future versions. Consider using a different execution engine (i.e. spark, tez) or using Hive 1.X releases.
Hive Session ID = 116e9624-d73c-42cc-b45f-ea4b7e4ede99
7.6.3 基本的HQL命令查询
-- 展示表
show tables;

-- 创建表
create table t1(id int,name string);

-- 往表添加数据,注意,此时就产生了MapReduce任务
insert into t1(id,name) values(1,"zs");

-- 查询表,不会经过mapreduce任务就可以获取到结果
select * from t1;

-- 删除表
drop table t1;

-- 退出
quit;
7.6.4 beeline连接
# 启动hiveserver2监听服务,要等4条Session ID才是启动成功
[root@bigdata04 ~]# hiveserver2
...
Hive Session ID = 008af6a0-4f7a-47f0-b45a-4445ff9fa7a7
Hive Session ID = 670a0c62-7744-4949-a25f-02060d950f90
Hive Session ID = 7aa43b1a-eafb-4848-9d29-4fe3eee0cbb7
Hive Session ID = a5c20828-7f39-4ed6-ba5e-2013b5250fe3

# hiveserver2默认会监听本机的10000端口
beeline -u jdbc:hive2://localhost:10000

# 新建bigdata04会话窗口
[root@bigdata04 ~]# beeline -u jdbc:hive2://localhost:10000

# 涉及建表插数据等需要更高权限
[root@bigdata04 ~]# beeline -u jdbc:hive2://localhost:10000 -n root

# -e 命令,这样这条hive命令就可以放到脚本中定时调度执行了
[root@bigdata04 ~]# beeline -u jdbc:hive2://localhost:10000 -n root -e "select * from t1"
7.6.5 Java操作hive
7.6.6 Set命令的使用
- 在hive命令行中可以使用set命令临时设置一些参数的值
hive-site.xml中有一个参数是 hive.cli.print.current.db
- 这个参数可以显示当前所在的数据库名称,默认值为 false
- 改为true则会显示当前所在数据库的名称
- 也可以用set命令来临时设置
hive> set hive.cli.print.current.db = true;
hive (default)>
hive-site.xml中有一个参数是 hive.cli.print.header
- 这个参数可以控制获取结果的时候显示字段名称,默认值为false
- 改为true则会显示字段名称
- 也可以用set命令来临时设置
hive (default)> set hive.cli.print.header = true;
hive (default)> select * from t1;
OK
t1.id t1.name
1     zs
Time taken: 0.202 seconds, Fetched: 1 row(s)
这些参数属于我自己的个人习惯,所以我希望把这个配置放到我个人用户下面
修改 ~/.hiverc ,我们每次在进入hive命令行的时候都会加载当前用户目录下的 .hiverc 文件中的内容
[root@bigdata04 apache-hive-3.1.2-bin]# vi ~/.hiverc
set hive.cli.print.current.db = true;
set hive.cli.print.header = true;
这个时候重新进来确认一下效果
hive (default)>如果想查看hive历史命令
- linux中有一个history命令可以查看历史操作命令 hive中也有类似的功能
- hive中的历史命令会存储在当前用户目录下的 .hivehistory 目录中
[root@bigdata04 apache-hive-3.1.2-bin]# more ~/.hivehistory
show tables;
exit
.....
7.6.7 Hive的日志配置
1、日志依赖包冲突
# hive的日志依赖包
/data/soft/apache-hive-3.1.2-bin/lib/log4j-slf4j-impl-2.10.0.jar
# hadoop的日志依赖包
/data/soft/hadoop-3.2.0/share/hadoop/common/lib/slf4j-log4j12-1.7.25.jar

# 把hive的日志依赖包改名
cd /data/soft/apache-hive-3.1.2-bin/lib
mv log4j-slf4j-impl-2.10.0.jar log4j-slf4j-impl-2.10.0.jar.bak
2、Hive的日志
- 运行时日志
- 在本地conf文件夹里
- 任务执行时日志
- 在Yarn集群里
- http://bigdata01:8088/cluster
```c
进入conf目录
cd /data/soft/apache-hive-3.1.2-bin/conf
hive日志文件
mv hive-log4j2.properties.template hive-log4j2.properties vi hive-log4j2.properties … property.hive.log.level = WARN property.hive.root.logger = DRFA property.hive.log.dir = /data/hive_repo/log property.hive.log.file = hive.log property.hive.perflogger.log.level = INFO
执行的日志文件
mv hive-exec-log4j2.properties.template hive-exec-log4j2.properties vi hive-exec-log4j2.properties … property.hive.log.level = WARN property.hive.root.logger = FA property.hive.query.id = hadoop property.hive.log.dir = /data/hive_repo/log property.hive.log.file = ${sys:hive.query.id}.log
启动hive生效配置
hive
退出hive
quit;
后期分析hive日志可以到该目录下查看
[root@bigdata04 log]# cd /data/hive_repo/log [root@bigdata04 log]# ll total 4 -rw-r—r—. 1 root root 196 Aug 11 09:38 hive.log
<a name="nPLaY"></a>
## 7.7 Hive中的数据操作
<a name="KIsLE"></a>
### 7.7.1 Hive中数据库的操作
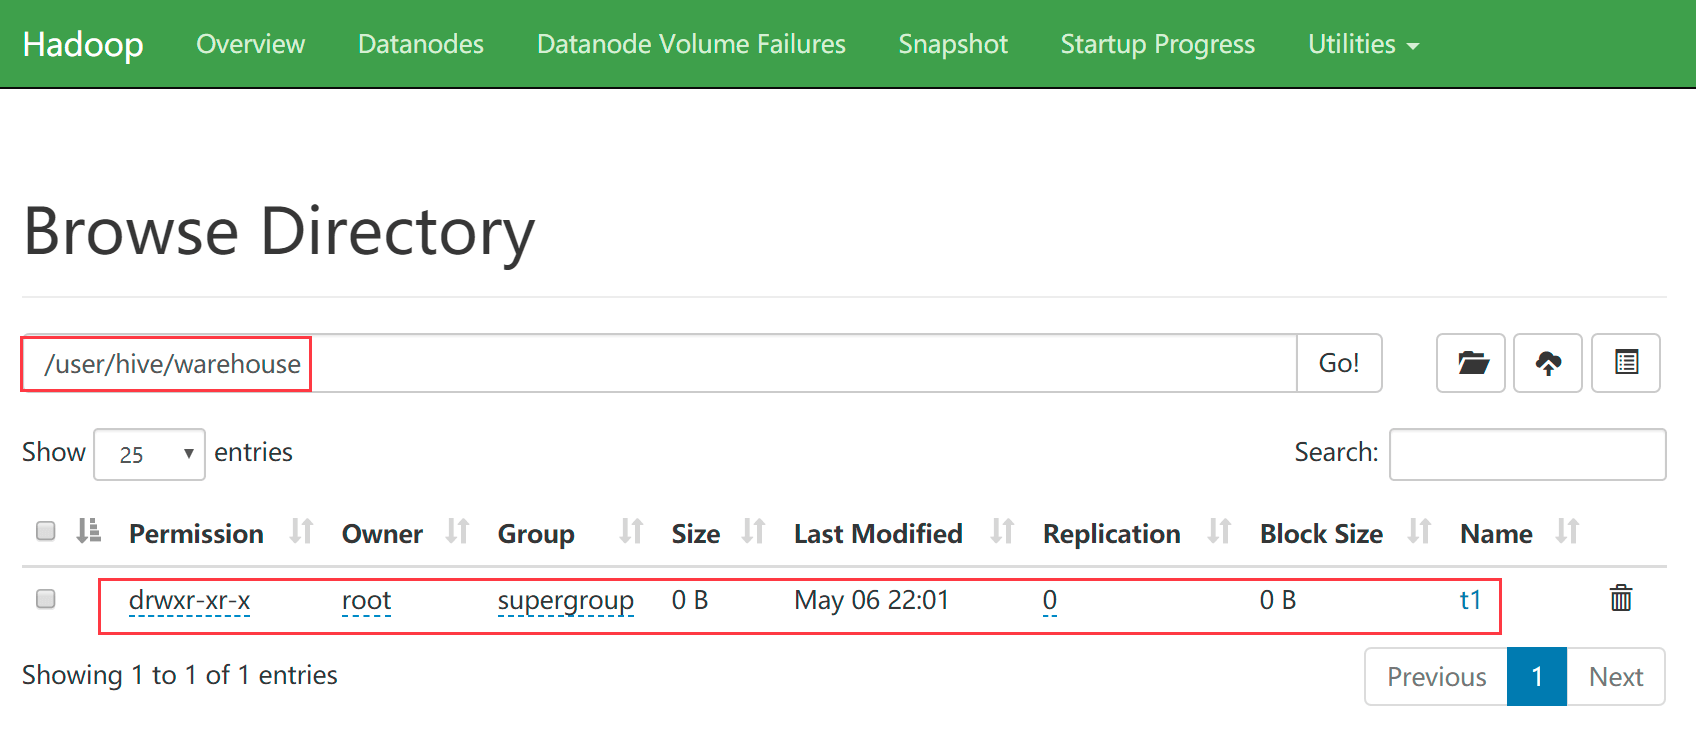
- hive的数据都是存储在hdfs里的
- 在 **hive-site.xml** 中有一个参数 **hive.metastore.warehouse.dir**

- Web UI查看路径
- [http://bigdata01:9870/explorer.html#/user/hive/warehouse](http://bigdata01:9870/explorer.html#/user/hive/warehouse)
- Navicat查看路径

- 数据库基本操作
```plsql
-- 查看数据库列表
show tables;
-- 创建数据库
create database mydb1;
-- 创建数据库指定路径
create database mydb2 location '/user/hive/mydb2';
-- 选择数据库
use mydb1;
-- 删除数据库
drop database mydb1;
7.7.2 Hive中表的操作
1、创建表
-- 创建表
create table t2(id int);

-- 查看表结构信息
desc t2;
2、查看表创建的信息
hive (default)> show create table t2;
OK
createtab_stmt
CREATE TABLE `t2`(
    `id` int)
ROW FORMAT SERDE
    'org.apache.hadoop.hive.serde2.lazy.LazySimpleSerDe'
STORED AS INPUTFORMAT
    'org.apache.hadoop.mapred.TextInputFormat'
OUTPUTFORMAT
    'org.apache.hadoop.hive.ql.io.HiveIgnoreKeyTextOutputFormat'
LOCATION
    'hdfs://bigdata01:9000/user/hive/warehouse/t2'
TBLPROPERTIES (
    'bucketing_version'='2',
    'transient_lastDdlTime'='1588776407')
  Time taken: 0.117 seconds, Fetched: 13 row(s)
- 从这里的location可以看到这个表在hdfs上的位置
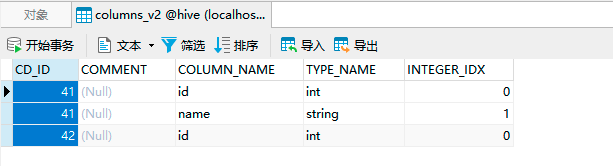
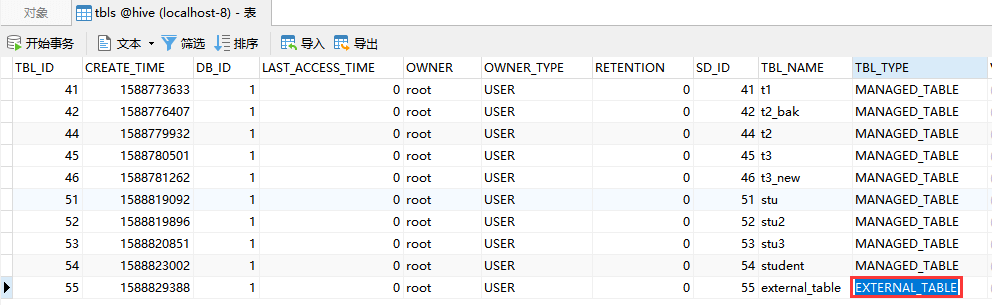
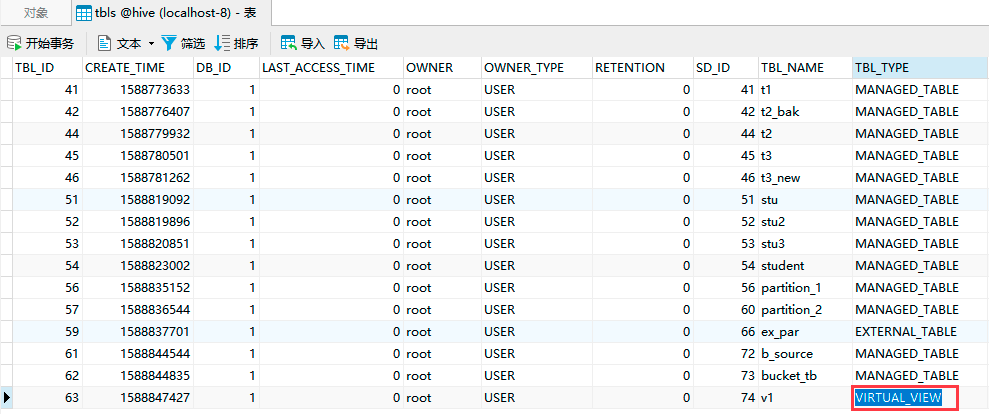
「注意:表中的数据是存储在hdfs中的,但是表的名称、字段信息是存储在metastore中的」
- 用Navicat到metastore中查看
- 先看tbls表
- 这个里面中存储的都是在hive中创建的表
- 可以看到DB_ID为1
- 可以到dbs表中看到默认default数据库的id就是1
- TBL_NAME 是这个表的名称


- 在COLUMNS_V2表中存储的是
- Hive表的字段信息(包含字段注释、字段名称、字段类型、字段顺序)
- 其中的CD_ID和tbls中的TBL_ID相等
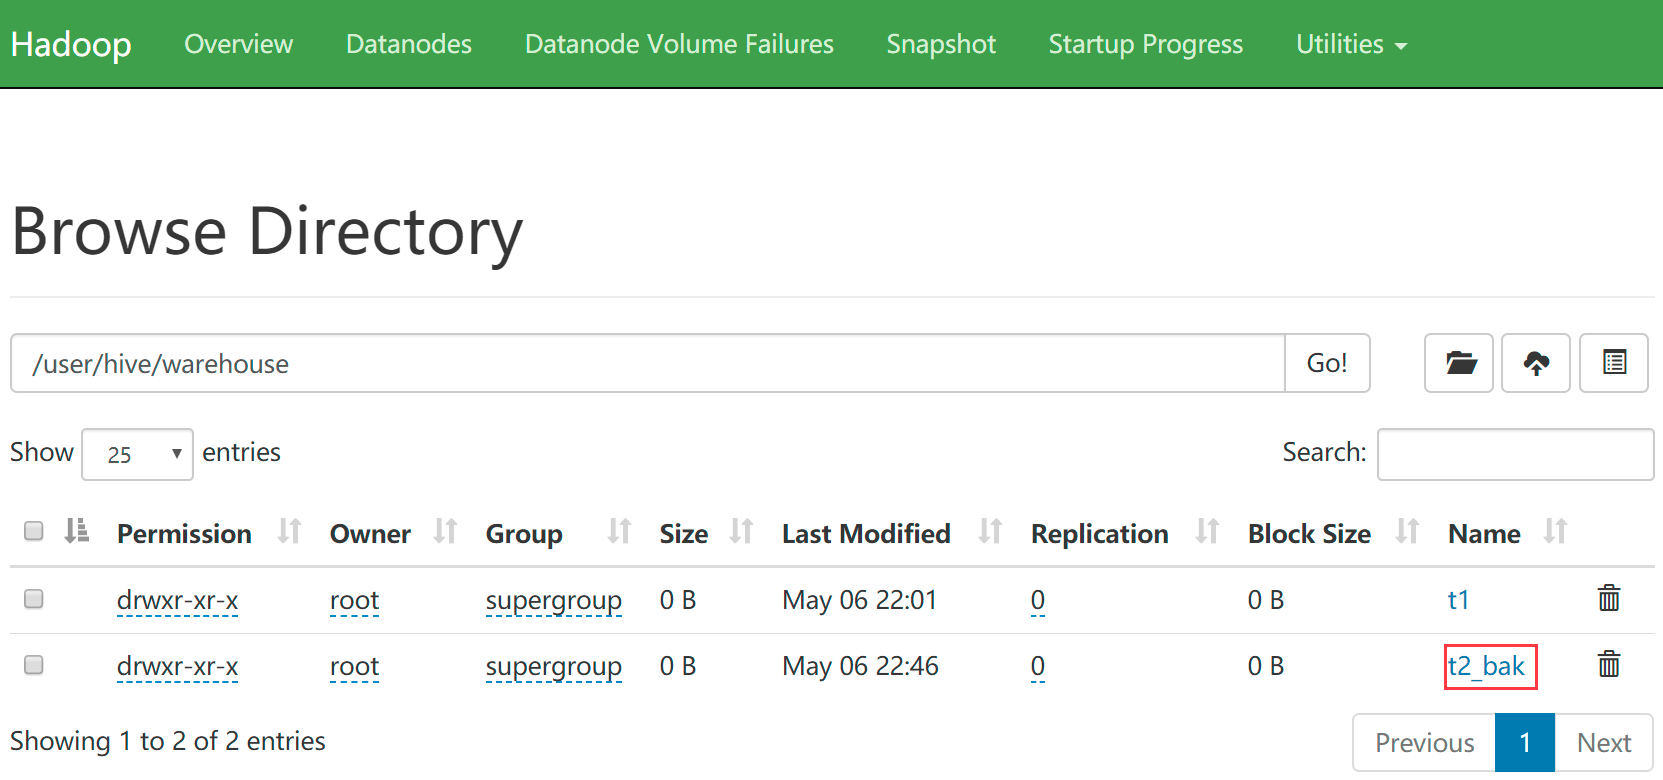
3、修改表名
hive (default)> alter table t2 rename to t2_bak;
OK
Time taken: 0.25 seconds
hive (default)> show tables;
OK
t1
t2_bak
Time taken: 0.138 seconds, Fetched: 2 row(s)
- hdfs中对应的目录名称也同步变化了
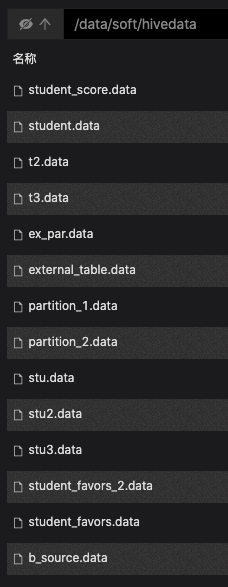
4、加载数据「后续数据准备」
# 准备数据
[root@bigdata04 soft]# mkdir -p /data/soft/hivedata
[root@bigdata04 soft]# cd /data/soft/hivedata

# 上传数据
-- 加载数据
hive (default)> load data local inpath '/data/soft/hivedata/t2.data' into table t2_bak;
Loading data to table default.t2_bak
OK
Time taken: 0.539 seconds

-- 查看数据
hive (default)> select * from t2_bak;
OK
1
2
3
4
5
Time taken: 0.138 seconds, Fetched: 5 row(s)
- 到hdfs上去看一下这个表,发现刚才的文件其实就是上传到了t2_bak目录中
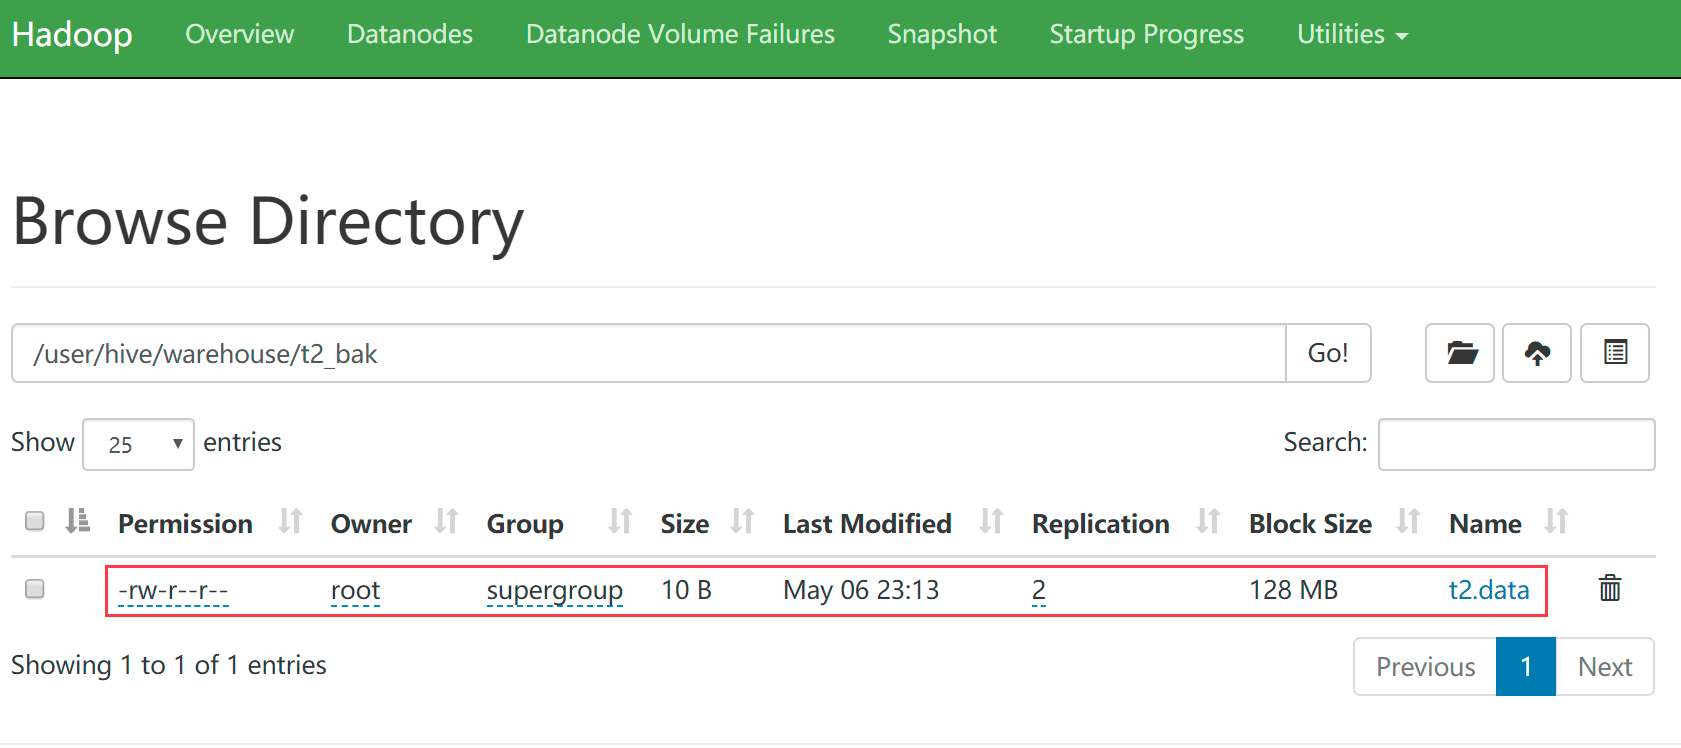
- 用hdfs手动put命令把数据上传到t2_bak目录
[root@bigdata04 soft]# cd /data/soft/hivedata
[root@bigdata04 hivedata]# hdfs dfs -put t2.data /user/hive/warehouse/t2_bak/t2_bak.data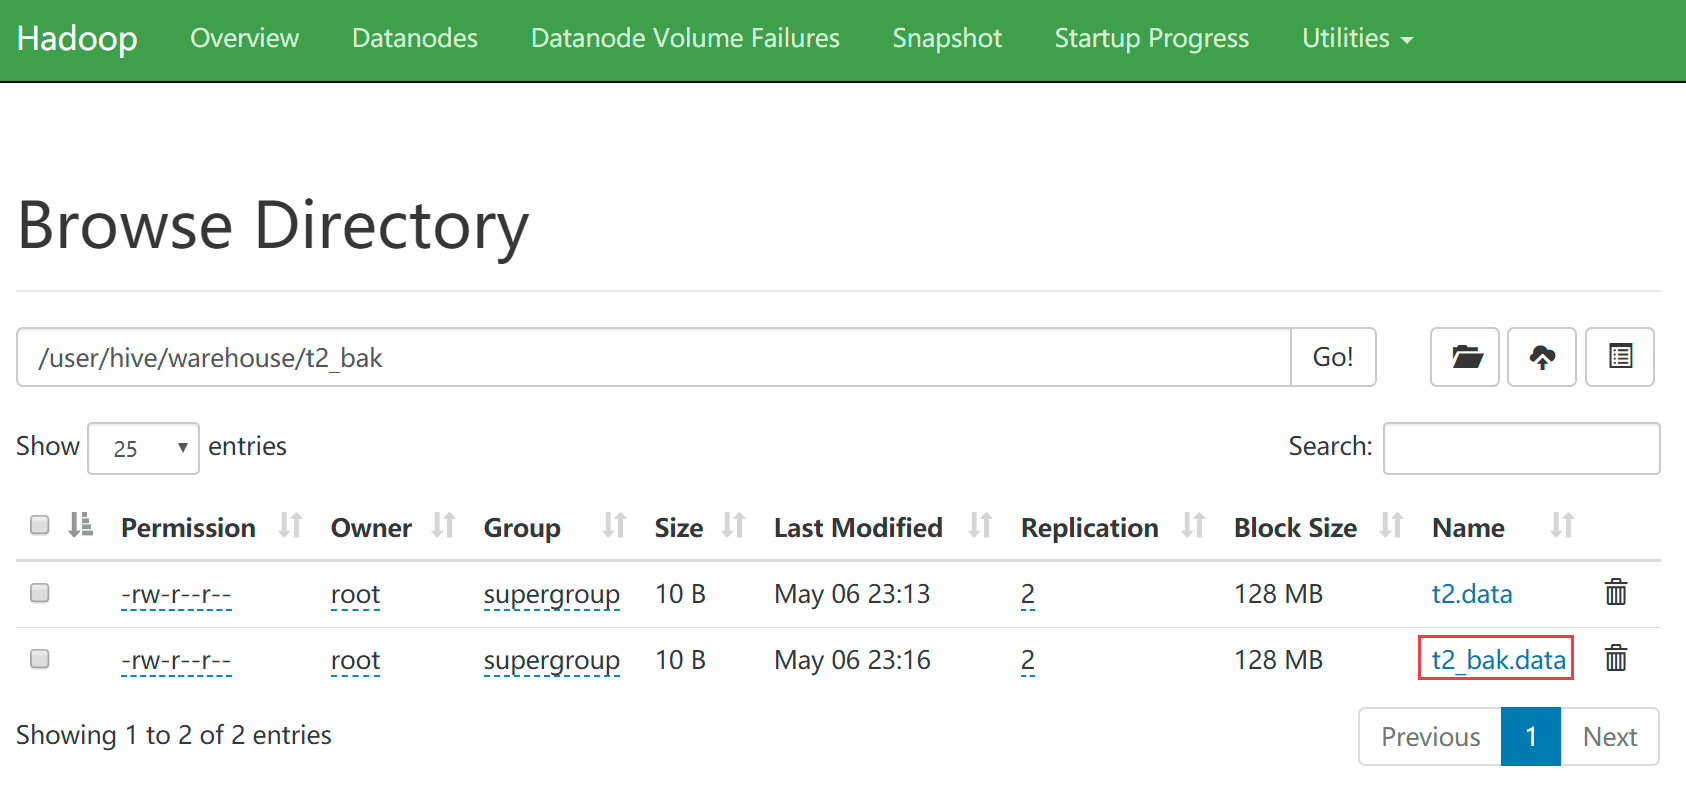
5、表增加字段及注释、删除表
- 因为我们的数据数据文件中就只有一列,第二列查询不到,就显示为null ```plsql — 新增字段 hive (default)> alter table t2_bak add columns (name string); OK Time taken: 0.175 seconds
hive (default)> select * from t2_bak; OK t2_bak.id t2_bak.name 1 NULL 2 NULL 3 NULL 4 NULL 5 NULL 1 NULL 2 NULL 3 NULL 4 NULL 5 NULL Time taken: 0.199 seconds, Fetched: 10 row(s)
— 建表语句 create table t2( age int comment ‘年龄’ ) comment ‘测试’;
— 中文乱码,是因为hive数据库里面的表都是latin1编码的,中文本来就会显示乱码,进入MySQL把专门的注释字段改为utf8 — 修改表编码 alter table COLUMNS_V2 modify column COMMENT varchar(256) character set utf8; alter table TABLE_PARAMS modify column PARAM_VALUE varchar(4000) character set utf8; — 表分区字段编码修改 alter table PARTITION_PARAMS modify column PARAM_VALUE varchar(4000) character set utf8; alter table PARTITION_KEYS modify column PKEY_COMMENT varchar(4000) character set utf8;
— 修改完后需要表重建,删除表 drop table t2; create table t2( age int comment ‘年龄’ ) comment ‘测试’;
<a name="YBYmM"></a>
####
<a name="zmZlu"></a>
#### 6、指定列和行的分隔符
```plsql
-- 创建多字段的表
create table t3(
id int comment 'ID',
stu_name string comment 'name',
stu_birthday date comment 'birthday',
online boolean comment 'is online'
);

-- 加载/data/soft/hivedata/t3.data的数据,发现数据都为null
hive (default)> load data local inpath '/data/soft/hivedata/t3.data' into tab Loading data to table default.t3
OK
Time taken: 0.456 seconds
hive (default)> select * from t3;
OK
t3.id t3.stu_name t3.stu_birthday t3.online
NULL NULL NULL NULL
NULL NULL NULL NULL
NULL NULL NULL NULL
Time taken: 0.229 seconds, Fetched: 3 row(s)
「注意了, hive 在创建表的时候, 需要我们指定相应的行分隔符, 列分隔符。 而我们在创建 mysql 表的时 候,这些都是不需要的,因为它在组织数据的时候,已经规定好了数据的表现形式。 我们刚才在创建t3的时候没有指定相应的分隔符,所以导致使用制表符分割的数据无法被解析」
-- 为t3表修改列和行的分割
create table t3_new(
id int comment 'ID',
stu_name string comment 'name',
stu_birthday date comment 'birthday',
online boolean comment 'is online'
)row format delimited
fields terminated by '\t'
lines terminated by '\n';
-- 在这需要注意的是, lines terminated by 行分隔符可以忽略不写,但是如果要写的话,只能写到最后面!

-- 加载数据
hive (default)> load data local inpath '/data/soft/hivedata/t3.data' into table t3_new;

-- 查询数据
hive (default)> select * from t3_new;
OK
t3_new.id t3_new.stu_name t3_new.stu_birthday t3_new.online
1 张三 2020-01-01 true
2 李四 2020-02-01 false
3 王五 2020-03-01 NULL
Time taken: 0.2 seconds, Fetched: 3 row(s)
7.7.3 Hive中的数据类型
hive作为一个类似数据库的框架,也有自己的数据类型,便于存储、统计、分析
Hive中主要包含两大数据类型
- 基本数据类型
- INT、STRING、BOOLEAN、DOUBLE等
- 复合数据类型
- ARRAY、MAP、STRUCT等
1、基本数据类型
- 比较常见的数据类型
- 数字:int
- 小数:double
- 日期:date
- 是否:boolean
- String、Varchar | 数据类型 | 开始支持的版本 | | —- | —- | | TINYINT | ~ | | SMALLINT | ~ | | INT/INTEGER | ~ | | BIGINT | ~ | | FLOAT | ~ | | DOUBLE | ~ | | DECIMAL | 0.11.0 | | TIMESTAMP | 0.8.0 | | DATE | 0.12.0 | | STRING | ~ | | VARCHAR | 0.12.0 | | CHAR | 0.13.0 | | BOOLEAN | ~ |
2、复合数据类型
| 数据类型 | 开始支持版本 | 格式 |
|---|---|---|
| ARRAY | 0.14.0 | ARRAY |
| MAP | 0.14.0 | MAP |
| STRUCT | ~ | STRUCT |
3、案例:Array
- 存储学生的爱好
- zhangsan的爱好是swing、sing、coding
- lisi的爱好是music、football
- 来建一张表, 指定了一个 array 数组类型的字段叫 favors , 数组中存储字符串, 数组中的元素怎么分割?
- 通过 collection items terminated by ‘,’ ```plsql — 查看学生爱好的数据 [root@bigdata04 /]# more /data/soft/hivedata/stu.data 1 zhangsan swing,sing,coding 2 lisi music,football
— 创建学生表
create table stu(
id int,
name string,
favors array
— 加载数据 hive (default)> load data local inpath ‘/data/soft/hivedata/stu.data’ into table stu;
— 查学生表 hive (default)> select * from stu; OK stu.id stu.name stu.favors 1 zhangsan [“swing”,”sing”,”coding”] 2 lisi [“music”,”football”]
— 查询第一个爱好 hive (default)> select id,name,favors[0] from stu; OK stu.id stu.name stu.favors 1 zhangsan swing 2 lisi music
<a name="7xcXD"></a>
#### 4、案例:Map

- 存储学生的成绩
- 建表语句如下:指定scores字段类型为map格式
   - 通过 **collection items terminated by ',' **指定了map中元素之间的分隔符
   - 通过 **map keys terminated by ':'** 指定了key和value之间的分隔符
```plsql
-- 查看学生爱好的数据
[root@bigdata04 /]# more /data/soft/hivedata/stu2.data
1 zhangsan chinese:80,math:90,english:100
2 lisi chinese:89,english:70,math:88

-- 创建学生成绩数据表
create table stu2(
    id int,
  name string,
  scores map<string,int>
)row format delimited
fields terminated by '\t'
collection items terminated by ','
map keys terminated by ':'
lines terminated by '\n';

-- 加载数据
hive (default)> load data local inpath '/data/soft/hivedata/stu2.data' into table stu2

-- 查询数据
hive (default)> select * from stu2;
OK
stu2.id stu2.name stu2.scores
1 zhangsan {"chinese":80,"math":90,"english":100}
2 lisi {"chinese":89,"english":70,"math":88}

-- 查询语文和数学的成绩
hive (default)> select id,name,scores['chinese'] as ch_score ,scores['math'] as math_score from stu2;
OK
id name ch_score math_score
1 zhangsan 80 90
2 lisi 89 88
「注意:我们取数据是根据元素中的key获取的,和map结构中元素的位置没有关系」
5、案例:Struct
- Struct和Java中的对象类似
- 存储员工地址信息 ```plsql — 查看员工的户籍城市和公司城市 [root@bigdata04 /]# more /data/soft/hivedata/stu3.data 1 zhangsan bj,sh 2 lisi gz,sz
— 创建员工表
create table stu3(
id int,
name string,
address struct
— 加载数据 hive (default)> load data local inpath ‘/data/soft/hivedata/stu3.data’ into table stu3;
—查询数据 hive (default)> select * from stu3; OK stu3.id stu3.name stu3.address 1 zhangsan {“home_addr”:”bj”,”office_addr”:”sh”} 2 lisi {“home_addr”:”gz”,”office_addr”:”sz”}
— 查询员工户籍地 hive (default)> select id,name,address.home_addr from stu3; id name home_addr 1 zhangsan bj 2 lisi gz
<a name="wYJvx"></a>
#### 6、三种复杂类型总结

- 对于上述需求,Array都可以搞定,但是在查询的时候只能通过角 标访问,不太方便而已。
- Struct和Map的区别
   - 存储的个数
      - map中可以随意增加k-v对的个数
      - struct中的k-v个数是固定的
   - 指定的类型
      - map在建表语句中需要指定k-v的类型
      - struct在建表语句中需要指定好所有的属性名称和类型
   - 取值
      - map中通过[]取值
      - struct中通过.取值,类似java中的对象属性引用
   - 数据源的值
      - map的源数据中需要带有k-v
      - struct的源数据中只需要有v即可
   - 总结
      - map比较灵活,但是会额外占用磁盘空间,因为他比struct多存储了数据的key
      - struct只需要存储value,比较节省空间,但是灵活性有限,后期无法动态增加k-v

<a name="FqylE"></a>
#### 7、案例:复合数据类型综合应用

- 上述学到的这三种复合数据类型结合到一块来使用一下
- 不一定非要使用这些复合类型,**主要是需要根据具体业务分析**,使用复合数据类型可以更方便的操作数据
```plsql
-- 查看学生数据
[root@bigdata04 /]# more /data/soft/hivedata/student.data
1 zhangsan english,sing,swing chinese:80,math:90,english:10
2 lisi games,coding chinese:89,english:70,math:88 gz,sz

-- 创建表
create table student(
    id int comment 'id',
    name string comment 'name',
  favors array<string>,
  scores map<string,int>,
  address struct<home_addr:string,office_addr:string>
) row format delimited
fields terminated by '\t'
collection items terminated by ','
map keys terminated by ':'
lines terminated by '\n';

-- 加载数据
hive (default)> load data local inpath '/data/soft/hivedata/student.data' into table studnet;

-- 查询数据
hive (default)> select * from student;
OK
student.id student.name student.favors student.scores student.address
1 zhangsan ["english","sing","swing"] {"chinese":80,"math":90,"english":100} {"home_addr":"bj","office_addr":"sh"}
2 lisi ["games","coding"] {"chinese":89,"english":70,"math":88} {"home_addr":"gz","office_addr":"sz"}
8、思考题
- 问:MySQL中有三张表,如果把这三张表迁移到hive中, 如何迁移?
- 学生表:student(id,name)
- 地址表:address(stu_id, home,school)
- 有联系方式表:contact(stu_id,mine,parents,others)
- 答:分为两个阶段
- 第一个阶段:先快捷迁移,让我们的系统能跑起来
- 使表每一张对应迁移
- 优点
- 迁移成本非常低,包括DDL和业务逻辑,几乎不需要修改,可以直接使用
- 缺点
- 产生大量的表连接,造成查询慢
- 优点
- 使表每一张对应迁移
- 第二个阶段:再做一 张大表,尽量包含以上所有字段
- 例如:stu(id, name, address struct
- mysql中的多张关联表可以创建为hive中的一张表
- 优点
- 减少表连接操作
- 缺点
- 迁移成本高,需要修改原有的业务逻辑
- 优点
- 例如:stu(id, name, address struct
- 总结:
- 让这两个阶段并行执行,在第一阶段不影响系统业务的前提,在第二阶段进行表整合之后上线系统里
- 第一个阶段:先快捷迁移,让我们的系统能跑起来
7.8 Hive中的表
7.8.1 Hive中表有哪些类型?
- MySQL中没有表类型概念,只有一种表
- Hive是有多种类型的,可以分为四种
- 内部表
- 外部表
- 分区表
- 桶表
7.8.2 内部表
- 内部表也可以称为受控表
- 它是Hive中的默认表类型,表数据默认存储在 warehouse 目录中
- 在加载数据的过程中,实际数据会被移动到warehouse目录中
- 删除表时,表中的数据和Metastore里面存的元数据,将会被同时删除
7.8.3 外部表
- 建表语句中包含 External 的表叫外部表
- 外部表在加载数据的时候,实际数据并不会移动到warehouse目录中,只是与外部数据建立一个链接(映射关系)
- 当删除一个外部表时,只删除元数据,不删除表中的数据,仅删除表和数据之间的链接 ```plsql — 创建外部表,数据存储在HDFS里的/data/external create external table external_table ( key string ) location ‘/data/external’;
— 查看hdfs里指定的数据目录是否创建 [root@bigdata04 /]# hdfs dfs -ls /data Found 1 items drwxr-xr-x - root supergroup 0 2020-05-07 13:29 /data/external
- 在MySQL查看一下**metastore**中的**tbls**表里的类型
```plsql
-- 查看测试数据
[root@bigdata04 /]# more /data/soft/hivedata/external_table.data
a
b
c
d
e
-- 加载数据
hive (default)> load data local inpath '/data/soft/hivedata/external_table.data' into table external_table;
- 此时加载的数据会存储到hdfs的 /data/external 目录下
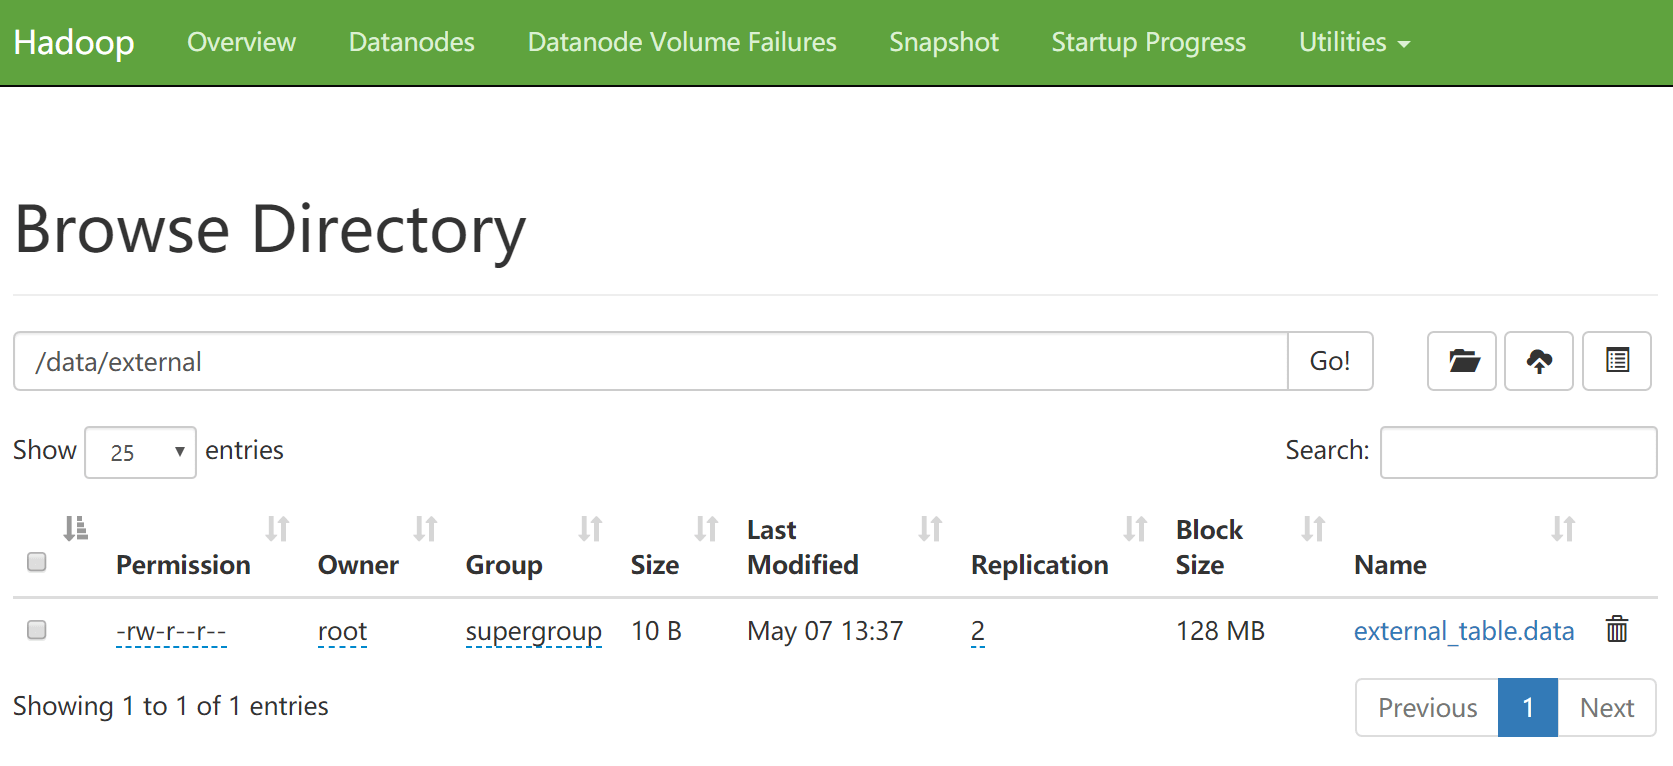
-- 查看数据
hive (default)> select * from external_table;
OK
external_table.key
a
b
c
d
e
Time taken: 0.272 seconds, Fetched: 5 row(s)

-- 尝试删除表
hive (default)> drop table external_table;
OK
Time taken: 0.462 seconds
- 到hdfs上查看数据,发现之前上传上去的数据还在

- 这就是,外部表的特性
- 外部表被删除时,只会删除表的元数据,表中的数据不会被删除
「注意:内外部表是可以互相转化的」
- 内部表转外部表
- alter table tblName set tblproperties (‘external’=‘true’);
- 外部表转内部表
- alter table tblName set tblproperties (‘external’=‘false’);
- 在实际工作中,我们在hive中创建的表95%以上的都是外部表,大致流程如下:
- 先通过flume采集数据,把数据上传到hdfs中,然后在hive中创建外部表和hdfs上的数据绑定关系,
- 就可以使用sql查询数据了,所以连load数据那一步都可以省略了,因为是先有数据,才创建的表。
7.8.4 内部分区表
- 分区可以理解为分类
- 通过分区把不同类型数据放到不同目录
- 分区的标准就是指定分区字段
- 分区字段可以有一个或多个
- 分区表的意义在于优化查询,查询时尽量利用分区字段
- 如果不使用分区字段,就会全表扫描
- 最典型的一个场景就是把天作为分区字段,查询的时候指定天,从而提高查询效率
1、单分区字段
-- 创建表,使用partitioned by指定区分字段,分区字段的名称为dt,类型为string
create table partition_1 (
  id int,
  name string,
) partitioned by (dt string)
row format delimited
fields terminated by '\t';

-- 查看测试数据
[root@bigdata04 /]# more /data/soft/hivedata/partition_1.data
1 zhangsan
2 lisi

-- 加载数据【注意,在这里添加数据的同时需要指定分区信息】
hive (default)> load data local inpath '/data/soft/hivedata/partition_1.data' into table partition_1 partition(dt='2020-01-01');
- 查看hdfs中刚才创建的分区信息目录
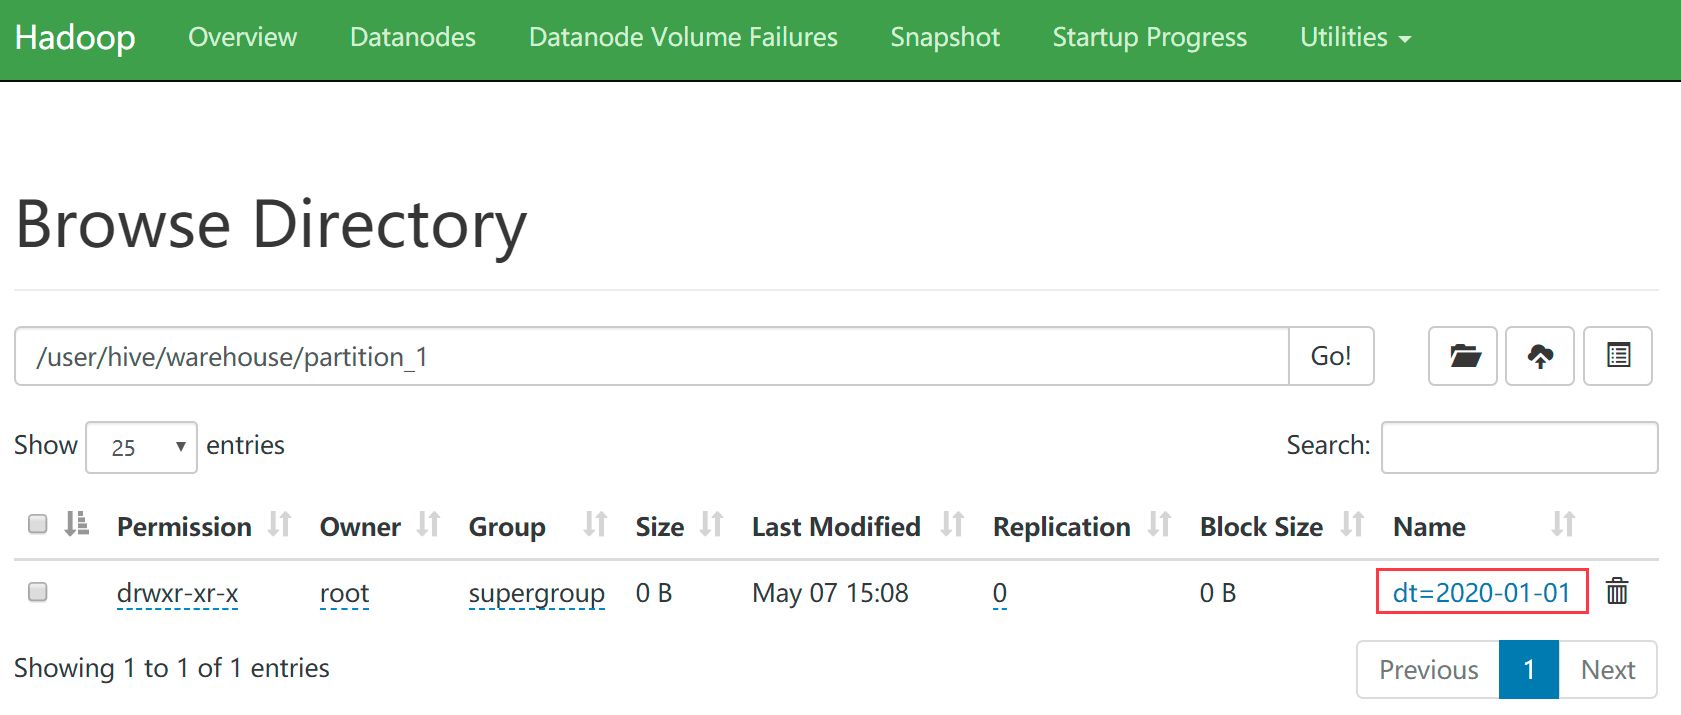
-- 手动在表中的分区信息目录里创建分区
hive (default)> alter table partition_1 add partition (dt='2020-01-02');
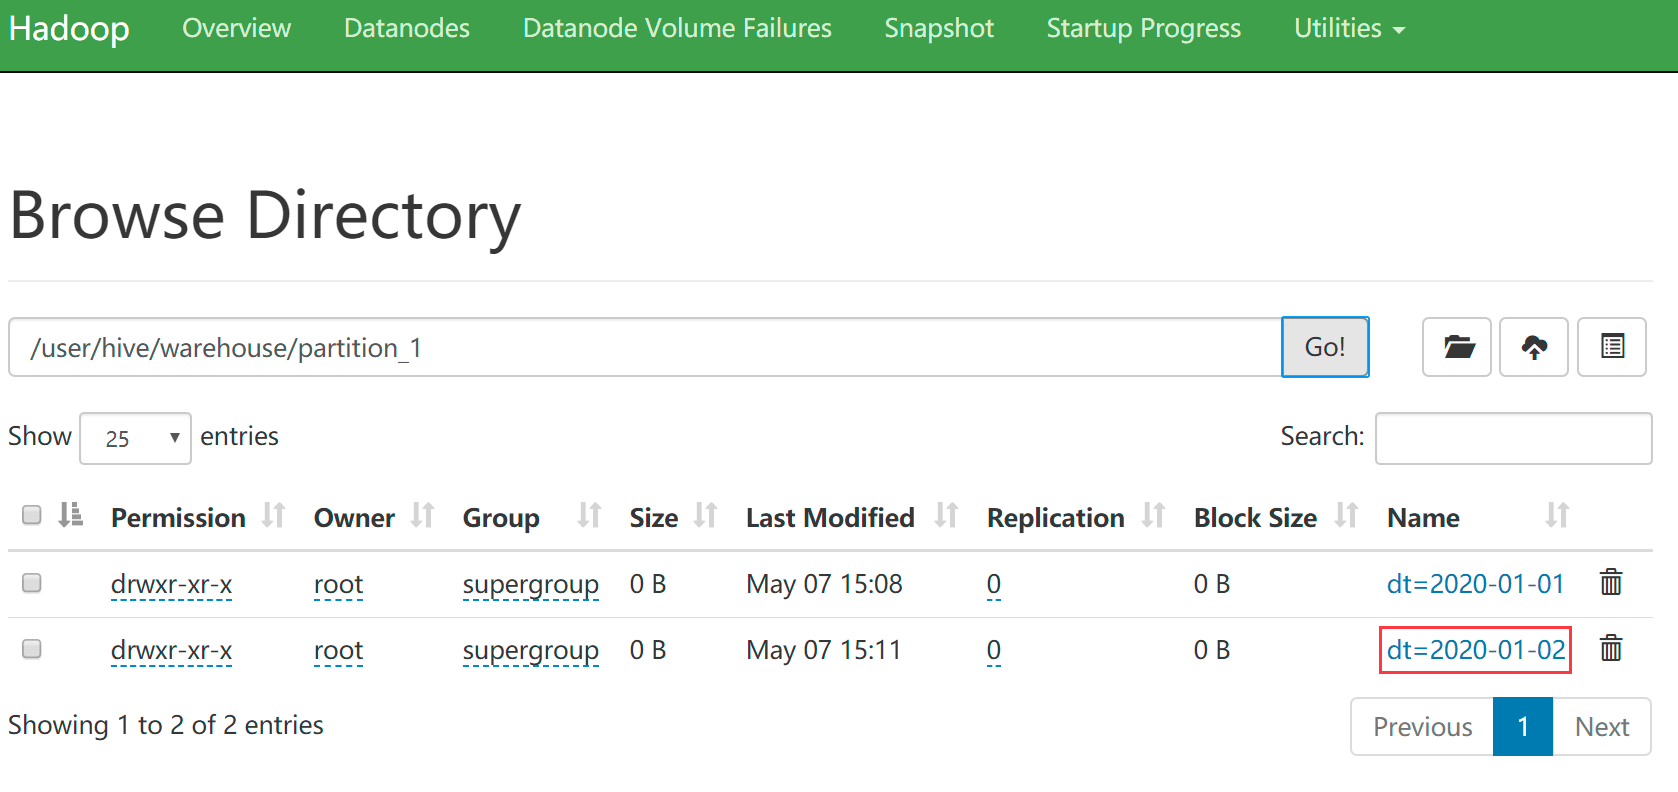
使用load命令或者hdfs的put命令都可以往分区中添加数据
-- 加载数据
hive (default)> load data local inpath '/data/soft/hivedata/partition_1.data' into table partition_1 partition(dt='2020-01-02');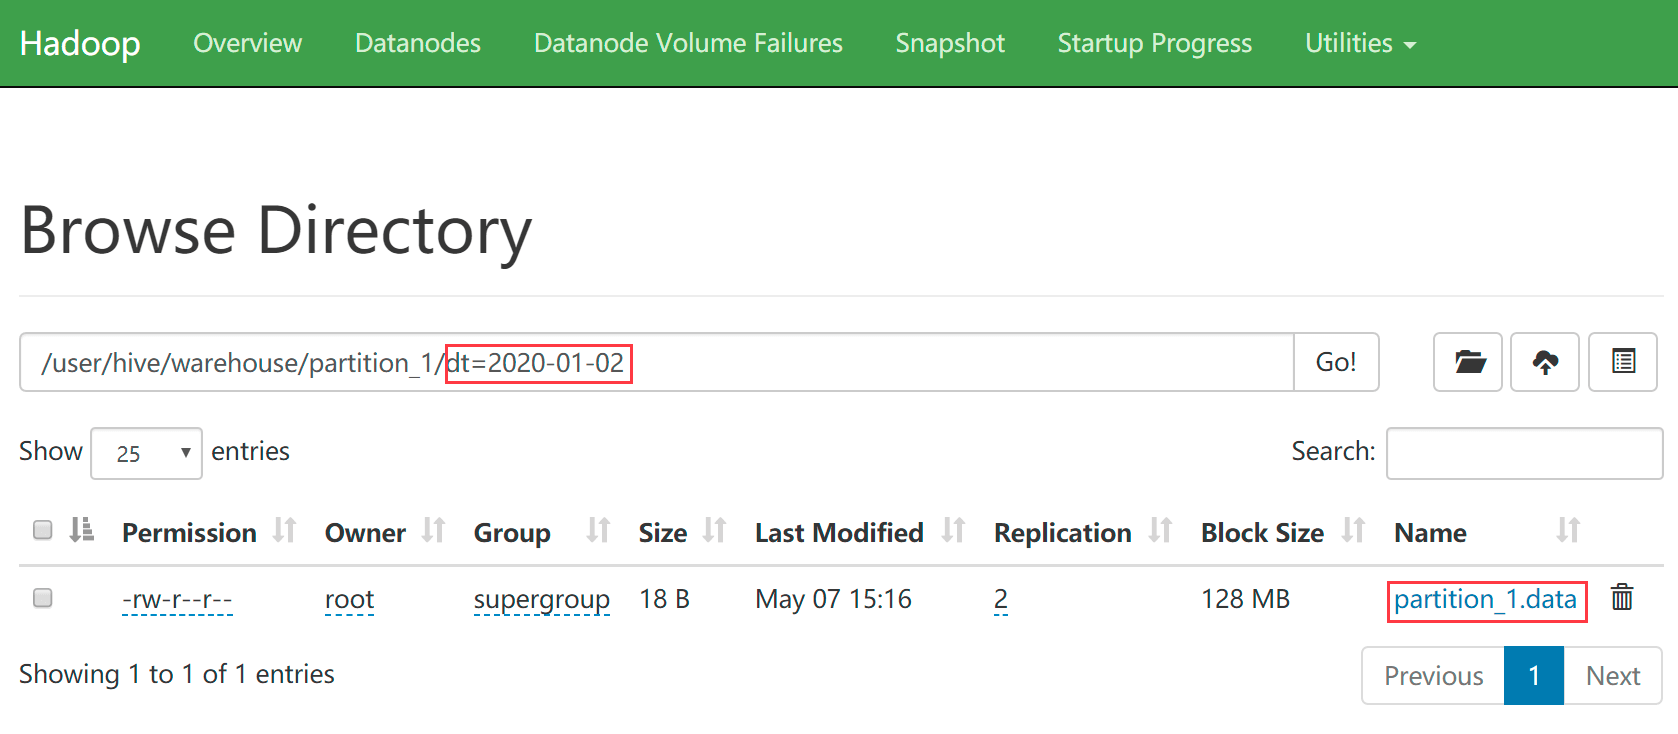
查看表中有哪些分区?
hive (default)> show partitions partition_1;
OK
partition
dt=2020-01-01
dt=2020-01-02
Time taken: 0.246 seconds, Fetched: 2 row(s)
删除分区呢?
hive (default)> alter table partition_1 drop partition(dt='2020-01-02');到HDFS上确认一下
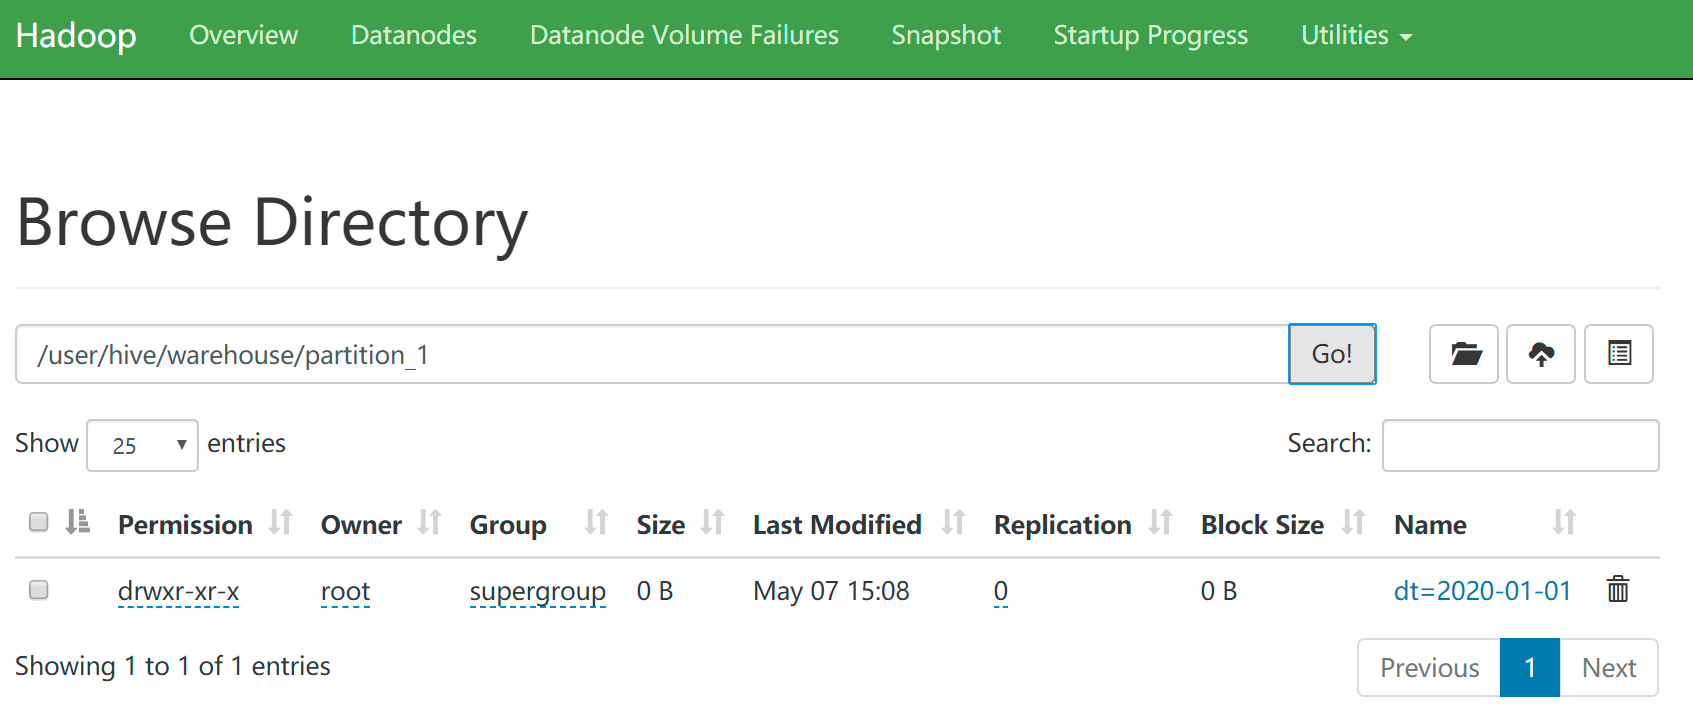
「注意:此时分区删除之后,分区中对应的数据也就没有了,因为是内部表,所以分区的数据是 会被删掉的」
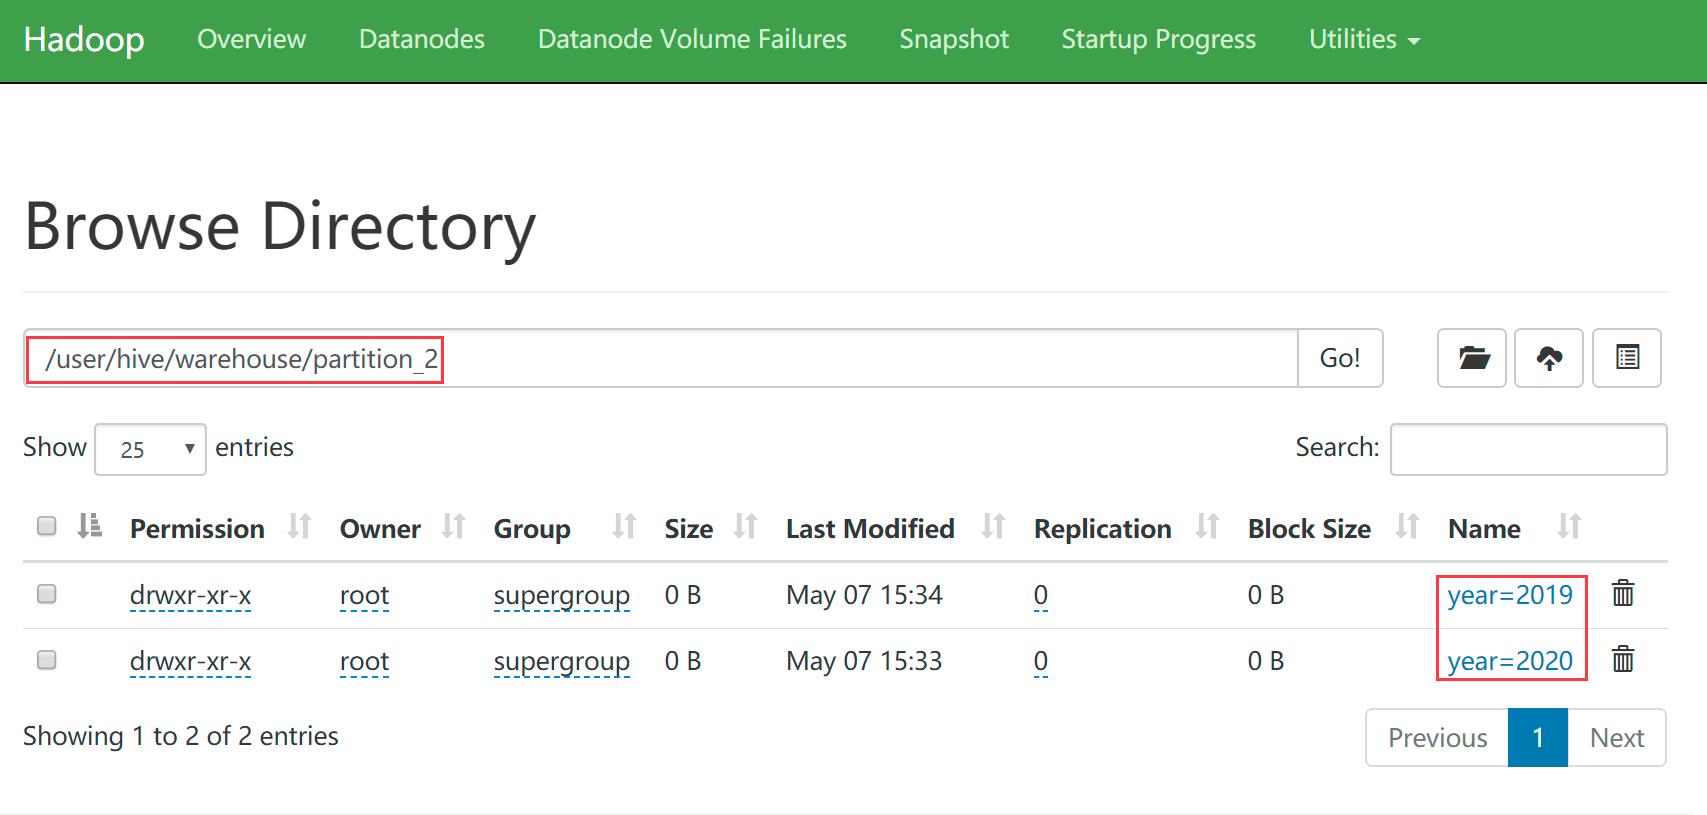
2、多分区字段
-- 创建多个分区字段的内部分区表
create table partition_2(
id int,
name string
)partitioned by (year int,school string)
row format delimited
fields terminated by '\t';
-- 查看测试数据
[root@bigdata04 /]# more /data/soft/hivedata/partition_1.data
1 zhangsan
2 lisi
3 wangwu
-- 加载数据
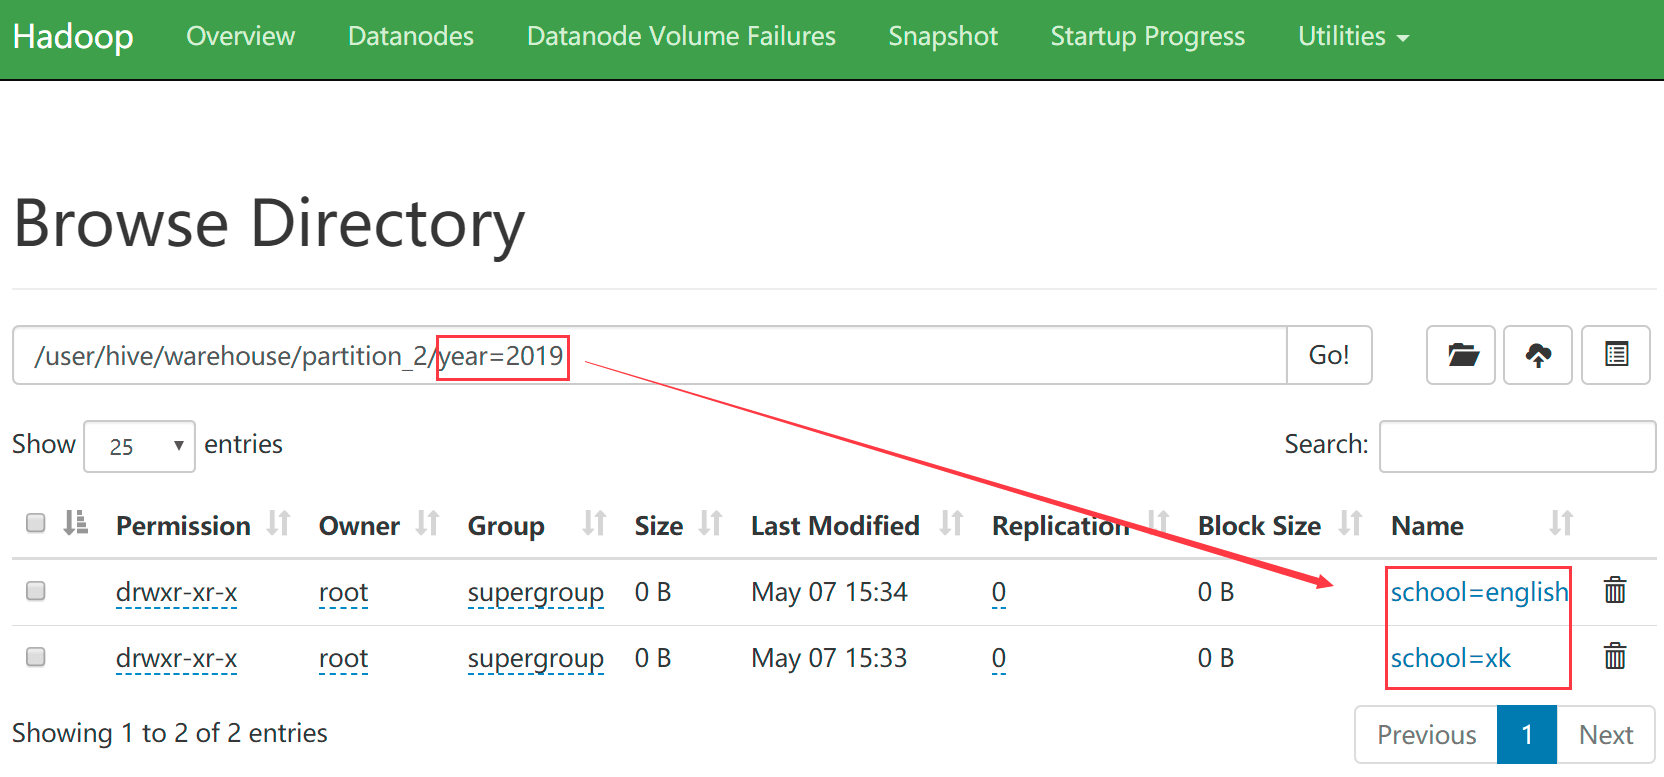
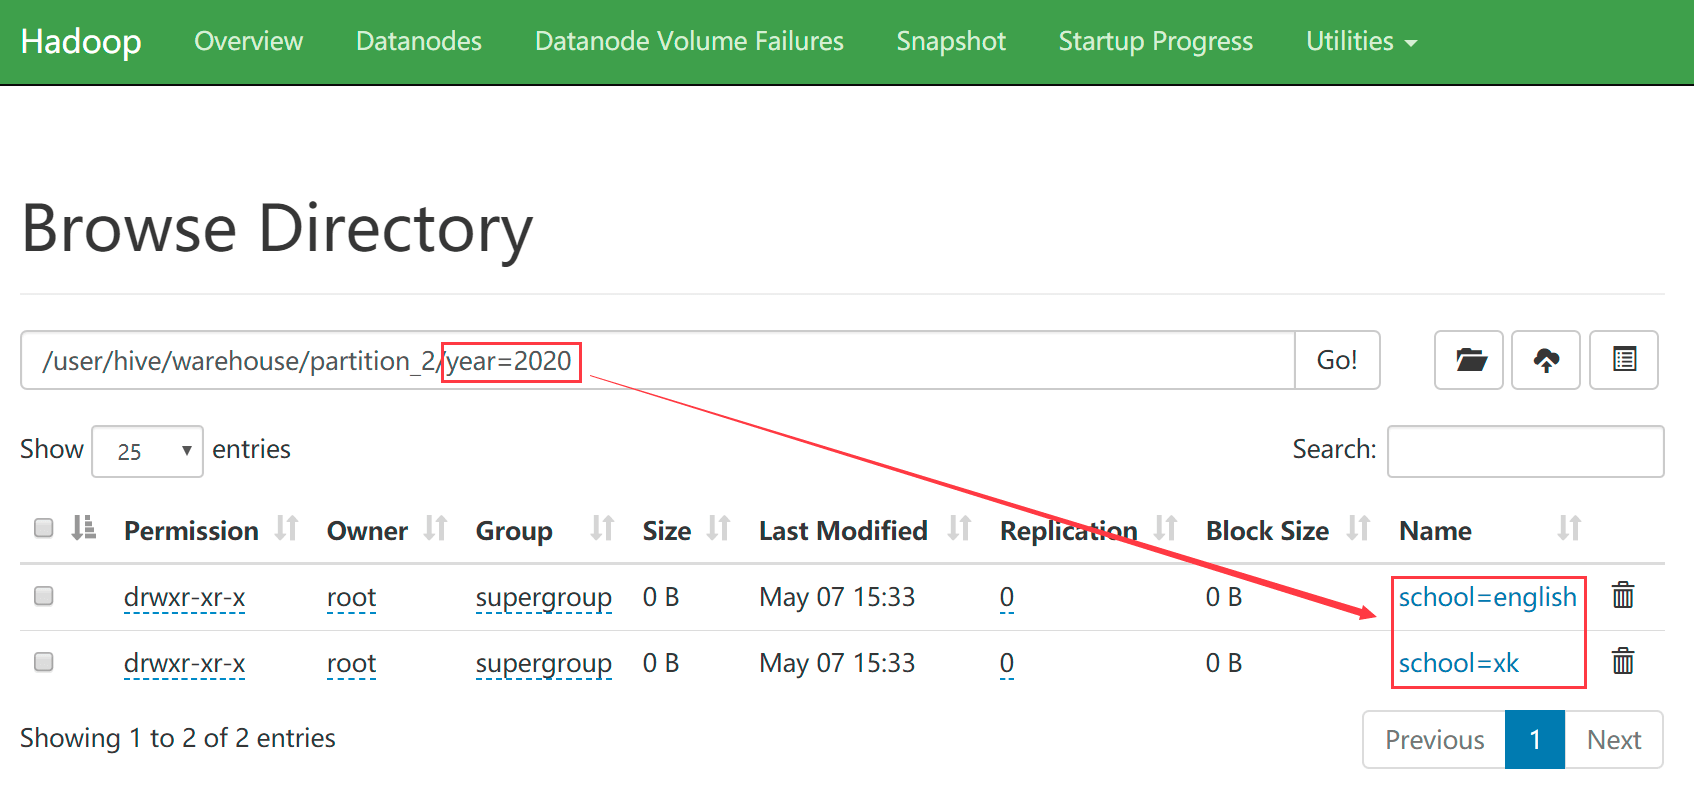
load data local inpath '/data/soft/hivedata/partition_2.data' into table partition_2 partition(year=2020,school='xk');
load data local inpath '/data/soft/hivedata/partition_2.data' into table partition_2 partition(year=2020,school='english');
load data local inpath '/data/soft/hivedata/partition_2.data' into table partition_2 partition(year=2019,school='xk');
load data local inpath '/data/soft/hivedata/partition_2.data' into table partition_2 partition(year=2019,school='english');
「注意:数据文件中只需要有id和name这两个字段的值就可以了,具体year和school这两个分区字 段是在加载分区的时候指定的」
查看分区信息
hive (default)> show partitions partition_2;
OK
partition
year=2019/school=english
year=2019/school=xk
year=2020/school=english
year=2020/school=xk
Time taken: 0.191 seconds, Fetched: 4 row(s)
查看hdfs中的目录
- 根据多分区字段查询数据
select * from partition_2; 【全表扫描,没有用到分区的特性】
select * from partition_2 where year = 2019;【用到了一个分区字段进行过滤】
select * from partition_2 where year = 2019 and school = 'xk';【用到了两个分区字段进行过滤】
7.8.5 外部分区表「工作中最常用的表」
- 外部分区表=外部表+分区表
- 删除分区时,分区数据不会被删除 ```plsql — 创建表 create external table ex_par( id int, name string )partitioned by (dt string) row format delimited fields terminated by ‘\t’ location ‘/data/ex_par’;
— 加载数据 load data local inpath ‘/data/soft/hivedata/ex_par.data’ into table ex_par partition(dt=’2020-01-01’);
— 删除表和分区数据的映射关系 alter table ex_par drop partition(dt=’2020-01-01’);
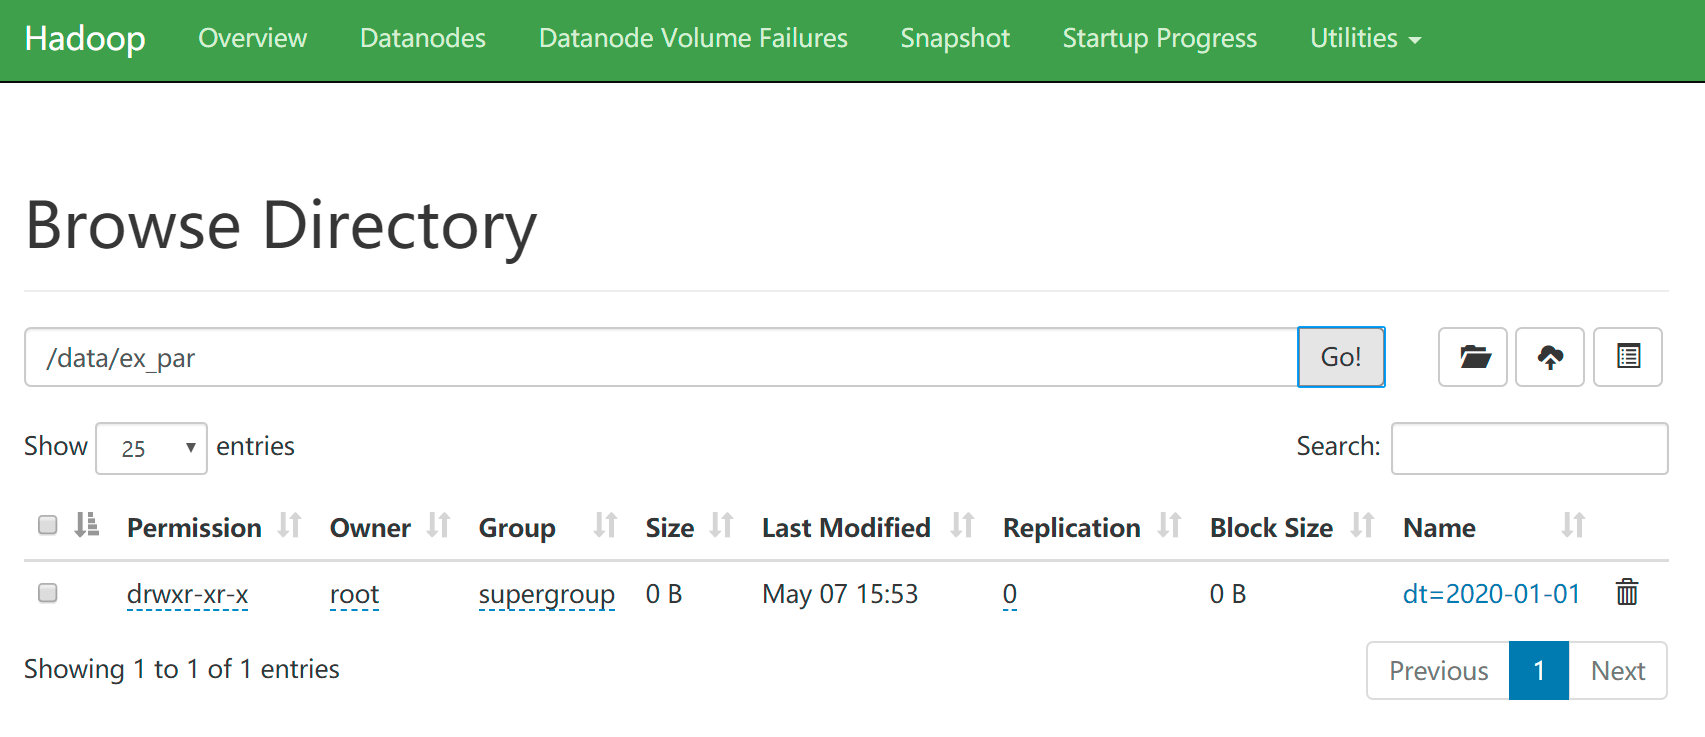
```plsql
-- 查看分区信息,空空如也
hive (default)> show partitions ex_par;
-- 查看表中的数据,空空如也
hive (default)> select * from ex_par;
OK
ex_par.id ex_par.name ex_par.dt
Time taken: 0.279 seconds
因为表和分区数据的映射关系没了,所以查询不到,需要重新绑定
alter table ex_par add partition(dt='2020-01-01') location '/data/ex_par/dt=2020-01-01';总结
- Hive加载数据
- load data local inpath ‘/data/soft/hivedata/ex_par.data’ into table ex_par partition(dt=’20200101’);
- load data …. partition 这条命令做了两个事情
- 1:上传数据
- 2:添加分区(绑定数据和分区之间的关系)
- HDFS加载数据
- hdfs dfs -mkdir /data/ex_par/dt=20200101
- hdfs dfs -put /data/soft/hivedata/ex_par.data /data/ex_par/dt=20200101
- alter table ex_par add partition(dt=’20200101’) location ‘/data/ex_par/dt=20200101’;
- 上面这三条命令做了两件事情,1:上传数据 2:添加分区(绑定数据和分区之间的关系)
- 工作都是用Flume或ELK采集数据后
- 从而创建表,并且生成绑定关系
- Hive加载数据
7.8.6 桶表
- 桶表是对数据进行哈希取值,然后放到不同文件中存储
- 物理上,每个桶就是表(或分区)里的一个文件
- 桶表的作用是:
- 1、数据抽样
- 2、提高某些查询效率,例如join
1、桶表实现
-- 准备数据源表
hive (default)> create table b_source(id int);
-- 加载数据
hive (default)> load data local inpath '/data/soft/hivedata/b_source.data' into table b_source;
-- 查数据
hive (default)> select * from b_source;
OK
b_source.id
1
2
3
4
5
6
7
8
9
10
11
12
Time taken: 0.187 seconds, Fetched: 12 row(s)

-- 创建桶表
create table bucket_tb(
   id int
)clustered by (id) into 4 buckets;

-- 设置reduce任务的数量,最终结果中文件的数量就和reduce任务的数量是挂钩的
set hive.enforce.bucketing=true;

-- 向桶表中添加数据
hive (default)> insert into table bucket_tb select id from b_source where id is not null;
- 按照我们设置的桶的数量为4,这样在hdfs中会存在4个对应的文件,每个文件的大小是相似的
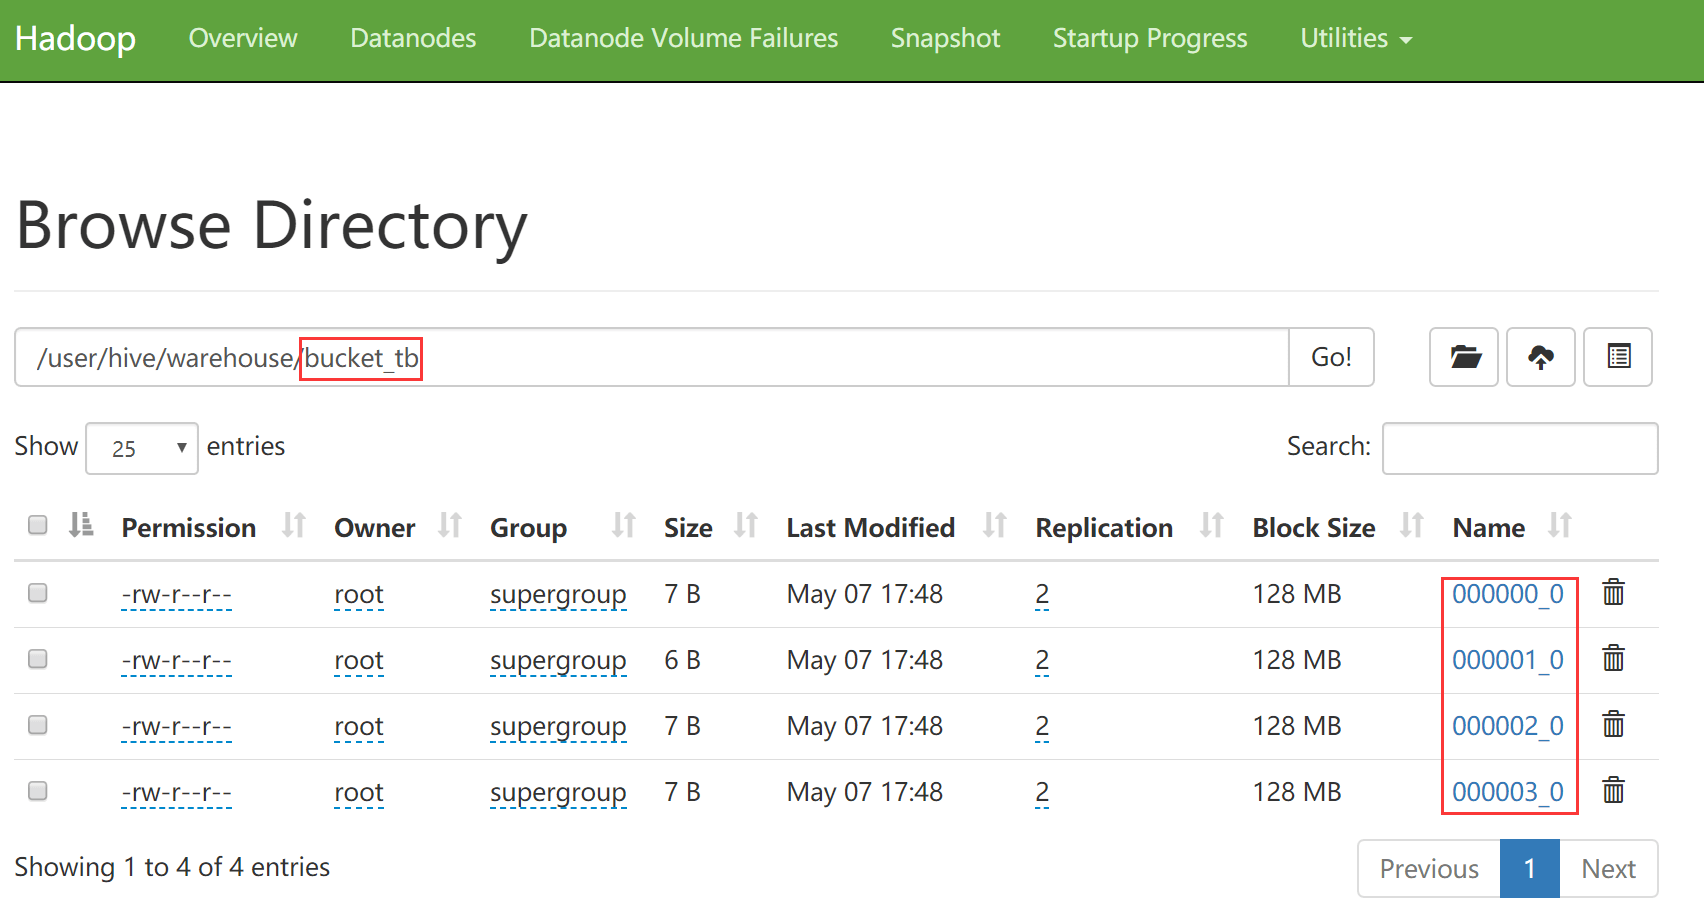
到hdfs上查看桶表中的文件内容,可以看出是通过对buckets取模确定的
[root@bigdata04 ~]# hdfs dfs -cat /user/hive/warehouse/bucket_tb/000000_0
12
8
4
[root@bigdata04 ~]# hdfs dfs -cat /user/hive/warehouse/bucket_tb/000001_0
9
5
1
[root@bigdata04 ~]# hdfs dfs -cat /user/hive/warehouse/bucket_tb/000002_0
10
6
2
[root@bigdata04 ~]# hdfs dfs -cat /user/hive/warehouse/bucket_tb/000003_0
11
7
3
2、数据抽样
假如我们使用的是一个大规模的数据集,我们只想去抽取部分数据进行查看
- 使用bucket表可以变得更加的高效
- select * from bucket_tb tablesample(bucket 1 out of 4 on id);
- tablesample是抽样语句
- 语法解析:TABLESAMPLE(BUCKET x OUT OF y ON column)
- y尽可能是桶表的bucket数的倍数或者因子,而且y>=x
- y表示是把桶表中的数据随机分为多少桶
- x表示取出第几桶的数据
- 例如
- bucket 1 out of 4 on id:根据id对桶表中的数据重新分桶,分成4桶,取出第1桶的数据
- bucket 2 out of 4 on id:根据id对桶表中的数据重新分桶,分成4桶,取出第2桶的数据
- bucket 3 out of 4 on id:根据id对桶表中的数据重新分桶,分成4桶,取出第3桶的数据
- bucket 4 out of 4 on id:根据id对桶表中的数据重新分桶,分成4桶,取出第4桶的数据
- 验证一下效果
- 这里面四个SQL语句,每个SQL语句取出一个桶的数据,最终的总和就是表中的所有数据 ```plsql — 取出第1桶的数据 hive (default)> select * from bucket_tb tablesample(bucket 1 out of 4 on id); OK bucket_tb.id 10 6 2 7 Time taken: 0.062 seconds, Fetched: 4 row(s)
- tablesample是抽样语句
— 取出第2桶的数据 hive (default)> select * from bucket_tb tablesample(bucket 2 out of 4 on id); OK bucket_tb.id 8 4 9 1 11 Time taken: 0.154 seconds, Fetched: 5 row(s)
— 取出第3桶的数据 hive (default)> select * from bucket_tb tablesample(bucket 3 out of 4 on id); OK bucket_tb.id 3 Time taken: 0.059 seconds, Fetched: 1 row(s)
— 取出第4桶的数据 hive (default)> select * from bucket_tb tablesample(bucket 4 out of 4 on id); OK bucket_tb.id 12 5 Time taken: 0.055 seconds, Fetched: 2 row(s)
<a name="yLWOv"></a>
#### 3、提高某些查询效率

- 例如:join查询,**可以避免产生笛卡尔积的操作**
   - select a.id,a.name,b.addr from a join b on a.id = b.id;
- 总结
   - 如果a表和b表已经是分桶表,而且分桶的字段是id字段,那么做这个操作的时候就不需要再进行全表笛卡尔积了
   - 因为分桶之后相同规则的id已经在相同的文件里面了

<a name="Gr3Py"></a>
### 7.8.7 视图

- 使用视图可以**降低查询的复杂度**
- 虚拟表,在HDFS里的warehouse是找不到的
```plsql
-- 创建视图
hive (default)> create view v1 as select id,stu_name from t3_new;

-- 展示表里面可以找到视图
hive (default)> show tables;

-- 通过视图查数据
hive (default)> select * from v1;
7.8.8 综合案例
7.9 Hive函数
7.9.1 Hive函数的基本操作
- 查看所有内置函数:show functions;
- 查看指定函数信息:descfunction FUNC;
- 查看指定函数扩展信息:descfunction extended FUNC;
7.9.2 Hive高级函数的应用
1、分组排序取TopN
- 主要需要使用到 ROW_NUMBER() 和 OVER() 函数
- row_number
- 会对数据编号,编号从1开始
- over
- 可以理解为把数据划分到一个窗口内,里面可以加上partition by,表示按照字段对数据进行分组
- 还可以加上order by 表示对每个分组内的数据按照某个字段进行排序
- row_number
- 需求
- 有一份学生的考试分数信息,语文、数学、英语这三门
- 需要计算出班级中单科排名前三名学生的姓名 ```plsql — 查看测试数据 [root@bigdata04 /]# more /data/soft/hivedata/student_score.data 1 zs1 chinese 80 2 zs1 math 90 3 zs1 english 89 4 zs2 chinese 60 5 zs2 math 75 6 zs2 english 80 7 zs3 chinese 79 8 zs3 math 83 9 zs3 english 72 10 zs4 chinese 90 11 zs4 math 76 12 zs4 english 80 13 zs5 chinese 98 14 zs5 math 80 15 zs5 english 70
— 建表 create external table student_score( id int, name string, sub string, score int )row format delimited fields terminated by ‘\t’ location ‘/data/student_score’;
— 加载数据 [root@bigdata04 hivedata]# hdfs dfs -put /data/soft/hivedata/student_score.data
— 查表数据,先分组,再排序,后编号,然后取前三名 select from ( select ,row_number() over(partition by sub order by score desc) as num from student_score ) s where s.num<=3;
- 高级函数的三种用法
   - row_number()
      - 成绩相同的人,会被分配个第二第三名
   - rank()
      - 成绩相同的人,会并列第二名,后续的人则为第四名
   - dense_rank()
      - 成绩相同的人,会并列第二名,后续的人为第三名

<a name="0SbA4"></a>
#### 2、行转列

- 行转列就是把多行数据转为一列数据
   - 针对行转列这种需求主要需要使用到
   - **CONCAT_WS()**
      - 可以实现根据指定的分隔符拼接多个字段的值,最终转化为一个带有分隔符的字符串
   - **COLLECT_LIST()**
      - 可以返回一个list集合,集合中的元素会重复,一般和group by 结合在一起使用
   - **COLLECT_SET()**
      - 可以返回一个set集合,集合汇中的元素不重复,一般和group by 结合在一起使用
```plsql
-- 查看测试数据
[root@bigdata04 /]# more /data/soft/hivedata/student_favors.data
zs swing
zs footbal
zs sing
zs codeing
zs swing

-- 行转列的结果
zs swing,footbal,sing,codeing,swing

-- 创建数据表
create external table student_favors(
  name string,
  favor string
)row format delimited
fields terminated by '\t'
location '/data/student_favors';

-- 上传数据
[root@bigdata04 /]# hdfs dfs -put /data/soft/hivedata/student_favors.data

-- 查看数据
hive (default)> select * from student_favors;
OK
student_favors.name student_favors.favor
zs swing
zs footbal
zs sing
zs codeing
zs swing
Time taken: 0.175 seconds, Fetched: 5 row(s)

-- collect_list(favor):对name字段进行分组,把favor转成一个数组
select name,collect_list(favor) as favor_list from student_favors group by name;

-- concat_ws(',',collect_list(favor)):把数组中的元素按照指定分隔符转成字符串
select name,concat_ws(',',collect_list(favor)) as favor_list from student_favors group by name;

-- concat_ws(',',collect_set(favor)):去重数据
select name,concat_ws(',',collect_set(favor)) as favor_list from student_favors group by name;

-- 结果如下
zs swing,footbal,sing,codeing
3、列转行
- 列转行就是把多列数据转为一行数据
- 针对行转列这种需求主要需要使用到
- SPLIT()
- 接受一个字串符和切割规则,最终返回一个array数组
- EXPLODE()
- explode(array):表示把数组中的每个元素转成一行
- explode(map) :表示把map中每个key-value对,转成一行,key为一列,value为一列
- LATERAL VIEW
- Lateral view 通常和split, explode等函数一起使用
- split可以对表中的某一列进行切割,返回一个数组类型的字段
- explode可以对这个数组中的每一个元素 转为一行
- lateral view可以对这份数据产生一个支持别名的虚拟表 ```plsql — 查看测试数据 [root@bigdata04 /]# more /data/soft/hivedata/student_favors_2.data zs swing,footbal,sing ls codeing,swing
— 列转行结果 zs swing zs footbal zs sing ls codeing ls swing
— 建表 create external table student_favors_2( name string, favorlist string )row format delimited fields terminated by ‘\t’ location ‘/data/student_favors_2’;
— 上传数据 [root@bigdata04 hivedata]# hdfs dfs -put /data/soft/hivedata/student_favors_2.data
— 查看数据 hive (default)> select * from student_favors_2; OK student_favors_2.name student_favors_2.favorlist zs swing,footbal,sing ls codeing,swing Time taken: 0.131 seconds, Fetched: 2 row(s)
— 先使用split对favorlist字段进行切割 hive (default)> select split(favorlist,’,’) from student_favors_2;
— 再使用explode对数据进行操作 hive (default)> select explode(split(favorlist,’,’)) from student_favors_2;
— laterview相当于把explode返回的数据作为一个虚拟表来使用了,起名字为table1,然后给这个表里面的 那一列数据起一个名字叫favor_new,如果有多个字段,可以再后面指定多个。这样在select后面就可以 使用这个名字了,有点类似join操作 select name,favor_new from student_favors_2 lateral view explode(split(favorlist,’,’)) table1 as favor_new;
— 结果如下 zs swing zs footbal zs sing ls codeing ls swing
<a name="BtTxB"></a>
#### 4、Hive排序函数

- **order by**
   - Hive中的order by跟传统的sql语言中的order by作用是一样的,会对查询的结果做一次全局排序
   - 使用这个语句的时候生成的reduce任务只有一个
- **sort by**
   - Hive中指定了sort by,如果有多个reduce,那么在每个reducer端都会做排序
   - 保证局部排序,但是不能保证全局排序
   - 除非只有一个reduce任务,但这和OrderBy也就没区别了
- **distribute by**
   - 只会根据指定的key对数据进行分区,但是不会排序
   - 一般情况下可以和sort by 结合使用,先对数据分区,再进行排序
   - 两者结合使用的时候distribute by必须要写在sort by之前
- **cluster by**
   - cluster by的功能就是distribute by和sort by的简写形式
   - 也就是 cluster by id 等于 distribute by id sort by id
```plsql
-- 使用之前的表查询
hive (default)> select id from t2_bak
OK
id
1
2
3
4
5
1
2
3
4
5
Time taken: 3.491 seconds, Fetched: 10 row(s)

-- 使用sort by排序
hive (default)> select id from t2_bak sort by id;
......
Hadoop job information for Stage-1: number of mappers: 1; number of reducers:
......
OK
id
1
1
2
2
3
3
4
4
5
5
Time taken: 24.562 seconds, Fetched: 10 row(s)

-- 为什么这里的sort by会全局排序呢?因为只有一个reduce任务,可以设置reduce任务数量为2
hive (default)> set mapreduce.job.reduces = 2;
hive (default)> select id from t2_bak sort by id;
......
Hadoop job information for Stage-1: number of mappers: 1; number of reducers:
......
OK
id
1
3
3
4
5
5
1
2
2
4
Time taken: 27.943 seconds, Fetched: 10 row(s)
-- 此时发现没全局排序了,因为多个reduce,对ORDER BY来说,你动态设置再多的reduce数量都没有用,最后还是只产生1个reduce

-- 使用ditribute by分区
hive (default)> select id from t2_bak distribute by id;
.......
Number of reduce tasks not specified. Defaulting to jobconf value of: 2
.......
OK
id
4
2
4
2
5
3
1
5
3
1
Time taken: 25.395 seconds, Fetched: 10 row(s)

-- 先ditribute by分区,后sort by排序
hive (default)> select id from t2_bak distribute by id sort by id;
.......
Number of reduce tasks not specified. Defaulting to jobconf value of: 2
.......
OK
id
2
2
4
4
1
1
3
3
5
5
Time taken: 24.468 seconds, Fetched: 10 row(s)

-- 使用cluster by
hive (default)> select id from t2_bak cluster by id;
.......
Number of reduce tasks not specified. Defaulting to jobconf value of: 2
.......
OK
id
2
2
4
4
1
1
3
3
5
5
Time taken: 25.495 seconds, Fetched: 10 row(s)
5、Hive分组和去重函数
- group by
- 对数据按照指定字段进行分组
- distinct
- 对数据中指定字段的重复值进行去重 ```plsql — 统计order 表中name 去重之后的数据量
— 执行单个reduce任务 select count(distinct name) from order — 执行并发reduce任务,效率高 select count(*) from (select name from order group by name) tmp
— 分析 第一种:使用distinct会将所有的name都shuffle到一个reducer里面,性能较低 第二种:先对name分组,因为分组的同时其实就是去重,此时是可以并行计算的,然后再计算count总数 ```
7.10 数据倾斜的分析和解决方案

若有收获,就点个赞吧
0 人点赞
