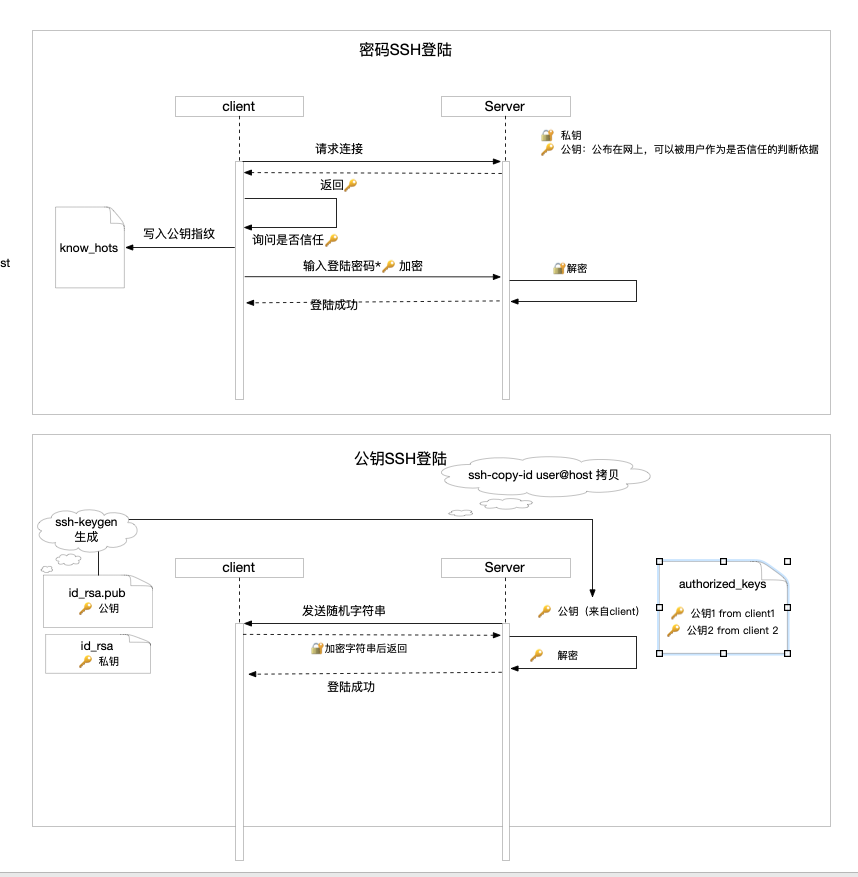
说明:下面的演示都是在在一台工作用的Mac中。
阮一峰:SSH登陆基本讲清楚了在类Linux系统下,SSH登陆是怎么工作的,下面是一些实验。
github是不提供SSH的使用方式的,

1. 服务器公钥如何写入know_hosts
ssh连接git@github.com
$ ssh git@github.comPTY allocation request failed on channel 0Hi tangyefei! You've successfully authenticated, but GitHub does not provide shell access.Connection to github.com closed.
authenticated:意思为“证实是真的”,说明github识别到了用户是tangyefei
但因为github不提供shell的使用方式,因此关闭了连接。
删除公钥后ssh连接git@github.com
$ ping github.comPING github.com (13.250.177.223): 56 data bytes$ ssh-keygen -R 13.250.177.223# Host 13.250.177.223 found: line 2/Users/eleme/.ssh/known_hosts updated.Original contents retained as /Users/eleme/.ssh/known_hosts.old$ ssh git@github.comThe authenticity of host 'github.com (13.250.177.223)' can't be established.RSA key fingerprint is SHA256:nThbg6kXUpJWGl7E1IGOCspRomTxdCARLviKw6E5SY8.Are you sure you want to continue connecting (yes/no/[fingerprint])? yesWarning: Permanently added 'github.com,13.250.177.223' (RSA) to the list of known hosts.PTY allocation request failed on channel 0Hi tangyefei! You've successfully authenticated, but GitHub does not provide shell access.Connection to github.com closed.
Are you sure you want to continue connecting (yes/no/[fingerprint])? yes
意味着我们将服务器公钥的指纹,生成并存储在了know_hosts。以后连接服务器就不用在询问了。
2. 演示如何免密登陆
注:47.111.64.6 是个人在阿里云上的一台服务器。
第一次ssh连接
$ ssh root@47.111.64.6The authenticity of host '47.111.64.6 (47.111.64.6)' can't be established.ECDSA key fingerprint is SHA256:P4ZhsDHqBGjUW709RZgzEYWnaYXY5pzEmr8oKs2+Sb0.Are you sure you want to continue connecting (yes/no/[fingerprint])? yesWarning: Permanently added '47.111.64.6' (ECDSA) to the list of known hosts.root@47.111.64.6's password:Welcome to Alibaba Cloud Elastic Compute Service !Activate the web console with: systemctl enable --now cockpit.socketLast login: Mon Feb 22 14:56:03 2021 from 106.11.255.72
通过(1)通过yes信任这提啊服务器(2)输入密码 完成登陆。
第二次ssh连接
$ ssh root@47.111.64.6root@47.111.64.6's password:Welcome to Alibaba Cloud Elastic Compute Service !Activate the web console with: systemctl enable --now cockpit.socketLast login: Mon Feb 22 18:06:22 2021 from 106.11.255.72
因为已经在know_hosts中存储了服务器公钥的指纹,所以直接输入密码就可以了。
拷贝公钥给服务器后ssh连接
为了方便测试,将 ~/.ssh 文件夹下的 _rsa, _rsa.pub 都删除。测试步骤可以描述为:
- 拷贝公钥到服务器,因为还没生成过,所以报Error
- 使用ssh-keygen生成公钥
- 拷贝公钥到服务器,输入密码后成功
- 免密登陆成功
$ ssh-copy-id root@47.111.64.6/usr/bin/ssh-copy-id: ERROR: No identities found
$ ssh-keygenGenerating public/private rsa key pair.Enter file in which to save the key (/Users/eleme/.ssh/id_rsa):Enter passphrase (empty for no passphrase):Enter same passphrase again:Your identification has been saved in /Users/eleme/.ssh/id_rsa.Your public key has been saved in /Users/eleme/.ssh/id_rsa.pub.The key fingerprint is:SHA256:Rrhpx0gvMZ6l2kyeJiO/XurTAiSdv2NSWVhc9Lpj0XI eleme@E110147.localThe key's randomart image is:+---[RSA 3072]----+| . oo || o. . || . . o= o . ||. + .o.& o || o . o@ S E || . +B = = || .o+oB + || .o**.. . || =*= |+----[SHA256]-----+
$ ssh-copy-id root@47.111.64.6/usr/bin/ssh-copy-id: INFO: Source of key(s) to be installed: "/Users/eleme/.ssh/id_rsa.pub"/usr/bin/ssh-copy-id: INFO: attempting to log in with the new key(s), to filter out any that are already installed/usr/bin/ssh-copy-id: INFO: 1 key(s) remain to be installed -- if you are prompted now it is to install the new keysroot@47.111.64.6's password:Number of key(s) added: 1Now try logging into the machine, with: "ssh 'root@47.111.64.6'"and check to make sure that only the key(s) you wanted were added.
$ ssh root@47.111.64.6Welcome to Alibaba Cloud Elastic Compute Service !Activate the web console with: systemctl enable --now cockpit.socketLast login: Mon Feb 22 18:16:42 2021 from 106.11.255.72
3. Github和SSH
公有repo
在Github上新建一个Public类型的repo,然后在本机执行clone
$ git clone https://github.com/wit-kaizen/note-web.gitCloning into 'note-web'...remote: Enumerating objects: 67, done.remote: Counting objects: 100% (67/67), done.remote: Compressing objects: 100% (56/56), done.remote: Total 67 (delta 11), reused 63 (delta 7), pack-reused 0Unpacking objects: 100% (67/67), done.
可见,克隆Public类型的repo不会要求进行 添加公钥到know_hosts 或 输入密码。
在服务器 47.111.64.6 上,执行clone操作,得到的是一样的结果。
当时,当你进行代码提交时,必然会因为不满足权限而无法提交,从而需要将公钥拷贝配置到Github中。
4. 问题
在本机开启 代理(公司的阿里郎)时,会报
$ git pullfatal: unable to access 'https://github.com/wit-kaizen/note-web.git/': LibreSSL SSL_connect: SSL_ERROR_SYSCALL in connection to github.com:443

