一般来说,日常使用只要记住下图6个命令,就可以了。但是熟练使用,恐怕要记住60~100个命令。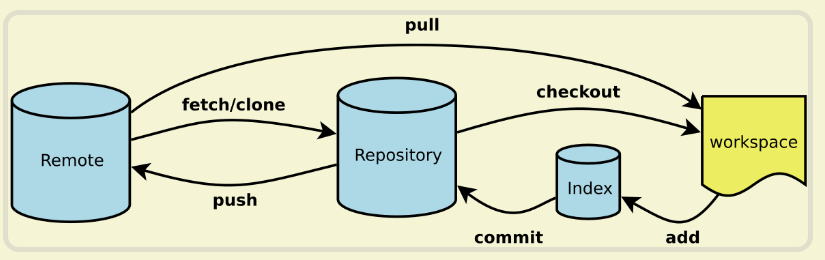
- Workspace:工作区
- Index / Stage:暂存区
- Repository:仓库区(或本地仓库)
- Remote:远程仓库
常用命令
```matlab // 把远程代码下载到本地仓库 git clone http://gitlab.ipipa.cn/portal/h5-vxiao.git
// 初始化git仓库 git init
// 将当前文件所有文件添加到暂存区 git add . // 将指定文件夹下所有文件添加到暂存区 git add src/pages/business/1155
// 将暂存区的文件提交到本地仓库 git commit -m “我是提交的说明”
// 将本地commit提交到远程分支 git push
//查看本地仓库所有分支 git branch
// 查看本地仓库当前状态 git status
// 查看最近3次提交的commit git log -3
// 把现在工作区添加到stash git stash git stash list //查看stash 列表
// 查看最近3条commit提交的文件 git log -3 —name-only
//修改git 远程仓库地址 git remote set-url origin [url]
//更新本地远程分支 git remote prune origin
// 把别分支的某一个commit提交到当前分支上 git cherry-pick commitId
<a name="kOVsD"></a># 新建代码库```matlab# 在当前目录新建一个Git代码库$ git init# 新建一个目录,将其初始化为Git代码库$ git init [project-name]# 下载一个项目和它的整个代码历史$ git clone [url]$ git clone git://github.com/yanhaijing/data.js.git$ git clone git://github.com/schacon/grit.git mypro#克隆到自定义文件夹进入根目录git remote 查看所有远程仓库, git remote xxx 查看指定远程仓库地址git remote set-url origin http://192.168.100.235:9797/john/git_test.git
配置
# 显示当前的Git配置$ git config --list# 编辑Git配置文件$ git config -e [--global]# 设置提交代码时的用户信息$ git config [--global] user.name "[name]"$ git config [--global] user.email "[email address]"ssh-keygen -t rsa -C yanhaijing@yeah.net #生成密钥ssh -T git@github.com #测试是否成功// 查看系统配置git config --system --list// 查看所有配置git config --global --list// 查看本地配置git config --local --list
增加/删除文件
# 添加指定文件到暂存区$ git add [file1] [file2] ...# 添加指定目录到暂存区,包括子目录$ git add [dir]# 添加当前目录的所有文件到暂存区$ git add .# 添加每个变化前,都会要求确认# 对于同一个文件的多处变化,可以实现分次提交$ git add -p# 删除工作区文件,并且将这次删除放入暂存区$ git rm [file1] [file2] ...# 停止追踪指定文件,但该文件会保留在工作区$ git rm --cached [file]# 改名文件,并且将这个改名放入暂存区$ git mv [file-original] [file-renamed]
代码提交
# 提交暂存区到仓库区$ git commit -m [message]# 提交暂存区的指定文件到仓库区$ git commit [file1] [file2] ... -m [message]# 提交工作区自上次commit之后的变化,直接到仓库区$ git commit -a# 提交时显示所有diff信息$ git commit -v# 使用一次新的commit,替代上一次提交# 如果代码没有任何新变化,则用来改写上一次commit的提交信息$ git commit --amend -m [message]# 重做上一次commit,并包括指定文件的新变化$ git commit --amend [file1] [file2] ...
更换仓库
以下均以项目git_test为例:老地址:http://192.168.1.12:9797/john/git_test.git新地址:http://192.168.100.235:9797/john/git_test.git远程仓库名称: origin方法一 通过命令直接修改远程地址进入git_test根目录git remote 查看所有远程仓库, git remote xxx 查看指定远程仓库地址git remote set-url origin http://192.168.100.235:9797/john/git_test.git方法二 通过命令先删除再添加远程仓库进入git_test根目录git remote 查看所有远程仓库, git remote xxx 查看指定远程仓库地址git remote rm origingit remote add origin http://192.168.100.235:9797/john/git_test.git方法三 直接修改配置文件进入git_test/.gitvim config[core]repositoryformatversion = 0filemode = truelogallrefupdates = trueprecomposeunicode = true[remote "origin"]url = http://192.168.100.235:9797/shimanqiang/assistant.gitfetch = +refs/heads/*:refs/remotes/origin/*[branch "master"]remote = originmerge = refs/heads/master修改 [remote “origin”]下面的url即可方法四 通过第三方git客户端修改。以SourceTree为例,点击 仓库 -> 仓库配置 -> 远程仓库 即可管理此项目中配置的所有远程仓库, 而且这个界面最下方还可以点击编辑配置文件,同样可以完成方法三。
分支
# 列出所有本地分支$ git branch# 列出所有远程分支$ git branch -r# 列出所有本地分支和远程分支$ git branch -a# 新建一个分支,但依然停留在当前分支$ git branch [branch-name]# 新建一个分支,并切换到该分支$ git checkout -b [branch]# 新建一个分支,指向指定commit$ git branch [branch] [commit]# 新建一个分支,与指定的远程分支建立追踪关系$ git branch --track [branch] [remote-branch]# 切换到指定分支,并更新工作区$ git checkout [branch-name]# 切换到上一个分支$ git checkout -# 建立追踪关系,在现有分支与指定的远程分支之间$ git branch --set-upstream [branch] [remote-branch]# 合并指定分支到当前分支$ git merge [branch]# 选择一个commit,合并进当前分支$ git cherry-pick [commit]# 删除分支$ git branch -d [branch-name]# 删除远程分支$ git push origin --delete [branch-name]$ git branch -dr [remote/branch]# 创建一个全新的分支$ git checkout --orphan gh-pages
把某个commit新建一个分支
1.git log 查看commit2.git checkout commitId -b '分支名称'
标签
# 列出所有tag$ git tag# 新建一个tag在当前commit$ git tag [tag]# 新建一个tag在指定commit$ git tag [tag] [commit]# 删除本地tag$ git tag -d [tag]# 删除远程tag$ git push origin :refs/tags/[tagName]# 查看tag信息$ git show [tag]# 提交指定tag$ git push [remote] [tag]# 提交所有tag$ git push [remote] --tags# 新建一个分支,指向某个tag$ git checkout -b [branch] [tag]
查看信息
# 显示有变更的文件$ git status# 显示当前分支的版本历史$ git log# 显示commit历史,以及每次commit发生变更的文件$ git log --stat# 搜索提交历史,根据关键词$ git log -S [keyword]# 显示某个commit之后的所有变动,每个commit占据一行$ git log [tag] HEAD --pretty=format:%s# 显示某个commit之后的所有变动,其"提交说明"必须符合搜索条件$ git log [tag] HEAD --grep feature# 显示某个文件的版本历史,包括文件改名$ git log --follow [file]$ git whatchanged [file]# 显示指定文件相关的每一次diff$ git log -p [file]# 显示过去5次提交$ git log -5 --pretty --oneline# 显示所有提交过的用户,按提交次数排序$ git shortlog -sn# 显示指定文件是什么人在什么时间修改过$ git blame [file]# 显示暂存区和工作区的差异$ git diff# 显示暂存区和上一个commit的差异$ git diff --cached [file]# 显示工作区与当前分支最新commit之间的差异$ git diff HEAD# 显示两次提交之间的差异$ git diff [first-branch]...[second-branch]# 显示今天你写了多少行代码$ git diff --shortstat "@{0 day ago}"# 显示某次提交的元数据和内容变化$ git show [commit]# 显示某次提交发生变化的文件$ git show --name-only [commit]# 显示某次提交时,某个文件的内容$ git show [commit]:[filename]# 显示当前分支的最近几次提交$ git reflog
远程同步
# 下载远程仓库的所有变动$ git fetch [remote]# 显示所有远程仓库$ git remote -v# 显示某个远程仓库的信息$ git remote show [remote]# 查看仓库信息$ git remote show origin# 增加一个新的远程仓库,并命名$ git remote add [shortname] [url]# 取回远程仓库的变化,并与本地分支合并$ git pull [remote] [branch]# 上传本地指定分支到远程仓库$ git push [remote] [branch]# 强行推送当前分支到远程仓库,即使有冲突$ git push [remote] --force# 推送所有分支到远程仓库$ git push [remote] --all
撤销
# 恢复暂存区的指定文件到工作区
$ git checkout [file]
# 恢复某个commit的指定文件到暂存区和工作区
$ git checkout [commit] [file]
# 恢复暂存区的所有文件到工作区
$ git checkout .
# 重置暂存区的指定文件,与上一次commit保持一致,但工作区不变
$ git reset [file]
# 重置暂存区与工作区,与上一次commit保持一致
$ git reset --hard
# 重置当前分支的指针为指定commit,同时重置暂存区,但工作区不变
$ git reset [commit]
# 重置当前分支的HEAD为指定commit,同时重置暂存区和工作区,与指定commit一致
$ git reset --hard [commit]
# 重置当前HEAD为指定commit,但保持暂存区和工作区不变
$ git reset --keep [commit]
# 新建一个commit,用来撤销指定commit
# 后者的所有变化都将被前者抵消,并且应用到当前分支
$ git revert [commit]
# 暂时将未提交的变化移除,稍后再移入
$ git stash
$ git stash pop  //删除历史
$ git stash apply  //stash 不删除历史
其他
# 生成一个可供发布的压缩包
$ git archive
$ git help *#获取命令的帮助信息
$ git status#获取当前的状态,非常有用,因为git会提示接下来的能做的操作
更改git分支名称
1. 本地分支重命名(还没有推送到远程)
$ git branch -m oldName newName
2.远程分支重命名 (已经推送远程-假设本地分支和远程对应分支名称相同)

a. 重命名远程分支对应的本地分支
$ git branch -m oldName newName
b. 删除远程分支
$ git push --delete origin oldName
c. 上传新命名的本地分支
$ git push origin newName
d.把修改后的本地分支与远程分支关联
$ git branch --set-upstream-to origin/newName
gititnore文件
把不需要git管理的文件
备份
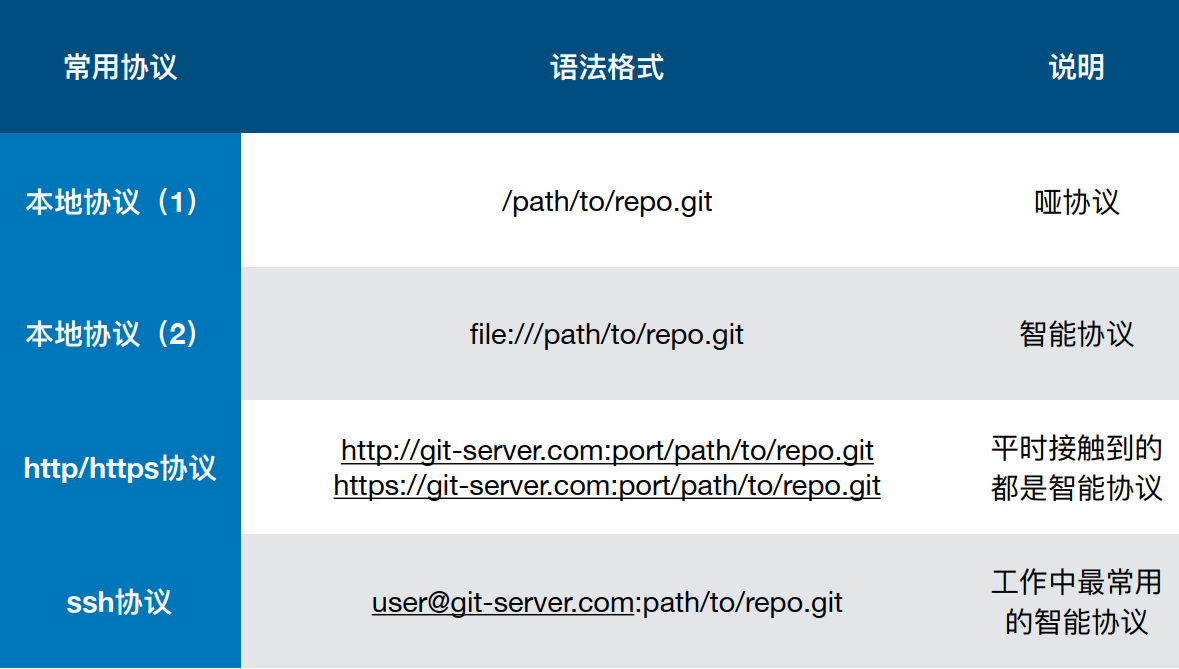
哑协议与智能协议
直观区别:哑协议传输进度不可见,智能协议传输可见
传输速度:智能协议比哑协议传输速度快
公私钥
Git禁用命令
git reset —hard
git push -f //强行更改
集成分支 不允许更改
SSH
1、配置用户名和邮箱
$ git config --global user.name "Marco"
$ git config --global user.email "matao_1891@163.com"
2、配置ssh密钥
1)生成密钥
$ ssh-keygen -t rsa -C "matao_1891@163.com"
2)查看公钥
$ cat ~/.ssh/id_rsa.pub
ssh-rsa AAAAB3NzaC1yc2EAAAADAQABAAABAQC0X6L1zLL4VHuvGb8aJH3ippTozmReSUzgntvk434aJ/v7kOdJ/MTyBlWXFCR+HAo3FXRitBqxiX1nKhXpHAZsMciLq8vR3c8E7CjZN733f5AL8uEYJA+YZevY5UCvEg+umT7PHghKYaJwaCxV7sjYP7Z6V79OMCEAGDNXC26IBMdMgOluQjp6o6j2KAdtRBdCDS/QIU5THQDxJ9lBXjk1fiq9tITo/aXBvjZeD+gH/Apkh/0GbO8VQLiYYmNfqqAHHeXdltORn8N7C9lOa/UW3KM7QdXo6J0GFlBVQeTE/IGqhMS5PMln3 admin@admin-PC
3)配置到github/gitlab
找到settings -> SSH keys 复制上面公钥进key文本域,起个title
4)查看配置是否成功
$ ssh -T git@github.com

若有收获,就点个赞吧
0 人点赞
