原型 prototype
function对象(函数是一种特殊的对象)都有一个属性prototype
function Handphone() {}console.log(Handphone.prototype); // {constructor: ƒ}
prototype属性又名为「原型」,prototype也是一个对象。
既然prototype是个对象,那我们能不能保存点什么?
function Handphone(color, brand) {this.color = color;this.brand = brand;this.screen = "18:9";this.system = "Android";}// 在 Handphone 函数的 prototype 上保存些属性Handphone.prototype.rom = "64G";Handphone.prototype.ram = "6G";console.log(Handphone.prototype)// {rom: '64G', ram: '6G', constructor: ƒ}
既然已经保存了那我们看看「实例对象」能不能访问得到?
function Handphone(color, brand) {this.color = color;this.brand = brand;this.screen = "18:9";this.system = "Android";}// 在 Handphone 函数的 prototype 上保存些属性Handphone.prototype.rom = "64G";Handphone.prototype.ram = "6G";// 实例化对象拥有的属性不会去原型上寻找Handphone.prototype.screen = "16:9";Handphone.prototype.call = function () {console.log("i am calling somebody");};var hp1 = new Handphone("red", "xiaomi");var hp2 = new Handphone("black", "huawei");// 能不能访问 prototype 对象呢?console.log(hp1.rom, hp1.screen); // 64G, 18:9console.log(hp2.ram, hp2.screen); // 6G, 18:9hp2.call(); // i am calling somebody
:::info
💡 实例化对象拥有的属性不会去原型上寻找。
:::
以上代码我们通过「实例化对象」直接访问prototype上面得属性或方法,发现竟然可以正常的打印,因此证明:「实例化对象」是可以访问「构造函数」的prototype属性。
(后面讲解为什么可以直接访问原型上的属性,而不需要 hp1.prototype.rom)
以上我们认识了prototype这个对象,那么prototype到底是什么东西?
:::success
其实prototype就是定义「构造函数」构造出每个「实例化对象」的公共祖先。
结合以上代码片段也就是hp1和hp2的公共祖先。
所有被「构造函数」构造出的「实例化对象」都可以继承**prototype**(原型)上的属性和方法。
:::
原型的真正作用:「实例化对象」往往有一些写死的值,这些写死的值每次new的时候都会走一遍「构造函数」内部的流程,这样的写法代码其实是冗余的,也是一种耦合,所以这种情况下能不能让「实例化对象」直接继承谁,在这种时候就可以使用原型挂载一些属性和方法。
还有我们在看到别人开发库的时候,方法都会写到原型上面,只有部分属性写在构造函数内部,这是因为属性往往都是配置项,而方法都是固定一样的。
实例化对象操作 prototype
// 实例化对象查询原型上面的属性function Test() {this.name = "proto";}Test.prototype.name = "prototype";var test = new Test();console.log(test); // {name: 'proto'}console.log(Test.prototype); // {name: 'prototype', constructor: ƒ}// 实例化对象无法新增原型上的属性// 只会新增到自己的实例上function Test() {this.name = "proto";}Test.prototype.name = "prototype";var test = new Test();test.num = 1;console.log(test); // {name: 'proto', num: 1}console.log(Test.prototype); // {name: 'prototype', constructor: ƒ}// 实例化对象无法删除原型的属性function Test() {this.name = "proto";this.num = 1;}Test.prototype.name = "prototype";var test = new Test();deletee test.nameconsole.log(test); // {num: 1}console.log(Test.prototype); //{name: 'prototype', constructor: ƒ}// 实例化对象无法更改原型上的属性// 只会更改实例化对象自身的属性function Test() {this.name = "proto";}Test.prototype.name = "prototype";var test = new Test();test.name = "proto2";console.log(test); // {name: 'proto2', num: 1}console.log(Test.prototype); //{name: 'prototype', constructor: ƒ}
简化 prototype 属性
既然prototype是个对象,那我们就没必要一行一行的去赋值,可以简化成字面量的形式。
function Handphone(color, brand) {this.color = color;this.brand = brand;this.screen = "18:9";this.system = "Android";}Handphone.prototype = {rom: "64G",ram: "6G",screen: "16:9",call: function () {console.log("i am calling somebody");},};var hp1 = new Handphone("red", "xiaomi");var hp2 = new Handphone("black", "huawei");// 能不能访问 prototype 对象呢?console.log(hp1.rom, hp1.screen); // 64G, 18:9console.log(hp2.ram, hp2.screen); // 6G, 18:9hp2.call(); // i am calling somebody
构造器 constructor
我们再打印「构造函数」的prototype属性的时候能看到prototype对象有个constructor属性。
function Handphone(color, brand, system) {this.color = color;this.brand = brand;this.system = system;}console.log(Handphone.prototype)

更改 constructor
其实**constructor**属性指向的就是「构造函数」本身!!!
结合以上代码,Handphone构造函数对象有一个prototype属性,prototype是个对象,该对象有一个constructor属性,该属性指向构造函数本身。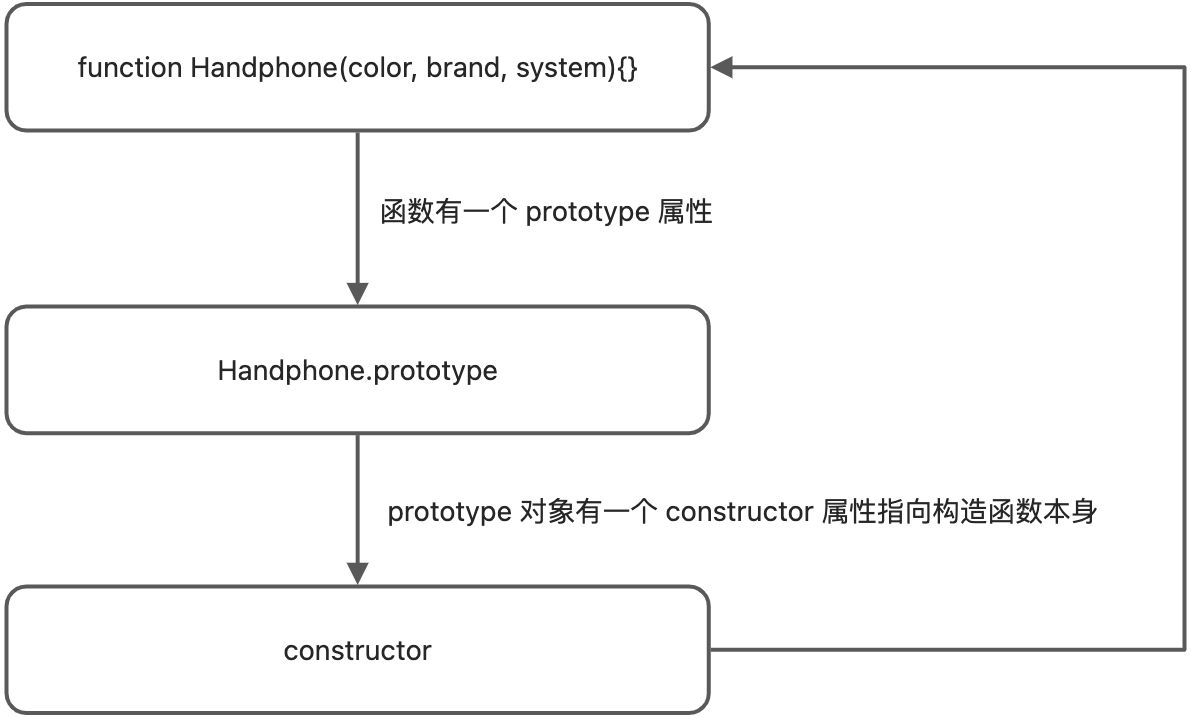
原型的constructor还可以强制指定为另外的构造函数。
function Telephone() {}function Handphone(color, brand, system) {this.color = color;this.brand = brand;this.system = system;}// 强制指定另外的构造函数 constructor 为 TelephoneHandphone.prototype = {constructor: Telephone};var hp1 = new Handphone("black", "iPhone", "IOS");// constructor 指向构造函数本身 Handphoneconsole.log(Handphone.prototype);

实例化对象 proto
先看代码:
function Car() {}Car.prototype.name = "Benz";var car = new Car();console.log(car);
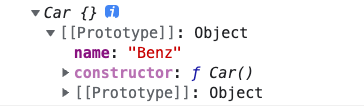
以上代码我们能看到car实例化对象有一个__proto__属性(也就是[[Prototype]]),
__proto__属性也是一个对象,该对象保存了Car构造函数的prototype属性。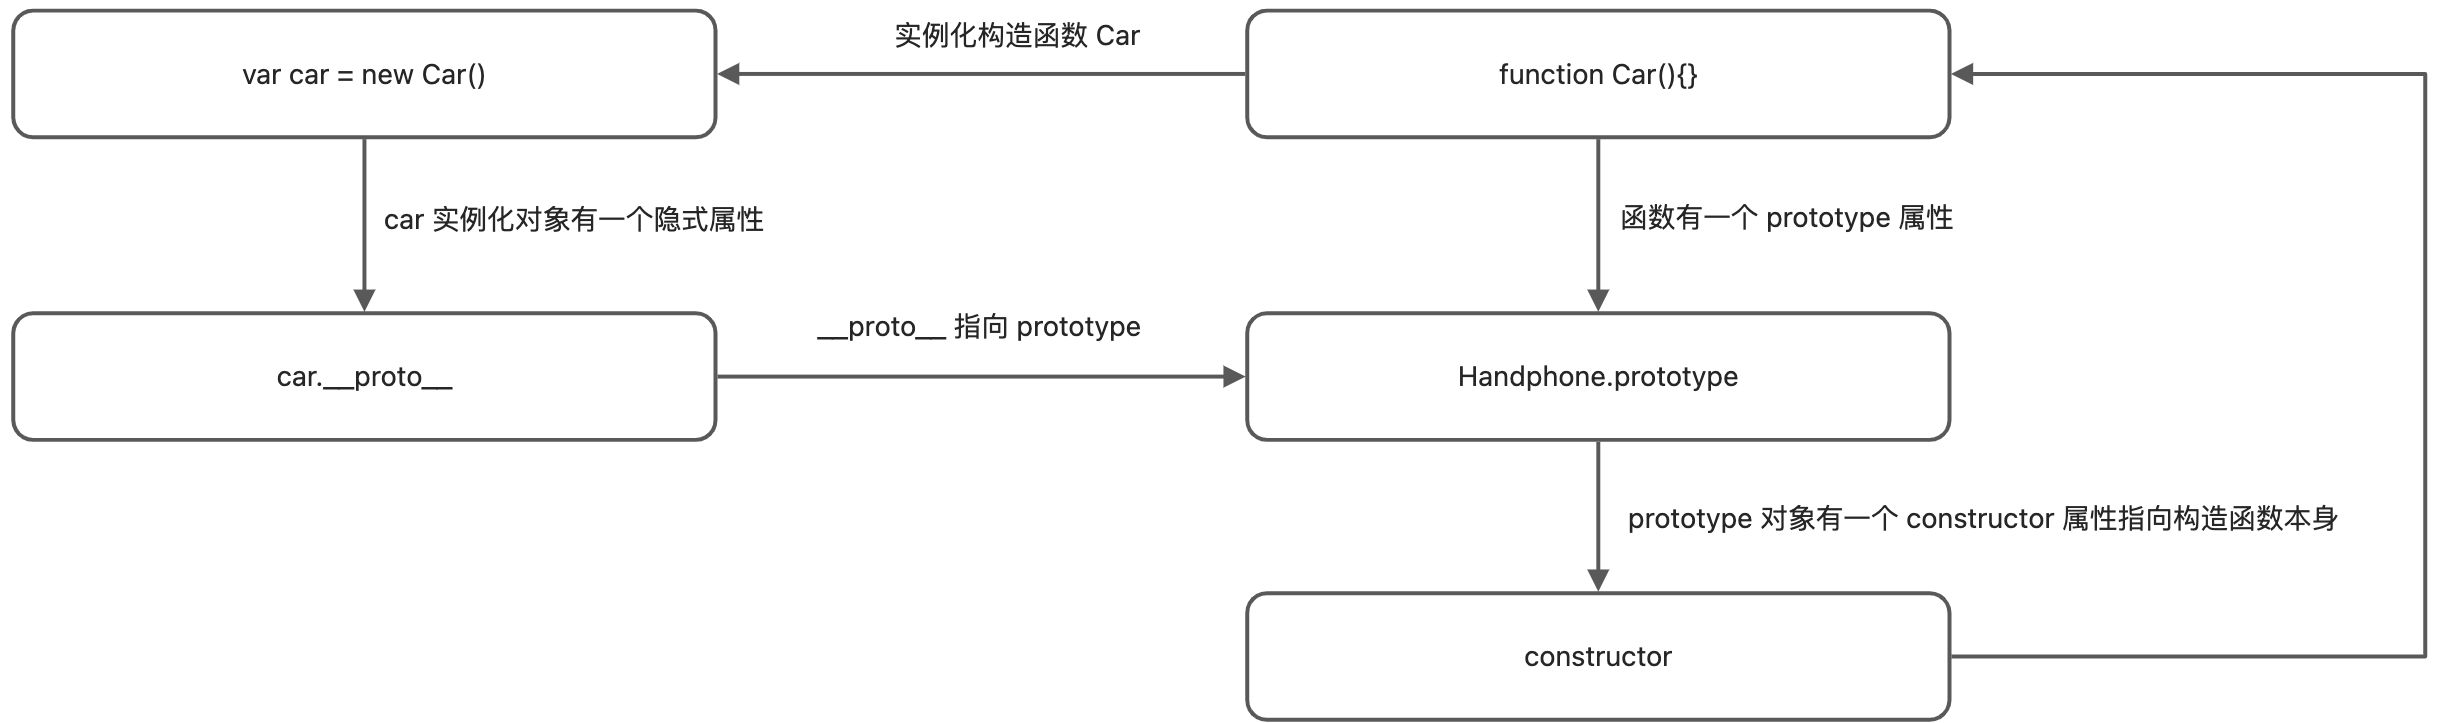
:::info
__proto__是实例化之后的结果,既然是实例化之后的结果,那么__proto__就是new过程中this对象的属性。
展开__proto__对象发现里面存储了构造函数的prototype__proto__是系统内置的属性,作用就是保存构造函数的prototype属性对象。
:::
function Car() {}Car.prototype.name = "Benz";var car = new Car();console.log(car);// ========== 分解 ==========/*** 当构造函数 new 的时候产生 this 对象,this对象 默认新增属性 __proto__* __proto__ 保存了构造函数的 prototype** function Car() {* var this = {* __proto__: Car.prototype* }* }** 所以 __proto__ 是属于对象实例**/
所以这就是为什么实例化对象能直接访问构造函数原型上属性的原型,因为它是通过**__proto__**属性去访问的。
更改实例化对象的 __proto__
function Person() {};Person.prototype.name = "张三";var p1 = {name: "李四",};var person = new Person();console.log(person, person.__proto__); // Person {}, {name: "张三"}person.__proto__ = p1;console.log(person, person.__proto__); // Person {}, {name: "李四"}
接下来看几个例子 🌰 :
还有一种情况就是更改构造函数的prototype对象和重写构造函数prototype对象的区别
function Car() {}Car.prototype.name = "Mazda";var car = new Car();Car.prototype.name = "Benz";console.log(car.name) // Benz
function Car() {}Car.prototype.name = "Mazda";var car = new Car();Car.prototype = {name: "Benz",};console.log(car.name); // Mazda/*** 因为 Car 在运行 new 的时候 this.__proto__ 已经指向了 Car.prorotype 对象* 实例化之后重写了 Car.prototype 就和 实例化对象.__proto__ 没关系了* 和上段代码的主要区别在于「重写了构造函数的 prototype 对象」*/

闭包立即执行函数
我们在之前的学习过程认识了闭包
function test() {var a = 1;function plus1() {a++;console.log(a);}return plus1;}var plus = test();plus(); // 2plus(); // 3plus(); // 4
而闭包的原理就是test函数作用域内部的plus1函数被返回到全局执行执行,plus1函数牵制这test函数中的a变量。
既然知道了闭包的原理,那我们能不能用window的方式来实现一个闭包。
function test() {var a = 1;function add() {a++;console.log(a);}window.add = add;}test();add(); // 2add(); // 3add(); // 4
这样也完全实现了闭包。
那我们能不能用「立即执行函数」实现一个闭包呢?
var res = (function () {var a = 1;function add() {a++;console.log(a);}return add;})();res(); // 2res(); // 3res(); // 4
结果依然是能够操作函数内部的变量a
以上代码依然是通过return的方式实现闭包,我们用window接着再来优化一下:
(function () {var a = 1;function add() {a++;console.log(a);}window.add = add;})();add(); // 2add(); // 3add(); // 4
插件开发
既然我们知道了可以通过window来实现闭包,我们发现有些工具库开发的时候是直接可以实例化的
new Vue({// ...})
其实它内部的原理就是通过挂载到window上,然后再实例化
(function () {// 防止变量污染// 内部的变量随意声明使用,外界无法访问和互相干扰function Test() {}Test.prototype.name = "ceshi";// 主要的是挂载到 window 上window.Test = Test;})();var test = new Test();console.log(test)

若有收获,就点个赞吧
0 人点赞
