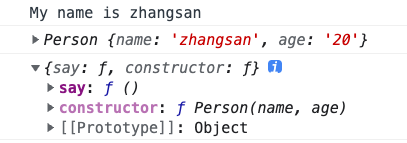
首先回顾一下ES5时想要创建实例化对象的写法:
function Person(name, age) {this.name = name;this.age = age;}// 在 Person 的原型上新增方法Person.prototype.say = function () {console.log("My name is " + this.name);};let person = new Person("zhangsan", "20");person.say();console.log(person);console.log(Object.getPrototypeOf(person));
class 的基本用法
ES6规定了class关键字进行构造函数的定义,主要目的是模仿其他类语言的「类」,其本质上就是ES5构造函数的语法糖。
以下是一个「类」的基本写法:
class Person {// 给构造函数传递参数constructor(name, age) {// 实例化的私有属性this.name = name;this.age = age;}}let person = new Person("张三", 20);console.log(person);
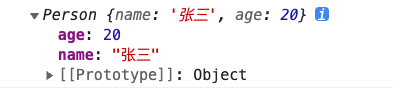
**constructor**函数用于接受实例化时传递的参数,如果你没有写**constructor**函数系统也不会报错,而是默认给你创建一个
除了基本写法不同之外,给「类」新增原型方法(也称为公共方法)也不同:
class Person {// 给构造函数传递参数constructor(name, age) {// 实例化的私有属性this.name = name;this.age = age;}// 不用写逗号// 公共的 say 方法say() {console.log("My name is " + this.name);}}let person = new Person("张三", 20);person.say(); // My name is 张三
:::danger
⚠️ 注意calss不是对象,所以constructor方法和say方法之间不用写逗号。
:::
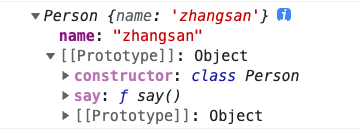
class没有公共的属性,如果直接赋值一个变量该变量会变成实例化对象的私有属性:
class Person{name = "zhangsan";say(){}}console.log(new Person());
虽然class对构造函数进行了语法糖的封装,但是其本质上还是一个函数:
class Person{}console.log(typeof Person); // function
那么如何将公有方法进行私有化?
第一种就是命名的时候加以区别:
class Person{say(){}_eat(){} // _eat 就是一个私有的方法}
但是这样的方法只是形式上私有,实际仍然可以被操作,所以第二种办法就是使用Symbol将方法名唯一化。
const eat = Symbol("eat");class Person{say(){}// 公有的方法私有化[eat]() {console.log("eat");}}
另外一个点和ES5不同的是class的原型方法不会被遍历:
// ES5function Person(){}Person.prototype.say = function(){}Person.prototype.eat = function(){}console.log(Object.keys(Person.prototype)); // ['say', 'eat']// ES6class Person{say(){}eat(){}}console.log(Object.keys(Person.prototype)); // []
class也可以像函数表达式的方式进行声明:
var A = function(){}var B = class{};let b = new B();
class也存在暂时性死区:
new A();function A(){}new B(); // B is not definedclass B{};
class还可以设置存值函数和取值函数:
class Person {"use strict" // class 默认就是严格模式,不需要手动 "use strict"get name() {return "123";}set name(newVal) {console.log("789");}}let person = new Person();console.log(person.name); // 123person.name = "456"; // 789
如果想要给class设置静态的属性和方法需要使用static关键字:
// ES5function A(){}A.name = "zhangsan"A.say= function(){}// ES6class B{static name = "zhangsan";static say() {}}
class 继承
ES5的时候如果想要实现继承是比较麻烦的,需要指来指去。
继承深入
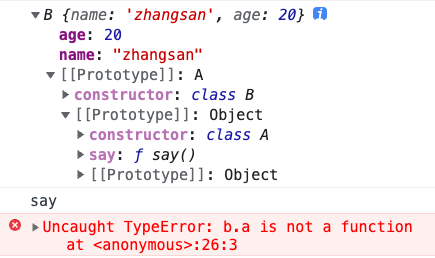
到了ES6使用extends+super就可以实现继承(不过仅限于class内)
class A{constructor(name) {this.name = name;}// 静态方法不会被继承static a() {console.log("静态方法a");}say() {console.log("say");}}class B extends A{constructor(age) {// super 必须是基于 constructor 内部// 继承父类的实例后才能使用 thissuper("zhangsan");this.age = age;}}let b = new B(20);console.log(b);b.say();b.a(); // b.a is not a function
:::danger
ES6要求,子类的构造函数必须执行一次super函数,否则引擎就会报错。
:::
super使用的更多细节:
实现 class 的过程
结合上面的案例我们知道了class有以下这些特点:
- 暂时性死区
- 严格模式
- 原型方法不能枚举
- 必须使用
new进行实例化 - 默认的
constructor
根据这些特点我们可以模拟一个class的过程:
class Person {constructor(name, age) {this.name = name;this.age = age;}static eat() {console.log("eat function");}say() {console.log("say function");}drink() {console.log("drink function");}}
// 判断必须使用new进行实例化function _classCallCheck(instance, Constructor) {if (!instance instanceof Constructor) {throw new Error("Cannot call a class as a function");}}// 定义构造函数的属性var _createClass = (function () {function defineProperties(target, props) {for (let index = 0; index < props.length; index++) {var descriptor = props[index];descriptor.enumerable = descriptor.enumerable || false;descriptor.configurable = true;if ("value" in descriptor) {descriptor.writable = true;}Object.defineProperty(target, descriptor.key, descriptor);}}return function (Constructor, protoProps, staticProps) {if (protoProps) {defineProperties(Constructor.prototype, protoProps);}if (staticProps) {defineProperties(Constructor, protoProps);}return Constructor;};})();// 立即执行函数var Person = (function () {function Person(name, age) {_classCallCheck(this, Person);this.name = name;this.age = age;}// 赋值原型属性和静态属性_createClass(Person,[{key: "say",value: function () {console.log("say");},},{key: "eat",value: function () {console.log("eat");},},],[{key: "drink",value: function () {console.log("drink");},},]);return Person;})();
装饰器
什么是装饰器?
把对象进行修饰,修饰的同时并不影响实际的使用,只是新增一些功能。
例如给class类增加一个装饰器:
function testable(target, name, descriptor) {// descriptor 和 Object.defineProperty 中的 descriptor 是一样的// 都是对属性的特性进行定义}@testableclass Person {}
给class的方法新增一个装饰器:
function readonly(target, name, descriptor) {descriptor.writable = false;}class Person {@readonlysay() {console.log("say function");}}
如果装饰器后面需要跟参数,装饰器函数则需要使用闭包的形式:
function readonly(str) {console.log(str);return function(target, name, descriptor){descriptor.writable = false;}}class Person {@readonly("123")say() {console.log("say function");}}
使用装饰器给class方法新增日志:
let log = (type) => {return function show(target, name, descriptor) {// descriptor.value 就表示属性的值,也就是函数let src_method = descriptor.value;// 重写了 descriptor.valuedescriptor.value = (...arg) => {src_method.apply(target, arg);console.log(type);};};};class AD {@log("show")show() {console.log("ad is show");}@log("click")click() {console.log("ad is click");}}new AD().show();// ad is show// shownew AD().click();// ad is click// click

若有收获,就点个赞吧
0 人点赞
