渲染函数也称为**render**函数,作用就是把虚拟 DOM 转换为真实 DOM 的渲染行为。
编译与渲染过程
那么 Vue 是怎么把组件中的<template>一步一步转换为真实 DOM 的呢?
例如下面这段代码:
<template><div id="box"><div class="article-box"><h1 class="title">{{ title }}</h1><p><span>{{ author }}</span> - <span>{{ dateTime }}</span></p><p class="content">{{ content }}</p></div></div></template>
1、引入组件
⬇️ ⬇️ ⬇️
2、提取<template>模版转换为字符串
⬇️ ⬇️ ⬇️
3、编译模版字符串为 AST 树
组件模版中不只有 HTML 能解析的东西也有不认识的东西,例如 v-if、插值表达式等等,浏览器无法解析这些属性,这就需要一种方式把这些浏览器不认识的属性「优化掉」,所以就需要把模版字符串转换为 AST 树。
AST 树是一种自定义的语法树,目的就是把浏览器不认识的东西都解析优化掉,转换为一种对应的 JS 逻辑且从字符串中移除掉,最后剩下一些浏览器能认识的东西。
⬇️ ⬇️ ⬇️
4、把 AST 树转换为虚拟 DOM 树
虚拟 DOM 就是对真实 DOM 的一种描述。
为什么需要虚拟 DOM ?
例如下面这段 DOM 结构:
<span>123</span>
如果没有虚拟 DOM ,我们想要更改<span>的内容一般都使用:
span.innerText = "123";
从逻辑角度来说,这句代码执行后 DOM 肯定会进行更新,但其实这是没有必要的!所以我们可以进行对比判断是否需要继续更新:
span.innerText !== "123" && (span.innerText = "123");
但是这样需要频繁的去操作获取 DOM。
可以通过虚拟 DOM 的去描述这个 DOM :
const vDOM = {tag: 'span',attrs: {},children: "123"}
当我们需要更改<span>的内容时,我们只需要去和之前的<span>内容进行对比,如果有变化再进行更新。
再比如这段 HTML:
<span><span>123<span>234</span></span></span>
当我们去更改的时候:
span.innerText = `<span>123<span>345</span></span>`;
但其实内容 123 并没有进行更改,如果不使用虚拟 DOM 就会把整个<span>都进行更新。而虚拟 DOM 会逐一的进行对比,只会去更新发生了变化的 DOM。
:::info
所以这就是虚拟 DOM 的好处,虚拟 DOM 是为了尽最大的能力去减少对 DOM 的操作。
:::
⬇️ ⬇️ ⬇️
5、虚拟 DOM 树转换为真实的 DOM 树
⬇️ ⬇️ ⬇️
6、当数据发生变化时,虚拟 DOM 树会进行对比,然后打一个「补丁 patch」
DOM 会使用 Diff 算法把新旧 DOM 进行对比,然后形成 patch 对象,该 patch 对象记录了对比后差异,然后根据 patch 对象去更新相应的内容。
7、更新真实的 DOM
以上 7 步就是 Vue 组件的编译、渲染过程!!!
h 函数
在 Vue2 的时候想要创建一个 Vue 的应用实例的时候会传递一个render函数,render函数通过 h 函数把根组件进行解析。
new Vue({render: (h) => h(App)}).$mount('#app')
文章的开头,我们就说了render函数就是把虚拟 DOM 渲染为真实的 DOM,那么 h 函数到底是干啥的???**h()**是 hyperscript 的简称,意思是“能生成 HTML (超文本标记语言) 的 JavaScript”。这个名字来源于许多虚拟 DOM 实现默认形成的约定。一个更准确的名称应该是**createVnode()**,意思是创建虚拟节点。
但当你需要多次使用渲染函数时,一个简短的名字h()会更省力。
:::info
所以h()就是用来创建 vNode (Virtual Node) 虚拟节点的,多个虚拟节点组合就会形成虚拟 DOM 树,虚拟 DOM 就是对真实 DOM 的描述。
:::
所以,当使用h()创建 DOM 的时候,直接省略了把模版字符串转换为 AST 再转换为虚拟 DOM 的过程,因为h()会直接返回一个虚拟 DOM!!!
创建 vNode
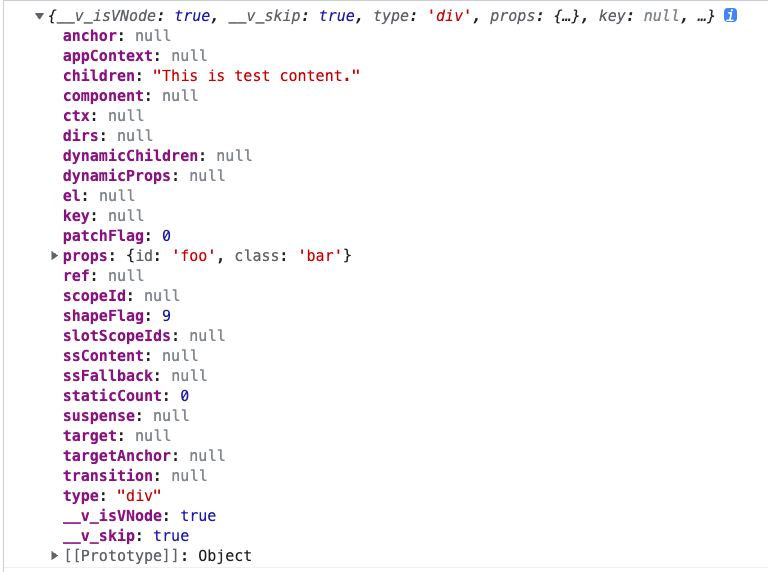
Vue 提供了一个h()函数用于创建 vnodes:
import { h } from 'vue'const vnode = h('div', // type{ id: 'foo', class: 'bar' }, // props"This is test content.")
h()函数的使用也可以更加灵活:
来源于 Vue 文档:https://cn.vuejs.org/guide/extras/render-function.html#creating-vnodes
// 除了类型必填以外,其他的参数都是可选的h('div')h('div', { id: 'foo' })// attribute 和 property 都能在 prop 中书写// Vue 会自动将它们分配到正确的位置h('div', { class: 'bar', innerHTML: 'hello' })// 像 `.prop` 和 `.attr` 这样的的属性修饰符// 可以分别通过 `.` 和 `^` 前缀来添加h('div', { '.name': 'some-name', '^width': '100' })// 类与样式可以像在模板中一样// 用数组或对象的形式书写h('div', { class: [foo, { bar }], style: { color: 'red' } })// 事件监听器应以 onXxx 的形式书写h('div', { onClick: () => {} })// children 可以是一个字符串h('div', { id: 'foo' }, 'hello')// 没有 props 时可以省略不写h('div', 'hello')h('div', [h('span', 'hello')])// children 数组可以同时包含 vnodes 与字符串h('div', ['hello', h('span', 'hello')])
:::warning
⚠️ 注意
当h()的子节点是一个元素节点的时候,必须再使用h()进行包裹!!!
:::
h('div', null, [h('span', null, 'hello'),h('span', null, 'world'),"This is text content."])
得到的 vnode 为如下形式:
const vnode = h('div', { id: 'foo' }, [])vnode.type // 'div'vnode.props // { id: 'foo' }vnode.children // []vnode.key // null
例如我想对开头那段 HTML 用h()进行表达:
<template><div id="box"><div class="article-box"><h1 class="title">{{ title }}</h1><p><span>{{ author }}</span> - <span>{{ dateTime }}</span></p><p class="content">{{ content }}</p></div></div></template>
<script>import { h } from "vue";export default{data() {return {title: "This is title.",author: "Xiechen",dateTime: "2023/05/23",content: "This is content."};},// 我们可以使用 render 选项来声明渲染函数// render() 函数可以访问同一个 this 组件实例render() {return h("div",{id: "box"},h("div",{class: "article-box"},[h("h1",{class: "title"},this.title),h("p", null, [this.author + "-",h("span", { class: "date-time" }, this.dateTime)]),h("p", { class: "content" }, this.content)]));}}</script>
我们在<template>中写的任何东西都可以使用h()来表达,但是h()不是虚拟节点,而是开发层面对虚拟节点的一种描述,也就是对<template>的描述,h()返回的是一个虚拟节点对象,然后组成虚拟节点书,最后组成虚拟 DOM 树。
:::warning
⚠️ 注意
在单文件 SFC 中,如果 render 选项也同时存在于该组件中,template 将被忽略。
如果应用的根组件不含任何 template 或 render 选项,Vue 将会尝试使用所挂载元素的 innerHTML 来作为模板。
:::
h 函数使用的案例
来源于 Vue 文档 https://cn.vuejs.org/guide/extras/render-function.html#render-function-recipes
1、一般写法
import { h } from "vue";const vNode = h("h1", null, "This is title");
当h()没有 props/attrs,默认第二个参数为 children。
import { h } from "vue";const vNode = h("h1", "This is title")const vNode2 = h("h1", ['"This is title"',h('span', null, "author")])
但是更推荐在没有第二个参数的情况下,使用null或者{}进行占位,这样可以避免一定的混乱!
2、vNode 必须是唯一的
多个 children,不要使用同一个虚拟节点,这样会重复使用 vNode,虽然能渲染,但是更新的时候会存在问题。
function render(){const vNode = h("li", null, "123");// 错误的行为!!!return h('div', null, [vNode,vNode])}
function render(){// 推荐这样操作return h('ul', null, Array.from({length:6}).map((el, index)=>{return h('li',null,index)}))}
3、当你用h()渲染一个全局组件的时候,但是又拿不到该组件的实例,你需要使用resolveComponent()来把组件名称进行解析。
import { createApp } from "vue";const app = createApp(App);// 注册全局组件app.component("MyTest", {render: () => h("div", null, "This is MyTest content.")});app.mount("#app");
resolveComponent()接收一个组件名称:
import { h, resolveComponent } from "vue";function render(){return h(resolveComponent("MyTest"));}
如果你能导入了 Vue 的组件,你可以直接把组件的实例传递给h(),这意味着使用渲染函数时不再需要注册组件了:
import TestComp from "./components/TestComp.vue";function render(){return h(TestComp);}
4、动态组件
动态组件需要使用resolveDynamicComponent()进行解析。
import { h, defineAsyncComponent, resolveDynamicComponent } from "vue";const Comp1 = defineAsyncComponent(() => import("./components/Comp1.vue"));const Comp2 = defineAsyncComponent(() => import("./components/Comp2.vue"));export default {data() {return {isOpen: true,currentComponentName: "Comp1"};},computed: {currentComponent() {return this.currentComponentName === "Comp1" ? Comp1 : Comp2;}},render(){const dComponent = resolveDynamicComponent(this.currentComponent);return h("div", null, [h(dComponent),h("button", {onClick: () => {this.currentComponentName = this.currentComponentName === "Comp1" ? "Comp2" : "Comp1"}}, "Switch Component")]);}}
5、模拟 v-if 的操作h()无法使用v-if指令,所以需要使用原生的 JS 去模拟
function render(){if(true){return h('h1',null,"This is title.")}return h('h2',null,"This is article.")}
6、模拟 v-show 的操作
function render(){return h("h1",{style: {display: this.isOpen ? "none" : ""}},"This is title.");}
7、模拟 v-for 的操作
function render(){return h('ul',this.items.map(({ id, text }) => {return h('li', { key: id }, text)}));}
8、模拟 v-on 和 v-model
import { h } from "vue";import VModel from "./components/VModel.vue";function render(){return h(VModel, {username: "default username",password: "default password","onUpdate:username": (value) => console.log(value),"onUpdate:password": (value) => console.log(value),onSubmit: (value) => console.log(value)});}
:::warning
⚠️ 注意
必须使用on开头且小驼峰的形式,来接收子组件emit出来的事件。
:::
<script>import { h } from "vue";export default {name: "VModel",props: {username: String,password: String},emits: ["update:username", "update:password", "submit"],render() {return h("div", null, [h("input", {type: "text",value: this.username,placeholder: "Username",onInput: ($event) => this.$emit("update:username", $event.target.value)}),h("input", {type: "password",value: this.password,placeholder: "Password",onInput: ($event) => this.$emit("update:password", $event.target.value)}),h("button", {onClick: () => this.$emit("submit")},'Submit')]);}};</script>
或者来个简易的版本:
h('button',{onClick(event) {/* ... */}},'click me')
对于.passive、.capture和.once事件修饰符,可以使用驼峰写法将他们拼接在事件名后面:
h('input', {onClickCapture() {/* 捕捉模式中的监听器 */},onKeyupOnce() {/* 只触发一次 */},onMouseoverOnceCapture() {/* 单次 + 捕捉 */}})
9、使用插槽
<script>import { h } from "vue";export default {name: "VSlot",render() {return h("div", null, [// 通过 this.$slot().name 来获取插槽的内容h("h1", { class: "title" }, this.$slots.default()),h("p", { class: "author" }, this.$slots.author()),h("p",{ class: "content" },// 给插槽传递数据,也就是作用域插槽this.$slots.content({content: "This is content"}))]);}};</script>
import { h } from "vue";import VSlot from "./components/VSlot.vue";function render(){return h(VSlot, null, {default: () => "This is title",author: () => "Xiechen",content: (props) => h("p", null, props.content)});}
10、使用自定义指令
可以使用withDirectives()将自定义指令应用于 vnode:
import { h, withDirectives } from 'vue'// 自定义指令const pin = {mounted() { /* ... */ },updated() { /* ... */ }}// <div v-pin:top.animate="200"></div>const vnode = withDirectives(h('div'),[[pin, 200, 'top', { animate: true }]])
当一个指令是以名称注册并且不能被直接导入时,可以使用resolveDirective()函数来解决这个问题。
import { h, withDirectives, resolveDirective } from 'vue'// <div v-pin:top.animate="200"></div>const pin = resolveDirective('pin');const vnode = withDirectives(h('div'), [[pin, 200, 'top', { animate: true }]])
更多用法请看:
渲染函数 & JSX | Vue.js

若有收获,就点个赞吧
0 人点赞
