“带时间的光线”划开了新旧篇章的界限,新的维度下,新的可能性在孕育。
这一章中就来看看,“时间”会给这个世界带来什么变化。本章我们会创建继“球”之后,第二个实体物体类:“移动的球”。呃,抱歉,它还是球。
匀速运动的球
创建新文件moving_sphere.h,并敲入如下代码,其实其中大部分代码是从球类中复制过来的:
#ifndef MOVING_SPHERE_H#define MOVING_SPHERE_H#include "rtweekend.h"#include "hittable.h"class moving_sphere : public hittable {public:moving_sphere() {}//带参构造,比sphere类要多吃四个参数,分别是两个时间值,以及这两个时间下对应的球心位置。moving_sphere(point3 cen0, point3 cen1, double _time0, double _time1, double r, shared_ptr<material> m): center0(cen0), center1(cen1), time0(_time0), time1(_time1), radius(r), mat_ptr(m){};virtual bool hit(const ray& r, double t_min, double t_max, hit_record& rec) const override;//多出来的函数,这个函数用来返回当前时间下球心位置。point3 center(double time) const;public://两个时间下的球心位置。point3 center0, center1;//两个时间值double time0, time1;double radius;shared_ptr<material> mat_ptr;};// 通过插值得到球心位置point3 moving_sphere::center(double time) const {return center0 + ((time - time0) / (time1 - time0))*(center1 - center0);}#endif
center函数的参数time不一定非要处于time0和time1之间,它也可以小于time0或者大于time1。从另一个角度来说,time0,time1和其对应的球心位置center0,center1并不是球运动的边界,而是用于确定球运动方向和速度的参数。
总结来说,这颗球沿着空间中的某条直线做匀速运动,它在time0时刻处于直线上的center0位置,time1时间下处于center1位置。
接下来补完moving_sphere类,它还差一个hit函数:
bool moving_sphere::hit(const ray& r, double t_min, double t_max, hit_record& rec) const {// 传入光线r的发射时间r.time()到center函数里,移动的球会根据这个值调整球心坐标。vec3 oc = r.origin() - center(r.time());auto a = r.direction().length_squared();auto half_b = dot(oc, r.direction());auto c = oc.length_squared() - radius*radius;auto discriminant = half_b*half_b - a*c;if (discriminant < 0) return false;auto sqrtd = sqrt(discriminant);auto root = (-half_b - sqrtd) / a;if (root < t_min || t_max < root) {root = (-half_b + sqrtd) / a;if (root < t_min || t_max < root)return false;}rec.t = root;rec.p = r.at(rec.t);//同理,法线的计算中的center也得更换成插值计算版本。auto outward_normal = (rec.p - center(r.time())) / radius;rec.set_face_normal(r, outward_normal);rec.mat_ptr = mat_ptr;return true;}
材质类对应修改
每次递归都会产生新的光线,得确保时间信息可以传递到新光线上,修改材质类:
class lambertian : public material {...virtual bool scatter(const ray& r_in, const hit_record& rec, color& attenuation, ray& scattered) const override {...//把time信息传递给出射光线。scattered = ray(rec.p, scatter_direction, r_in.time());...}...};class metal : public material {...virtual bool scatter(...) const override {...//把time信息传递给出射光线。scattered = ray(rec.p, reflected + fuzz*random_in_unit_sphere(), r_in.time());...}...};class dielectric : public material {...virtual bool scatter(...//把time信息传递给出射光线。scattered = ray(rec.p, direction, r_in.time());...}...};
修改初篇最终场景
我们尝试把初篇最终场景中的所有漫反射小球都替换成移动的球,并且让他们移动的方向都为y轴正方向,为了做出差异性,让所有的小球移动的速度都不同,我们要利用随机数给定不同的参数。
假设相机镜头在 time0=0 时刻打开镜头,time1=1 时刻关闭镜头,且time0时刻这些移动的球正好都在y = 0.2 平面上(这也是我们以前最终场景中的设计),也就是说center0.y() 是 0.2 ,那么center1就可以根据center0加上一个随机长度的y轴正方向向量得到,具体如下:
...#include "moving_sphere.h"...hittable_list random_scene() {...for (int a = -11; a < 11; a++) {for (int b = -11; b < 11; b++) {...if (choose_mat < 0.8) {auto albedo = color::random() * color::random();sphere_material = make_shared<lambertian>(albedo);// center2表示1.0时刻球心位置。auto center2 = center + vec3(0, random_double(0,.5), 0);// 创建moving_sphere时,比sphere多传入四个参数。world.add(make_shared<moving_sphere>(center, center2, 0.0, 1.0, 0.2, sphere_material));} else if (choose_mat < 0.95) {...}
再修改相机和图片参数,为了不等待太久,适当降低了分辨率:
int main() {// changeauto aspect_ratio = 16.0 / 9.0;// ↓↓↓int image_width = 400;// ↓↓↓int samples_per_pixel = 100;...//相机传入的两个时间值和刚刚移动的球中的值保持一致,方便同步修改。camera cam(lookfrom, lookat, vup, 20, aspect_ratio, aperture, dist_to_focus, 0.0, 1.0);
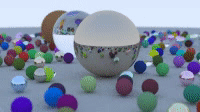
会得到:<br />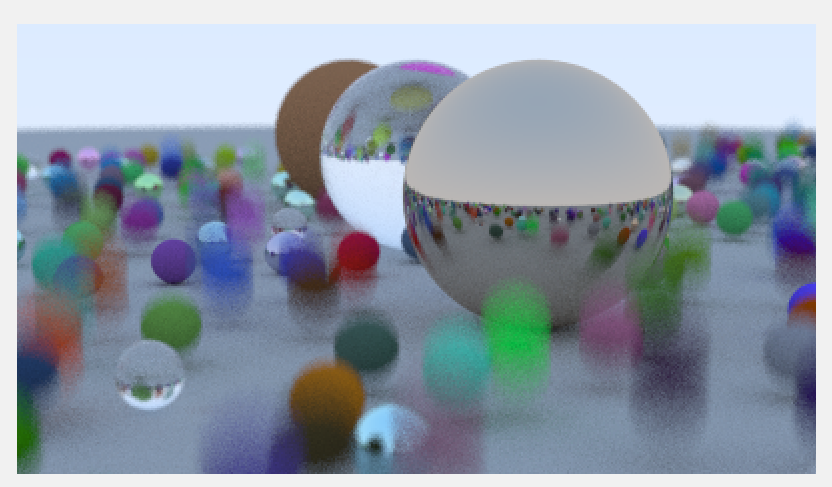<br />虽然这些移动的球的运动轨迹是“直破云霄”往天上去的,但是看起来就好像是球在平台上弹跳一样。这是因为无论是向下运动还是向上运动,动态模糊看上去都是一个样子的。<br />动态模糊的实现非常简单对吧。<br />跃动的小球就好像暴风雨来临之前躁动不安的动物们——这是因为在下一章中我们的代码底层将迎来风暴。我们即将开始往深处挖掘,探索本篇中最困难的部分——包围盒。<br />这是件枯燥且抽象的事业,但是包围盒子因为其实用价值和广泛应用,也是图形工程师方向的考试的常见考点之一。如果你有这方面的兴趣,那么就有认真掌握的必要。
配置ffmpeg*
现在来休息一下,暂停对技术的探索,一起来做一些工程方向的趣事。让我们来生成一系列的图片,并且把它串成视频。你不想看到自己的小球真的动起来吗?如果答案为肯定,那就来继续探索时空光线追踪的极限吧。
图片按序列帧转视频这件差事如果要靠代码完成可得费一番功夫,幸好伟大的前辈们早就写好了统一解决方案——ffmpeg!一个伟大的开源程序!它可以用来记录、转换数字音频、视频,并能将其转化为流,总之,它在音视频方面几乎无所不精无所不能。
但本篇并不是ffmpeg的教程贴,而且为了整体项目的精简,把ffmpeg接入光追项目暂时来看是没有必要。我们仅仅只利用ffmpeg作为外部工具生成视频,或者更准确来说,仅仅只用到一个命令。
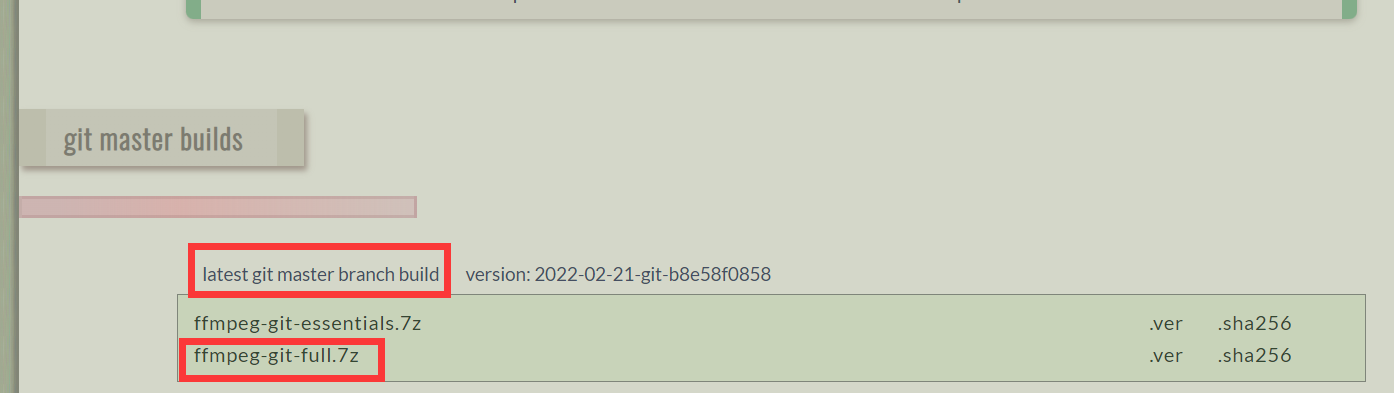
一:先需要下载ffmpeg,直接点击该链接进行下载:https://www.gyan.dev/ffmpeg/builds/ffmpeg-git-full.7z。
(授人以鱼不如授人以渔,以防上方链接失效,我再教你如何得到本下载链接:
     1. 先上官网:[https://ffmpeg.org/download.html](https://ffmpeg.org/download.html)
     1. 因为我是windows系统,就按下图所示进入链接(其他系统下的ffmpeg安装远比windows下安装简单,具体请自行搜索):
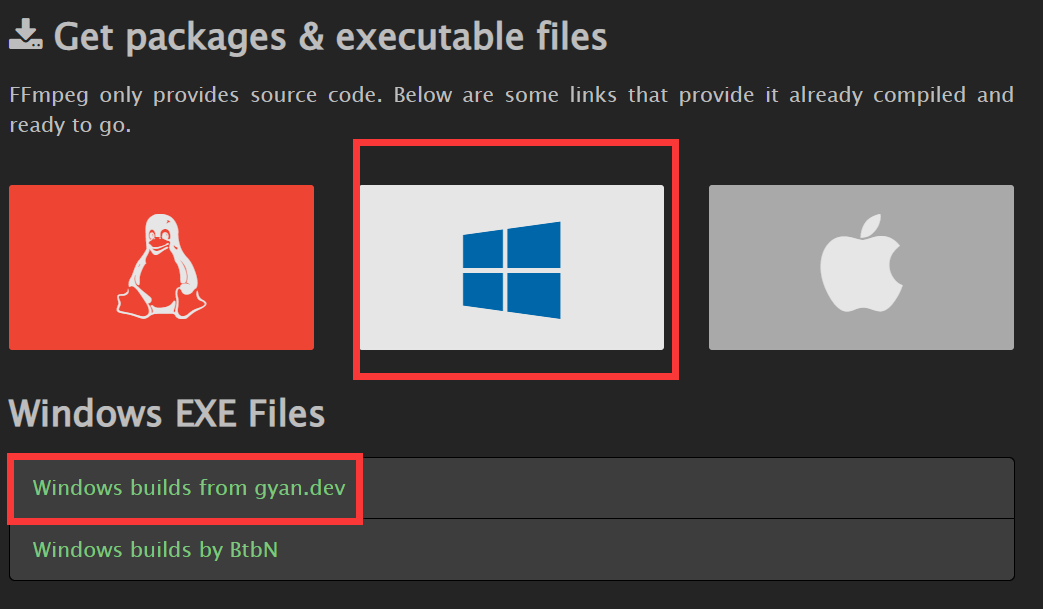
3. 进入之后,第一行就是最新的git分支的压缩包,俩个分别是只包含基础功能的以及全部功能的压缩包,随便选一个,因为我还使用ffmpeg做其他项目,所以安装的是full版本,但是应对本项目,essential应该就足够了。
4. 你会下载到和刚刚我给你的链接里一样的安装包。
二:把下载的压缩包解压到某个目录,笔者将其解压到了D:\ffmpeg文件夹下。
三:配置环境变量。我的电脑右键属性-高级系统设置-环境变量-再编辑path-新建一个path为ffmpeg目录下的bin文件夹。(本部分我简单描述,环境变量配置为程序员必修课,如果不会的话去看教程,这里贴一个百度经验教程https://jingyan.baidu.com/article/a17d5285c9b0c48099c8f26a.html),配置完成你的path应该会大概如下多出一行: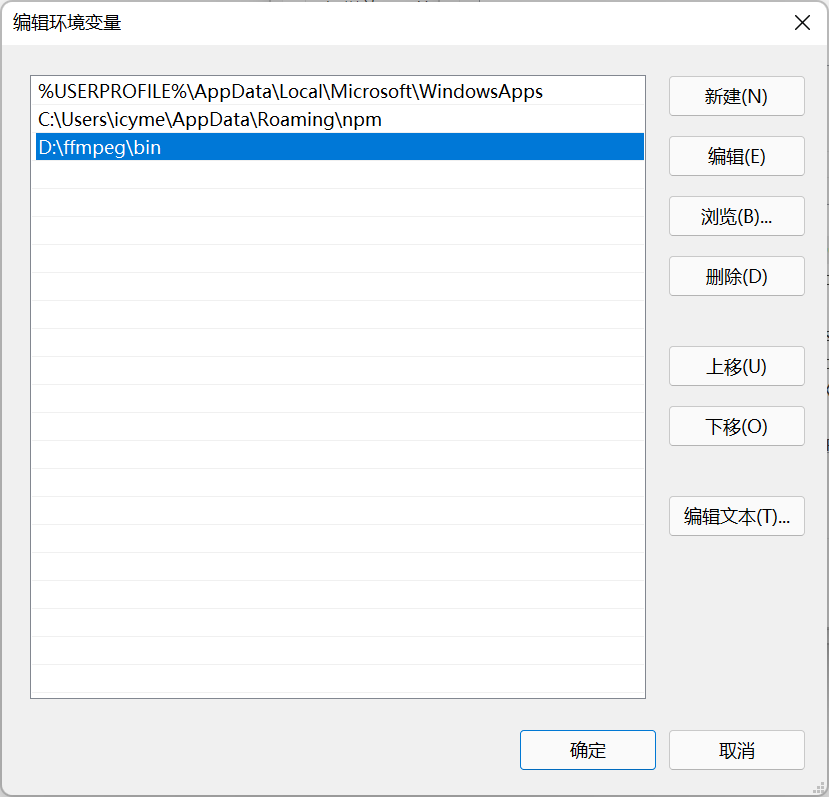
四:配置完毕之后就可以通过命令行测试是否配置成功,在任意目录下输入ffmpeg -version,如果出现版本信息,即表示配置成功: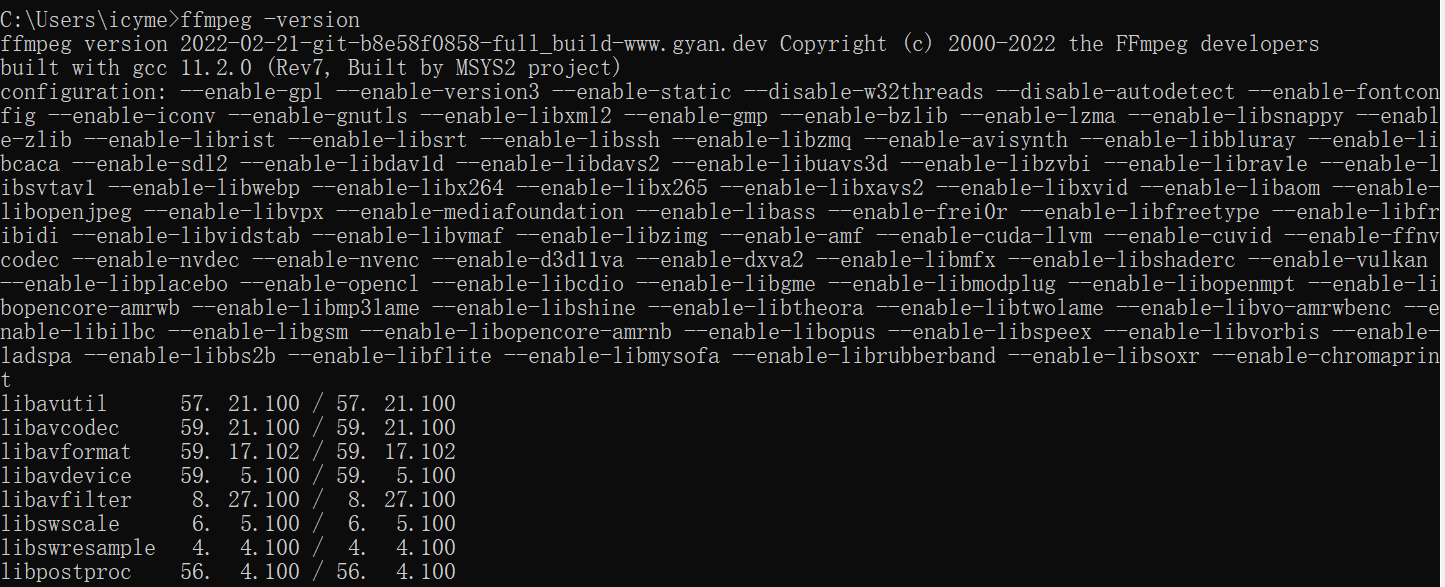
多线程输出序列帧*
切换代码为多线程模式,修改多线程的main所在文件如下所示:
#if MULTITHREAD
//我们需要用到c语言中的部分内存操作函数,比如sprintf,在C++标准中它们被认为是危险和禁忌的。
//使用这个宏即可解禁这些函数,你亦可将其写入预处理器命令中。
#define _CRT_SECURE_NO_WARNINGS
...
#include "moving_sphere.h"

// 调整为16/9,和本章中动态模糊示例代码保持一致。
const auto aspect_ratio = 16.0 / 9.0;
// ↓↓↓,因为要输出多张图片,我们让其尽可能的快。
const int image_width = 200;

const int image_height = static_cast<int>(image_width / aspect_ratio);
const int samples_per_pixel = 100;
const int max_depth = 50;

...

hittable_list random_scene() {
    ...

    if (choose_mat < 0.8) {
        ...

         // 让center2尽可能的高,我打算让球高高的飞起!
         auto center2 = center + vec3(0, random_double(0, 50), 0);

         // 时间依然不变,卡在1个单位时间内运行完毕。
         world.add(make_shared<moving_sphere>(
            center, center2, 0.0, 1.0, 0.2, sphere_material));
    } else if (choose_mat < 0.95) {
        ...
    ...
}

int main() {
    // 视频一共有多少帧。
    int video_frame_num = 10;
    // 把这些序列帧存放在指定目录下,方便查看和编辑。
    std::string video_folder_path = "video";

    world = random_scene();
    point3 lookfrom(13, 2, 3);
    point3 lookat(0, 0, 0);
    vec3 vup(0, 1, 0);
    auto dist_to_focus = 10.0;
    auto aperture = 0.1;

    // C的新建文件夹的多种方式之一,这种通过system命令新建文件夹的方式不需要多余的头文件包含,很方便。
    std::string command;
    // mkdir命令就是命令行中新建文件夹的命令,后跟新文件夹目录
    command = "mkdir " + video_folder_path;
    // 会在当前目录上创建video文件夹。
    // system只接受c风格字符串,所以要用c_str转换一下。
    system(command.c_str());
    // 具体文件名。
    char filename[50];

    // 循环创建多帧。
    for (int i = 0; i < video_frame_num; i++) {

        std::cerr << "LineIndex:" << i << std::endl;

        // sprintf和c语言中人尽皆知的printf几乎没有什么不同。
        // 唯一的区别是它要把字符串输出给一个char数组而不是标准输出流。
        // 图片名需要规律排列,ffmpeg会从编号为0的图片开始串帧成视频。
        sprintf(filename, "./%s/videoframe%04d.ppm", video_folder_path.c_str(), i);

        buf = new imageoutput(image_width, image_height, filename);
        std::vector<std::thread> threads;

        //本帧图片的时间区间,随后讲解。
        cam = new camera(lookfrom, lookat, vup, 20, aspect_ratio, aperture, dist_to_focus, pow(i / (float)video_frame_num, 5), pow((i + 1) / (float)video_frame_num, 5));

        for (int k = 0; k < numThread; k++) {
            threads.push_back(std::thread(ray_tracing_by_thread, k));
        }
        for (auto& thread : threads) {
            thread.detach();
        }

        while (thread_remain > 0) {
            std::cerr << "\rScanlines remaining : " << line_remain - 1 << ' ' << std::flush;
        }

        //注意初始化这些进程监视相关变量。
        line_remain = image_height;
        thread_remain = numThread;

        std::cerr << "\nDone.\n";
        buf->buffer_2_file();

        delete cam;
        delete buf;
    }

    return 0;
}

#endif
移动的球类是一些匀速运动的小球,但这个匀速运动也是有条件的,那就是时间流速是匀速不变的。<br />我们将均匀增加的自变量i(每次循环加一),套进函数,并将其映射到(0,1)区间内(和移动的球在创建之初指定的时间区间保持同步),即可实现球速逐渐加快效果,因为在此区间为凹函数。可以简单理解为,套用该函数之后,时间流速不再均匀,而是会逐渐加快。<br />运行代码,如果你是在命令行中运行exe文件,就可以在exe所在目录下找到video文件夹。如果是vs内运行生成,这个文件夹会在代码所在目录下。<br />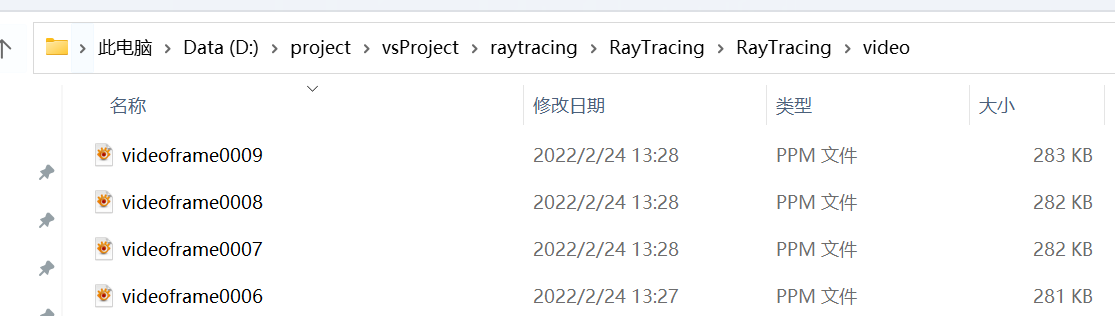
ffmpeg命令生成视频*
打开命令行,走到video目录,然后输入以下命令:
ffmpeg -r 10 -i videoframe%04d.ppm -q:v 1 output.avi
如图所示:
我们分开看看这个命令讲了什么:
ffmpeg 表示运行的exe的名字,系统会在环境变量里面的那些目录去找叫这个名字的exe,显然,它要找的就是ffmpeg/bin文件夹下的那个exe。
-r 10 表示我们要以一秒10帧的速度安排这些图片,最后生成的图片每秒钟会有十张图片播放。
-i videoframe%04d.ppm 表示图片输入,ffmpeg会找指定格式化输入的%d从0开始,这样它就可以找到目录下全部的10张图片。
-q:v 1 表示我们希望最后生成的图像质量高一些,但可惜的是,即使是这样它还是会失去一些清晰度。
output.avi 输出文件目录,没有前缀的话它就会存放在和图片同样的目录里。
在一阵提示输出之后,你会得到视频: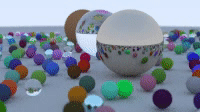
它的时长是1秒。我们做到了三个时间统一:移动的球类指定时间,相机区间和最终生成图片时间区间。
时间统一有很多好处,它可以让时间轴一目了然。
当然它们三个也可以不完全统一,而是某种映射关系,这取决于你的设计。
课后实践*
- 尝试制作更清晰时长更久的视频,享受结果。
- 尝试制作镜头动画,如下是一个最简单的镜头动画:
- 尝试实现球的弹跳效果,如下是物理弹跳效果的某种模拟近似:

参考文献
https://raytracing.github.io/books/RayTracingTheNextWeek.html
参考自《Ray Tracing: The Next Week》第2.2节到第2.5节。

若有收获,就点个赞吧
0 人点赞
