Geospatial 地理位置
- 朋友的定位,附近的人,打车距离计算
- redis的 geo 在 redis3.2 之后就已经更新了,这个功能可以推算两地距离,方圆几公里的人
- 规则: 两级无法直接添加,一般会下载城市数据,直接通过java代码一次性导入
- 参数 key 值 经纬度,名称 ```java 127.0.0.1:6379> geoadd china:city 116.40 39.90 beijing (integer) 1
<a name="Cay9c"></a>## GEOPOS 获得之前存储的地理位置信息```javaGEOPOS china:city beijing
GEODIST
GEODIST china:city beijing chongqing km
-- km 为单位,可自定义
-- mi 表示英里
-- gt 表示单位为英尺
-
GEORADIUS 以给定的经纬度为圆心统计周围参数千米的元素
前提为所有数据都应该录入 china:city 才会让结果更加清晰 ```java GEORADIUS china:city 110 30 500 km — 查询中国城市 经度110,纬度30 半径为500km的城市并打印
GEORADIUS china:city 110 30 500 km count 1 — count为取出结果个数
<a name="IOGU8"></a>
## GEOHASH

- 返回一个或者多个位置元素的geohash表示
```java
geohash china:city bejing chongqing
底层原理
底层原理就是zset ,可以使用zset的命令去操作geo数据
Hyperloglog 基数统计
BitMap
事务
redis 事务本质:一组命令的集合,一个事务中的所有命令都会被序列化,在事务执行过程中,会按照顺序执行。一次性,顺序性,排他性,执行一系列的命令。
- redis 事务没有隔离级别的概念!
- 所有的命令在事务中,并没有直接被执行!只有发起执行命令的时候才会执行!Exec
- redis 单挑命令式保存原子性的,但是事务不保证原子性
- redis的事务
- 开启事务(multi)
- 命令入队(…)
- 执行事务(exec) ```java 127.0.0.1:6379> multi OK 127.0.0.1:6379(TX)> set k1 v1 QUEUED 127.0.0.1:6379(TX)> set k2 v2 QUEUED 127.0.0.1:6379(TX)> exec 1) OK 2) OK 127.0.0.1:6379>
- 每个事务执行结束之后这个事务就没了,如果需要开启新的事务就需要另外定义新的事务
- 放弃事务
```java
127.0.0.1:6379> multi
OK
127.0.0.1:6379(TX)> set k1 v1
QUEUED
127.0.0.1:6379(TX)> set k2 v2
QUEUED
127.0.0.1:6379(TX)> discard   -- 取消事务   事务中的命令都不会被执行
1) OK
127.0.0.1:6379>
编译性异常 (代码有问题,命令有错) 事务中所有的命令都不会被执行
运行时异常 (1/0) 如果事务队列中存在 语法性错误,那么执行命令的时候,其他命令是可正常执行的,错误命令抛出异常。
悲观锁
-
乐观锁
乐观 , 认为什么时候都不会出问题,所以不会上锁!更新数据的时候去判断一下,在此期间是否有人修改过这个数据
监视
```java 127.0.0.1:6379> set money 100 OK 127.0.0.1:6379> set out 0 OK 127.0.0.1:6379> watch money # 监视moeny这个key OK 127.0.0.1:6379> multi # 事务正常结束,数据期间没有发生变动
这个时候正常执行成功OK 127.0.0.1:6379(TX)> decrby money 20 QUEUED 127.0.0.1:6379(TX)> incrby out 20 QUEUED 127.0.0.1:6379(TX)> exec 1) (integer) 80 2) (integer) 20 127.0.0.1:6379>
- 测试,
   - 新建一个事务
```java
root@6c4a7d612da4:/data# redis-cli -p 6379 -a 123456
Warning: Using a password with '-a' or '-u' option on the command line interface may not be safe.
127.0.0.1:6379> get money
"80"
127.0.0.1:6379> set money 10000
OK
127.0.0.1:6379>
127.0.0.1:6379> multi
OK
127.0.0.1:6379(TX)> decrby moeny 20
QUEUED
127.0.0.1:6379(TX)> incrby out 40
QUEUED
127.0.0.1:6379(TX)> exec  #执行之前 ,另外一个线程修改了watch的变量,导致事务失败
(nil)
127.0.0.1:6379>
- 另外开辟一个进程链接redis ,使用watch 可以当作redis的乐观锁,添加watch之后会影响事务,如果添加watch监视的变量在别的线程中发生更改,会导致事务失败
Jedis使用
要使用java来操作redis
jedis 是redis官方退件的java链接开发工具,使用java操作redis中间件,如果要使用java操作redis,那么一定要对jedis十分的熟悉Springboot 整合redis
- 与常用组件相同,先导入依赖,之后进行配置。 ```java
配置redis的地址,端口,密码如果有
spring.redis.host=49.234.122.xxx spring.redis.port=8000 spring.redis.password=123456
- 无法直接穿对象到redis,需要对pojo类进行序列化,实体类实现serializable接口,或者是重写redisTemplate类来进行自定义序列化规则
- redistemplate简单例程。
```java
package com.learn.redis;

import org.junit.jupiter.api.Test;
import org.springframework.beans.factory.annotation.Autowired;
import org.springframework.boot.test.context.SpringBootTest;
import org.springframework.data.redis.connection.RedisConnection;
import org.springframework.data.redis.connection.RedisConnectionFactory;
import org.springframework.data.redis.core.RedisTemplate;

@SpringBootTest
class RedisApplicationTests {


    @Autowired
    private RedisTemplate redisTemplate;


    @Test
    void contextLoads() {

        // redistemplate
        redisTemplate.opsForValue().set(); // 操作字符串
        redisTemplate.opsForList().set();  // 操作list 类似list
        redisTemplate.opsForSet().intersect();

        // 获取redis的链接
        RedisConnection connection = redisTemplate.getConnectionFactory().getConnection();
        connection.flushAll();
        connection.flushDb();//  获取数据库链接对象进行数据库操作
    }

}
redis - 配置文件
网路
# bind 127.0.0.1 ::1
#
# ~~~ WARNING ~~~ If the computer running Redis is directly exposed to the
# internet, binding to all the interfaces is dangerous and will expose the
# instance to everybody on the internet. So by default we uncomment the
# following bind directive, that will force Redis to listen only into
# the IPv4 loopback interface address (this means Redis will be able to
# accept connections only from clients running into the same computer it
# is running).
#
# IF YOU ARE SURE YOU WANT YOUR INSTANCE TO LISTEN TO ALL THE INTERFACES
# JUST COMMENT THE FOLLOWING LINE.
# ~~~~~~~~~~~~~~~~~~~~~~~~~~~~~~~~~~~~~~~~~~~~~~~~~~~~~~~~~~~~~~~~~~~~~~~~
bind 127.0.0.1 # 绑定的ip

protected-mode yes  # 保护模式

# Accept connections on the specified port, default is 6379 (IANA #815344).
# If port 0 is specified Redis will not listen on a TCP socket.
port 6379  # 端口


# By default Redis does not run as a daemon. Use 'yes' if you need it.
# Note that Redis will write a pid file in /var/run/redis.pid when daemonized.
daemonize no  # 守护进程,默认为no 需要自己开启为yes


# If a pid file is specified, Redis writes it where specified at startup
# and removes it at exit.
#
# When the server runs non daemonized, no pid file is created if none is
# specified in the configuration. When the server is daemonized, the pid file
# is used even if not specified, defaulting to "/var/run/redis.pid".
#
# Creating a pid file is best effort: if Redis is not able to create it
# nothing bad happens, the server will start and run normally.
pidfile /var/run/redis_6379.pid  # 如果是以后台的方式去运行,就需要指定一个pid 文件


# This can be one of:
# debug (a lot of information, useful for development/testing)
# verbose (many rarely useful info, but not a mess like the debug level)
# notice (moderately verbose, what you want in production probably)
# warning (only very important / critical messages are logged)
loglevel notice  # log日志登记

# Specify the log file name. Also the empty string can be used to force
# Redis to log on the standard output. Note that if you use standard
# output for logging but daemonize, logs will be sent to /dev/null
logfile ""  # log文件目录


# Set the number of databases. The default database is DB 0, you can select
# a different one on a per-connection basis using SELECT <dbid> where
# dbid is a number between 0 and 'databases'-1
databases 16  # 默认数据库数量

# By default Redis shows an ASCII art logo only when started to log to the
# standard output and if the standard output is a TTY. Basically this means
# that normally a logo is displayed only in interactive sessions.
#
# However it is possible to force the pre-4.0 behavior and always show a
# ASCII art logo in startup logs by setting the following option to yes.
always-show-logo yes  # 是否显示log


#
#   save ""

save 900 1  # 参数意思为 如果900s内有一个key进行了更改,就进行持久化操作
save 300 10  # 300秒 10个key进行了更改,就进行持久化
save 60 10000  # 60秒内, 10000个key进行了更改,就进行持久化
    # 快照
   # 持久化,在规定的时间内,执行了多少此操作,则会持久化到文件 .rdb.aof,如果没有持久化,断电数据就丢失

  # If the background saving process will start working again Redis will
# automatically allow writes again.
#
# However if you have setup your proper monitoring of the Redis server
# and persistence, you may want to disable this feature so that Redis will
# continue to work as usual even if there are problems with disk,
# permissions, and so forth.
stop-writes-on-bgsave-error yes  # 持久化操作失败之后,是否需要继续运行服务

# Compress string objects using LZF when dump .rdb databases?
# For default that's set to 'yes' as it's almost always a win.
# If you want to save some CPU in the saving child set it to 'no' but
# the dataset will likely be bigger if you have compressible values or keys.
rdbcompression yes  # 是否压缩rdb文件,需要小号一些cpu资源


# Since version 5 of RDB a CRC64 checksum is placed at the end of the file.
# This makes the format more resistant to corruption but there is a performance
# hit to pay (around 10%) when saving and loading RDB files, so you can disable it
# for maximum performances.
#
# RDB files created with checksum disabled have a checksum of zero that will
# tell the loading code to skip the check.
rdbchecksum yes # 保存 rbd文件的时候,进行错误的检查校验

# The filename where to dump the DB
dbfilename dump.rdb  #


# The working directory.
#
# The DB will be written inside this directory, with the filename specified
# above using the 'dbfilename' configuration directive.
#
# The Append Only File will also be created inside this directory.
#
# Note that you must specify a directory here, not a file name.
dir ./  # rbd文件保存路径


限制 clients
# maxclients 10000  # 设置链接上redis的最大客户端数量
# maxmemory <bytes> # redis配置最大的内存容量

# maxmemory-policy noeviction  # 内存达到上线之后的处理策略,总共六种
- noeviction:用不国旗,返回错误
- allkeys-lru:删除lru算法的key
- volatile-lru:只对设置了国旗时间的key进行lru
- allkeys-random:随机删除
- volatile-random:随机删除即将过期的key
- volatile-ttl:删除即将过期的。


Append only 模式 aof配置
appendonly no # 默认不开启aof模式 默认使用rdb方式来进行持久化,在大部分情况下rbd完全够用
appendfilename “appendonly.aof”  # 持久化文件的名字

# apendfsync always  # 每次修改都会sync
appendfsync everysec # 每秒执行一次 sync 可能会丢失这1s的数据
appendfsync no # 不执行sync 这个时候操作系统自己同步数据,
持久化 rdb
- 面试和工作 rdb持久化都是重点
- redis是内存数据库,如果不讲内存中的数据库状态保存到磁盘,一旦服务器进程退出,服务器中的数据库状态也会消失,所以redis提供了持久化功能
-
RDB
什么是 rdb
- 在指定的时间间隔内将内存中的数据写入磁盘,也就是snapshot快照,它恢复时是将快找文件读到内存里
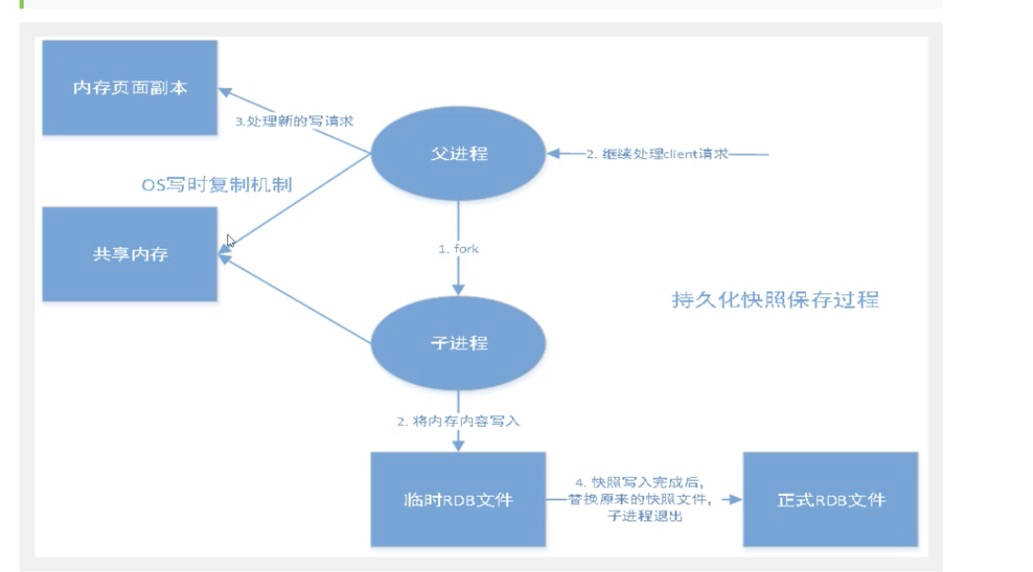
- redis会单独创建(fork) 一个子进程来进行持久化,会先将数据写入到一个临时文件中,待持久化过程都结束了,在用这个临时文件替换上次持久化好的文件,整个过程中,主进程是不进行任何io操作的,这就确保了极高的性能,如果需要进行大规模数据的恢复,且对于数据恢复的完整性不是特别敏感,那么rdb方式要比aof方式更加的搞笑,rdb的缺点是最后一次持久化后的数据可能丢失。
- 默认是rdb,一般情况下不需要修改这个配置。
rdb 保存的文件是 dump.rdb 都是在配置文件中的快照配置中进行配置的
触发机制
save的规则满足的情况下,会自动触发rdb规则
- 执行flushall命令,也会触发rdb规则
- 退出redis 也会产生rdb文件
-
那么如何恢复呢?
只需要将rdb文件放在redis的启动目录就可以,redis启动的时候会自动检查dump.rdb 恢复其中的数据
- 查看需要存到哪的目录下 ```java (empty array) 127.0.0.1:6379> config get dir 1) “dir” 2) “/data” # 如果在这个目录下存在 dump.rdb文件,启动后就会自动恢复其中的数据 127.0.0.1:6379>
```
几乎使用它默认的配置就够用了,但是还是需要学习
在生产环境下一般会对 dump.rdb文件进行备份,防止数据丢失
优点
- 适合大规模的数据恢复
-
缺点
需要一定的时间间隔进程操作,如果redis意外宕机了,那么最后一次修改的数据就丢失了
-
AOF append only file
是什么
- 将所有命令都记录下来,history,恢复的时候就将这些命令再执行一遍

- 以日志的形式来记录每个写操作,将Rdis执行过的所有命令记录下来(不包括读操作)只许追加文件但不可以改写文件redis启动之初会读取该文件重新构建数据,换言之,redis重启的话就根据日志文件的内容将写指令从前到后执行一次以完成数据的恢复工作
- aof 保存的是appendonly.aof 文件

- 默认不开启,修改为yes即可开启,需要重启redis服务生效
- 如果aof文件有错误,这时候进行redis服务启动是会报错的,需要修复aof文件
redis 提供了一个工具 redis-check-aof —fix appendonly.aof
aof的重写规则
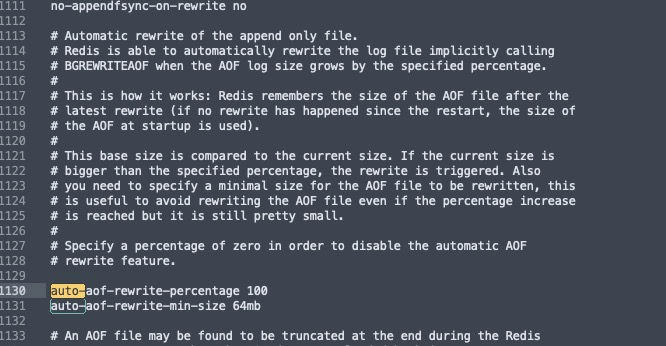
如果aof文件大雨64m,太大了,就会fork一个新的进程来将文件进行重写
-
优点
每次修改都同步,文件的完整性会更加好一些
- 每秒同步一次,可能会丢失一秒的数据
-
缺点
相对与数据文件来说,aof远远大于rdb,修复的速度也比rdb慢
- aof的运行效率也比rdb慢,原因是aof是io操作,所以redis默认是rdb模式

若有收获,就点个赞吧
0 人点赞
