- 查看cpu盒数:cat /proc/cpuinfo
- ulimit -a 来显示当前的各种用户进程限制
- 程序与进程、线程的理解:
- Nginx:不起线程:多进程工作模式
- ">
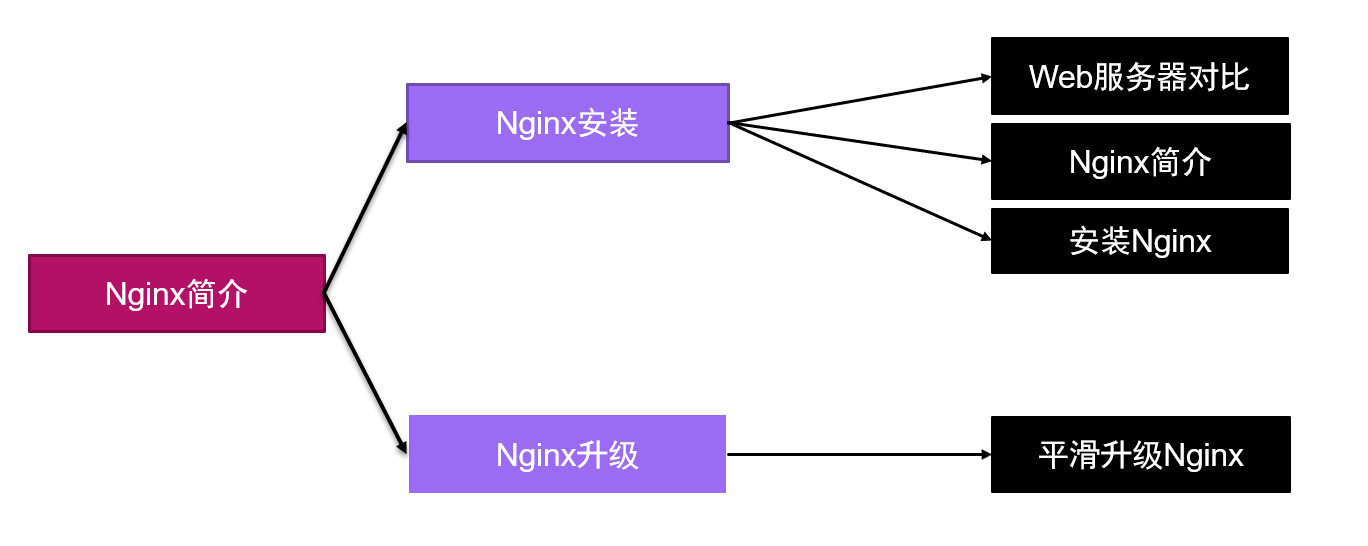
- Web服务器对比:
- Nginx简介:
- 源码安装Nginx
- 控制服务
- 查看服务状态命令:
- Nginx配置文件及目录:/usr/local/nignx
- 平滑升级Nginx版本
- 检测新版本
- Nginx配置文件解析
- 阿帕奇hpptd
- 用户认证
- Nginx虚拟主机
- 基于域名的虚拟主机
- 基于端口的虚拟主机
- 基于IP的虚拟主机
- 部署加密网站:
- Nginx地址重写
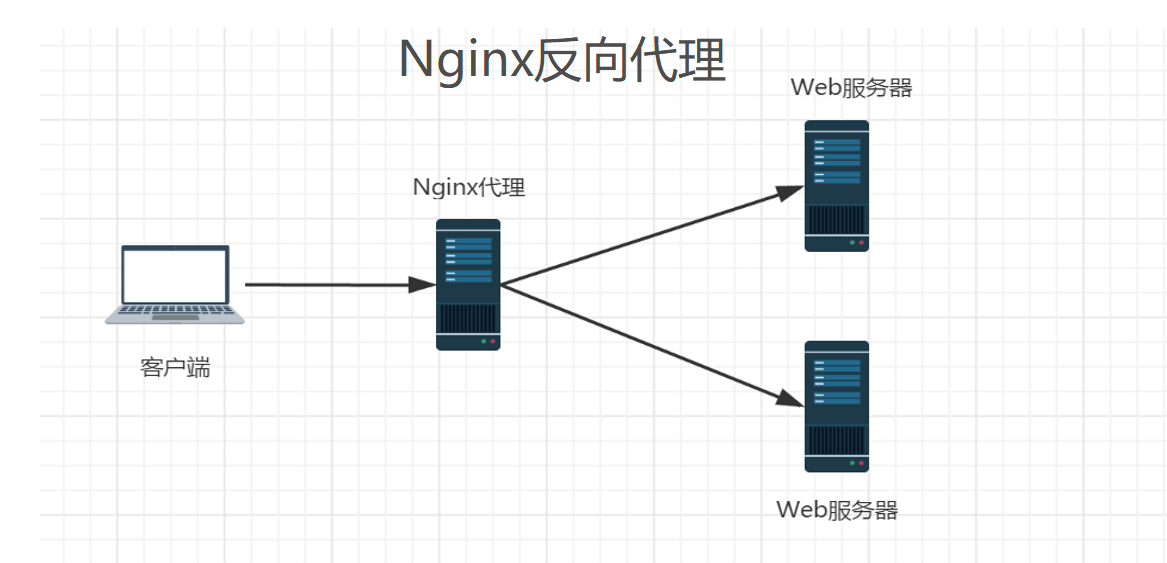
- Nginx反向代理
- 配置Nginx调度SSH服务
- Nginx优化
- 优化Linux内核参数
- HTTP状态码
- Nginx页面压缩
查看cpu盒数:cat /proc/cpuinfo
ulimit -a 来显示当前的各种用户进程限制
程序与进程、线程的理解:
程序:在磁盘里面的时候。
进程:在内存里面的运行的时候,进程有自己的独立空间,进程与进程之间相互隔离,互不干预。
线程:是进程的子集,进程下边起线程,线程没有自己的独立的空间,线程共享进程的内存空间。
Nginx:不起线程:多进程工作模式
链接:https://pan.baidu.com/s/1cCB8jSQafTiWPSMP__Widg 提取码:6666
—来自百度网盘超级会员V3的分享
Web服务器对比:
适用于Unix和Linux平台下
- **httpd——>Apache**- **Nginx**- **Tengine——>淘宝**- **Tomcat——>Java**- **WebSphere——>IBM**- **Jboss——>红帽**
Nginx简介:
Nginx(“engine x”)
是俄罗斯人编写的十分轻量级的HTTP服务器
是一个高性能的HTTP和反向代理,同时也是一个IMAP/POP3/SMTP 代理服务器
官网:http://nginx.org/
源码安装Nginx
安装依赖包:yum -y install pcre-devel zlib-devel mysql-devel
yum -y install gccpcre-devel openssl-devel
创建普通用户:useradd -s /sbin/nologin nginx
解压Nginx源码包: tar -xf nginx-1.10.3.tar.gz
进入源码包路径:cd nginx-1.10.3
检测环境,指定安装功能与安装位置:
./configure --prefix=/usr/local/nignx --user=nginx --group=nginx --with-http_ssl_module
./configure
—prefix=/usr/local/nginx #指定安装路径
—user=nginx #指定用户
—group=nginx #指定组
--with-http_ssl_module #指定模块名
编译源码:make
安装:make install
控制服务
启动服务:/usr/local/nginx/sbin/nginx
查看服务状态:ss -anptul | grep nginx
关闭服务:/usr/local/nginx/sbin/nginx -s stop
重启服务:/usr/local/nginx/sbin/nginx -s reload
查看软件信息:/usr/local/nginx/sbin/nginx -V
$PATH #查看环境变量目录
ln -s 绝对路径 环境变量目录 #设置环境变量,使得Nginx可以在任何界面调用启动
查看服务状态命令:
netstat|ss查看系统中启动的端口信息
- **-a 显示所有端口信息**- **-n 以数字格式显示端口号**- **-t 显示TCP连接的端口**- **-u 显示UDP连接的端口**- **-l 显示服务正在监听的端口信息**- **-p 显示监听端口的服务名称是什么(也就是程序名)**
Nginx服务默认通过TCP 80 端口监听客户端请求
[root@servernginx]# ss -anptul | grep nginx
Nginx配置文件及目录:/usr/local/nignx
- **/usr/local/nginx/ //默认安装目录**- **conf/nginx.conf //主配置文件**- **html //网页目录**- **logs //日志文件**- **sbin/nginx //启动脚本**
平滑升级Nginx版本
- l**编译新版本: tar -xf nginx-1.12.2.tar.gz **- l**进到新版本路径: cd nginx-1.12.2**- l**检查环境:./configure --user=nginx --group=nginx --with-http_ssl_module #因为之前已经确认过文件位置(/usr/local/nginx/)**- l**编译新版本:make**- l**备份旧版本Nginx主程序,并使用make好的新版本替换旧版本**- l** mv /usr/local/nginx/sbin/nginx /usr/local/nginx/sbin/nginxold**- l**杀死旧版本进程:killallnginx #如果服务已经关闭不需要执行此步骤**- l**拷贝新版本:cp objs/nginx /usr/local/nginx/sbin/**- l**启动新版本:/usr/local/nginx/sbin/nginx**
检测新版本
- **查看版本信息:/usr/local/nginx/sbin/nginx –V**- ** [root@qmtest ~]# nginx version: nginx/1.12.2**- l**查看新版本状态: ss -anptul | grep nginx**- l**访问服务:http://IP地址**
Nginx配置文件解析
- **全局配置文件: /usr/local/nginx/conf/nginx.conf**
[root@client nginx]# vim /usr/local/nginx/conf/nginx.confhttp {.. ..server { //定义虚拟主机listen 80; //默认监听端口号server_name localhost; //网站域名location / {root html; //网页根目录index index.html index.htm; //网页默认配置文件}}}
- **错误日志文件:/usr/local/nginx/logs/error.log**- **访问日志文件:/usr/local/nginx/logs/access.log**- 
阿帕奇hpptd
<virtualhost*:80>servername 网站域名:www.xxx.comdocumentroot 定义网站根目录 /var/www/html<virtualhost>
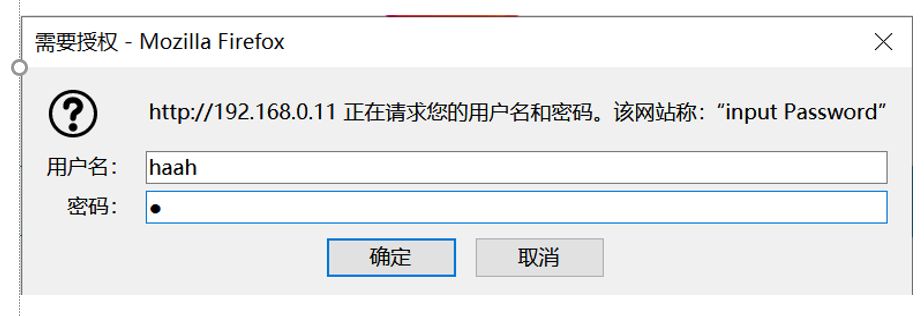
用户认证
[root@client nginx]# vim /usr/local/nginx/conf/nginx.confhttp {.. ..server { //定义虚拟主机listen 80; //默认监听端口号server_name localhost; //网站域名auth_basic “input Password”; //认证提示符auth_basic_user_file “/usr/local/nginx/pass”; //认证密码文件location / {root html;index index.html index.htm;}}}
创建认证密码文件[root@client nginx]# touch /usr/local/nginx/pass安装软件包[root@client nginx]# yum -y install httpd-tools添加认证用户[root@client nginx]# htpasswd -c /usr/local/nginx/pass haha \\只在第一次生成的时候加-c 选项添加用户[root@client nginx]# htpasswd /usr/local/nginx/pass laowang重启服务[root@client nginx]# nginx -s reload访问测试:192.168.0.x
Nginx虚拟主机
Nginx三种模式虚拟主机
— 基于域名的虚拟主机
— 基于端口的虚拟主机
— 基于IP的虚拟主机
基于域名的虚拟主机
基于域名的虚拟主机[root@client nginx]# vim /usr/local/nginx/conf/nginx.conf.. ..第一个:server {listen 80; //端口server_name www.xxoo.com; //域名location / {root html; //网站根目录index index.html index.htm;}}第二个大概83行有模板:server {listen 80; //端口server_name www.xxxx.com; //域名location / {root xxxx; //网站根目录index index.html index.htm;}}创建网站目录[root@client nginx]# mkdir /usr/local/nginx/xxxx编写www.xxxx.com测试页面[root@client nginx]# echo xxxx > /usr/local/nginx/xxxx/index.html编写www.xxoo.com测试页面[root@client nginx]# echo xxoo > /usr/local/nginx/html/index.html加载配置[root@client nginx]# nginx -s reload创建本地解析[root@client nginx]# vim /etc/hosts.. ..192.168.0.x www.xxoo.com192.168.0.x www.xxxx.com访问测试[root@client nginx]# curl http://www.xxoo.com[root@client nginx]# curl http://www.xxxx.com
基于端口的虚拟主机
域名相同但端口不同基于端口的虚拟主机(了解内容)server {listen 8080; //端口server_name www.xxoo.com; //域名root html; //网站根目录}server {listen 8000; //端口server_name www.xxoo.com; //域名root www; //网站根目录}
基于IP的虚拟主机
域名无所谓了,ip不同
ip指定端口
server {
        listen       192.168.0.x:80;            //IP 端口
        server_name  www.xxoo.com;        //域名
    root   html;                            //网站根目录
}
server {
        listen      192.168.0.x 80;            //IP 端口
        server_name  www.xxoo.com;        //域名
     root   www;                        //网站根目录
}
部署加密网站:
部署HTTPS加密网站,加密模块 –with-http_ssl_module
     - **加密算法一般分为:对称加密算法、非对称加密算法、信息摘要**
     - **对称加密算法:AES、DES 主要用于单机数据加密**
     - **非对称加密算法:RSA、DSA 主要用于网路数据加密**
     - **信息摘要:MD5、sha256 、sha512主要用于对数据的完整校验**
部署私钥|证书
SSL加密网站的核心技术是非对称生成密钥
        - **[root@client ~]# cd /usr/local/nginx/conf/**
        - **[root@client conf]# opensslgenrsa > cert.key  //生成私钥**
        - **[root@client conf]# openssl req -new -x509 -key cert.key > cert.pem  //生成证书**
回答问题:
1:国家的名字必须是2个字母的:CN
2:省份:
3:城市:
4;公司:
5:部门:
6:名字服务器或者自己姓名:
7:邮箱地址:
vim /usr/local/nginx/conf/nginx.conf
“100行附近“
server {
    listen       443 ssl;
    server_name  localhost;

    ssl_certificate      cert.pem;    //证书文件
    ssl_certificate_key  cert.key;    //私钥文件

    ssl_session_cache    shared:SSL:1m;
    ssl_session_timeout  5m;

    ssl_ciphers  HIGH:!aNULL:!MD5;
    ssl_prefer_server_ciphers  on;

    location / {
        root   html;
        index  index.html index.htm;
    }
}
[root@client conf]# nginx -s reload        //重启服务
Nginx地址重写
什么是地址从写?
获取一个来访的URL请求,然后改成服务器可以处理的另一个URL的过程
地址重写的好处
l缩短URL,隐藏实际路径提高安全性
l易于用户记忆
l易于被搜索引擎记录
Nginx地址重写语法
lrewrite 基于语句
lrewrite regex replacement flag
lrewirte就地址 新地址 [选项]
l选项:
lredirect 临时重定向
lpermament 永久重定向
l应用案例:要求访问 a.html -à b.html
lrewrite /a.html /b.html;
地址重写应用案例
l应用案例:要求访问 a.html -à b.html
[root@client ~]# vim /usr/local/nginx/conf/nginx.conf

server {
listen       80;
server_name  localhost;
location / {
root   html;
index  index.html index.htm;
rewrite /a.html /b.html redirect;
}

[root@client ~]# nginx -s reload  //重启服务
l访问测试:192.168.0.x/a.html
域名跳转
案例要求:访问192.168.0.x 跳转到www.baidu.com
[root@client ~]# vim /usr/local/nginx/conf/nginx.conf

server {
listen       80;
server_name  localhost;
rewrite ^/ http://www.baidu.com;
解释:当有人访问以根开始,跳转到www.baidu.com

重新加载服务
[root@client ~]# nginx -s reload
访问测试:192.168.0.x/xxxx
案例要求:当访问本网站下的子页面时,跳转到www.baidu.com下相同的子页面
[root@client ~]# vim /usr/local/nginx/conf/nginx.conf


server {
listen       80;
server_name  localhost;
rewrite   ^/(.*)    http://www.baidu.com/$1;

重新加载服务
[root@client ~]# nginx -s reload
访问测试:192.168.0.x/xxxx
Nginx反向代理
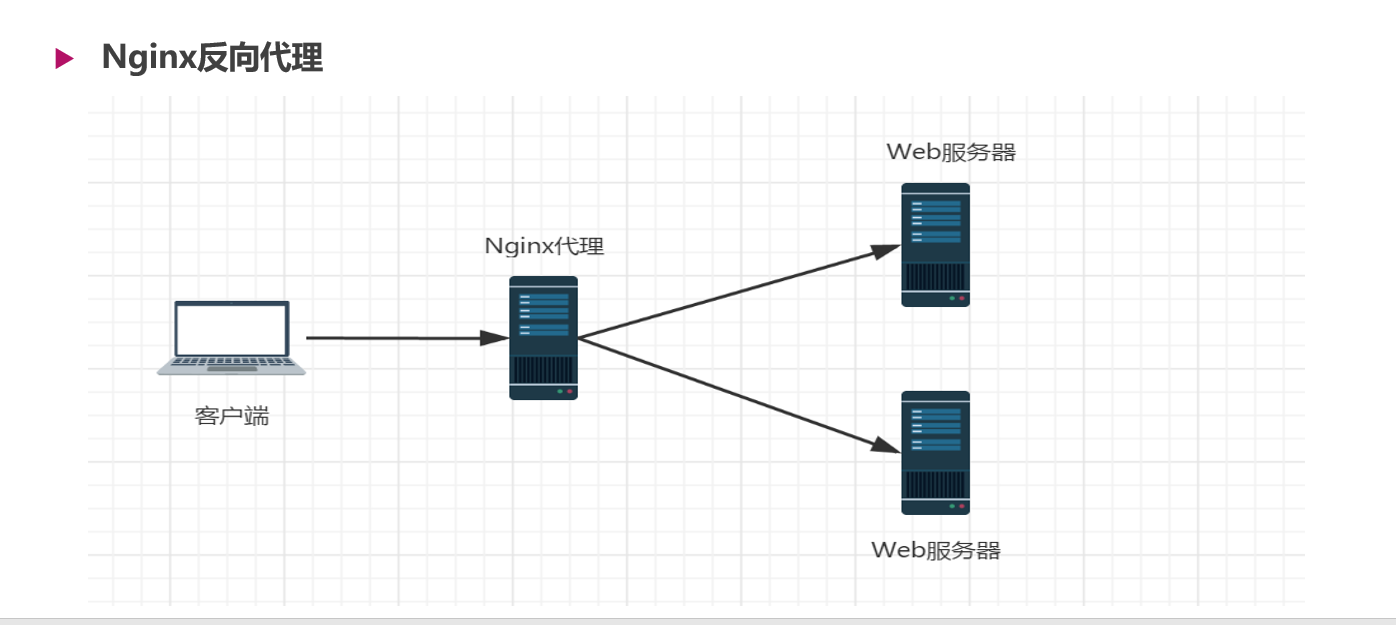
部署网站服务器
安装软件包
[root@web1 ~]# systemctl start httpd
启动服务
[root@web1 ~]# systemctl start httpd
修改默认首页
[root@web1 ~]# echo web1 > /var/www/html/index.html
部署调度器
配置Nginx服务器,添加服务池,实现反向代理功能
[root@client ~]# vim /usr/local/nginx/conf/nginx.conf

....
http {
.. ..
upstream webserver {  //定义集群
server 192.168.0.12;
server 192.168.0.120;
}
server {
listen       80;
server_name  localhost;
location / {
proxy_passhttp://webserver;  //调用集群
.. ..
配置upstream服务器集群
     1. **weight可以设置后台服务器的权重值,默认为1**
     1. **max_fails可以设置后台服务器的最大连接失败次数**
     1. **fail_timeout可以设置后台服务器的失败超时时间,单位为秒**
     1. **down标记服务器已关机,不参与集群调度**
[root@client ~]# vim /usr/local/nginx/conf/nginx.conf

upstream webserver {
                server 192.168.0.12:80  weight=2 max_fails=1 fail_timeout=30;
                                (权重为2次,连接失败1次算失败,失败后30秒不在连接)
                server 192.168.0.120:80 weight=1 max_fails=1 fail_timeout=30;
                server 192.168.0.63 down;(不在参与集群调度)
}
 server {
        listen       80;
        server_name  localhost;
 location / {
        proxy_pass http://webserver;
            root   html;
            index  index.html index.htm;
        }
Nginx目前支持的调度算法
     1. **— 轮询(默认):逐一循环调度,可通过weight执行轮询几率**
     1. **— ip_hash:根据客户端IP分配固定的后端服务器**
[root@client ~]# vim /usr/local/nginx/conf/nginx.conf

upstream webserver {
                ip_hash;    //设置调度算法
                server 192.168.0.12:80 weight=2 max_fails=1 fail_timeout=30;
                server 192.168.0.120:80 weight=1 max_fails=1 fail_timeout=30;
                server 192.168.0.63 down;
}
    server {
        listen       80;
        server_name  localhost;
 location / {
        proxy_pass http://webserver;
            root   html;
            index  index.html index.htm;
        }
配置Nginx支持TCP/UDP调度
配置Nginx调度SSH服务

如果想让Nginx支持4层代理,需要编译安装 –with-stream 模块
停止nginx服务
[root@proxy ~]# nginx -s stop
删除nginx目录
[root@proxy ~]# rm -rf /usr/local/nginx/
重新编译安装nginx
[root@proxy nginx-1.12.2]# ./configure --user=nginx \
> --group=nginx \
> --with-http_ssl_module \
> --with-stream    //添加模块
启动nginx
[root@proxy nginx-1.12.2]# nginx
配置Nginx调度SSH服务
vim  /usr/local/nginx/conf/nginx.conf

stream {                                //调用模块
        upstream sshserver {                //定义集群
                server 192.168.0.12:22;            //定义集群内主机
}

    server {
        listen       800;            //修改监听的端口
        proxy_pass sshserver;    //调用集群
          }
}

http {
.. ..
重新加载服务
[root@proxy nginx-1.12.2]# nginx -s reload
客户端访问测试
[root@web3 ~]# ssh 192.168.0.11 -p 800
Nginx优化
Nginx并发量优化
安装http-tools,使用ab压力测试工具
  1. **ab    -n  总请求数   -c  并发数    URL**
  1. **[root@proxy ~]# yum -y install httpd-tools**
  1. **[root@proxy nginx-1.12.2]# ab -n 1000 -c 1000 **[http://192.168.0.11/](http://192.168.0.11/)**    ****//****测试压力**
  1. **[root@proxy nginx-1.12.2]# ab -n 2000 -c 2000 **[http://192.168.0.11/](http://192.168.0.11/)**  ****//****测试压力**
  1. socket**:** Too many open files**(24)  //打开文件数量过多**
修改Nginx并发量
[root@proxy nginx-1.12.2]# vim /usr/local/nginx/conf/nginx.conf

  .. ..
worker_processes  1;  //进程数量与CPU核数一致
.. ..
events {
worker_connections  65535;  //进程处理的最大连接数
}
.. ..
重新加载服务
[root@proxy nginx-1.12.2]# nginx -s reload
优化Linux内核参数
修改Linux内核打开文件的最大数量
修改Linux内核打开文件的最大数量

[root@proxy nginx-1.12.2]# ulimit -Hn 100000            //硬限制(临时)
[root@proxy nginx-1.12.2]# ulimit -Sn 100000            //软限制(临时)
永久修改
[root@proxy nginx-1.12.2]# vim /etc/security/limits.conf
* (所有人) sort (软限制) hard (硬限制) nofile (打开文件数量) 100000
测试并发访问量
  1. **[root@proxy nginx-1.12.2]# ab -n 2000 -c 2000 **[http://192.168.0.11/](http://192.168.0.11/)
  1. **[root@proxy nginx-1.12.2]# ab -n 5000 -c 5000 http://192.168.0.11/**
  1. **[root@proxy nginx-1.12.2]# ab -n 10000 -c 10000 http://192.168.0.11/**
  1. **[root@proxy nginx-1.12.2]# ab -n 20000 -c 20000 http://192.168.0.11/**
  1. **[root@proxy nginx-1.12.2]# ab -n 50000 -c 50000 **[http://192.168.0.11/](http://192.168.0.11/)
  1. **解释:ab压测工具最大只能测试两万并发访问量**
HTTP状态码
| 返回码 | 状态描述 |
|---|---|
| 200 | 一切正常 |
| 301 | 永久重定向 |
| 302 | 临时重定向 |
| 401 | 用户名或密码错误 |
| 403 | 禁止访问(客户端的IP地址被拒绝) |
| 404 | 文件不存在 |
| 414 | 请求的Url头部过长 |
| 500 | 服务器内部错误 |
| 502 | Bad Gateway |
优化Nginx数据包头缓存
使用脚本测试服务器长头部请求
脚本
#!/bin/bash
URL=http://192.168.0.11/index.html?    # ? 代表传输的参数
for i in {1..5000}
do
URL=${URL}X$i
done
curl $URL


http://192.168.0.11/index.html
http://192.168.0.11/x1
http://192.168.0.11/x1x2
http://192.168.0.11/x1x2x3
重启Nginx服务
[root@nginx ~]# nginx -s reload
运行脚本
[root@nginx]# bash buffer.sh
修改配置文件,增加缓存空间
[root@nginx ~]# vim /usr/local/nginx/conf/nginx.conf
....
http {
client_header_buffer_size 1k;  //默认的请求包缓存大小
large_client_header_buffers 4 4k;  //最大请求包缓存个数与容量
....
}
重启Nginx服务
[root@nginx ~]# nginx -s reload
Nginx设置本地浏览器缓存
配置Nginx缓存静态页面及缓存天数
[root@nginx ~]# vim /usr/local/nginx/conf/nginx.conf

server {
listen       80;
server_name  localhost;
location / {
root   html;
index  index.html index.htm;
}
location ~.*\.(jpg|png|jif)$ {  //匹配用户地址栏
expires 30d;  //缓存天数
}

重启Nginx服务
[root@nginx ~]# nginx  -s reload
自定义报错页面
优化Nginx404报错页面
客户端用浏览器访问不存在页面时,会提示404 Not Found
修改Nginx配置文件,自定义报错页面
[root@nginx ~]# vim /usr/local/nginx/conf/nginx.conf
.. ..
error_page  404              /404.html;  //自定义报错页面
.. ..
[root@nginx ~]# nginx -s reload //重启服务
[root@nginx ~]# touch /usr/local/nginx/html/404.html //创建错误文件
[root@nginx ~]# echo “

若有收获,就点个赞吧
0 人点赞
