简介
AQS:AbstractQueuedSynchronizer
JAVA的几乎所有锁(除synchronized,LockSupport外)都是用AQS实现的,比如ReentrantLock,CountdownLatch,CyclicBarrier,Semaphore等;
可以说AQS的底层就是CAS+volatile
1. state变量使用int类型的volatile变量维护同步状态(state)围绕state提供锁的两种操作“获取”和“释放=0”; 读锁与写锁区分 65535= 2^16-1FutureTask用它来表示任务的状态2. 内置的同步队列 CLH,双端双向列表FIFO队列存放阻塞的等待线程,来完成线程的排队执行;封装成Node,Node维护一个prev引用和next引用,实现双向链表AQS维护两个指针,分别指向队列头部head和尾部tail锁是面向使用者的,定义了用户调用的接口,隐藏了实现细节;AQS是锁的实现者,屏蔽了同步状态管理,线程的排队,等待唤醒的底层操作。锁是面向使用者,AQS是锁的具体实现者背后复杂的线程排队,线程阻塞/唤醒,如何保证线程安全,都由AQS为我们完成了
底层是一个双向链表—>cas来维护 ; int常量state volatile修饰
- 属性private volatile int state;同步状态
这个state在不同的子类实现中有不同的含义,但都是通过这个state来控制”同步”的行为.这个state通过CAS来改变.
- AQS维护着Node的双向链表作为等待队列,这个等待队列是”CLH”(Craig, Landin, and Hagersten)队列的变体Node是AQS的内部类,Node里面的属性装着线程volatile Thread thread,和一个状态volatile int waitStatus.各个线程去争抢的过程其实就是这个CLH队列的入列和出列,这个过程的关键操作都是通过CAS来实现的
通过ReentrantLock的lock()方法,去阅读理解AQS
AbstractQueuedSynchronizer的state属性对于ReentrantLock的意义:
state表示线程持有锁的次数:
state=0表示没有线程持有锁;
state>0表示有一个线程持有锁,重入了state次.
起初我是看的JDK8的源码,但是它和JDK13上有一些细节上的区别,JDK13更好理解一些.我还记下了JDK8和JDK11在AQS实现上的区别,后来想想没啥意义,还容易记忆混乱,就干脆只记录JDK13的实现方式了.既然学习嘛,那就学新的~
JDK8和新版的JDK(以11为例)实现的细节上有些不同,整体思路是一样的:
CAS修改state和Node节点入队列时,JDK8通过unsafe获取变量的内存地址偏移量,和JDK11通过变量句柄指向变量的地址.
按我的理解,这俩效果是一样的,JDK11的效率应该更高一些
以state为例:
JDK8用到了stateOffset.(为了允许将来的优化没有用AtomicInteger),这个stateOffset可以理解为state的”指针”(地址),可以通过stateOffsetCAS改变state。
long stateOffset=unsafe.objectFieldOffset(AbstractQueuedSynchronizer.class.getDeclaredField("state"));unsafe.compareAndSwapInt(this, stateOffset, expect, update);
JDK11用到了VarHandle,可以直接CAS改变state
VarHandle STATE=MethodHandles.lookup().findVarHandle(AbstractQueuedSynchronizer.class, "state", int.class);STATE.compareAndSet(this, expect, update)
Unsafe是实现CAS的核心类,Java无法直接访问底层操作系统,而是通过本地(native)方法来访问。Unsafe类提供了硬件级别的原子操作。
lock()的大致流程如下:
下面简称AbstractQueuedSynchronizer为AQS,AbstractOwnableSynchronizer为AOS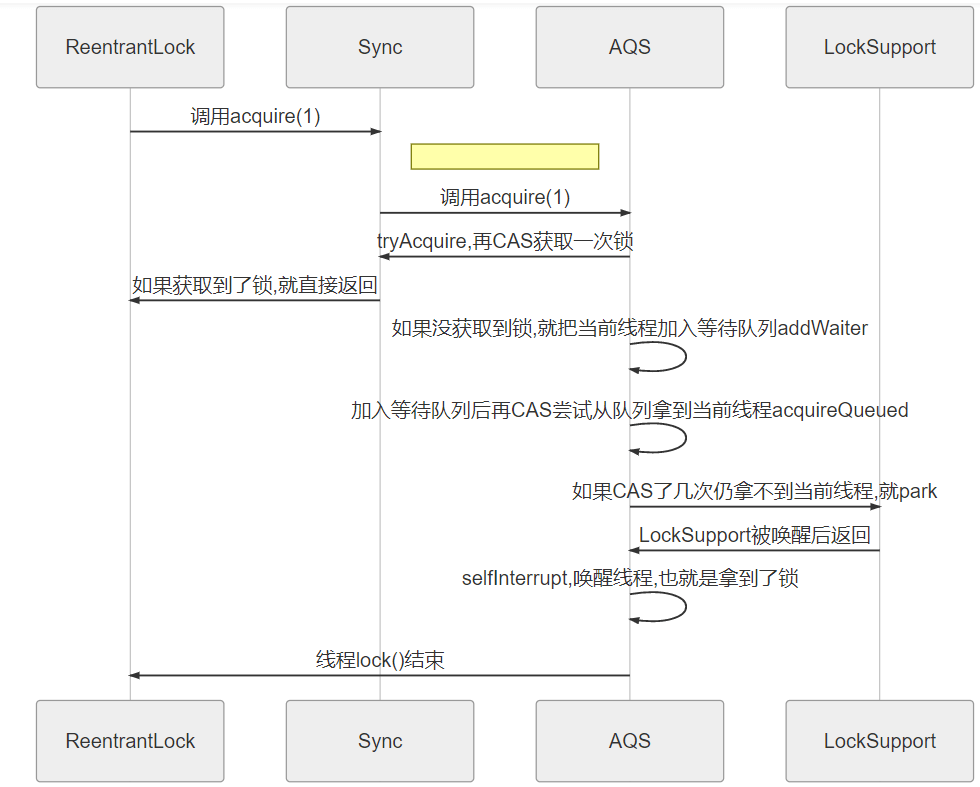
尝试阅读ReentrantLock的lock()方法
下面尝试着通过debugReentrantLock.lock()方法,去阅读源码.
首先随便写个方法,在lock.lock()处打断点,然后debug运行,追踪下去
public static void main(String[] args) {ReentrantLock lock = new ReentrantLock();lock.lock();System.out.println("hahaha");lock.unlock();}
看到ReentrantLock的lock()方法
ReentrantLock.lock()方法注释的大致意思:
这个方法用于获得该锁;
如果该锁没有被线程持有,那么把锁的hold count设为1后直接返回;
如果当前线程已经持有该锁,则hold count加一,然后返回;
如果该锁被其他线程持有,那么当前线程将”阻塞”,直到获得锁,然后把hold count设为1后返回
这个lock hold count应该就是AQS的state
/*** Acquires the lock.** <p>Acquires the lock if it is not held by another thread and returns* immediately, setting the lock hold count to one.** <p>If the current thread already holds the lock then the hold* count is incremented by one and the method returns immediately.** <p>If the lock is held by another thread then the* current thread becomes disabled for thread scheduling* purposes and lies dormant until the lock has been acquired,* at which time the lock hold count is set to one.*/public void lock() {sync.acquire(1);}
看到ReentrantLock.lock()其实是调用了sync.acquire(1),sync变量是Sync类型.Sync是何许人也?
Sync,NonfairSync,FairSync都是ReentrantLock的内部类<br /> Sync 继承了 AbstractQueuedSynchronizer<br /> NonfairSync(非公平锁的实现) 和 FairSync(公平锁的实现) 都继承了 Sync<br /> Sync的acquire方法继承自AQS,自己没有实现:
/*** Acquires in exclusive mode, ignoring interrupts. Implemented* by invoking at least once {@link #tryAcquire},* returning on success. Otherwise the thread is queued, possibly* repeatedly blocking and unblocking, invoking {@link* #tryAcquire} until success. This method can be used* to implement method {@link Lock#lock}.** @param arg the acquire argument. This value is conveyed to* {@link #tryAcquire} but is otherwise uninterpreted and* can represent anything you like.*/public final void acquire(int arg) {if (!tryAcquire(arg) &&acquireQueued(addWaiter(Node.EXCLUSIVE), arg))selfInterrupt();}
3.1 AQS的acquire中的tryAcquire是由子类实现的,
这个tryAcquire是NonfairSync实现的,调用了Sync的nonfairTryAcquire方法,因为ReentrantLock是默认是非公平锁
下面代码/*** Performs non-fair tryLock. tryAcquire is implemented in* subclasses, but both need nonfair try for trylock method.*/@ReservedStackAccessfinal boolean nonfairTryAcquire(int acquires) {final Thread current = Thread.currentThread();/*getState()调用了AQS的方法,直接返回了state属性.如果state等于0,则CAS设置stateOffset为acquires;如果state!=0,则判断拥有锁的线程是不是当前线程,如果不是则返回false;如果是当前线程已经持有锁,则更新state值为state+acquire(可重入)可见ReentrantLock把state作为是否锁定的判断标准,如果state=0则表示没有线程持有锁.如果state值>0,则表示已有线程持有了锁,并且持有了state次(可重入).*/int c = getState();if (c == 0) {// compareAndSetState是AQS的方法,CAS修改state值if (compareAndSetState(0, acquires)) {//AQS继承了AbstractOwnableSynchronizer//设置状态后,则进入AbstractOwnableSynchronizer的setExclusiveOwnerThread方法.表示已经拿到锁.setExclusiveOwnerThread(current);return true;}}// 没拿到锁,则判断是否锁的持有者就是当前线程else if (current == getExclusiveOwnerThread()) {// 当前线程重入int nextc = c + acquires;if (nextc < 0) // overflowthrow new Error("Maximum lock count exceeded");setState(nextc);return true;}return false;}
3.2 如果tryAcquire没有成功获得锁,则把当前线程加入等待队列
/*** Creates and enqueues node for current thread and given mode.** @param mode Node.EXCLUSIVE for exclusive, Node.SHARED for shared* @return the new node*/private Node addWaiter(Node mode) {Node node = new Node(mode);// 自旋把前节点加入等待队列for (;;) {Node oldTail = tail;if (oldTail != null) {node.setPrevRelaxed(oldTail);if (compareAndSetTail(oldTail, node)) {oldTail.next = node;return node;}} else {initializeSyncQueue();}}}
然后调用acquireQueued方法
/*** Acquires in exclusive uninterruptible mode for thread already in* queue. Used by condition wait methods as well as acquire.** @param node the node* @param arg the acquire argument* @return {@code true} if interrupted while waiting*/final boolean acquireQueued(final Node node, int arg) {boolean interrupted = false;try {for (;;) {final Node p = node.predecessor();// 如果上一个节点是头节点,则说明下一个就该当前线程了// 那就试着去拿一下锁,tryAcquire仍是调用的子类(Sync)的方法if (p == head && tryAcquire(arg)) {setHead(node);p.next = null; // help GCreturn interrupted;}// 判断是否需要park,需要的话就调用LockSupport的park阻塞线程if (shouldParkAfterFailedAcquire(p, node))interrupted |= parkAndCheckInterrupt();}} catch (Throwable t) {cancelAcquire(node);if (interrupted)selfInterrupt();throw t;}}
AQS的应用
在上一篇文章中我们手写了AQS和利用AQS实现了ReentrantLock和ReentrantReadWriteLock的,今天我们再来用自己的AQS和jdk的AQS来继续实现它的衍生物:计数器CountDownLatch、信号量Semaphone、回旋栅栏CyclicBarrier(不是AQS实现)。
计数器CountDownLatch
利用它可以实现类似计数器的功能。比如有一个任务A,它要等待其他任务执行完毕之后才能执行,或者说当其他任务执行到一定数量后才执行,此时就可以利用CountDownLatch来实现这种功能了。<br /> 计数器实际上就是一把共享锁,每个线程(读线程)执行完后将锁的readCount-1。直到减少到我们认为合理的值(一般是0),而这个减少的方法就是我们countDown()的释放锁的方法,每次释放锁都会-1,但此时并不会真正的释放整个读锁,释放的只是单个读线程的锁。所以此时await()方法实际上就是另外一个写线程去抢锁,只有等到整个读线程释放锁,另一个写线程(我们测试的是main线程)才能拿到锁,才会打断阻塞。
基于JDK的AQS实现
/*** @author heian* @create 2020-03-07-9:08 下午* @description 计数器就是一把共享锁,只有当线程执行之后-1,直至0*/public class MyCountDownLatch {private Sync sync;public MyCountDownLatch(int count){if (count<0){throw new IllegalArgumentException("参数传入有误");}this.sync= new Sync(count);}//阻塞 只有当readCount == 0,释放共享锁,类比ReentrantLock的lock拿到锁public void await() {sync.acquireShared(1);}//countDown 就是释放锁,并把state-1public void countDown() {sync.releaseShared(1);}class Sync extends AbstractQueuedSynchronizer{//开始存值public Sync(int count){setState(count);}//await 就是抢占共享锁,当state变为0的时候就表示锁释放,就会去唤醒main或者抢锁线程抢锁@Overrideprotected int tryAcquireShared(int arg) {return getState()<=0 ? 1:-1;}//countDown 释放锁就是-1,直至减少到0,才会释放共享锁@Overrideprotected boolean tryReleaseShared(int arg) {//System.out.println("打印队列长度" + getQueueLength());for (;;){int newNum = getState() - arg;if (compareAndSetState(getState(),newNum)){return newNum <= 0;}}}}}
基于我们的AQS实现
/*** @author heian* @create 2020-03-07-10:53 下午* @description*/public class MyCountDownLatch2 {private Sync sync;public MyCountDownLatch2(int count){if (count<0){throw new IllegalArgumentException("参数传入有误");}this.sync = new Sync(count);}class Sync extends MyAQS{public Sync(int count){readCount.compareAndSet(readCount.get(),count);}// await readCount<=0 >0 表示别的线程抢锁成功 <0 失败@Overridepublic int tryLockShared(int acquires) {return readCount.get() <=0 ? 1:-1;}//countDown别的线程抢锁,只有当readCount ==0 才会抢成功@Overridepublic boolean tryUnlockShared(int releases) {for (;;){int newNum = readCount.get() - releases;if (readCount.compareAndSet(readCount.get(),newNum)){return readCount.get()<=0;}}}}public void await() {//我的AQS这里arg 默认是1 就没传参输this.sync.lockShared();}public void countDown() {//我的AQS这里arg 默认是1 就没传参输this.sync.unlockShared();}}
测试代码
public static void main(String[] args) {MyCountDownLatch countDownLatch = new MyCountDownLatch(5);IntStream.range(0,5).forEach(value -> {new Thread(() -> {LockSupport.parkNanos(1000000000*1L);System.out.println(Thread.currentThread().getName() + "结束");countDownLatch.countDown();}).start();});countDownLatch.await();System.out.println("main开始");}Thread-2结束Thread-3结束Thread-1结束Thread-4结束Thread-0结束main开始
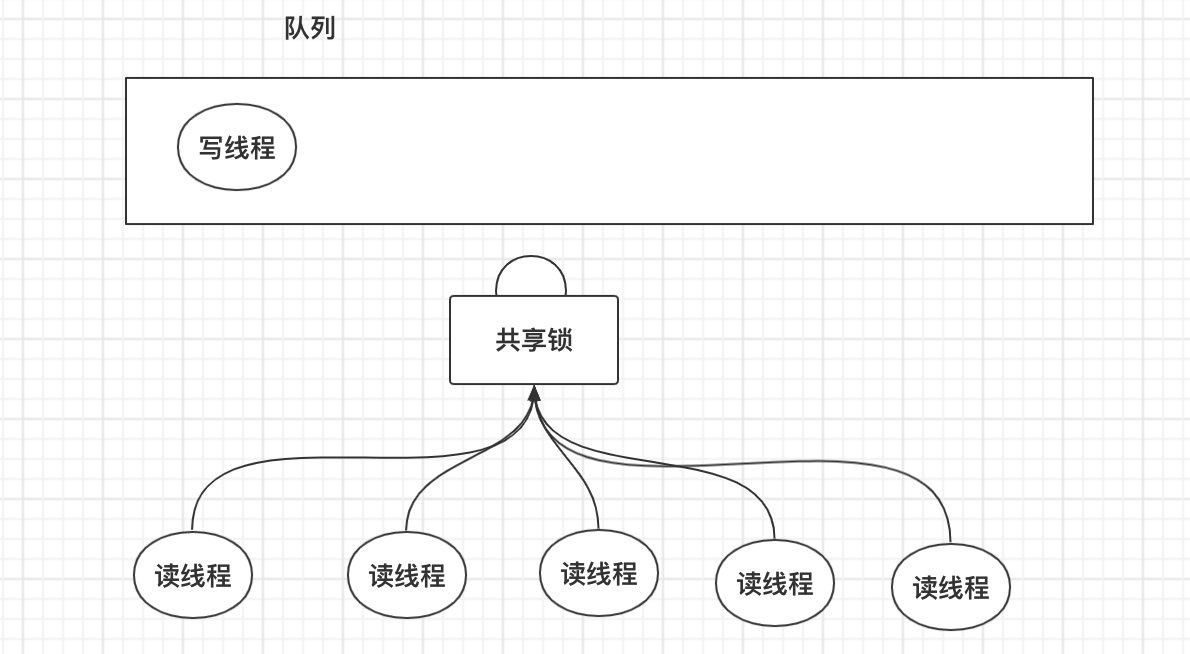<br /> 需要说明的就是我们这里实现AQS的两个tryLockShared/tryUnlockShared 方法是<=0。它的语义就是说:因为我们这里仅仅开辟了5个读线程去调用了释放锁的方法,而释放锁的方法会调用tryUnlockShared方法,而我们设置好的readCount数量是5,只有当它一直减少至0或者<0(读线程数量大于5)的时候才会唤醒在队列中的写线程,我们这里是main线程,才会打断await的阻塞,唤醒它重新调用tryLockShared方法,而此时由于readCount已经<=0了,这时候会抢锁成功,于是乎便打断阻塞,便可以执行main线程了。(读线程不会放入队列)
信号量Semaphone
Semaphore字面意思为信号量,Semaphore可以控同时访问的线程个数,以此来达到限流的作用。<br /> 其主要有两个常用的方法 acquire() 和release(),前者的语义是获得一个许可,其实说白了就是去抢锁,抢到了则readCount+1,并从队列中移除,没抢则该线程挂起,只有当别的读线程执行完调用了release()方法,被挂起的线程才有机会去抢锁。<br />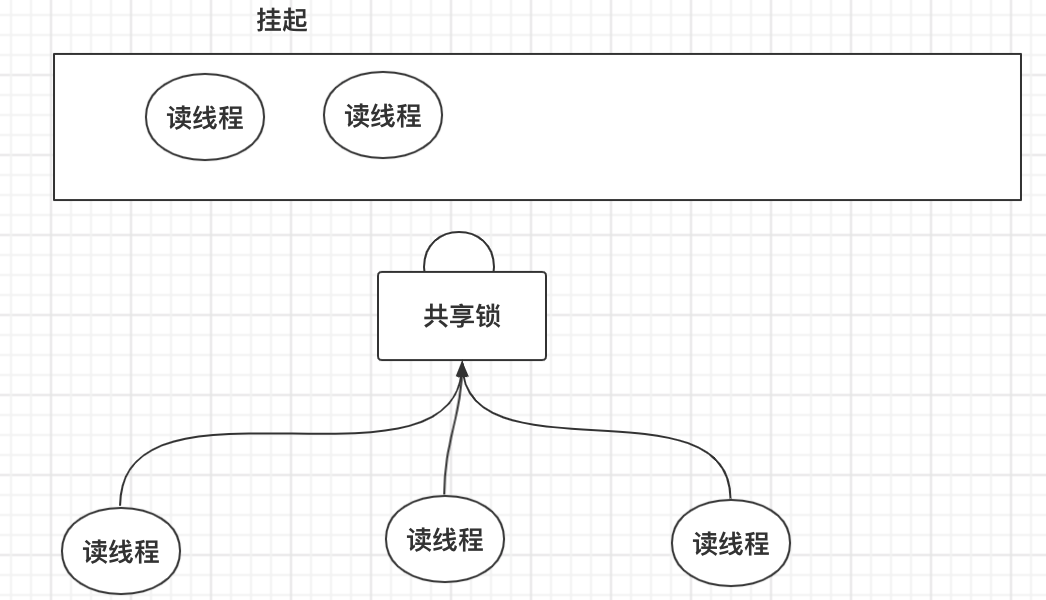
基于JDK的AQS实现
/*** @author heian* @create 2020-03-07-9:08 下午* @description 信号量 进来就拿锁,拿到了就+1,释放了就-1,共享锁的线程只允许最大连接permitCount个线程*/public class MySemaphone {private Sync sync;private int permitCount;public MySemaphone(int count){if (count<0){throw new IllegalArgumentException("参数传入有误");}this.sync= new Sync();this.permitCount = count;}public void acquire() {sync.acquireShared(1);}public void release() {sync.releaseShared(1);}class Sync extends AbstractQueuedSynchronizer{@Overrideprotected int tryAcquireShared(int arg) {for (;;){int currentReadCount = getState() + arg;if (currentReadCount<=permitCount){if (compareAndSetState(getState(),currentReadCount)){return 1;}}else {return -1;}}}@Overrideprotected boolean tryReleaseShared(int arg) {//System.out.println("打印队列长度" + getQueueLength());for (;;){int remainNum = getState() - arg;return compareAndSetState(getState(),remainNum);}}}}
测试代码
public static void main(String[] args) {MySemaphone semaphore = new MySemaphone(3);IntStream.range(0,5).forEach(value -> {new Thread(() -> {semaphore.acquire();System.out.println(Thread.currentThread().getName() + " 获得许可");LockSupport.parkNanos(1000000000*2L);System.out.println(Thread.currentThread().getName() + "释放许可");semaphore.release();}).start();});}Thread-0 获得许可Thread-2 获得许可Thread-1 获得许可Thread-0释放许可Thread-1释放许可Thread-2释放许可Thread-4 获得许可Thread-3 获得许可Thread-3释放许可Thread-4释放许可
回旋栅栏CyclicBarrier
回环栅栏:让一组线程等待至某个状态之后再全部同时执行,叫做回环是因为当所有等待线程都被释放以后,CyclicBarrier可以被重用。叫做栅栏,描述所有线程被栅栏挡住了,当都达到时,一起跳过栅栏执行,我们可以把这个状态就叫做barrier。<br /> CyclicBarrier并不是ASQ实现的,因为AQS内部只有一个队列,而这个队列可以用来装所有进来的线程,但是我们还需要一个队列用来装正在运行的线程。而我们每次调用await方法都会去做一个自增操作,当自增操作count=许可数目,我们便启动这个栅栏,然后重置count,在来装下一轮。<br /> 可以用我们生活的例子举例,比如我们排队等公交,一辆公车只允许装在3个人,而此时 你有7个人,则会一开始装走3个下一辆在装走3个,但是最后只剩下一个因为不满足3个人一车的条件只能被阻塞在外面不允许运行该线程。<br /> 实现回旋栅栏的方式一般有两种,一个是基于ReentranLock,另外也可以基于syncronized。这里我已syncronized+notifyAll写出实现代码。这里代码演示就是每过一秒增加一个线程运行,只有当线程数达到3方可运行。
基于syncronized+notifyAll实现
/*** @author heian* @create 2020-03-08-2:34 下午* @description 循环栅栏 实现原理*/public class MyCyclicBarrier {private int initCount = 0;private int permitCount;private Object generation = new Object();public MyCyclicBarrier(int permitCount){this.permitCount = permitCount;}public void await() throws InterruptedException {synchronized (this){initCount++;Object currentG = generation;if (initCount == permitCount){//进入下一次计数nextGeneration();}else {//防止伪唤醒for (;;){this.wait();//释放锁//被更改了,则直接跳出阻塞if (currentG != generation){break;}}}}}public void nextGeneration(){synchronized (this){initCount =0;generation = new Object();notifyAll();}}}
测试代码
public static void main(String[] args) {MyCyclicBarrier cyclicBarrier = new MyCyclicBarrier(3);IntStream.range(0,7).forEach(value -> {new Thread(() -> {try {cyclicBarrier.await ();System.out.println (Thread.currentThread ().getName () + "一起跳出栅栏");} catch (Exception e) {e.printStackTrace();}}).start();LockSupport.parkNanos(1000000000*1L);});}//少一个线程未跳出Thread-1一起跳出栅栏Thread-0一起跳出栅栏Thread-2一起跳出栅栏Thread-5一起跳出栅栏Thread-3一起跳出栅栏Thread-4一起跳出栅栏

若有收获,就点个赞吧
0 人点赞
