Spring
参考资料
Spring学习(全)_codekiang的博客-CSDN博客_spring学习
(26条消息) 最全面的 Spring 学习笔记_Java干货-CSDN博客_spring学习
优点
轻量:Spring框架使用的jar包都比较小,运行时占用的资源少;
针对接口编程,解耦合;
AOP编程的支持;
方便集成各种优秀的框架
模块
数据访问/继承层
Web层
AOP
植入
核心容器
消息传输
测试
Spring的一个示例
引入spring的一个依赖后,创建一个接口类并定义接口方式,然后实现该接口,最后创建一个.xml文件,用以生成bean信息:
<?xml version="1.0" encoding="UTF-8"?><!--spring的配置文件beans是根标签,里面存储了java对象spring-beans.xsd是约束文件,和mybatis中的dtd一样--><beans xmlns="http://www.springframework.org/schema/beans"xmlns:xsi="http://www.w3.org/2001/XMLSchema-instance"xsi:schemaLocation="http://www.springframework.org/schema/beanshttp://www.springframework.org/schema/beans/spring-beans.xsd"><!-- 声明bean,告诉spring要创建哪个类的对象(一个bean只能声明一个对象)id:对象的自定义名称(唯一)class:类的全限定名称,不能是接口。--><bean id="demo" class="org.example.service.Impl.DemoImpl"/></beans>
spring容器会把创建好的bean对象放到一个map中,然后通过键去获取该bean对象:
@Testpublic void shouldAnswerWithTrue(){// 手动创建对象// DemoImpl d = new DemoImpl();// d.example();// spring自动创建对象// 1.指定spring配置文件的名称String config = "beans.xml";// 2.创建表示spring容器对象ApplicationContext ac = new ClassPathXmlApplicationContext(config);// 3.从容器中获取对象getBean(id)DemoImpl d = (DemoImpl) ac.getBean("demo");// 4.使用对象d.example();}
需要注意的是ApplicationContext是一个接口,不能直接new,所以需要new它的实现类。而且spring中的对象默认是单例的
spring ioc
是一个概念、一个思想。就是将对象的创建、复制和管理都交给代码外的容器,即管理所有的依赖注入的关系
Bean就是由IOC容器初始化、装配及管理的对象
使用IOC可以减少代码的改动,也可以实现不同的功能,实现解耦合
IOC的技术实现是DI,即依赖注入,只需要在程序中提供要使用的对象名即可,其他都交给容器实现。比如Spring底层自动创建对象,其原理是利用了java反射的机制。
原理
spring aop
基于动态代理实现的,也可以说是动态代理的规范化,把动态代理实现的步骤和方式都定义好,以统一的形式使用动态代理。至于统一的原因,是不允许同一功能的实现多种方式
使用AOP的好处是可以减少代码纠缠,即交叉业务与主业务逻辑可以分开。例如,转账:在真正的转账业务逻辑前后,需要权限控制、日志记录、加载事务、结束事务等交叉业务逻辑,其代码量大却复杂,大大影响了主业务逻辑
一个好的面向编程需要:
- 要以切面为核心,分析项目中哪些功能可以用切面的形式去实现它
- 要合理的安排切面执行的时间Advice(在目标方法的前还是后)
- 要合理的安排切面执行的位置Pointcut(在哪个类哪个方法中)
什么时候考虑使用AOP:
- 当你不知道源码的情况下,要给一个系统中存在的类增加功能时。
- 给项目中多个类增加相同的功能时。
- 给业务方法增加事务、日志输出等。
AOP的两种技术实现框架:是spring自带的、aspectJ,spring自带的比较笨重,一般使用aspectJ,轻量高校,spring框架已经集成了aspectJ
原理
首先是第一步内容是对我们在AopConfig中的AOP配置内容进行解析并且保存到BeanFactory中,这个过程就是解析保存切面信息。
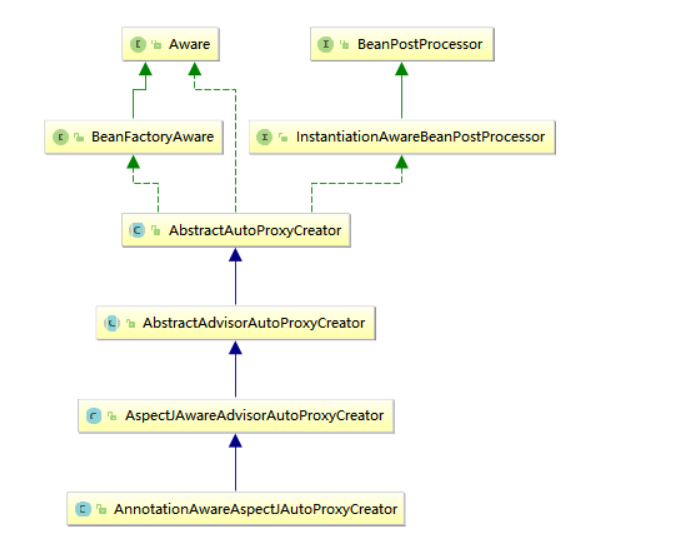
其核心类为AnnotationAwareAspectJAutoProxyCreator,它的继承类实现了BeanPostProcessor接口,BeanPostProcessor的实现类可以有多个执行处理节点,其中一个执行节点就是在Bean实例化之后。也就是在这个时机AnnotationAwareAspectJAutoProxyCreator拦截bean的初始化过程,根据提前解析得到的切面信息,对bean的方法进行尝试适配,如果有匹配则需要进行代理创建。

AnnotationAwareAspectJAutoProxyCreator是继承了BeanfactoryAware接口,所以在实例化时,会执行setFactory方法。而所有切面信息解析的执行者BeanFactoryAspectJAdvisorsBuilderAdapter初始化的时机也是在setFactory方法。
AnnotationAwareAspectJAutoProxyCreator是实现了InstantiationAwareBeanPostProcessor接口的,InstantiationAwareBeanPostProcessor接口定义的postProcessBeforeInitialization方法是一个可以对已经注入依赖属性的bean对象实例进行编辑操作的接口,会在
AbstractAutowireCapableBeanFactory中的doCreateBean
、initializeBean(String, Object, RootBeanDefinition)
、applyBeanPostProcessorsBeforeInstantiation方法执行InstantiationAwareBeanPostProcessor的postProcessBeforeInstantiation方法,初次初始化缓存切面信息的话就是在这个方法里面。
这里的postProcessBeforeInstantiation方法实际上是AnnotationAwareAspectJAutoProxyCreator的实例进行调用,AnnotationAwareAspectJAutoProxyCreator实现InstantiationAwareBeanPostProcessor接口。
@Overrideprotected boolean shouldSkip(Class<?> beanClass, String beanName) {// TODO: Consider optimization by caching the list of the aspect names//预先解析缓存切面信息List<Advisor> candidateAdvisors = findCandidateAdvisors();for (Advisor advisor : candidateAdvisors) {if (advisor instanceof AspectJPointcutAdvisor) {if (((AbstractAspectJAdvice) advisor.getAdvice()).getAspectName().equals(beanName)) {return true;}}}return super.shouldSkip(beanClass, beanName);}
AnnotationAwareAspectJAutoProxyCreator#findCandidateAdvisors
(),这个方法是预先解析缓存所有切面advisor信息,返回一个Advisor类型的list集合,其中的advisors.addAll(this.aspectJAdvisorsBuilder.buildAspectJAdvisors());
就是前面提到的BeanFactoryAspectJAdvisorsBuilder解析所有切面信息的调用点
而BeanFactoryAspectJAdvisorsBuilder中的buildAspectJAdvisors方式就是用来解析aop配置的,用了synchronized修饰其中的代码块
通过isAspect(Class<?> clazz)去判断是否是切面配置类
通过getAdvisors()方法遍历所有没被@PointCut注解标注的方法,循环解析,生成一个Advisor对象保存在BeanFactoryAspectJAdvisorsBuilder#advisorsCache方法中,当AnnotationAwareAspectJAutoProxyCreator拦截bean的创建过程时,从这里面适配是否有切面可用。
在AbstractAutoProxyCreator#postProcessAfterInitialization执行时,找到上面AbstractAutoProxyCreator#postProcessBeforeInitialization缓存的所有的切面信息,进行切面适配,从而决定是否需要进行代理对象的创建。
通过AbstractAdvisorAutoProxyCreator#getAdvicesAndAdvisorsForBean方法去查找匹配的切面,if判断,找到后,通过AbstractAutoProxyCreator#createProxy方法去生成代理对象,设置ProxyFactory创建Proxy需要的一切信息,通过proxyFactory.getProxy(getProxyClassLoader())方法,然后根据class的种类判断采用的代理方式(cglib或者jdk),然后执行getProxy(ClassLoader classLoader),通过getCallbacks(rootClass)方法获取拦截回调函数
JDK动态代理
使用Proxy、Method、InvocationHandler创建代理对象
CGLIB动态代理
生成目标类的子类,此子类对象就是代理对象。所以该代理方式要求目标类必须能够继承,而且不是final修饰的类。
五种通知类型
除了环绕通知外,所有的通知方法可加入JoinPoint,该对象可获取目标方法的一些属性、参数等。环绕通知使用的是ProceedingJoinPoint
@Before:前置通知
public interface SomeService {void doSome();}
public class SomeServiceImpl implements SomeService {@Overridepublic void doSome() {System.out.println("喝奶茶了!");}}
import org.aspectj.lang.annotation.Aspect;import org.aspectj.lang.annotation.Before;import java.util.Date;// 声明当前类为切面类@Aspectpublic class MyAspect {// 前置通知@Before(value = "execution(public void doSome(..))")public void myBefore(){System.out.println("你在"+ new Date() + "的时候喝了一杯奶茶!");}}
创建对象
<?xml version="1.0" encoding="UTF-8"?><beans xmlns="http://www.springframework.org/schema/beans"xmlns:xsi="http://www.w3.org/2001/XMLSchema-instance" xmlns:aop="http://www.springframework.org/schema/aop"xsi:schemaLocation="http://www.springframework.org/schema/beans http://www.springframework.org/schema/beans/spring-beans.xsd http://www.springframework.org/schema/aop https://www.springframework.org/schema/aop/spring-aop.xsd"><!-- 声明目标对象 --><bean id="someService" class="org.example.ba01.SomeServiceImpl" /><!-- 声明切面类对象 --><bean id="myAspect" class="org.example.ba01.MyAspect" /><!-- 声明自动代理生成器:创建代理对象是在内存中完成的,创建代理对象实际是修改目标对象在内存中的结构。即最后的目标对象实际是修改结构后的代理对象。--><aop:aspectj-autoproxy /></beans>
@AfterReturning:返回后通知
在目标方法成功执行之后调用通知
- 属性:
value 切入点表达式
returning 接收目标方法的返回值 - 特点:
可以获取到目标方法的返回值,开发人员可以根据返回值来做不同的事情
可以修改返回值
import org.aspectj.lang.annotation.AfterReturning;import org.aspectj.lang.annotation.Aspect;import org.aspectj.lang.annotation.Before;import java.util.Date;// 声明当前类为切面类@Aspectpublic class MyAspect {@AfterReturning(value = "execution(* *..ba02.*.do*(..))", returning = "res")public void myAfterReturning(Object res){System.out.println(new Date() + "进行了事务提交");System.out.println("doSubmit的返回值是:"+res);}}
<?xml version="1.0" encoding="UTF-8"?><beans xmlns="http://www.springframework.org/schema/beans"xmlns:xsi="http://www.w3.org/2001/XMLSchema-instance" xmlns:aop="http://www.springframework.org/schema/aop"xsi:schemaLocation="http://www.springframework.org/schema/beans http://www.springframework.org/schema/beans/spring-beans.xsd http://www.springframework.org/schema/aop https://www.springframework.org/schema/aop/spring-aop.xsd"><!-- 声明目标对象 --><bean id="someService" class="org.example.ba02.SomeServiceImpl" /><!-- 声明切面类对象 --><bean id="myAspect" class="org.example.ba02.MyAspect" /><aop:aspectj-autoproxy /></beans>
@Around:环绕通知
在被通知的方法调用之前和调用之后执行自定义的行为
- 属性:
value 切入点表达式 - 特点:
是功能最强的通知。可以在目标方法前后增强功能。经常用于事务操作。
可控制目标方法是否调用,通过ProceedingJoinPoint.proceed()调用目标方法不写则不调
修改目标方法的执行结果,影响最后的调用结果
等同于jdk动态代理的InnovationHandler接口
@AfterThrowing:异常通知
在目标方法抛出异常后调用通知
@After:后置通知
在目标方法完成之后调用通知,并不关心方法的输出是什么
名词解析
Aspect
切面。给目标类所增加的功能叫做切面,比如日志、事务等
JoinPoint
连接点。连接业务方法切面的位置,即某类中的业务方法
Pointcut
切入点。一个或多个连接点方法的集合
当一个项目中有多个execution()是重复的,那么就可以使用它来减少重复代码
@Aspectpublic class MyAspect {@Around(value = "mypt()") // 一定要加上括号!!public Object myAround(ProceedingJoinPoint pjp) throws Throwable {Object result = null;return result;}@Around(value = "mypt()") // 一定要加上括号!!public Object myAround2(ProceedingJoinPoint pjp) throws Throwable {}@Pointcut(value = "execution(* *..ba03.*.doAround(..))")private void mypt(){// 作为别名的函数,不需要代码,修饰符为private}}
Advice
通知,表示切面功能执行的时间
DI(依赖注入)
表示创建对象,给属性赋值
两种实现方式
基于XML
在spring的配置文件中,使用标签和属性来实现
set注入
对于实体属性类来说,可省略set/get方法
<?xml version="1.0" encoding="UTF-8"?><beans xmlns="http://www.springframework.org/schema/beans"xmlns:xsi="http://www.w3.org/2001/XMLSchema-instance"xsi:schemaLocation="http://www.springframework.org/schema/beans http://www.springframework.org/schema/beans/spring-beans.xsd"><bean id="myStudent" class="org.example.Student"><property name="name" value="codeKiang" /><property name="age" value="18" /><!-- 引用类型 --><property name="school" ref="school" /></bean><!-- 非自定义类的属性赋值 --><bean id="myDate" class="java.util.Date"><property name="time" value="2020082899" /></bean><bean id="school" class="org.example.ba02.School"><property name="name" value="清华" /><property name="address" value="北京" /></bean></beans>
@Testpublic void test01(){String config = "applicationContext.xml";ApplicationContext ac = new ClassPathXmlApplicationContext(config);Student s = (Student)ac.getBean("myStudent");System.out.println(s);System.out.println("=========以下为非自定义类的调用======");Date date = (Date) ac.getBean("myDate");System.out.println(date);}
autowire注入
对于简单类型的set注入有个好处,就是可以自动注入。即当一个类中有很多的引用类型时,你不需要写很多的<property>标签,spring会根据某些规则自动给引用类型赋值。
byName(按名称注入):java类中引用类型的属性名要与bean标签的id值一致。
<bean id="myStudent" class="org.example.ba02.Student" autowire="byName"><property name="name" value="byName" /><property name="age" value="18" /></bean>
byType (按类型注入):java类中引用类型的数据类型和bean的class属性是同源关系。
同源就是一类的意思:
java类中引用类型的数据类型和bean的class值一样。
java类中引用类型的数据类型和bean的class值是父子关系。(引用类型的数据类型为父类)
java类中引用类型的数据类型和bean的class值是接口与实现类关系。(引用类型的数据类型为接口类型)
<bean id="myStudent" class="org.example.ba02.Student" autowire="byType"><property name="name" value="byType" /><property name="age" value="18" /><!-- 因为属性school的类型是School,所以spring会自动找School类,或者其子类,或者其实现类School school = new School();--></bean>
构造注入
构造注入只是调用类的有参构造函数。
<bean id="对象名" class="类的全限定名称"><constructor-arg name="形参名0" value="形参值"/><constructor-arg name="形参名1" value="形参值"/><constructor-arg name="形参名2" ref="bean的id值(对象名称)"/></bean>
当形参类型为引用类型时,需要把value 改成ref。
基于注解
使用spring提供的注解来完成对象创建、属性赋值,这是比较常用的,需要用到spring-aop的依赖
@Component
在类上加入,@Component(value = “对象名”),默认首字母小写的类名,即将这个类当成对象使用
<!-- 声明组件扫描器base-package:指定注解在你项目中的包名工作方式:spring会扫描遍历base-package指定的包中所有的类,找到类中的注解,按照注解的功能创建对象/给属性赋值组件扫描器扫描多个包的方式:使用;或者,隔开,也可以直接指定父包--><context:component-scan base-package="componentDemo" />
@Repository
表示创建dao对象,处于持久层类的上面,即也是标明类的注解
@Service
表示创建service对象,也是标明类的注解
@Controller
表示创建控制器对象,相当于serverlet,也是标明类的注解
@Value
给属性赋值,无需set/get,标注后可直接获取其值
@Autowired、@Resource、@Qualifier
引用类型的赋值。
@Autowired使用的是自动注入原理,默认使用的是byType自动注入,其属性required是一个boolean类型,默认为true,表示当引用类型赋值失败时,程序报错,并终止执行
@Qualifier使用的是byName的方式自动注入,即@Qualifier(“bean的id”)
@Resource是来自jdk的注解,spring只是提供了对这个注解的支持,类似于@Autowired和@Qualifier的结合体,可以使用byType和byName的方式
Spring事务
事务就是一组sql语句,这组语句要么全部执行成功,要么全部执行失败
在java程序中,一般吧事务放在service类的业务方法上。
使用spring事务的好处就是spring提供了统一处理事务的模型,能统一使用事务的方法来完成不同数据库访问技术的事务处理。
Spring处理事务的流程
指定事务管理器
使用事务管理器对象进行事务提交和回滚事务
事务管理器是一个接口(PlatformTransactionManager)和它的众多实现类
接口方法有commit、rollback等
实现类:mybatis对应的实现了类为DataSourceTransactionManager;hibernate对应的实现类为HibernateTransactionManager
指定事务与事务的类型
指定事务的隔离级别
DEFAULT:使用DB默认的事务隔离级别。Mysql默认的隔离级别是REPEATABLE_READ;Oracle默认为REAS_COMMITTED
READ_UNCOMMITTED:读未提交
READ_COMMITTED:读已提交
REOEATABLE_READ:可重复读
SERIALIZABLE:串行化
指定事务的超时时间
即一个方法最长的执行时间为多少。若该方法超过了指定时间,事务就回滚。
单位是秒,默认为-1,表示无限时间
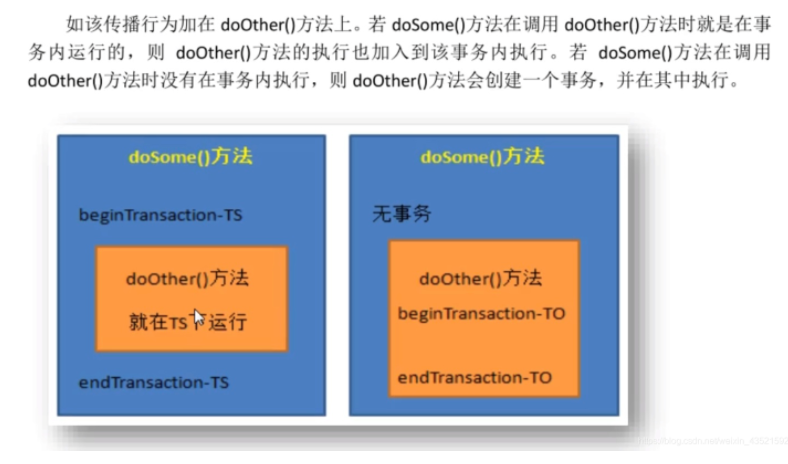
指定事务的传播行为
控制业务是否有事务,是什么样的事务
PROPAGATION_REQUIRED:指定的方法必须在事务内执行。若当前存在事务,则加入到当前事务中;否则创建一个新事务,这是spring默认的传播行为

PROPAGATION_REQUIRED_NEW:总是创建一个事务。若当前存在事务,则将当前事务挂起,重新创建一个新事务,新事务执行完毕才将原事务唤醒。
即若doSome()的执行有事务,则doOther()会创建一个新事务并将doSome()的事务挂起,直至新事务执行完毕。
PROPAGATION_REQUIRED_NEW:指定的方法支持当前事务,但若当前没有事务,则以非事务的方式执行。
如doSome()的执行有事务,则doOther()会加入到当前事务;若doSome()的执行没有事务,则doOther()就以非事务的方式执行。
PROPAGATION_MANDATORY
PROPAGATION_NESTED
PROPAGATION_NEVER
PROPAGATION_NOT_SUPPORTED
提交事务,回滚事务的机制
当业务方法执行成功,没有运行时异常,则spring在方法执行完之后提交事务
当业务方法抛出运行时异常或ERROR,spring会执行回滚
注解处理事务
@Transaction,spring中,使用该注解就能给当前方法增加事务,需要放在public方法的上面,可以在该注解中添加属性,以添加隔离级别、传播行为以及指定哪个异常时进行回滚。该注解使用aop的方式给业务方法增加事务功能的。
使用步骤
- 在主配置文件中声明事务管理器对象。如
- 使用@Transaction创建代理对象,给方法增加事务功能
案例
第一步:在entity包中创建实体类
package org.example.entity;public class Goods {private int id;private String name;private int amount;private float price;public Goods(){}public Goods(int id, int amount) {this.id = id;this.amount = amount;}// 省略了getter跟setter@Overridepublic String toString() {return "Goods{" +"id=" + id +", name='" + name + '\'' +", amount=" + amount +", price=" + price +'}';}}
package org.example.entity;public class Sale {private int id;private int gid;private int nums;public Sale(){}public Sale(int gid, int nums) {this.gid = gid;this.nums = nums;}// 省略了getter跟setter@Overridepublic String toString() {return "Sale{" +"id=" + id +", gid=" + gid +", nums=" + nums +'}';}}
第二步:在dao包中穿件dao类,并添加相应的mapper
package org.example.dao;import org.example.entity.Goods;public interface GoodsDao {int updateGoods(Goods goods);Goods selectGoods(int gid);}
<?xml version="1.0" encoding="UTF-8" ?><!DOCTYPE mapperPUBLIC "-//mybatis.org//DTD Mapper 3.0//EN""http://mybatis.org/dtd/mybatis-3-mapper.dtd"><mapper namespace="org.example.dao.GoodsDao"><update id="updateGoods">update goods set amount = amount - #{amount} where id=${id};</update><select id="selectGoods" resultType="org.example.entity.Goods">select * from goods where id=#{gid};</select></mapper>
package org.example.dao;import org.example.entity.Sale;public interface SaleDao {int insertSale(Sale sale);}
<?xml version="1.0" encoding="UTF-8" ?><!DOCTYPE mapperPUBLIC "-//mybatis.org//DTD Mapper 3.0//EN""http://mybatis.org/dtd/mybatis-3-mapper.dtd"><mapper namespace="org.example.dao.SaleDao"><insert id="insertSale">insert into sale(gid,nums) value(#{gid}, #{nums});</insert></mapper>
第三步:编写mybatis主配置文件
<?xml version="1.0" encoding="UTF-8" ?><!DOCTYPE configurationPUBLIC "-//mybatis.org//DTD Config 3.0//EN""http://mybatis.org/dtd/mybatis-3-config.dtd"><configuration><!-- settings:控制mybatis全局行为 --><settings><!-- 设置mybatis输出日志 --><setting name="logImpl" value="STDOUT_LOGGING"/></settings><typeAliases><!-- 实体类所在的包名 --><package name="org.example.entity"/></typeAliases><mappers><package name="org.example.dao"/></mappers></configuration>
第四步:自定义运行时异常类,用以描述业务方法在遇到异常时是否回滚
package org.example.exceptions;// 自定义运行时异常public class NotEnoughException extends RuntimeException{public NotEnoughException() {super();}public NotEnoughException(String message) {super(message);}}
第五步:编写service层业务
package org.example.service;public interface BuyGoodsService {void buy(int gid, int nums);}
package org.example.service.impl;import org.example.dao.GoodsDao;import org.example.dao.SaleDao;import org.example.entity.Goods;import org.example.entity.Sale;import org.example.exceptions.NotEnoughException;import org.example.service.BuyGoodsService;import org.springframework.transaction.annotation.Transactional;public class BuyGoodsServiceImpl implements BuyGoodsService {private SaleDao saleDao;private GoodsDao goodsDao;// 事务注解【注意】@Transactional@Overridepublic void buy(int gid, int nums) {// 记录销售信息Sale sale = new Sale(gid, nums);saleDao.insertSale(sale);Goods s_goods = goodsDao.selectGoods(gid);// 判断商品是否存在或库存是否足够if(s_goods == null) throw new NullPointerException(gid+"商品不存在");else if(s_goods.getAmount() < nums) throw new NotEnoughException(gid+"商品库存不足");// 更新库存Goods goods = new Goods(gid, nums);goodsDao.updateGoods(goods);}public void setSaleDao(SaleDao saleDao) {this.saleDao = saleDao;}public void setGoodsDao(GoodsDao goodsDao) {this.goodsDao = goodsDao;}}
第六步:编写spring主配置文件
<?xml version="1.0" encoding="UTF-8"?><beans xmlns="http://www.springframework.org/schema/beans"xmlns:xsi="http://www.w3.org/2001/XMLSchema-instance"xmlns:context="http://www.springframework.org/schema/context" xmlns:tx="http://www.springframework.org/schema/tx"xsi:schemaLocation="http://www.springframework.org/schema/beanshttp://www.springframework.org/schema/beans/spring-beans.xsdhttp://www.springframework.org/schema/contexthttps://www.springframework.org/schema/context/spring-context.xsdhttp://www.springframework.org/schema/txhttp://www.springframework.org/schema/tx/spring-tx.xsd"><!-- 告诉spring我们数据库信息文件的位置 --><context:property-placeholder location="jdbc.properties" /><bean id="myDataSource" class="com.alibaba.druid.pool.DruidDataSource"init-method="init" destroy-method="close"><property name="url" value="${jdbc.url}" /><property name="username" value="${jdbc.username}" /><property name="password" value="${jdbc.pwd}" /><property name="maxActive" value="${jdbc.max}" /></bean><bean id="sqlSessionFactory" class="org.mybatis.spring.SqlSessionFactoryBean" ><property name="dataSource" ref="myDataSource" /><property name="configLocation" value="classpath:mybatis.xml" /></bean><bean class="org.mybatis.spring.mapper.MapperScannerConfigurer" ><property name="sqlSessionFactoryBeanName" value="sqlSessionFactory" /><property name="basePackage" value="org.example.dao" /></bean><!-- 声明service --><bean id="goodsService" class="org.example.service.impl.BuyGoodsServiceImpl" ><property name="goodsDao" ref="goodsDao" /><property name="saleDao" ref="saleDao" /></bean><!-- 1. 声明事务管理器 --><bean id="transactionManager" class="org.springframework.jdbc.datasource.DataSourceTransactionManager" ><!-- 连接的数据库,指定数据源 --><property name="dataSource" ref="myDataSource" /></bean><!-- 2. 开启事务注解驱动,告诉spring使用注解管理事务,创建代理对象transaction-manager:事务管理器对象的id--><tx:annotation-driven transaction-manager="transactionManager" /></beans>
最后测试
@Testpublic void shouldAnswerWithTrue(){String config = "spring-config.xml";ApplicationContext ac = new ClassPathXmlApplicationContext(config);BuyGoodsService service = (BuyGoodsService)ac.getBean("goodsService");service.buy(1002, 10);}
aspectJ配置文件处理事务
在大型项目中事务处理有时会使用aspectJ框架提供的功能来处理事务。
在spring配置文件中声明类、方法所需要的事务。使得事务配置与业务方法完全分离
步骤
加入依赖,使用aspectJ框架
<dependency><groupId>org.springframework</groupId><artifactId>spring-aspects</artifactId><version>5.2.8.RELEASE</version></dependency>
声明事务管理器对象
<bean id="transactionManager" class="org.springframework.jdbc.datasource.DataSourceTransactionManager"><property name="dataSource" ref="myDataSource" /></bean>
声明对应方法需要的事务类型
<!-- 2.声明业务方法的事务属性(传播行为,隔离级别等) --><tx:advice id="myAdvice" transaction-manager="transactionManager"><!-- tx:attributes:配置事务的属性 --><tx:attributes><!-- tx:method:配置要增加事务的方法和该事务的属性name:方法名(不带包和类),可使用通配符*表示任意字符propagation、isolation等等--><tx:method name="buy" propagation="REQUIRED" isolation="DEFAULT"/><tx:method name="add*" propagation="REQUIRES_NEW"/><tx:method name="*" read-only="true"/></tx:attributes></tx:advice>
配置aop,指定哪些类要创建代理
<!-- 配置aop:即指定哪些包哪些类要应用事务 --><aop:config><!-- 配置切入点表达式 --><aop:pointcut id="service" expression="execution(* *..service..*.*(..))"/><!-- 配置增强器:关联advice和pointcut --><aop:advisor advice-ref="myAdvice" pointcut-ref="service" /></aop:config>
核心组件
Bean
每一个类实现了Bean的规范才可以由sring来接管,其规范为:
- 类必须是一个公有类
- 类必须提供一个无参的构造方法
- 用公共方法暴露内部成员属性,即set/get
实现这样的规范后的类称为java bean,是一种可重用的组件
Bean的组件在Spring的org.springframework.beans包下。这个包下的所有类主要解决三件事:Bean的定义、Bean的创建以及对Bean的解析
Spring Bean的创建时典型的工厂模式,它的最上层接口是BeanFactory
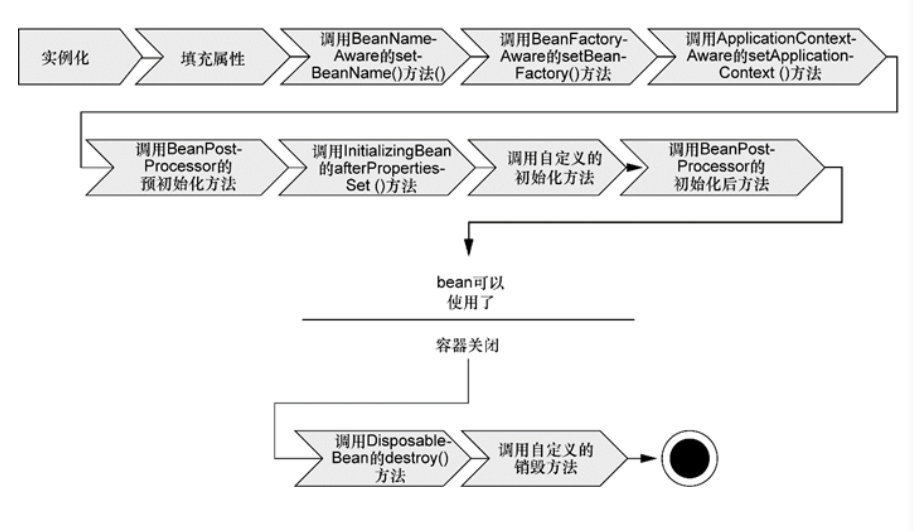
bean的生命周期
初始化——>依赖注入——>setBeanName()——>setBeanFactory()——>setApplicationContext()——>postProcessBeforeInitialization()——>afterPropertiesSet()——>自定义初始化方法——>postProcessAfterInitialization()——>生存期——>destroy()——>自定义销毁方法
Spring对bean进行实例化
Spring将值和bean的引用注入到bean对应的属性中
如果bean实现了BeanNameAware接口,则Spring将bean的ID传递给setBean-Name()方法;
如果bean实现了BeanFactoryAware接口,则Spring将调用serBeanFactory()方法,将BeanFactory容器实例传入
如果bean实现了ApplicationContextAware接口,则Spring将调用setApplicationContext()方法,将bean所在的应用上下文的引入传入进来
如果bean实现了BeanPostProcessor接口,则Spring将调用它们的post-ProcessBefourInitialization()方法
如果bean实现了InitializingBean接口,则Spring将调用它们的after-PropertiesSet()方法。类似地,如果bean使用init-method声明了初始化方法,则该方法也会被调用
如果bean实现了BeanPostProcessor接口,则Spring将调用它们的post-ProcessAfterInitialization()方法
此时,bean已经准备就绪,就可以被应用程序使用了,它们将一直驻留在应用上下文中,知道该应用上下文被销毁
如果bean实现了DisposableBean接口,则Spring将调用它的destory()接口方法。同样,如果bean使用destroy-method声明了销毁方法,该方法也会被调用

Bean的作用域
Spring可以基于这些作用域创建bean,包括:
单例(Singleton):在整个应用中,只创建bean的一个实例;
原型(Prototype):每次注入或者通过Spring应用上下文获取的时候,都会创建一个新的bean实例
会话(Session):在Web应用中,为每个会话创建一个bean实例
请求(Request):在Web应用中,为每个请求创建一个bean实例
代码中:
@Scope(ConfigurableBeanFactory.SCOPE_PROTOTYPE)public class MyIsBean{...}
xml中:
<bean id="BEANID" class = "com.my.beans" scope="prototype">
在默认情况下,Spring应用上下文中所有bean都是以单例的形式创建的。也就是说,不管给定的一个bean被注入到其他bean多少次,每次所注入的都是同一个实例
在大多数情况下,单例bean是很理想的方案。初始化和垃圾回收对象实例所带来的成本值留给一些小规模任务,在这些任务中,让对象保持无状态并且在应用中反复重用这些对象可能并不合理。有时候可能会发现所使用的的类是易变的,它们会保持一些状态,因此重用是不安全的。在这种清理下,将class声明为单例的bean就不是声明好主意了,因为对象会被污染,稍后重用的时候会出现意想不到的问题
Bean的声明
- @Component 组件,没有明确的角色
- @Service 在业务逻辑层使用
- @Repository 在数据访问层使用
- @Controller 在展现层使用(MVC -> Spring MVC)使用
在这里,可以指定bean的id名:Component(“yourBeanName”)
同时,Spring支持将@Named作为@Component注解的替代方案。两者之间有一些细微的差异,但是在大多数场景中,它们是可以互相替换的。
Bean的注入
Spring提供的@Autowired注解,也可以使用jdk提供的@Inject和@Resource
Bean的条件化
当以希望一个或多个bean只有在应用的类路径下包含特定的库时才创建,或者希望某个bean只有当另外某个特定的bean声明后才创建时,又或者要求只有某个特定的环境变量设置之后,才创建bean时。
这在spring4之前很难实现这种条件化配置,但spring4之后引入了一个新的注解,即@Conditional,它可以用到带有@Bean注解的方法上。如果给定的条件计算结果为true,就会创建这个bean,否则的话,这个bean就会被忽略。
通过ConditionContext,可以做到:
借助getRegistry()返回的BeanDefinitionRegistry检查bean定义
借助getBeanFactory()返回的ConfigurableListableBeanFactory检查bean是否存在,甚至探查bean的属性;
借助getEnvironment()返回的Environment检查环境变量是否存在以及它的值是什么
读取并探查getResourceLoader()返回的ResourceLoader所加载的资源
借助getClassLoader()返回的ClassLoader加载并检查类是否存在
Bean的限定
注解@Qualifier,使用限定符,指定注入的bean是哪一个,可与@Autowired和@Inject协同使用
Bean之间的通信
使用Application Event可以做到bean与bean之间的通信
需要遵循如下流程:
- 自定义事件,继承Application Event
- 定义事件监听器,实现ApplicationListener
- 使用容器发布事件
Core
发现、建立和维护每个Bean之间的关系所需要的一系列的工具
Context
给bean包装的Object数据提供生存环境,即发现每个Bean之间的关系,为它们建立这种关系并维护好这种关系,所以Context就是一个Bean关系的集合,这个关系集合又叫IOC容器
Context把资源换的加载、解析和描述工作委托给了ResourcePatternResolver类来完成,它相当于一个接头人,把资源的加载、解析和资源的定义整合在一起便于其他组件使用
对于ApplicationContext来说,必须要完成一下几件事:
- 表示一个应用环境
- 利用BeanFactory来创建Bean对象
- 保存对象关系表
- 能够不会各种事件
Spring高级特性
@TaskExecutor
可以实现多线程和并发编程。通过该注解开启对异步任务的支持,并通过实际执行的bean的方法始终使用@Async注解来声明其是一个异步任务
@Scheduled计划任务
首先通过在配置类注解@EnableScheduling来开启对计划任务的支持,然后在要执行计划任务的方法上添加注解,声明这是一个计划任务
@conditional
根据满足某一个特定条件判断是否要创建bean

