MyBatis
简介
Mybatis是一个java的sql映射框架。它提供了数据库的操作能力,相当于一个增强的JDBC。使用时。只需编写sql语句,其他操作,诸如创建销毁Connection、Statement、sql的执行等,Mybatis会自定完成。对于传统的JDBC编程,其代码较多,开发效率的,且需要关注Connection、Statement、ResultSet对象的创建与销毁,而且对ResultSet对象的查询结果还需要进行进一步的封装,重复代码较多,业务逻辑代码与数据库操作代码冗余
Mybatis的两个主要使命:
- sql mapper:sql映射。可以把数据库表中的一行数据映射为一个java对象。我们操作java对象就相当于操作表中的数据
- Data Access Object:数据访问。对数据库执行增删改查
需要注意的是,Mybatis默认不自动提交事务
配置文件中支持配置日志打印功能
Mybatis默认开启事务,即关闭自动提交
SQLSession(持久化管理器)
是Mybatis的核心,它的创建方法是由SQLSessionFactoryBuilder工厂创建的
@Beanpublic Connection connection(){// TODO: 2021/7/26 创建一个工厂SqlSessionFactoryBuilder builder = new SqlSessionFactoryBuilder();InputStream resourceAsStream = SqlSessionFactoryBuilder.class.getClassLoader().getResourceAsStream("mybatis-config.xml");SqlSessionFactory build = builder.build(resourceAsStream);// TODO: 2021/7/26 创建了持久化管理器 ,所谓工厂模式,是将配置信息放入工厂,最终将创建一个持久化管理器SqlSession sqlSession = build.openSession();Connection connection = sqlSession.getConnection();return connection;}
也可以将其写在一个工具类上,这样就不用每次都写了,因为SqlSessionFactory 接口对象是一个重量级对象,即系统开销大的对象,且是线程安全的,所以一个应用只需要一个该对象即可
public class GradleMyBatisUtils {private static SqlSessionFactory factory;// TODO: 2021/7/28 可以把ThreadLocal<>看成是一个容器,这个容器有判断hash值的方法,确定在里面的实例是否是唯一(即单例)private static ThreadLocal<SqlSession> local = new ThreadLocal<>();static {try {factory = new SqlSessionFactoryBuilder().build(GradleMyBatisUtils.class.getClassLoader().getResourceAsStream("classpath:mybatis-config.xml"));} catch (Exception e) {throw new ExceptionInInitializerError("MyBatis初始化失败" + e.getMessage());}}// TODO: 2021/7/28 获取一个持久化管理器,管理器里包数据库连接池,事务和数据库连接的相关信息,具体内容和配置文件中有关public static SqlSession getSession(){// TODO: 2021/7/28 从容器中获得对象, 由于是单例的,所以,会依据类型进行匹配SqlSession sqlSession = local.get();if (sqlSession == null) {sqlSession = factory.openSession();local.set(sqlSession);}return sqlSession;}// TODO: 2021/7/28 关闭持久化管理对象,关闭此对象,会同时关闭数据库连接池中相关对象,如connection,statement等!public static void close(){SqlSession sqlSession = local.get();if (sqlSession!=null) {sqlSession.close();local.remove();}}}
动态sql
if标签
SQL的if语句,其主要通途是对传入的参数对象的某个属性进行条件判断,如果条件为真,就可以执行或者拼接sql语句。判断是在if标签中的test属性中进行的
<select id="selectif" parameterType="Student" resultType="Student">select name, agefrom studentwhere 1 = 1<if test="name!=null and name!=''">and name = #{name}</if></select>
choose标签
意思和if差不多,但只会拼接一个sql语句
<select id="selectchoose" parameterType="Student" resultType="Student">select name, agefrom studentwhere<choose><when test="name != null and name !=''">name=#{name}</when><when test="age!=null and age!=0">age=#{age}</when><otherwise>1=1</otherwise></choose></select>
where标签
一般要结合if或者choose一起使用
<select id="selectwhere" parameterType="Student" resultType="Student">select name,age from student<where><if test="name != null and name != ''">and name=#{name}</if></where></select>
set标签
在做更新操作的时候用set标签,set标签不能单独使用,一般也需要结合if或choose来使用
<update id="updateset" parameterType="Student">update student<set><if test="name !=null and name !=''">name = #{name},</if><if test="age!=null and age!=0">age=#{age}</if></set><where><if test="id!=null and id!=''">and id=#{id}</if></where></update>
trim标签
可以在语句的两边去除、增加相关的内容。其主要作用是可以在语句的开头或者末尾添加特定的前缀或后缀,也可以删除揩油或末尾参数指定的内容
<select id="selecttrim" parameterType="Student" resultType="Student">select name,age from student<trim prefix="where" prefixOverrides="and|or"><if test="id != null">and id=#{id}</if></trim></select>
foreach标签
增强for循环,如在数据库表中需要同事找出字段不同值的内容。
foreach中的属性:
collection:要遍历的集合,主要意思是所有的集合都会转换成一个map。mao的key名是传入参数的类型
item:迭代遍历
open:遍历前添加的字符串
close:遍历后添加的字符串
spearator:元素的分隔符
index:遍历元素的索引
List<Student> selectforeach(List<Integer> list);
<select id="selectforeach" resultType="Student">select name,age from studentwhere id in<foreach collection="list" item="abc" open="(" close=")" separator=",">#{abc}</foreach></select>
多表关系之间的映射
提个数据库对象中的一个属性可以是另外一个数据库表对象
当对象模型作为SQL语句的一个参数的时候,如果有一个属性是对象,那么在占位符#{}中可以用这个对象的属性
添加操作
<insert id="insertEmp" parameterType="Emp">insert into emp(empname, empage, deptid)VALUES (#{empname}, #{empage}, #{dept.deptid})</insert>
@Testpublic void test237() {Dept dept = new Dept();Dept dept1 = new Dept();dept.setDeptname("市场部");dept1.setDeptname("营销部");Emp emp1 = new Emp("admin", 20, dept);Emp emp2 = new Emp("javachello", 30, dept1);try {dreamDept.insertDept(dept);dreamDept.insertDept(dept1);dreamEmp.insertEmp(emp1);dreamEmp.insertEmp(emp2);MyBatisUtils.commit();} catch (Exception e) {MyBatisUtils.rollback();e.printStackTrace();} finally {MyBatisUtils.close();}}
查询操作
多对一
在多对一关系中,举个例子就是多个员工对应一个部门
可通过标签做属性的映射
<resultMap id="deptmapperthis" type="Dept"><id property="deptid" column="deptId"/><result property="deptname" column="deptName"/></resultMap>
<resultMap id="empMapper2" type="Emp"><id property="empid" column="empid"/><result property="empname" column="empname"/><result property="empage" column="empage"/><association property="dept" javaType="Dept" resultMap="deptmapperthis"/></resultMap>
一对多
在一个对象中,定义另外一个对象集合,在java中可以这样理解,而在数据库表中,一对多可以理解为:通过Group by 分组后的一个字段,在别的字段中包含多条记录
<resultMap id="deptnewmapper" type="Dept"><id property="deptid" column="deptid"/><result property="deptname" column="deptname"/><collection property="emps" ofType="Emp"><id property="empid" column="empId"/><result property="empname" column="empName"/><result property="empage" column="empAge"/></collection></resultMap>
代码生成器
mybatis-generator是一款mybatis的插件,能够自动生成Mybatis相关的代码,如:dao接口、mapper映射文件、实体类,实体类可以是与数据库表对应的java对象,也可以是sql条件对象
存在的缺点:
- 生成的代码默认只支持单表操作,多表查询需要自己编写;
- 对象之间的关系需要自己维护;
- 保存返回主键需要自己添加
分页插件
PageHelper
<dependency><groupId>com.github.pagehelper</groupId><artifactId>pagehelper</artifactId><version>5.2.1</version></dependency><dependency><groupId>com.github.jsqlparser</groupId><artifactId>jsqlparser</artifactId><version>4.0</version></dependency>
<!--plugins在配置文件中的位置必须符合要求,否则会报错,顺序如下:properties?, settings?,typeAliases?, typeHandlers?,objectFactory?,objectWrapperFactory?,plugins?,environments?, databaseIdProvider?, mappers?--><plugins><plugin interceptor="com.github.pagehelper.PageInterceptor"><!-- config params as the following --><!--<!–分页参数合理化 –>--><property name="reasonable" value="true"/></plugin></plugins>
@RequestMapping("/emps")public String list(@RequestParam(required = false,defaultValue = "1",value = "pn")Integer pn,Map<String,Object> map){//引入分页查询,使用PageHelper分页功能//在查询之前传入当前页,然后多少记录PageHelper.startPage(pn,5);//startPage后紧跟的这个查询就是分页查询List<Employee> emps = employeeService.getAll();//使用PageInfo包装查询结果,只需要将pageInfo交给页面就可以PageInfo pageInfo = new PageInfo<>(emps,5);//pageINfo封装了分页的详细信息,也可以指定连续显示的页数map.put("pageInfo",pageInfo);return "list";}
public class PageInfo<T> implements Serializable {private static final long serialVersionUID = 1L;//当前页private int pageNum;//每页的数量private int pageSize;//当前页的数量private int size;//由于startRow和endRow不常用,这里说个具体的用法//可以在页面中"显示startRow到endRow 共size条数据"//当前页面第一个元素在数据库中的行号private int startRow;//当前页面最后一个元素在数据库中的行号private int endRow;//总记录数private long total;//总页数private int pages;//结果集private List<T> list;//前一页private int prePage;//下一页private int nextPage;//是否为第一页private boolean isFirstPage = false;//是否为最后一页private boolean isLastPage = false;//是否有前一页private boolean hasPreviousPage = false;//是否有下一页private boolean hasNextPage = false;//导航页码数private int navigatePages;//所有导航页号private int[] navigatepageNums;//导航条上的第一页private int navigateFirstPage;//导航条上的最后一页private int navigateLastPage;public PageInfo() {}/*** 包装Page对象** @param list*/public PageInfo(List<T> list) {this(list, 8);}/*** 包装Page对象** @param list page结果* @param navigatePages 页码数量*/public PageInfo(List<T> list, int navigatePages) {if (list instanceof Page) {Page page = (Page) list;this.pageNum = page.getPageNum();this.pageSize = page.getPageSize();this.pages = page.getPages();this.list = page;this.size = page.size();this.total = page.getTotal();//由于结果是>startRow的,所以实际的需要+1if (this.size == 0) {this.startRow = 0;this.endRow = 0;} else {this.startRow = page.getStartRow() + 1;//计算实际的endRow(最后一页的时候特殊)this.endRow = this.startRow - 1 + this.size;}} else if (list instanceof Collection) {this.pageNum = 1;this.pageSize = list.size();this.pages = this.pageSize > 0 ? 1 : 0;this.list = list;this.size = list.size();this.total = list.size();this.startRow = 0;this.endRow = list.size() > 0 ? list.size() - 1 : 0;}if (list instanceof Collection) {this.navigatePages = navigatePages;//计算导航页calcNavigatepageNums();//计算前后页,第一页,最后一页calcPage();//判断页面边界judgePageBoudary();}}}
#{}和${}的区别
{}和${}的作用是一样的,都是可以获取参数,但两者的实现原理不同
{}底层是使用Preparestatement来进行操作的,在执行sql语句的时候会把它替换成?,这样的方式是可以防止sql注入的
而${}的底层是使用Statement来进行参照的,获取参数后,会使用字符串拼接的方式来拼接参数,因此不能防止sql注入,但它却可以替换表名或列名,这也是它能够留下来的原因
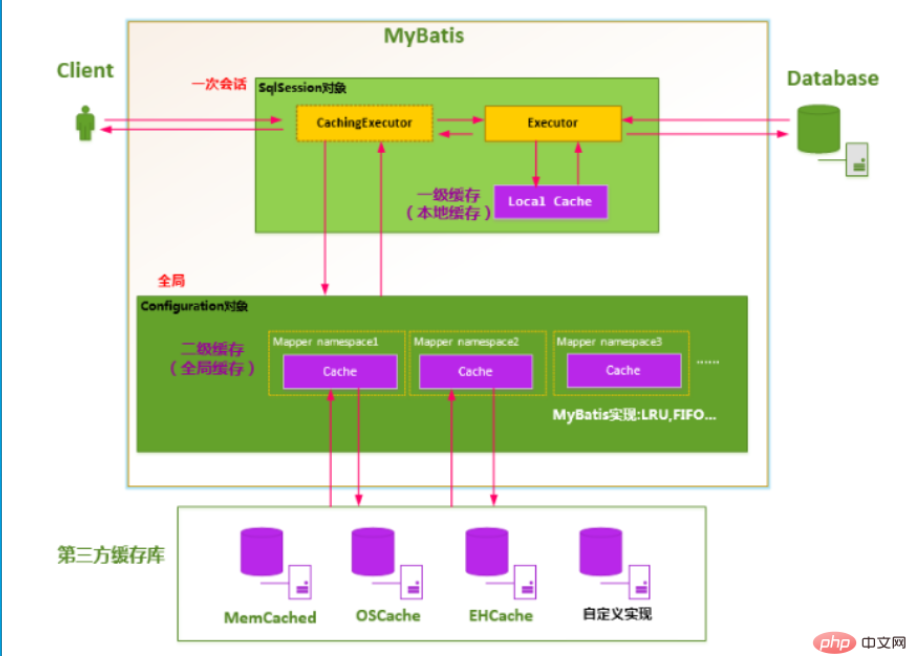
一级缓存和二级缓存
经常查询并且不经常改变的数据,且数据的正确与否对最终结果影响不大的,适合做缓存
一级缓存
在同一个SQLSession中执行相同的sql查询是,第一次回去查询数据库,并写在缓存中,第二次则直接从缓存中取。该缓存是SQLSession提供的一块区域,该区域结构是一个map
当执行的sql两次查询中间发生了增删改的操作,则SQLSession的缓存会被清空
Mybatis的内部缓存使用一个hashmap,key为hashcode+statementId+sql语句,value为查询出来的结果集映射成的java对象
二级缓存
二级缓存是mapper级别的,Mybatis默认是没有开启二级缓存的
第一次调用mapper下的SQL去查询表记录,查询到的信息会被存放到该mapper对应的二级缓存区域。当第二次调用namespace下的mapper映射文件时,相同的sql查询记录,会从对应的二级缓存内取出结果集。

Spring整合MyBatis
第一步:在pom.xml中加入依赖
<dependencies><dependency><groupId>junit</groupId><artifactId>junit</artifactId><version>4.11</version><scope>test</scope></dependency><!-- spring的maven依赖 --><dependency><groupId>org.springframework</groupId><artifactId>spring-context</artifactId><version>5.2.8.RELEASE</version></dependency><!-- spring事务依赖1 --><dependency><groupId>org.springframework</groupId><artifactId>spring-tx</artifactId><version>5.2.8.RELEASE</version></dependency><!-- spring事务依赖2 --><dependency><groupId>org.springframework</groupId><artifactId>spring-jdbc</artifactId><version>5.2.7.RELEASE</version></dependency><!-- mybatis依赖 --><dependency><groupId>org.mybatis</groupId><artifactId>mybatis</artifactId><version>3.5.1</version></dependency><!-- spring和mybatis的集成依赖 --><dependency><groupId>org.mybatis</groupId><artifactId>mybatis-spring</artifactId><version>1.3.1</version></dependency><!-- mysql驱动依赖 --><dependency><groupId>mysql</groupId><artifactId>mysql-connector-java</artifactId><version>8.0.17</version></dependency><!-- 阿里的数据库连接池 --><dependency><groupId>com.alibaba</groupId><artifactId>druid</artifactId><version>1.1.12</version></dependency></dependencies><build><resources><resource><directory>src/main/java</directory> <!--所在的目录--><includes> <!-- 包括目录下的.properties跟.xml文件都会进行编译 --><include>**/*.properties</include><include>**/*.xml</include></includes><filtering>false</filtering></resource></resources></build>
第二步:创建实体类
public class Student {private int id;private String name;private String email;private int age;public Student(){}public Student(int id, String name, String email, int age) {this.id = id;this.name = name;this.email = email;this.age = age;}@Overridepublic String toString() {return "Student{" +"id=" + id +", name='" + name + '\'' +", email='" + email + '\'' +", age=" + age +'}';}}
第三步:dao接口和mapper文件
import org.example.entity.Student;import java.util.List;public interface StudentDao {List<Student> QueryAllStudent();int InsertStudent(Student stu);}
.xml
<?xml version="1.0" encoding="UTF-8" ?><!DOCTYPE mapperPUBLIC "-//mybatis.org//DTD Mapper 3.0//EN""http://mybatis.org/dtd/mybatis-3-mapper.dtd"><mapper namespace="org.example.dao.StudentDao"><select id="QueryAllStudent" resultType="Student">select * from student;</select><insert id="InsertStudent" >insert into student values(#{id}, #{name}, #{email}, #{age});</insert></mapper>
当数据库表字段名与实体类属性名不一致时,可使用别名或者
<!-- TODO:外部定义的映射标签1:id:是一个标识符,在后面sql语句中被调用2:type:要映射到的返回对象3.区分主键和普通字段,主键单独用id标签,普通字段用result标签4.proerties是自定义对象中的属性,column是数据库表中的字段--><resultMap id="studentMapper" type="NewStudent"><id property="user_id" column="id"/><result property="user_name" column="name"/><result property="user_age" column="age"/></resultMap>
第四步:创建mybatis主配置文件
<?xml version="1.0" encoding="UTF-8" ?><!DOCTYPE configurationPUBLIC "-//mybatis.org//DTD Config 3.0//EN""http://mybatis.org/dtd/mybatis-3-config.dtd"><configuration><!-- settings:控制mybatis全局行为 --><settings><!-- 设置mybatis输出日志 --><setting name="logImpl" value="STDOUT_LOGGING"/></settings><typeAliases><!-- 实体类所在的包名 --><package name="org.example.entity"/></typeAliases><mappers><mapper resource="org/example/dao/StudentDao.xml"/></mappers></configuration>
第五步:创建service接口和实现类,属性是dao
import org.example.entity.Student;import java.util.List;public interface StudentService {List<Student> QueryAllStudent();int InsertStudent(Student stu);}
import org.example.dao.StudentDao;import org.example.entity.Student;import org.example.service.StudentService;import java.util.List;public class StudentServiceImpl implements StudentService {private StudentDao studentDao;@Overridepublic List<Student> QueryAllStudent() {return studentDao.QueryAllStudent();}@Overridepublic int InsertStudent(Student stu) {return studentDao.InsertStudent(stu);}public void setStudentDao(StudentDao studentDao) {this.studentDao = studentDao;}}
第六步:创建spring主配置文件
<?xml version="1.0" encoding="UTF-8"?><beans xmlns="http://www.springframework.org/schema/beans"xmlns:xsi="http://www.w3.org/2001/XMLSchema-instance"xsi:schemaLocation="http://www.springframework.org/schema/beans http://www.springframework.org/schema/beans/spring-beans.xsd"><!-- 声明数据源,代替mybatis的数据库init-method:开始时执行的方法destroy-method:结束时执行的方法--><bean id="myDataSource" class="com.alibaba.druid.pool.DruidDataSource"init-method="init" destroy-method="close"><property name="url" value="jdbc:mysql://localhost:3306/ssm?useSSL=false&serverTimezone=UTC" /><property name="username" value="root" /><property name="password" value="密码" /><property name="maxActive" value="20" /></bean><!-- 声明Mybatis中提供的SqlSessionFactoryBean类,创建SqlSessionFactory --><bean id="sqlSessionFactory" class="org.mybatis.spring.SqlSessionFactoryBean" ><!-- set注入,将数据库连接池赋值给dataSource属性 --><property name="dataSource" ref="myDataSource" /><!-- set注入,指定mybatis主配置文件的位置 --><property name="configLocation" value="classpath:mybatis.xml" /></bean><!-- 使用SqlSession的getMapper(Class)创建dao对象MapperScannerConfigurer:在内部调用getMapper(Class)生成每个dao接口的代理对象需要指定sqlSessionFactory对象的id--><bean class="org.mybatis.spring.mapper.MapperScannerConfigurer" ><!-- 指定sqlSessionFactory对象的id --><property name="sqlSessionFactoryBeanName" value="sqlSessionFactory" /><!-- 指定dao接口所在的包名MapperScannerConfigurer会扫描这个包中的所有接口(多个包用逗号分隔),把每个接口都执行一次getMapper()方法,得到每个接口的dao对象(对象名默认以接口名首字母小写)--><property name="basePackage" value="org.example.dao" /></bean><!-- 声明service --><bean id="studentService" class="org.example.service.impl.StudentServiceImpl" ><!-- set注入,将spring创建的studentDao对象赋值给studentDao属性 --><property name="studentDao" ref="studentDao" /></bean></beans>
最后测试:
@Testpublic void test01(){String config = "spring-config.xml";ApplicationContext ac = new ClassPathXmlApplicationContext(config);// 获取到service对象StudentService std = (StudentService) ac.getBean("studentService");List<Student> students = std.QueryAllStudent();students.forEach(x -> System.out.println(x));}
mybatis-plus
全新的 MyBatis-Plus 3.0 版本基于 JDK8,提供了 lambda 形式的调用
Spring Boot 工程:
- 配置 MapperScan 注解
Navicat Premium 15 永久激活版安装教程 - 简书 (jianshu.com)
条件构造器
警告:
不支持以及不赞成在 RPC 调用中把 Wrapper 进行传输
- wrapper 很重
- 传输 wrapper 可以类比为你的 controller 用 map 接收值(开发一时爽,维护火葬场)
- 正确的 RPC 调用姿势是写一个 DTO 进行传输,被调用方再根据 DTO 执行相应的操作
- 我们拒绝接受任何关于 RPC 传输 Wrapper 报错相关的 issue 甚至 pr
RPC:远程过程调用协议。所谓远程过程调用,通俗的理解就是可以在本地程序中调用运行在另外一台服务器上的程序的功能方法。这种调用的过程跨越了物理服务器的限制,是在网络中完成的,在调用远端服务器上程序的过程中,本地程序等待返回调用结果,直到远端程序执行完毕,将结果进行返回到本地,最终完成一次完整的调用。
DTO:DTO就是数据传输对象(Data Transfer Object)的缩写。 DTO模式,是指将数据封装成普通的JavaBeans,在J2EE多个层次之间传输。 DTO类似信使,是同步系统中的Message。 该JavaBeans可以是一个数据模型Model。
设计一个dto:
(1)定义一个父类,在父类中就是共同的字段;
(2)定义子类,子类继承父类,然后子类在定义自己的私有字段。

