配置一个简单案例
第一步,在web.xml文件中配置DispatchServlet:主要是为了配置springmvc配置文件的位置和名称
<servlet><servlet-name>springDispatcherServlet</servlet-name><servlet-class>org.springframework.web.servlet.DispatcherServlet</servlet-class><!-- 配置DispatcherServlet的初始化参数:SpringMvc配置文件的位置和名称 --><init-param><param-name>contextConfigLocation</param-name><param-value>classpath:springMvc.xml</param-value></init-param><load-on-startup>1</load-on-startup></servlet><!-- Map all requests to the DispatcherServlet for handling --><servlet-mapping><servlet-name>springDispatcherServlet</servlet-name><url-pattern>/</url-pattern></servlet-mapping>
第二步,创建springmvc配置文件,根据web.xml中的配置
<!-- 配置自动扫描的包 --><context:component-scan base-package="springmvc.helloworld"></context:component-scan><!-- 配置视图解析器 --><bean class="org.springframework.web.servlet.view.InternalResourceViewResolver"><property name="prefix" value="/WEB-INF/views/"></property><property name="suffix" value=".jsp"></property></bean>
第三步,使用@RequestMapping映射请求
@Controllerpublic class HelloWorld {@RequestMapping("/helloWorld")public String hello(){System.out.println("helloWorld");return "success";}}
处理模型数据
ModelAndView
控制器处理方法的返回值可以是ModelAndView,其包含模型和数据信息,SpringMvc会将model中的数据方法request域中
添加模型数据:
ModelAndView addObject(String attributeName,Object attributeValue)
ModelAndView addAllObject(Map
设置视图:
void setView(View view)
void setViewName(String ViewName)
@RequestMapping("/testModelAndView")public ModelAndView testModelAndView() {ModelAndView mv = new ModelAndView("success");mv.addObject("time", new Date());return mv;}
Map以及Model
可以传入Map和Model类型,目标方法可以添加Map类型(也可以是Model类型或是ModelMap类型参数)
@RequestMapping("testMap")public String testMap(Map<String, Object> map) {map.put("names", Arrays.asList("Li","Wu","Zhang"));return "success";}
前端接收
names:<%=request.getAttribute("names") %>
@SessionAttributes
此注解只能放在类上,即多个请求之间共用某个模型参数SpringMVC将在模型中对应的属性暂时存到HttpSession中。
value属性:通过属性名指定需要放到会话中的属性
types属性:通过模型属性的对象类型指定哪些模型属性需要放到会话中
@SessionAttributes(value= {"user"},types= {String.class})@Controllerpublic class HelloWorld {@RequestMapping("/testSessionAttributes")public String testSessionAttributes(Map<String, Object> map) {User user = new User("Li", "123456", 24);map.put("user", user);return "success";}}
前端接收
user:<%=session.getAttribute("user") %>
@ModelAttribute
@ModelAttribute标记的方法,会在每个目标方法执行之前被SpringMva调用
@ModelAttributepublic void getUser(@RequestParam(value="id") Integer id,Map<String,Object> map) {if(id!=null) {User user = new User(1, "Tom", "123456", 24);System.out.println("从数据库中取出:"+user);map.put("user", user);}}@RequestMapping("/testModelAttribute")public String testModelAttribute(User user) {System.out.println("修改:" + user);return "success";}
视图以及视图处理器
对于那些返回String、view或者ModelMap等类型的处理方法,SpringMvc都会将其装配成一个ModelAndView对象。view接口是无状态的,所以不会有线程安全问题
重定向
将字符串url重向到指定页面
数据的转换、格式化、校验
数据转换
SpringMvc定义了3中类型的转换器接口:
- Converter
- ConverterFactory:将相同系列多个“同质”Conterver封装在一起
- GenericConverter: 会根据源类对象及目标所在的宿主主类中的上下文信息进行类型转换
实例如下:
表单
<form action="testConverter" method="POST"><!-- 格式例如:Harry-123456-24 -->Employee:<input type="text" name="user"><input type="submit" name="Submit"></form>
转换器
@Componentpublic class UserConverter implements Converter<String, User> {@Overridepublic User convert(String source) {if(source != null) {System.out.println("aa");String[] vals = source.split("-");if(vals != null) {String username = vals[0];String password = vals[1];String age = vals[2];User user = new User(username, password, Integer.parseInt(age));System.out.println("converter:"+user);return user;}}return null;}}
3).配置文件
<mvc:annotation-driven conversion-service="converterService"></mvc:annotation-driven><!-- 配置converterService --><bean id="converterService" class="org.springframework.context.support.ConversionServiceFactoryBean"><property name="converters"><set><ref bean="userConverter"/></set></property></bean>
4).目标方法
@RequestMapping("/testConverter")public String testConverter(@RequestParam("user") User user) {System.out.println(user);return "success";}
数据格式化
1).在配置文件中添加上
2).在目标类型的属性上配置
@NumberFormat(pattern="#.###")private double price;@DateTimeFormat(pattern="yyyy-mm-dd")private Date birth;
数据校验
使用JSR 303验证标准,在SpringMvc配置文件中添加
<mvc:annotation-driven />
会默认装配好一个LocalValidatorFactoryBean,然后在bean的属性上添加对应注解,例如@NotNull,表示被注释的元素不能为空;@Email,表示被注释的元素必须是一个email,最后再添加 @Valid注解
文件上传
SpringMvc通过MutipartResolver实现文件上传
配置MutipartResolver
<!-- 配置 MultipartResolver --><bean id="multipartResolver"class="org.springframework.web.multipart.commons.CommonsMultipartResolver"><property name="defaultEncoding" value="UTF-8"></property><property name="maxUploadSize" value="1024000"></property></bean>
表单
<form action="testFileUpload" method="POST" enctype="multipart/form-data">File: <input type="file" name="file"/>Desc: <input type="text" name="desc"/><input type="submit" value="Submit"/></form>
目标方法
@RequestMapping("/testFileUpload")public String testFileUpload(@RequestParam("desc") String desc,@RequestParam("file") MultipartFile file) throws Exception {System.out.println("InputStream:" + file.getInputStream());return "success";}
拦截器
可以使用拦截器对请求进行拦截,可以自定义拦截器来实现特定的功能,自定义的拦截器必须实现HandlerInterceptor接口
public class FirstInterceptor implements HandlerInterceptor {/*** 渲染视图之后被调用. 释放资源*/@Overridepublic void afterCompletion(HttpServletRequest arg0, HttpServletResponse arg1, Object arg2, Exception arg3)throws Exception {System.out.println("afterCompletion");}/*** 调用目标方法之后, 但渲染视图之前.* 可以对请求域中的属性或视图做出修改.*/@Overridepublic void postHandle(HttpServletRequest arg0, HttpServletResponse arg1, Object arg2, ModelAndView arg3)throws Exception {System.out.println("postHandle");}/*** 该方法在目标方法之前被调用.* 若返回值为 true, 则继续调用后续的拦截器和目标方法.* 若返回值为 false, 则不会再调用后续的拦截器和目标方法.** 可以考虑做权限. 日志, 事务等.*/@Overridepublic boolean preHandle(HttpServletRequest arg0, HttpServletResponse arg1, Object arg2) throws Exception {System.out.println("preHandle");return true;}}
配置拦截器
<!-- 配置拦截器 --><mvc:interceptors><bean class="springmvc.helloworld.FirstInterceptor"></bean></mvc:interceptors>
SpringMvc的执行流程
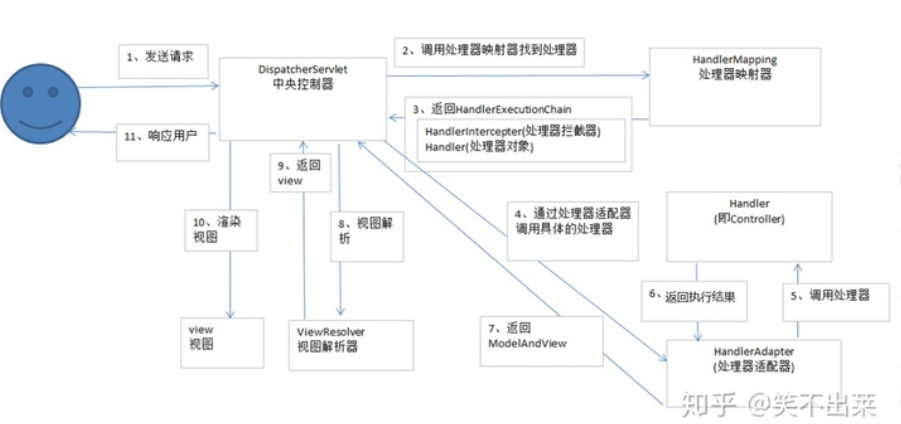
DispatcherServlet(中央控制器):作为springmvc最重要的一部分,它本身也是一个servlet。它负责调用handlerMapping,即处理器映射器来处理我们编写的handler,处理器映射器处理完handler后向中央控制器返回handlerExecutionChain对象,该对象包含处理器拦截器和处理器对象等信息,中央控制器根据这些信息去匹配带合适的HandlerAdapter,即处理器适配器,去处理handler,最终向中央控制器返回一个ModelAndView对象,中央控制器接收到这个对象后会向ViewResolver,即视图解析器发送请求,让视图解析器去解析、渲染这个ModelAndView对象,然后视图解析器想中央控制器返回view,中央控制器渲染view后响应用户。
Handler:用Object接受的,也就是我们自己写的Controller。我们要使用spring、mvc来处理一般有三种方式:第一种是实现Controller接口,第二种可以实现HttpRequestHandler接口,第三种就是走@RequestMapping注解方式。这三种方式会分别使用不同的HandlerMapping来处理,返回的handler类型也会不一样
HandlerExecutionChain:里面封装了handler和HandlerInterceptor的List集合
源码分析
DispatcherServlet继承里FrameworkServlet,FrameworkServlet又继承了HttpServlet,并覆写了HttpServlet的service(HttpServletRequest request,HttpServletResponse reponse)方法,FrameworkServlet的service方法也设计到调用,调用后还做了很多初始化的工作,但这些不重要,重点是它会调用doService方法,FrameworkServlet的doService方法是个抽象方法,所以直接转到它的实现类DIspatcherServlet中区,DispatcherServlet的doService方法有回做很多初始化的工作,向Request域保存很多信息,重点是它会调用本类的doDispatch(request,response)方法
protected void doDispatch(HttpServletRequest request, HttpServletResponse response) throws Exception {HttpServletRequest processedRequest = request;HandlerExecutionChain mappedHandler = null;boolean multipartRequestParsed = false;WebAsyncManager asyncManager = WebAsyncUtils.getAsyncManager(request);try {ModelAndView mv = null;Exception dispatchException = null;try {processedRequest = checkMultipart(request);multipartRequestParsed = (processedRequest != request);// 1、调用处理器映射器(HandlerMapping),得到HandlerExecutionChain对象mappedHandler = getHandler(processedRequest);if (mappedHandler == null || mappedHandler.getHandler() == null) {noHandlerFound(processedRequest, response);return;}// 2、根据我们编写的Contorller得到匹配到适合的处理器适配器HandlerAdapter ha = getHandlerAdapter(mappedHandler.getHandler());// Process last-modified header, if supported by the handler.String method = request.getMethod();boolean isGet = "GET".equals(method);if (isGet || "HEAD".equals(method)) {long lastModified = ha.getLastModified(request, mappedHandler.getHandler());if (logger.isDebugEnabled()) {logger.debug("Last-Modified value for [" + getRequestUri(request) + "] is: " + lastModified);}if (new ServletWebRequest(request, response).checkNotModified(lastModified) && isGet) {return;}}// 执行每个拦截器的preHandle方法if (!mappedHandler.applyPreHandle(processedRequest, response)) {return;}/*3、利用处理器适配器,执行我们编写的Contorller方法,并进一步处理,返会ModelAndView对象 */mv = ha.handle(processedRequest, response, mappedHandler.getHandler());if (asyncManager.isConcurrentHandlingStarted()) {return;}applyDefaultViewName(request, mv);// 执行每个拦截器的postHandle方法mappedHandler.applyPostHandle(processedRequest, response, mv);}// 对自定义的异常处理器进行捕获catch (Exception ex) {dispatchException = ex;}// 3、处理结果(页面渲染),这里过了,基本主要流程就走完了processDispatchResult(processedRequest, response, mappedHandler, mv, dispatchException);}catch (Exception ex) {// 异常时执行拦截器的afterCompletion方法triggerAfterCompletion(processedRequest, response, mappedHandler, ex);}catch (Error err) {// 错误时也会执行拦截器的afterCompletion方法triggerAfterCompletionWithError(processedRequest, response, mappedHandler, err);}//==========================================================================================// 下面的不是重点了finally {if (asyncManager.isConcurrentHandlingStarted()) {// Instead of postHandle and afterCompletionif (mappedHandler != null) {mappedHandler.applyAfterConcurrentHandlingStarted(processedRequest, response);}}else {// Clean up any resources used by a multipart request.if (multipartRequestParsed) {cleanupMultipart(processedRequest);}}}}
getHandler(processedRequest),请求HandlerMapping获取HandlerExecutionChain对象:
protected HandlerExecutionChain getHandler(HttpServletRequest request) throws Exception {for (HandlerMapping hm : this.handlerMappings) {if (logger.isTraceEnabled()) {logger.trace("Testing handler map [" + hm + "] in DispatcherServlet with name '" + getServletName() + "'");}HandlerExecutionChain handler = hm.getHandler(request);if (handler != null) {return handler;}}return null;}
getHandler()方法会先遍历handlerMapping这个list集合,这个集合封装了所有的HandlerMapping对象,其信息包括BeanNameUrlHandlerMapping(处理xml配置的Controller)和RequestMappingHandlerMapping(处理注解配置的Controller),遍历获取到HandlerMapping后一次执行getHandler(request)
HandlerAdapter ha =getHandlerAdapter(mappedHandler.getHandler());
protected HandlerAdapter getHandlerAdapter(Object handler) throws ServletException {for (HandlerAdapter ha : this.handlerAdapters) {if (logger.isTraceEnabled()) {logger.trace("Testing handler adapter [" + ha + "]");}if (ha.supports(handler)) {return ha;}}throw new ServletException("No adapter for handler [" + handler +"]: The DispatcherServlet configuration needs to include a HandlerAdapter that supports this handler");}
getHandlerAdapter方法接收的参数就是封装在HandlerExecutionChain里面的handler独享。首先,它会先遍历HandlerAdapter这个List集合,这个集合封装了所有的HandlerAdapter对象,其信息包括HttpRequestHandlerAdapter(处理实现了HttpRequestHandler接口中自己写的控制器)和SimpleControllerHandlerAdapter(实现了Controller接口中自己写的控制器),还有RequestMappingHandlerAdapter(处理使用了注解@RequestMapping的控制器),然后依次执行HandlerAdapter的supports(handler)方法,来判断传入的handler会适配哪一个HandlerAdapter,最终返回这个匹配的HandlerAdapter
mv = ha.handle(processedRequest, response, mappedHandler.getHandler());
HandlerAdapter处理handler,返回ModelAndView对象,即调用在Controller中声明的方法,然后返回。
processDispatchResult(processedRequest, response, mappedHandler, mv, dispatchException);
请求ViewResolver对ModelAndView解析,然后页面渲染
protected View resolveViewName(String viewName, Map<String, Object> model, Locale locale,HttpServletRequest request) throws Exception {for (ViewResolver viewResolver : this.viewResolvers) {View view = viewResolver.resolveViewName(viewName, locale);if (view != null) {return view;}}return null;}
也是一个for循环,找到合适的视图解析器,解析出view对象,然后根据这个view对象中的render方法来进行渲染,渲染做的就是取出modelmap里面的数据,将其放进request域中,并给视图加上前后缀,利用request获取RequestDispatcher对象,然后forwar转发到对应的视图中
@Overrideprotected void renderMergedOutputModel(Map<String, Object> model, HttpServletRequest request, HttpServletResponse response) throws Exception {// 取出model里的数据保存到request域中exposeModelAsRequestAttributes(model, request);// Expose helpers as request attributes, if any.exposeHelpers(request);// 获取物理视图地址(就是转发路径)String dispatcherPath = prepareForRendering(request, response);// (获取RequestDispatcher以方便后面的转发)RequestDispatcher rd = getRequestDispatcher(request, dispatcherPath);if (rd == null) {throw new ServletException("Could not get RequestDispatcher for [" + getUrl() +"]: Check that the corresponding file exists within your web application archive!");}// If already included or response already committed, perform include, else forward.if (useInclude(request, response)) {response.setContentType(getContentType());if (logger.isDebugEnabled()) {logger.debug("Including resource [" + getUrl() + "] in InternalResourceView '" + getBeanName() + "'");}// 请求转发rd.include(request, response);}
渲染结束后,再调用拦截器的afterCompletion方法

若有收获,就点个赞吧
0 人点赞
