在使用SpringBoot之后,启动一个应用变得非常简单。但作为一个有追求的技术人,不仅要会用,还要了解其基本原理。
下面是一个启动类例子,由三部分组成:SpringBootApplication注解,main方法,run方法调用
**
@SpringBootApplicationpublic class SampleWebApplication {public static void main(String[] args) {SpringApplication.run(SampleWebApplication.class, args);}}
main 方法这个没什么好说的,名字是别人定好的,启动的时候会执行这个方法。
SpringBootApplication注解
@Target({ElementType.TYPE})@Retention(RetentionPolicy.RUNTIME)@Documented@Inherited@SpringBootConfiguration@EnableAutoConfiguration@ComponentScan(excludeFilters = {@Filter(type = FilterType.CUSTOM,classes = {TypeExcludeFilter.class}), @Filter(type = FilterType.CUSTOM,classes = {AutoConfigurationExcludeFilter.class})})public @interface SpringBootApplication {//忽略其它代码}
SpringBootApplication注解其实是SpringBootConfiguration,EnableAutoConfiguration和ComponentScan的复合体。
1.SpringBootConfiguration
其实就是@Configuration,用来表示被标注的类是一个配置类,并将其加载到Spring容器中
**
2.EnableAutoConfiguration
开启SpringBoot自动配置,在程序启动时读取 ClassPath 下面的 META-INF/spring.factories 文件来获取所有导出类,生成默认配置
3.ComponentScan
包扫描注解,默认扫描主类包路径下的类
run的调用过程
run方法本质就是 new SpringApplication 实例,同时调用一下它的run方法
public static ConfigurableApplicationContext run(Class<?> primarySource, String... args) {return run(new Class[]{primarySource}, args);}public static ConfigurableApplicationContext run(Class<?>[] primarySources, String[] args) {return (new SpringApplication(primarySources)).run(args);}
构造函数
我们先看一下构造函数的内容
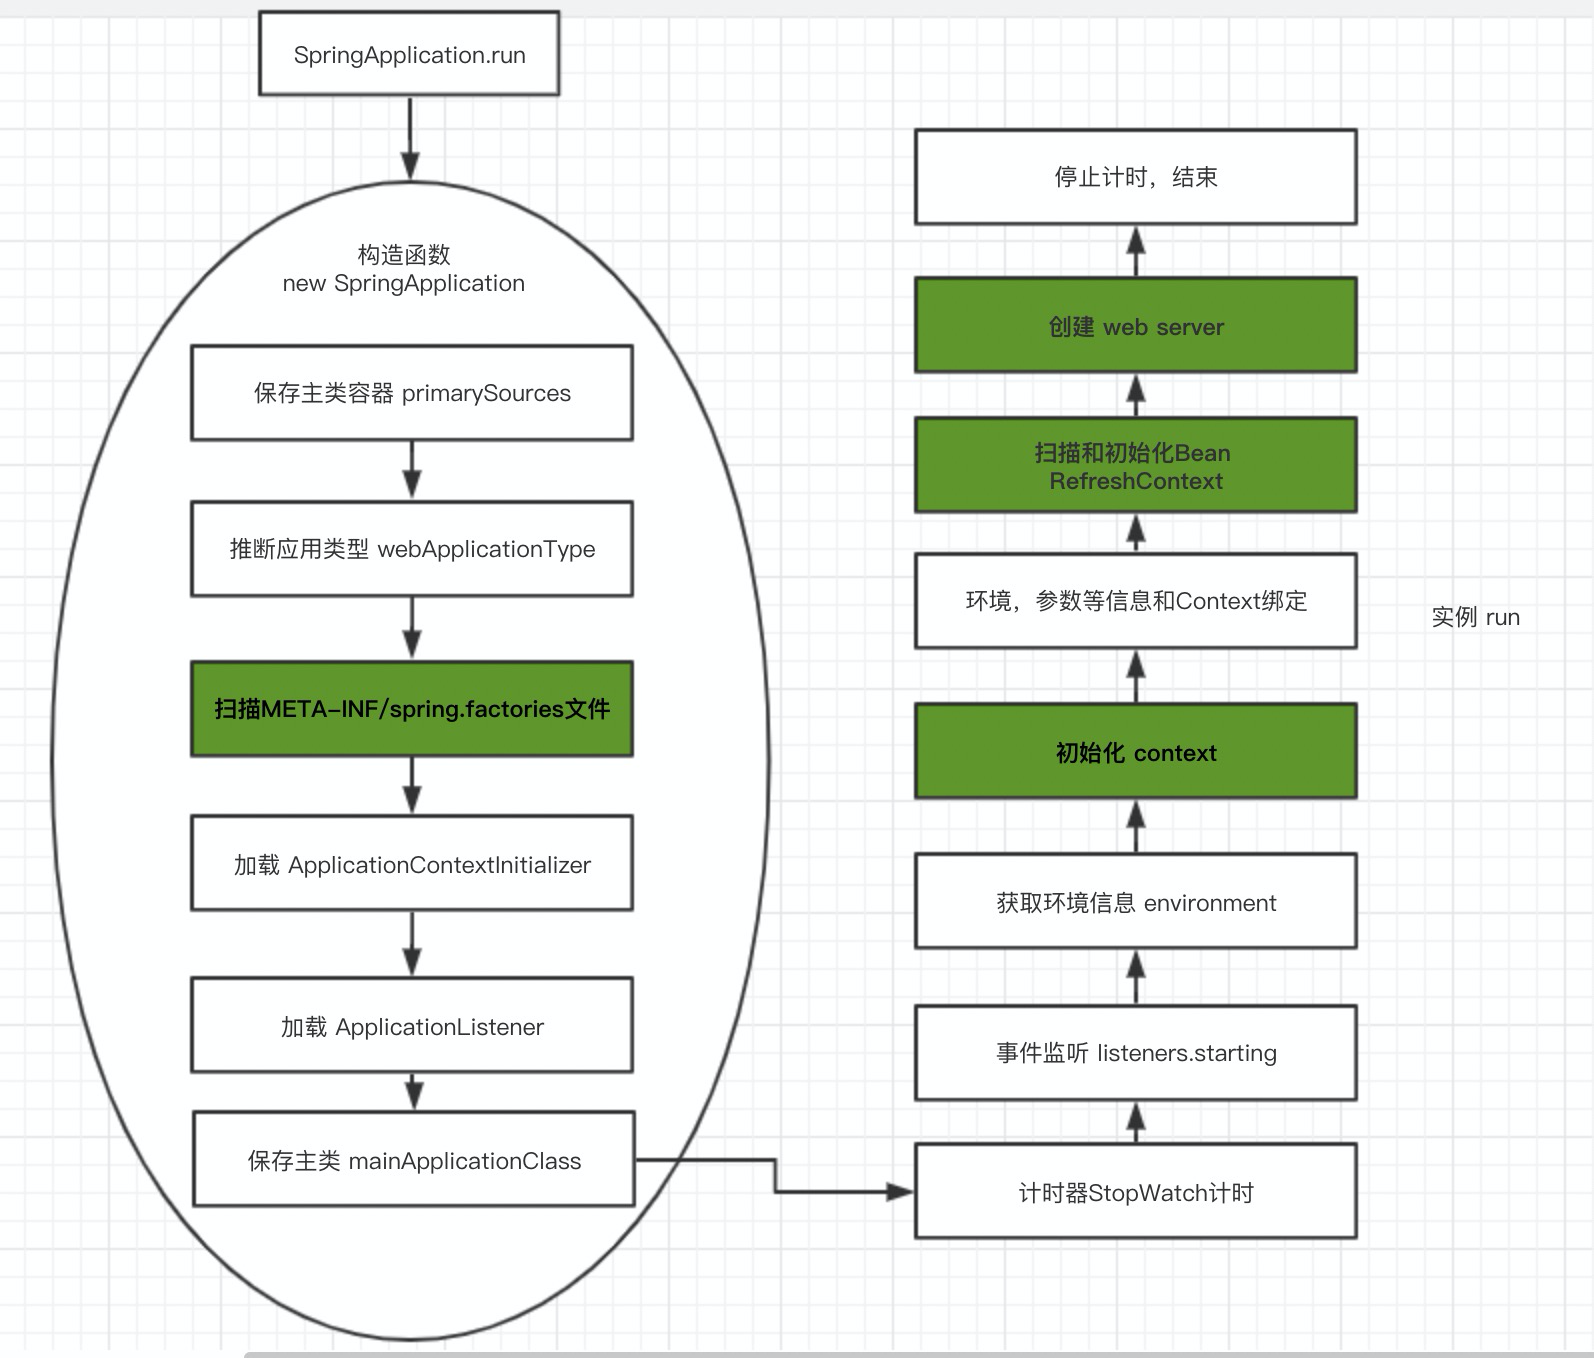
public SpringApplication(ResourceLoader resourceLoader, Class<?>... primarySources) {this.resourceLoader = resourceLoader;Assert.notNull(primarySources, "PrimarySources must not be null");// 1.主类容器this.primarySources = new LinkedHashSet<>(Arrays.asList(primarySources));// 2.推断应用类型this.webApplicationType = WebApplicationType.deduceFromClasspath();// 3.扫描META-INF/spring.factories文件的 ApplicationContextInitializer 并加载setInitializers((Collection) getSpringFactoriesInstances(ApplicationContextInitializer.class));// 4.扫描META-INF/spring.factories文件的 ApplicationListener 并加载setListeners((Collection) getSpringFactoriesInstances(ApplicationListener.class));// 5.保存主类this.mainApplicationClass = deduceMainApplicationClass();}
整个构造过程主要是加载了 ApplicationContextInitializer 和 ApplicationListener
- ApplicationContextInitializer 初始化了 SpringBoot 上下文 Context,后面会用到
- ApplicationListener 则是监听 SpringBoot 启动后的事件 onApplicationEvent
加载的配置和内容都在 META-INF/spring.factories 下面
run
我们再看一下实例调用的 run 方法
public ConfigurableApplicationContext run(String... args) {// 1.这是一个计时器StopWatch stopWatch = new StopWatch();stopWatch.start();// 2.初始化 contextConfigurableApplicationContext context = null;// 3.给用户定制 Exception 错误提示用的,先忽略Collection<SpringBootExceptionReporter> exceptionReporters = new ArrayList<>();// 4.设置一些环境变量configureHeadlessProperty();// 5.获取事件监听器并开始监听SpringApplicationRunListeners listeners = getRunListeners(args);listeners.starting();try {// 6.把参数args封装成DefaultApplicationArgumentsApplicationArguments applicationArguments = new DefaultApplicationArguments(args);// 7.准备环境信息并和 Spring 上下文绑定ConfigurableEnvironment environment = prepareEnvironment(listeners, applicationArguments);configureIgnoreBeanInfo(environment);// 8.打印bannerBanner printedBanner = printBanner(environment);// 9.创建应用 contextcontext = createApplicationContext();// 10.获取异常事件监听exceptionReporters = getSpringFactoriesInstances(SpringBootExceptionReporter.class,new Class[] { ConfigurableApplicationContext.class }, context);// 11.把环境信息,监听器,参数,banner和context上下文绑定prepareContext(context, environment, listeners, applicationArguments, printedBanner);// 12.刷新Context?这个命名我也比较奇怪。在这里是Spring真正的启动处,会去扫描和初始化BeanrefreshContext(context);// 13.一个Refresh结束之后的钩子,什么也没做afterRefresh(context, applicationArguments);// 14.停止计时stopWatch.stop();if (this.logStartupInfo) {new StartupInfoLogger(this.mainApplicationClass).logStarted(getApplicationLog(), stopWatch);}// 15.监听器 startlisteners.started(context);// 16.调用Context里面的 ApplicationRunner 和 CommandLineRunnercallRunners(context, applicationArguments);}catch (Throwable ex) {handleRunFailure(context, ex, exceptionReporters, listeners);throw new IllegalStateException(ex);}try {// 15.监听器 开始运行listeners.running(context);}catch (Throwable ex) {handleRunFailure(context, ex, exceptionReporters, null);throw new IllegalStateException(ex);}return context;}
整体来说,run是在初始化上下文和绑定一些参数,环境信息等
其中最关键的是 refreshContext ,点击去发现很惊喜,这部分代码注释写得非常好,每一行都有注释…
@Overridepublic void refresh() throws BeansException, IllegalStateException {synchronized (this.startupShutdownMonitor) {// Prepare this context for refreshing.prepareRefresh();// Tell the subclass to refresh the internal bean factory.ConfigurableListableBeanFactory beanFactory = obtainFreshBeanFactory();// Prepare the bean factory for use in this context.prepareBeanFactory(beanFactory);try {// Allows post-processing of the bean factory in context subclasses.postProcessBeanFactory(beanFactory);// Invoke factory processors registered as beans in the context.invokeBeanFactoryPostProcessors(beanFactory);// Register bean processors that intercept bean creation.registerBeanPostProcessors(beanFactory);// Initialize message source for this context.initMessageSource();// Initialize event multicaster for this context.initApplicationEventMulticaster();// Initialize other special beans in specific context subclasses.// 这里很关键,在创建 web ServeronRefresh();// Check for listener beans and register them.registerListeners();// Instantiate all remaining (non-lazy-init) singletons.finishBeanFactoryInitialization(beanFactory);// Last step: publish corresponding event.finishRefresh();}catch (BeansException ex) {if (logger.isWarnEnabled()) {logger.warn("Exception encountered during context initialization - " +"cancelling refresh attempt: " + ex);}// Destroy already created singletons to avoid dangling resources.destroyBeans();// Reset 'active' flag.cancelRefresh(ex);// Propagate exception to caller.throw ex;}finally {// Reset common introspection caches in Spring's core, since we// might not ever need metadata for singleton beans anymore...resetCommonCaches();}}}
总结:
1、run 方法主要是扫描配置,初始化了应用上下文并加载bean到容器
2、启动Web容器
图解
参考文章:
Using the @SpringBootApplication Annotation:https://docs.spring.io/spring-boot/docs/current/reference/html/using-spring-boot.html#using-boot-using-springbootapplication-annotation
SpringBoot启动流程总结: https://blog.csdn.net/mnicsm/article/details/93893669

若有收获,就点个赞吧
0 人点赞
