Mybatis的mapper只需要声明 Interface ,就能实现 CRUD 的操作。显然这个过程中,Mybatis对这个接口做了一些事情。在探究这个过程之前我们先回忆一下我们使用Mybatis的流程
Mybatis的使用流程
通常我们使用 Mybatis 的主要步骤是:
- 构建 SqlSessionFactory ( 通过 xml 配置文件 , 或者直接编写Java代码)
- 从 SqlSessionFactory 中获取 SqlSession
- 从SqlSession 中获取 Mapper
- 调用 Mapper 的方法 ,例如:blogMapper.selectBlog(int blogId)
// 1.DataSource dataSource = BlogDataSourceFactory.getBlogDataSource();TransactionFactory transactionFactory = new JdbcTransactionFactory();Environment environment = new Environment("development", transactionFactory, dataSource);Configuration configuration = new Configuration(environment);configuration.addMapper(BlogMapper.class);// 添加Mapper接口SqlSessionFactory sqlSessionFactory = new SqlSessionFactoryBuilder().build(configuration);// 2.SqlSession session = sqlSessionFactory.openSession();try {// 3.BlogMapper mapper = session.getMapper(BlogMapper.class);// 4.Blog blog = mapper.selectBlog(1);} finally {session.close();}
不难看出,1和2主要是Mybatis初始化的过程,4已经是在调用具体的CRUD方法。mapper接口转化为类的过程就发生在第3步
// 3.BlogMapper mapper = session.getMapper(BlogMapper.class);
经验丰富的老司机应该已经猜到这个过程是采用了动态代理的技术,下面我们看一下这个具体的过程
Mapper转换
1.在转换之前,首先得把Mapper存下来
configuration.addMapper(BlogMapper.class);// 添加Mapper接口
2.addMapper 则是把Mapper存到了 mapperRegistry 里面
public <T> void addMapper(Class<T> type) {mapperRegistry.addMapper(type);}
3.点击去看一下,mapperRegistry本质就是一个HashMap(knownMappers),值得注意的是,在存储的时候value值为 MapperProxyFactory 实例
knownMappers.put(type, new MapperProxyFactory<>(type));
从MapperProxyFactory名字来看,不难看出这是一个创建MapperProxy的工厂
4.动态代理类生成
现在回到
BlogMapper mapper = session.getMapper(BlogMapper.class);
追溯下去,其他这个方法调用的是 Configuration 的 getMapper,而它则是将 knownMappers里面的值取了出来,并 通过 newInstance 方法转换为 MapperProxy 实例。
public <T> T getMapper(Class<T> type, SqlSession sqlSession) {final MapperProxyFactory<T> mapperProxyFactory = (MapperProxyFactory<T>) knownMappers.get(type);if (mapperProxyFactory == null) {throw new BindingException("Type " + type + " is not known to the MapperRegistry.");}try {return mapperProxyFactory.newInstance(sqlSession);} catch (Exception e) {throw new BindingException("Error getting mapper instance. Cause: " + e, e);}}
而 newInstance 实质就是 Proxy.newProxyInstance 生成代理对象 MapperProxy
protected T newInstance(MapperProxy<T> mapperProxy) {return (T) Proxy.newProxyInstance(mapperInterface.getClassLoader(), new Class[] { mapperInterface }, mapperProxy);}
最后再贴一下 MapperProxy 方法调用的逻辑,核心方法就是 invoke 和 execute
@Overridepublic Object invoke(Object proxy, Method method, Object[] args) throws Throwable {try {if (Object.class.equals(method.getDeclaringClass())) {return method.invoke(this, args); // 重点} else if (method.isDefault()) {if (privateLookupInMethod == null) {return invokeDefaultMethodJava8(proxy, method, args);} else {return invokeDefaultMethodJava9(proxy, method, args);}}} catch (Throwable t) {throw ExceptionUtil.unwrapThrowable(t);}final MapperMethod mapperMethod = cachedMapperMethod(method);return mapperMethod.execute(sqlSession, args); // 重点}
其实Java的框架源码写得都非常清晰,习惯阅读源码的可以直接看session下面的Configuration,非常简短且清晰。
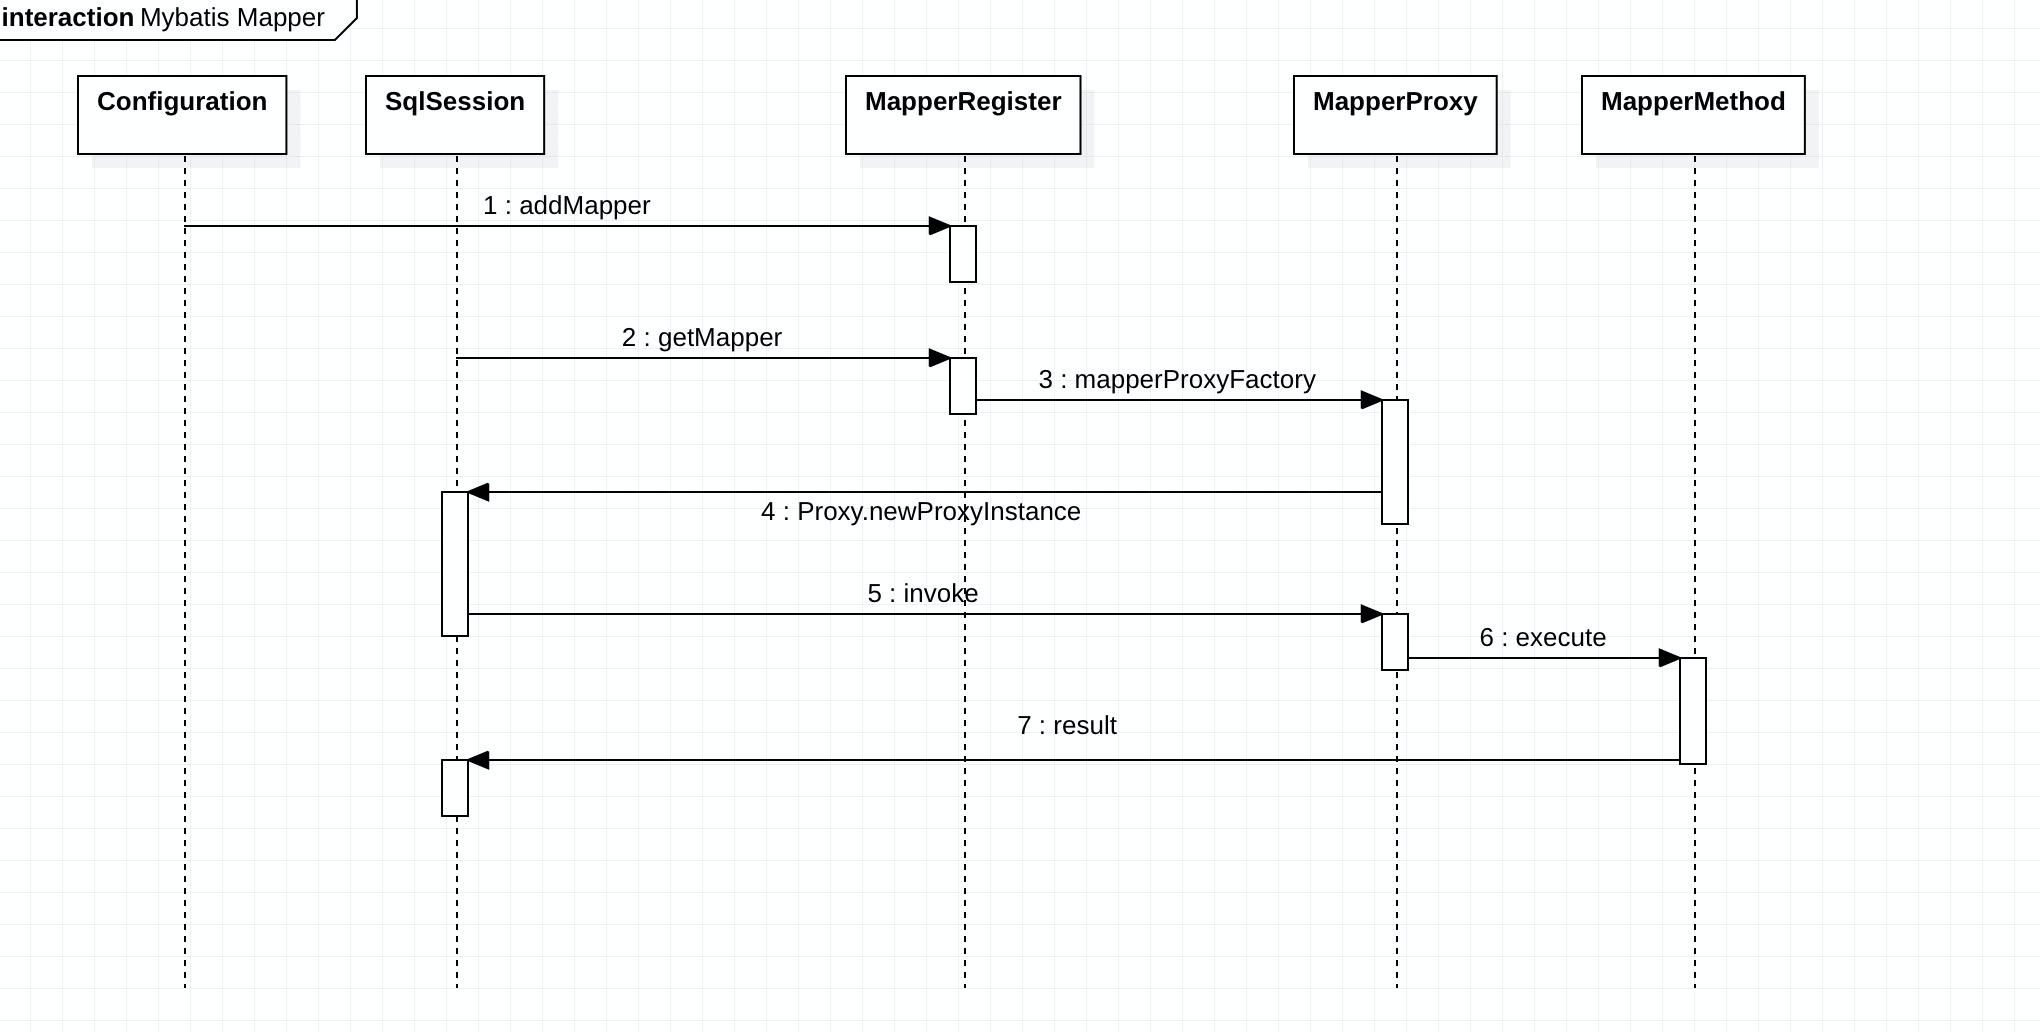
5.时序图
参考文章
Mybatis Mapper接口是如何找到实现类的-源码分析:https://www.cnblogs.com/demingblog/p/9544774.html
两张图彻底搞懂MyBatis的Mapper原理!:https://segmentfault.com/a/1190000018440184

若有收获,就点个赞吧
0 人点赞
