因为V5要实现正常的运行一个SpringBoot项目,所以我们需要写一个支持单应用的Servlet容器,而且还需要实现之前版本未实现的其他Servlet接口。
BinCatWebAppClassLoader实现
为了实现加载Web应用的资源和类文件,我们需要实现一个类简单的加载器,用于加载WEB-INF目录下的classes和libs中的所有文件。
BinCatWebAppClassLoader代码:
package com.anbai.sec.server.loader;import java.net.URL;import java.net.URLClassLoader;public class BinCatWebAppClassLoader extends URLClassLoader {public BinCatWebAppClassLoader(URL[] urls, ClassLoader parent) {super(urls, parent);}}
为了统一加载Web应用的资源文件,我们还需要将BinCatWebAppClassLoader的类示例设置为当前线程的类加载器,如下:
// 定义需要加载的Web应用路径,默认配置的路径必须先使用maven编译:javasec-blog项目String webAppFile = System.getProperty("user.dir") +"/javaweb-sec-source/javasec-test/javasec-blog/target/javasec-blog-1.0.0/";// 创建BinCatWebAppClassLoader,加载Web应用BinCatWebAppClassLoader appClassLoader = BinCatConfig.createAppClassLoader(webAppFile);// 设置当前线程的上下文类加载器Thread.currentThread().setContextClassLoader(appClassLoader);
这样一来在整个Web应用(示例中指的是javasec-blog项目)默认将会使用BinCatWebAppClassLoader来实现资源文件和类文件的加载了。
BinCatWebAppClassLoader初始化
BinCatWebAppClassLoader在初始化的时候需要加载所有应用的WEB-INF目录的类和资源文件,但由于V5版本我们只想实现单应用的部署,所以我们只需要加载我们预设好的Web应用目录就好了。在初始化BinCatWebAppClassLoader的时候将WEB-INF/classes目录和WEB-INF/libs目录下的所有jar文件都添加到BinCatWebAppClassLoader当中。
BinCatWebAppClassLoader创建并加载Web应用资源代码:
public static BinCatWebAppClassLoader createAppClassLoader(String webAppFile) throws IOException {File webRoot = new File(webAppFile);File webInfoDir = new File(webRoot, "WEB-INF");File libDir = new File(webInfoDir, "lib");File classesDir = new File(webInfoDir, "classes");Set<URL> classPathURL = new HashSet<>();File[] libs = libDir.listFiles(new FilenameFilter() {@Overridepublic boolean accept(File dir, String name) {return name.endsWith(".jar");}});// 加载lib目录下所有的jar文件for (File lib : libs) {classPathURL.add(lib.toURL());}// 加载classes目录的所有资源文件classPathURL.add(classesDir.toURL());// 创建Web应用的类加载器return new BinCatWebAppClassLoader(classPathURL.toArray(new URL[classPathURL.size()]), BinCatConfig.class.getClassLoader());}
BinCatServletContext实现
在V4版本中我们虽然已经实现了一个BinCatServletContext,但是我们并没有实现Servlet的动态注册功能,而且V4实现的Servlet注册和初始化过程都是静态的,我们需要将整个过程升级为动态的。
- 为了能够在
BinCatServletContext中获取到我们自定义的Web应用的类加载器,我们需要在创建BinCatServletContext的时候将将其缓存到类对象中。 - 创建一个
Map<String, Servlet> servletMap和Set<BinCatServletRegistrationDynamic> registrationDynamics对象用于缓存动态注册的Servlet。 - 创建一个
Map<String, String> initParameterMap对象用于记录ServletContext初始化参数。 - 创建一个
Map<String, Object> attributeMap,用于记录ServletContext中的属性对象(attribute)。
BinCatServletContext代码:
package com.anbai.sec.server.servlet;import com.anbai.sec.server.loader.BinCatWebAppClassLoader;import javax.servlet.*;import javax.servlet.descriptor.JspConfigDescriptor;import java.io.File;import java.io.InputStream;import java.net.MalformedURLException;import java.net.URL;import java.util.*;public class BinCatServletContext implements ServletContext {// 创建一个装动态注册的Servlet的Mapprivate final Map<String, Servlet> servletMap = new HashMap<>();// 创建一个装ServletContext初始化参数的Mapprivate final Map<String, String> initParameterMap = new HashMap<>();// 创建一个装ServletContext属性对象的Mapprivate final Map<String, Object> attributeMap = new HashMap<>();// 创建一个装Servlet动态注册的Setprivate final Set<BinCatServletRegistrationDynamic> registrationDynamics = new LinkedHashSet<>();// BinCatWebAppClassLoader,Web应用的类加载器private final BinCatWebAppClassLoader appClassLoader;// 此处省略ServletContext接口中的大部分方法,仅保留几个实现了的示例方法...public BinCatServletContext(BinCatWebAppClassLoader appClassLoader) throws Exception {this.appClassLoader = appClassLoader;}@Overridepublic Servlet getServlet(String name) throws ServletException {return servletMap.get(name);}@Overridepublic Enumeration<Servlet> getServlets() {Set<Servlet> servlets = new HashSet<Servlet>(servletMap.values());return Collections.enumeration(servlets);}@Overridepublic Enumeration<String> getServletNames() {Set<String> servlets = new HashSet<String>(servletMap.keySet());return Collections.enumeration(servlets);}@Overridepublic String getRealPath(String path) {return new File(System.getProperty("user.dir"), path).getAbsolutePath();}public Map<String, String> getInitParameterMap() {return initParameterMap;}@Overridepublic String getInitParameter(String name) {return initParameterMap.get(name);}@Overridepublic Enumeration<String> getInitParameterNames() {return Collections.enumeration(initParameterMap.keySet());}@Overridepublic boolean setInitParameter(String name, String value) {if (!initParameterMap.containsKey(name)) {initParameterMap.put(name, value);return true;}return false;}@Overridepublic Object getAttribute(String name) {return attributeMap.get(name);}@Overridepublic Enumeration<String> getAttributeNames() {return Collections.enumeration(attributeMap.keySet());}@Overridepublic void setAttribute(String name, Object object) {attributeMap.put(name, object);}@Overridepublic void removeAttribute(String name) {attributeMap.remove(name);}@Overridepublic ServletRegistration.Dynamic addServlet(String servletName, Servlet servlet) {servletMap.put(servletName, servlet);BinCatServletRegistrationDynamic dynamic = new BinCatServletRegistrationDynamic(servletName, servlet, this);registrationDynamics.add(dynamic);return dynamic;}@Overridepublic ClassLoader getClassLoader() {return this.appClassLoader;}public Map<String, Servlet> getServletMap() {return servletMap;}public Set<BinCatServletRegistrationDynamic> getRegistrationDynamics() {return registrationDynamics;}}
BinCatServletContext初始化
在初始化BinCatServletContext时我们通过手动注册Servlet的方式初始化了几个容器内置的Servlet,并通过扫描初始化Servlet类注解的方式将Servlet在BinCatServletContext中注册。
BinCatServletContext初始化代码:
/*** 手动注册Servlet并创建BinCatServletContext对象** @param appClassLoader 应用的类加载器* @return ServletContext Servlet上下文对象*/public static BinCatServletContext createServletContext(BinCatWebAppClassLoader appClassLoader) throws Exception {BinCatServletContext servletContext = new BinCatServletContext(appClassLoader);// 手动注册Servlet类Class<Servlet>[] servletClass = new Class[]{TestServlet.class,CMDServlet.class,QuercusPHPServlet.class};for (Class<Servlet> clazz : servletClass) {Servlet servlet = clazz.newInstance();WebServlet webServlet = clazz.getAnnotation(WebServlet.class);if (webServlet != null) {// 获取WebInitParam配置WebInitParam[] webInitParam = webServlet.initParams();// 动态创建Servlet对象ServletRegistration.Dynamic dynamic = servletContext.addServlet(webServlet.name(), servlet);// 动态设置Servlet映射地址dynamic.addMapping(webServlet.urlPatterns());// 设置Servlet启动参数for (WebInitParam initParam : webInitParam) {dynamic.setInitParameter(initParam.name(), initParam.value());}}}// 创建ServletContextreturn servletContext;}
BinCatServletRegistrationDynamic实现
BinCatServletContext中核心的是addServlet方法的动态注册Servlet,如下:
@Overridepublic ServletRegistration.Dynamic addServlet(String servletName, Servlet servlet) {servletMap.put(servletName, servlet);BinCatServletRegistrationDynamic dynamic = new BinCatServletRegistrationDynamic(servletName, servlet, this);registrationDynamics.add(dynamic);return dynamic;}
当Web应用调用addServlet注册一个Servlet对象时会返回一个ServletRegistration.Dynamic对象,通过这个Dynamic对象可以设置Servlet的映射信息和初始化信息。但因为ServletRegistration.Dynamic是一个接口,所以我们必须实现此接口的所有方法。
BinCatServletRegistrationDynamic代码:
package com.anbai.sec.server.servlet;import javax.servlet.MultipartConfigElement;import javax.servlet.Servlet;import javax.servlet.ServletRegistration;import javax.servlet.ServletSecurityElement;import java.util.*;public class BinCatServletRegistrationDynamic implements ServletRegistration.Dynamic {private final String servletName;private final Set<String> servletMapping = new LinkedHashSet<>();private final Map<String, String> initParametersMap = new HashMap<>();private final Servlet servlet;private final BinCatServletContext servletContext;public BinCatServletRegistrationDynamic(String servletName, Servlet servlet, BinCatServletContext servletContext) {this.servletName = servletName;this.servlet = servlet;this.servletContext = servletContext;}@Overridepublic void setLoadOnStartup(int loadOnStartup) {}@Overridepublic Set<String> setServletSecurity(ServletSecurityElement constraint) {return null;}@Overridepublic void setMultipartConfig(MultipartConfigElement multipartConfig) {}@Overridepublic void setRunAsRole(String roleName) {}@Overridepublic void setAsyncSupported(boolean isAsyncSupported) {}@Overridepublic Set<String> addMapping(String... urlPatterns) {Collections.addAll(servletMapping, urlPatterns);return servletMapping;}@Overridepublic Collection<String> getMappings() {return servletMapping;}@Overridepublic String getRunAsRole() {return null;}@Overridepublic String getName() {return servletName;}@Overridepublic String getClassName() {return servlet.getClass().getName();}@Overridepublic boolean setInitParameter(String name, String value) {if (!initParametersMap.containsKey(name)) {initParametersMap.put(name, value);return true;}return false;}@Overridepublic String getInitParameter(String name) {return initParametersMap.get(name);}@Overridepublic Set<String> setInitParameters(Map<String, String> initParameters) {initParametersMap.putAll(initParameters);return initParametersMap.keySet();}@Overridepublic Map<String, String> getInitParameters() {return initParametersMap;}public Servlet getServlet() {return servlet;}public String getServletName() {return servletName;}}
实现Web应用的启动
在启动我们的示例应用之前我们已经创建了一个BinCatWebAppClassLoader和BinCatServletContext,其中BinCatWebAppClassLoader已经加载了javasec-blog项目的WEB-INF信息、BinCatServletContext也初始化了几个BinCat内置的Servlet。万事俱备,我们现在只欠如何启动Servlet容器了。
从Servlet3.0开始,Servlet除了可以从web.xml启动,还可以通过SPI机制动态获取ServletContainerInitializer(简称SCI)并通过SCI启动Servlet容器。因为V5并未打算实现传统的web.xml启动方式,而是只想实现SCI启动方式(这也是SpringBoot以war包部署的启动方式)。ServletContainerInitializer是一个接口类,仅定义了一个叫onStartup的方法,所有实现了该接口的类只要重写onStartup方法将可以实现Servlet容器的启动。
ServletContainerInitializer代码:
package javax.servlet;import java.util.Set;/*** Interface which allows a library/runtime to be notified of a web* application's startup phase and perform any required programmatic* registration of servlets, filters, and listeners in response to it.** <p>Implementations of this interface may be annotated with* {@link javax.servlet.annotation.HandlesTypes HandlesTypes}, in order to* receive (at their {@link #onStartup} method) the Set of application* classes that implement, extend, or have been annotated with the class* types specified by the annotation.** <p>If an implementation of this interface does not use <tt>HandlesTypes</tt>* annotation, or none of the application classes match the ones specified* by the annotation, the container must pass a <tt>null</tt> Set of classes* to {@link #onStartup}.** <p>When examining the classes of an application to see if they match* any of the criteria specified by the <tt>HandlesTypes</tt> annontation* of a <tt>ServletContainerInitializer</tt>, the container may run into* classloading problems if any of the application's optional JAR* files are missing. Because the container is not in a position to decide* whether these types of classloading failures will prevent* the application from working correctly, it must ignore them,* while at the same time providing a configuration option that would* log them.** <p>Implementations of this interface must be declared by a JAR file* resource located inside the <tt>META-INF/services</tt> directory and* named for the fully qualified class name of this interface, and will be* discovered using the runtime's service provider lookup mechanism* or a container specific mechanism that is semantically equivalent to* it. In either case, <tt>ServletContainerInitializer</tt> services from web* fragment JAR files excluded from an absolute ordering must be ignored,* and the order in which these services are discovered must follow the* application's classloading delegation model.** @see javax.servlet.annotation.HandlesTypes** @since Servlet 3.0*/public interface ServletContainerInitializer {/*** Notifies this <tt>ServletContainerInitializer</tt> of the startup* of the application represented by the given <tt>ServletContext</tt>.** <p>If this <tt>ServletContainerInitializer</tt> is bundled in a JAR* file inside the <tt>WEB-INF/lib</tt> directory of an application,* its <tt>onStartup</tt> method will be invoked only once during the* startup of the bundling application. If this* <tt>ServletContainerInitializer</tt> is bundled inside a JAR file* outside of any <tt>WEB-INF/lib</tt> directory, but still* discoverable as described above, its <tt>onStartup</tt> method* will be invoked every time an application is started.** @param c the Set of application classes that extend, implement, or* have been annotated with the class types specified by the* {@link javax.servlet.annotation.HandlesTypes HandlesTypes} annotation,* or <tt>null</tt> if there are no matches, or this* <tt>ServletContainerInitializer</tt> has not been annotated with* <tt>HandlesTypes</tt>** @param ctx the <tt>ServletContext</tt> of the web application that* is being started and in which the classes contained in <tt>c</tt>* were found** @throws ServletException if an error has occurred*/public void onStartup(Set<Class<?>> c, ServletContext ctx)throws ServletException;}
因为BinCatWebAppClassLoader已经加载了示例项目的所有资源文件,所以我们可以使用BinCatWebAppClassLoader来获取到示例项目中的所有路径为:META-INF/services/javax.servlet.ServletContainerInitializer的资源文件。
BinCatWebAppClassLoader classLoader = (BinCatWebAppClassLoader) servletContext.getClassLoader();String servletService = "META-INF/services/javax.servlet.ServletContainerInitializer";// 获取当前ClassLoader中的所有ServletContainerInitializer配置Enumeration<URL> resources = classLoader.getResources(servletService);
SCI资源文件中配置的是实现了SCI接口的Java类,一个SCI资源文件可能会配置多个实现类(多个类以换行分割)。读取到SCI资源文件后我们将可以使用反射的方式去加载资源文件中配置的Java类了。
读取SCI配置并加载SCI实现类示例: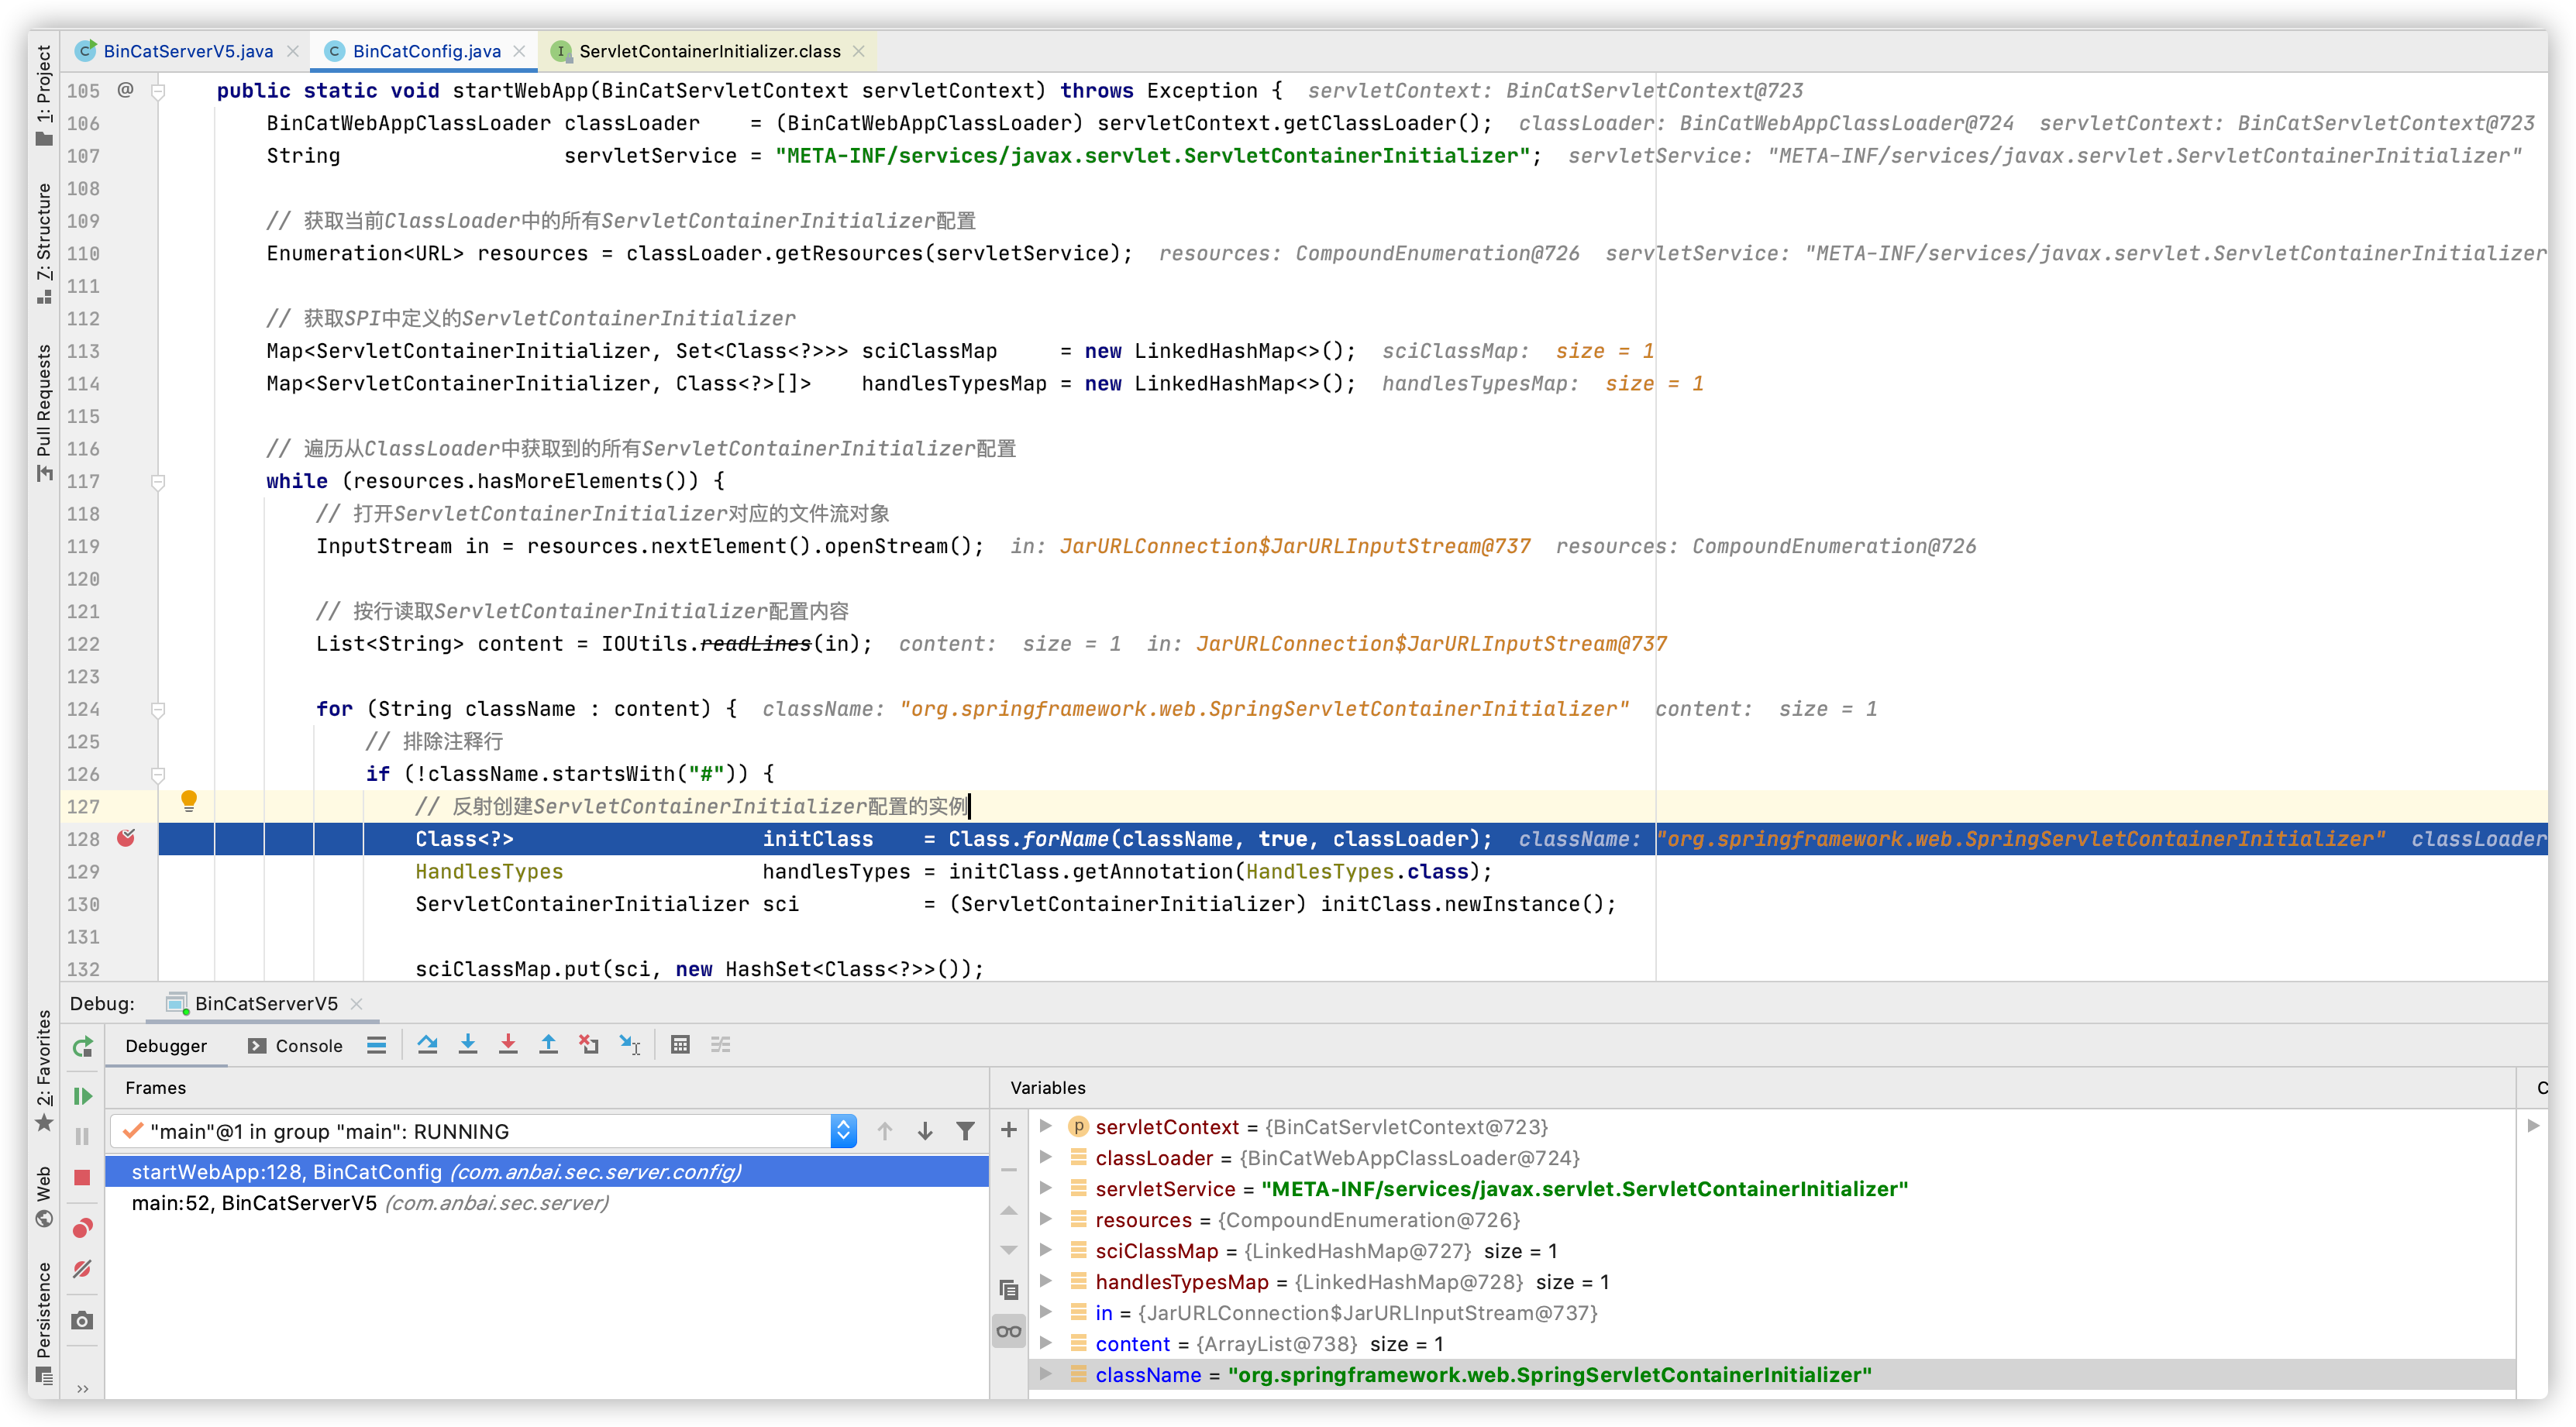
上图示例中可以看到我们通过读取BinCatWebAppClassLoader中的SCI资源时获取到了一个类名为:org.springframework.web.SpringServletContainerInitializer的类。SpringServletContainerInitializer实现了ServletContainerInitializer,所以想要启动示例的SpringBoot项目仅需要调用该类的onStartup方法将可以了。onStartup方法需要两个参数:Set<Class<?>> c和ServletContext ctx,即可SCI启动类对象集合和Servlet上下文。因为ServletContext我们可以轻易的获取到,所以我们重点是如何获取到SCI启动类对象集合了。
通过阅读源码不难发现,在实现了SCI的接口类类名上会有一个叫做@HandlesTypes的注解,读取到这个注解的值将可以找到处理SCI启动类对象集合的类对象,然后反向去找该类对象的实现类将可以找到所有需要被SCI启动的类数组了。
SpringServletContainerInitializer示例:
创建SCI实现类示例和获取该示例的HandlesTypes配置方式如下:
Class<?> initClass = Class.forName(className, true, classLoader);HandlesTypes handlesTypes = initClass.getAnnotation(HandlesTypes.class);ServletContainerInitializer sci = (ServletContainerInitializer) initClass.newInstance();sciClassMap.put(sci, new HashSet<Class<?>>());if (handlesTypes != null) {Class[] handlesClass = handlesTypes.value();handlesTypesMap.put(sci, handlesClass);}
获取到@HandlesTypes配置的类名后剩下的就是如何在示例项目中的所有类中找出@HandlesTypes配置的类实例了,如上图中SpringServletContainerInitializer配置的@HandlesTypes是WebApplicationInitializer,那么我们现在就必须通过扫包和类文件的方式找出所有WebApplicationInitializer的子类,然后再通过上一步创建出来的SCI实例调用onStartup方法完成Servlet容器启动。
为了扫描当前类加载所有的类对象,我们需要先获取出当前类加载加载的所有的类名称,然后再依次扫描这些类是否是@HandlesTypes中配置的类(如:WebApplicationInitializer)的子类。
获取BinCatWebAppClassLoader加载的所有的类名代码:
/*** 获取BinCatWebAppClassLoader类加载器加载的所有class类名** @param classLoader 类加载器* @param sciClassMap SCI类对象* @param handlesTypesMap SCI类对象配置的HandlesTypes对象映射Map* @return* @throws Exception*/private static void findInitializerClass(BinCatWebAppClassLoader classLoader,Map<ServletContainerInitializer, Set<Class<?>>> sciClassMap,Map<ServletContainerInitializer, Class<?>[]> handlesTypesMap) throws Exception {// 创建一个存储所有被BinCatWebAppClassLoader加载的类名称对象Set<String> classList = new HashSet<>();// 获取BinCatWebAppClassLoader加载的所有URL地址URL[] urls = classLoader.getURLs();for (URL url : urls) {File file = new File(url.toURI());// 遍历所有的jar文件if (file.isFile() && file.getName().endsWith(".jar")) {JarFile jarFile = new JarFile(file);Enumeration<JarEntry> jarEntry = jarFile.entries();while (jarEntry.hasMoreElements()) {JarEntry entry = jarEntry.nextElement();String fileName = entry.getName();// 遍历jar文件中的所有class文件,并转换成java类名格式,如com/anbai/Test.class会转换成com.anbai.Testif (fileName.endsWith(".class")) {String className = fileName.replace(".class", "").replace("/", ".");classList.add(className);}}} else if (file.isDirectory()) {// 遍历所有classes目录下的.class文件,并转换成java类名格式Collection<File> files = FileUtils.listFiles(file, new String[]{"class"}, true);for (File classFile : files) {String className = classFile.toString().substring(file.toString().length()).replace(".class", "").replaceAll("^/", "").replace("/", ".");classList.add(className);}}}// 通过ASM方式获取所有Java类的继承关系,并判断是否是HandlesTypes配置中的类的子类for (String className : classList) {// 通过ASM的方式获取当前类的所有父类(包括继承和实现的所有类)Set<String> superClassList = ClassUtils.getSuperClassListByAsm(className, classLoader);// 遍历所有HandlesTypes配置for (ServletContainerInitializer sci : handlesTypesMap.keySet()) {// 获取HandlesTypes配置的类数组对象Class[] handlesTypesClass = handlesTypesMap.get(sci);// 遍历所有HandlesTypes配置的类数组对象for (Class typesClass : handlesTypesClass) {// 获取HandlesTypes配置的类名称String typeClassName = typesClass.getName();// 检测当前Java类是否是HandlesTypes配置的类的子类,如果是就记录下来if (superClassList.contains(typeClassName) && !className.equals(typeClassName)) {// 获取SCI启动类对象集合Set<Class<?>> sciClass = sciClassMap.get(sci);// 反射加载当前类对象Class clazz = classLoader.loadClass(className);// 将找到的SCI启动类添加到集合中sciClass.add(clazz);}}}}}
整个扫包过程会比较缓慢,因为一次性扫描了1万多个类,并且还是用ASM解析了这1万多个类的继承关系。最终我们将会得出一个Map<ServletContainerInitializer, Set<Class<?>>> sciClassMap对象,我们通过遍历这个sciClassMap并依次调用onStartup方法即可实现Servlet容器的启动。
启动所有SCI代码:
for (ServletContainerInitializer initializer : sciClassMap.keySet()) {Set<Class<?>> initClassSet = sciClassMap.get(initializer);// 调用Servlet容器初始化的onStartup方法,启动容器initializer.onStartup(initClassSet, servletContext);}
initializer.onStartup(initClassSet, servletContext);因为传入了ServletContext,所以initializer很有可能会通过ServletContext动态注册一些Filter、Servlet、Listener,而这些Filter、Servlet、Listener和我们BinCat的内置的Servlet都处于未初始化的状态,这个时候我们就必须要做一些初始化工作(V5版本只支持Servlet,并不支持Filter和Listener)了。
初始化ServletContext中的所有Servlet代码:
initServlet(servletContext);
完成以上所有逻辑后我们的BinCat也就算启动成功了,剩下的就是如何处理浏览器请求了。
Servlet请求处理
V5依旧是根据浏览器请求的URL地址调用对应的Servlet的service方法处理Servlet请求,访问javasec-blog首页测试:http://localhost:8080/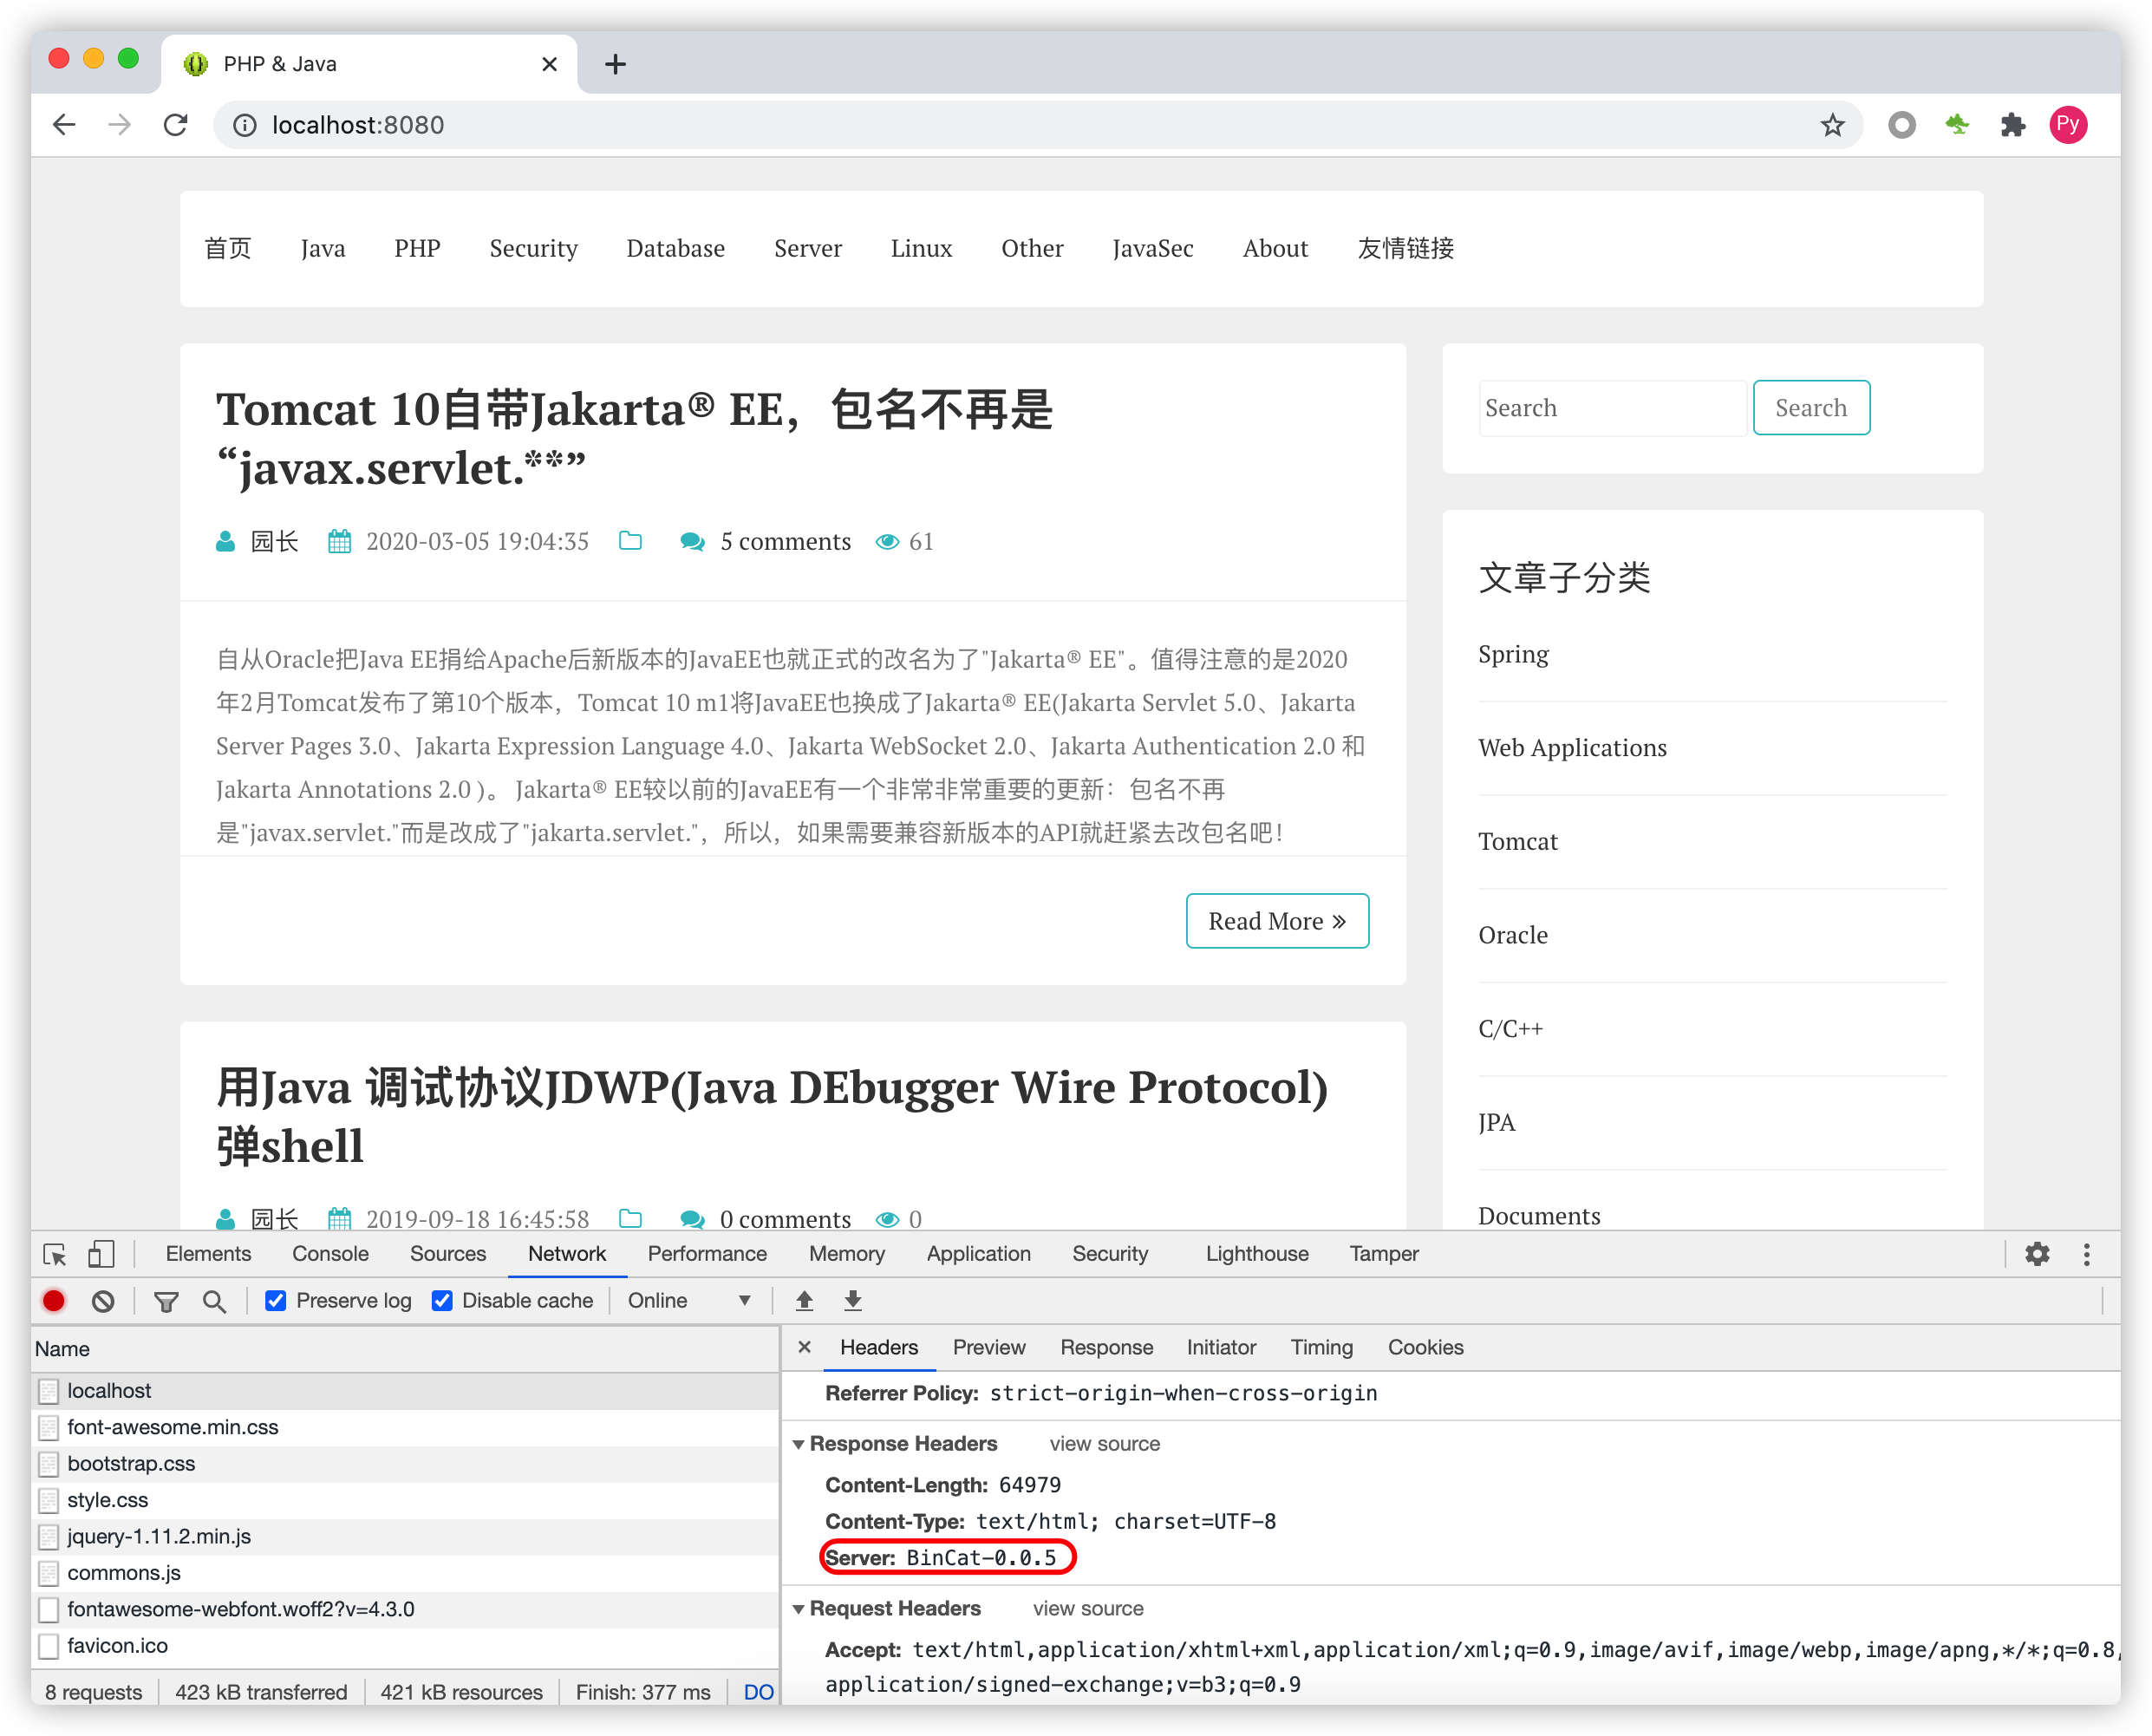
请求的/最终会调用SpringMVC的org.springframework.web.servlet.DispatcherServlet类处理请求,如下:
dynamic.getServlet().service(req, resp)最终会调用Spring的DispatcherServlet类的父类org.springframework.web.servlet.FrameworkServlet的service方法,如下: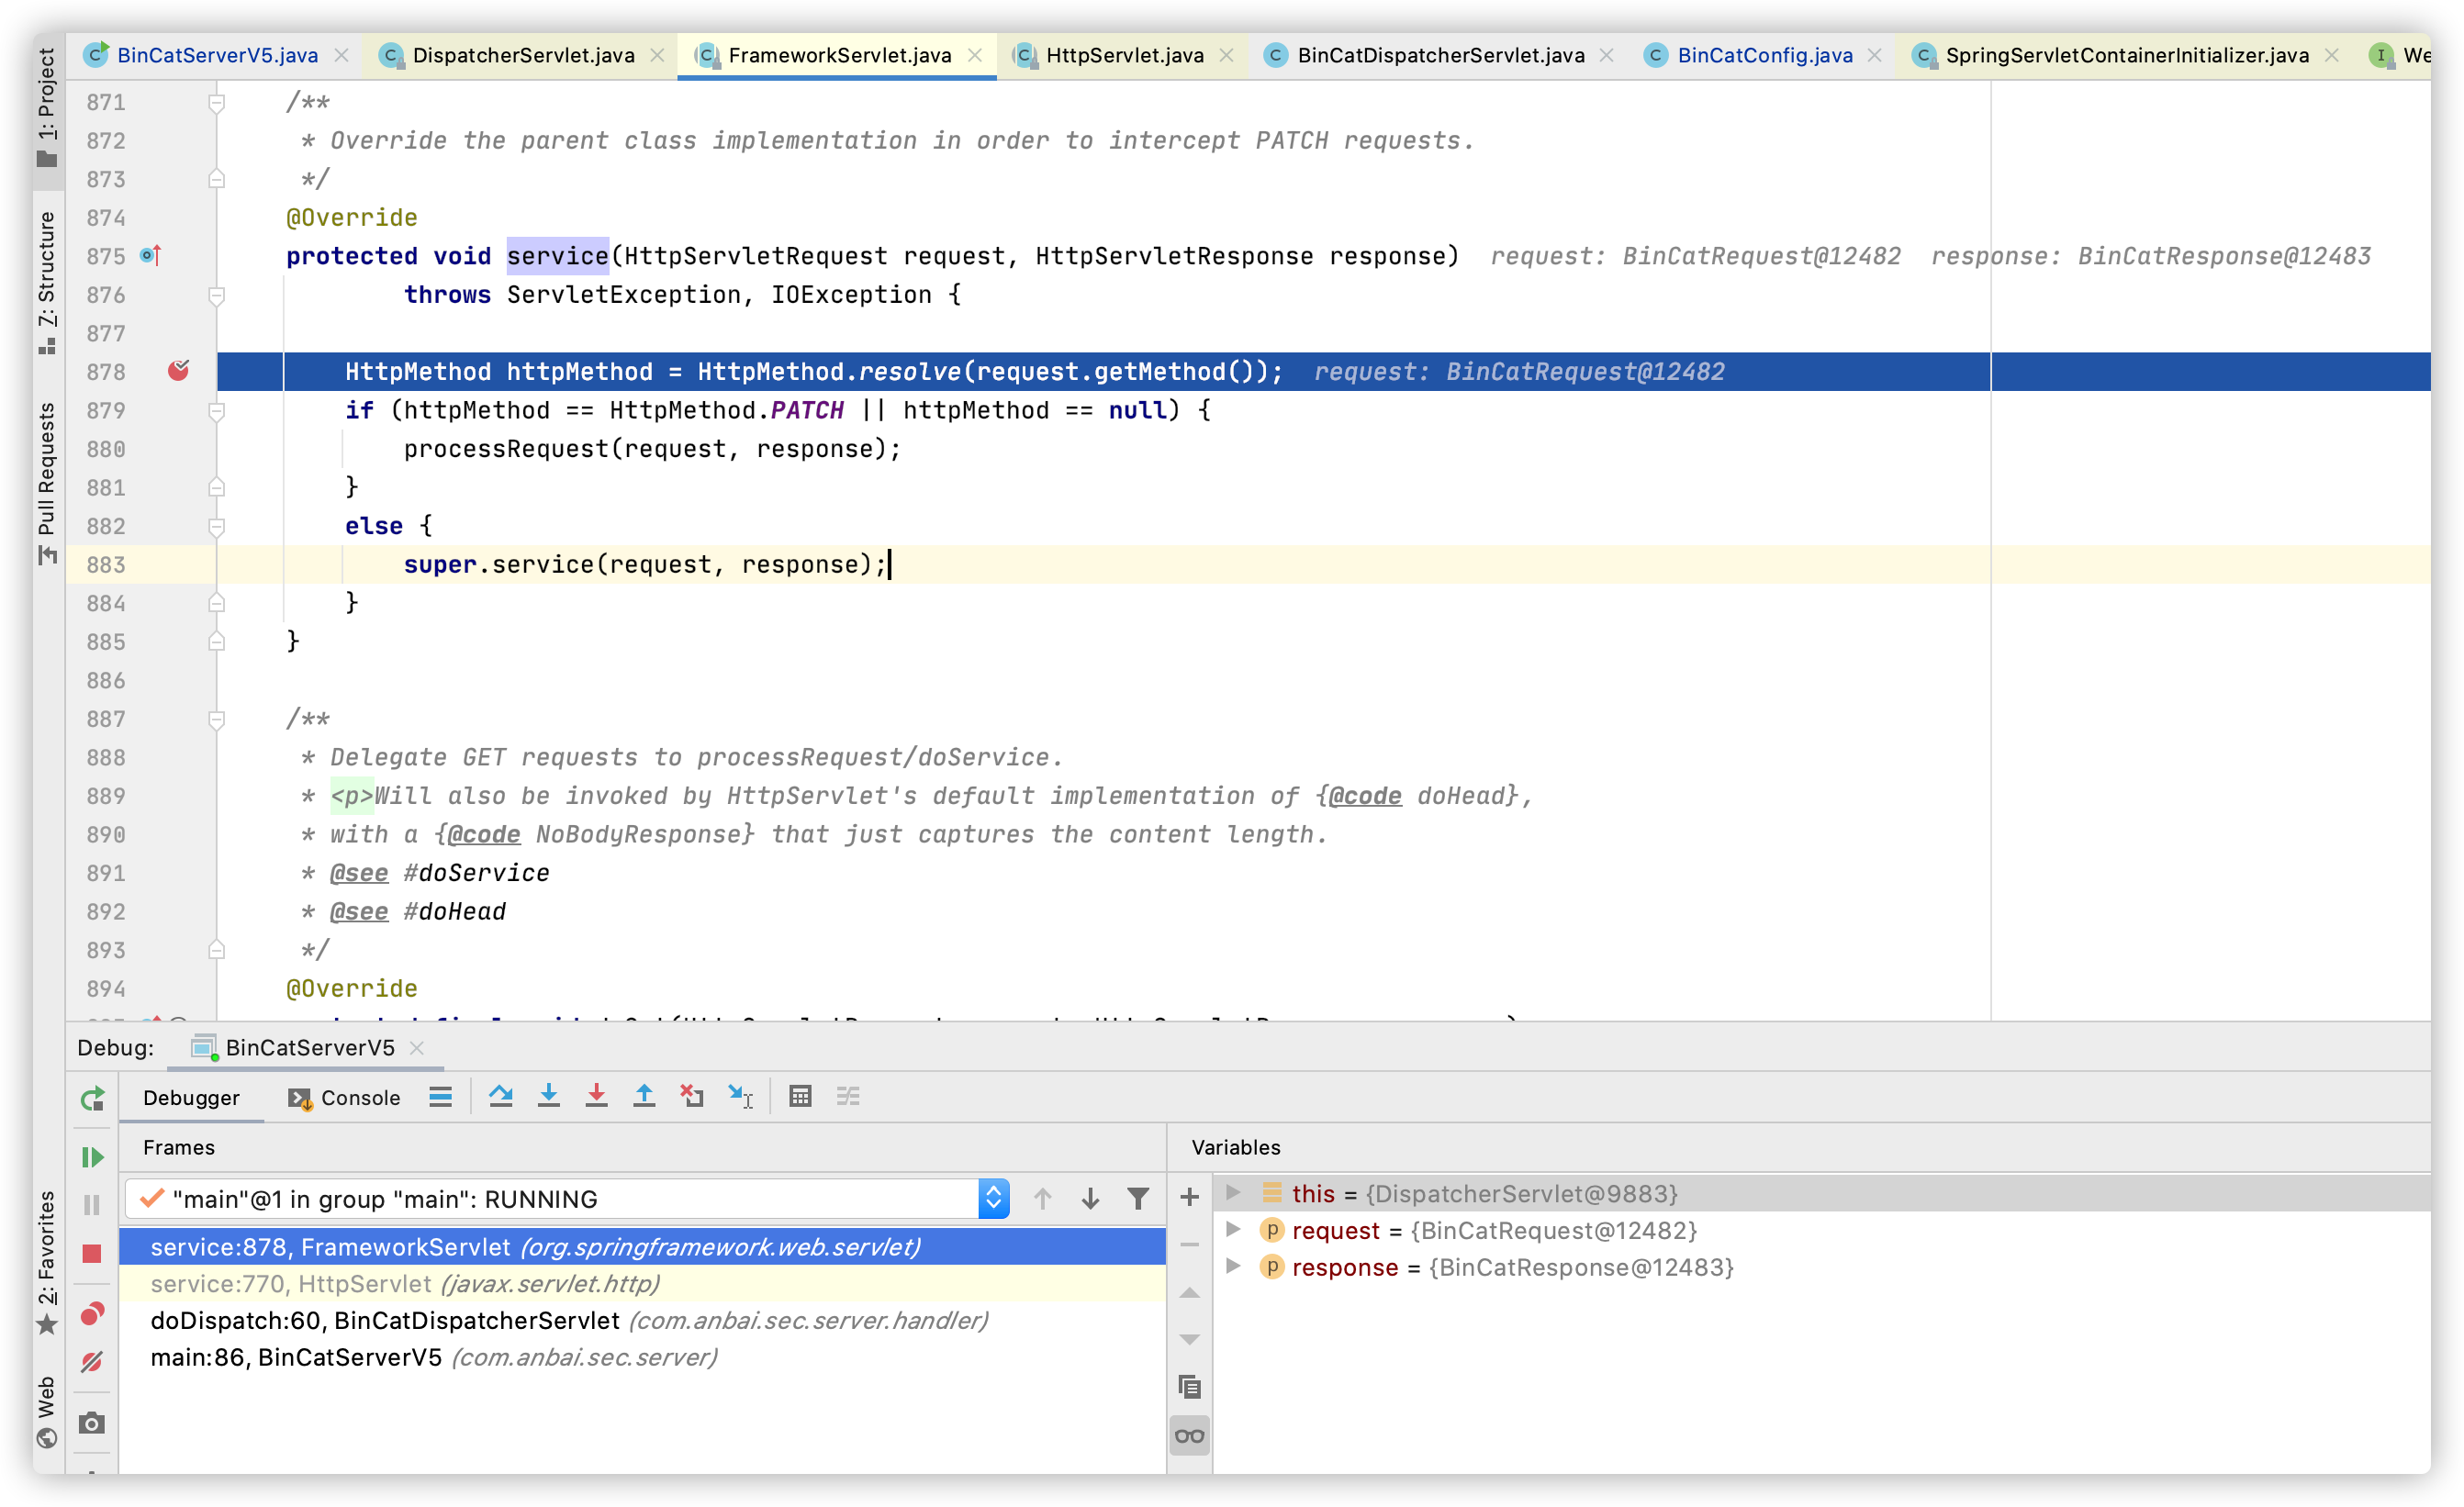
访问文章详情页测试:http://localhost:8080/?p=12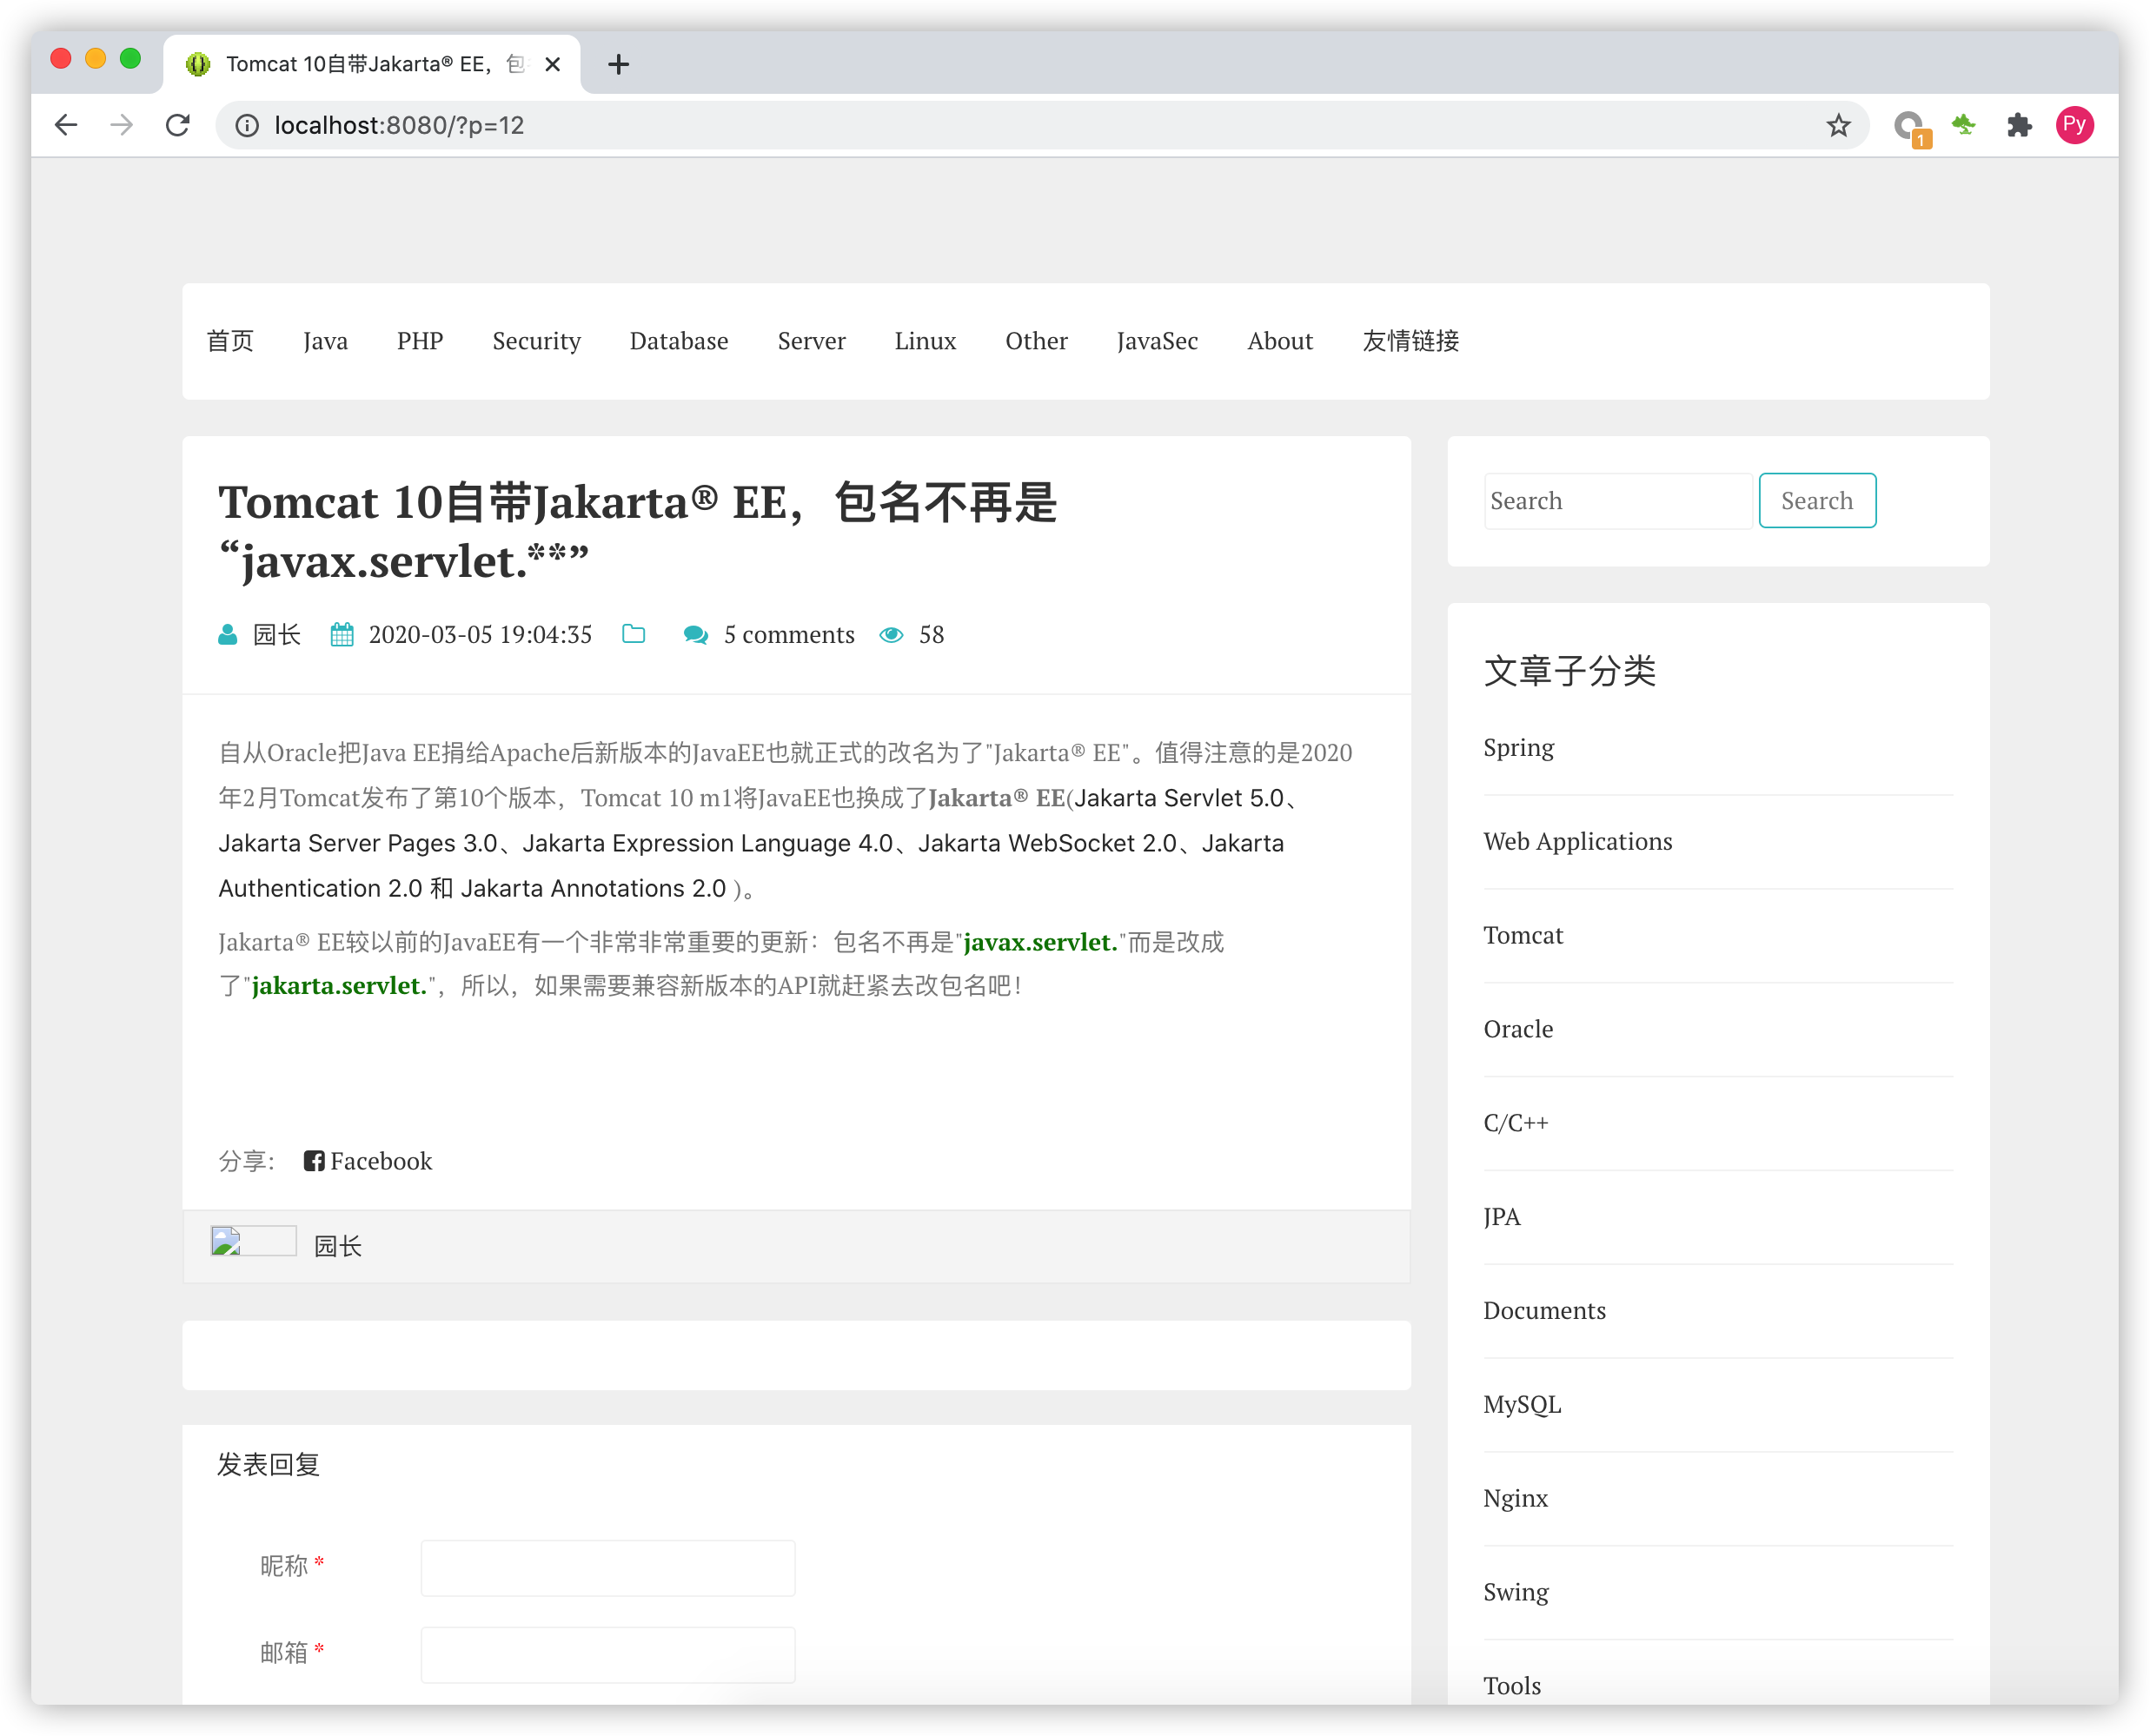
至此,耗时大约一周时间,我们的BinCat从支持解析简单的HelloWorld到如今已经实现了启动单Web应用的SpringBoot了,当然这里面充斥这各种各样的Bug和安全问题,我们的目标并不是实现一个国产化Java中间件,而是将BinCat变成一个存在各种各样漏洞的靶场。

若有收获,就点个赞吧
0 人点赞
