一、基础服务配置(Server版)
1、安装系统
直接用refus安装到SD卡即可
注意:格式化内存卡尽量用SDFormatter工具,此工具是SD卡协会推出,相比win10自带的工具格式化效果更好。官方下载链接:https://www.sdcard.org/downloads/formatter/
2、开机配置
(1)Wifi配置
方法一:
首先通过连接LAN口,进行访问,打开 /etc/wpa_supplicant/wpa_supplicant.conf 配置文件,在里面添加你要连接的WiFi信息,如WiFi名称,WiFi密码,加密方式等,修改内容如下:
country=US 》》》支持的5G频段多; country=CN 》》》和国内的兼容性好
ctrl_interface=DIR=/var/run/wpa_supplicant GROUP=netdevupdate_config=1country=USnetwork={ssid="HUAWEI-BOX"psk="zmy20141321"key_mgmt=WPA-PSKpriority=9}network={ssid="HUAWEI-1702"psk="zmy20141321"key_mgmt=WPA-PSKpriority=8}network={ssid="OrayBox-Desktop"psk="zmy20141321"key_mgmt=WPA-PSKpriority=7}network={ssid="OrayBox-mate"psk="zmy20141321"key_mgmt=WPA-PSKpriority=1}
方法二:在树莓派的SD卡的根目录下新建wpa_supplicant.conf 文件,内容如方法一
(2)设置静态IP
方法一:配置完后,可以设置路由器的DHCP绑定树莓派网卡的mac地址,给树莓派分配固定的WLAN或LAN的IP地址。
方法二:
按照网上的资料,大多是通过修改/etc/network/interfaces配置文件,增加静态IP的设置。不过这种设置静态IP的方式并不完美,即便是取得了静态IP,路由器的DHCP服务依然会为设备分配一个IP和DNS地址,导致路由表默认网关出现冲突而无法访问外网,以及手动DNS不生效。
但是仔细看/etc/network/interfaces配置文件
pi@raspberrypi:~ $ cat /etc/network/interfaces# interfaces(5) file used by ifup(8) and ifdown(8)# Please note that this file is written to be used with dhcpcd# For static IP, consult /etc/dhcpcd.conf and 'man dhcpcd.conf'# Include files from /etc/network/interfaces.d:source-directory /etc/network/interfaces.d
在配置文件的头注释中发现,For static IP, consult /etc/dhcpcd.conf and ‘man dhcpcd.conf’,如果设置静态IP,应该去查看/etc/dhcpcd.conf配置文件
pi@raspberrypi:~ $ cat /etc/dhcpcd.conf# A sample configuration for dhcpcd.# See dhcpcd.conf(5) for details.# Allow users of this group to interact with dhcpcd via the control socket.#controlgroup wheel# Inform the DHCP server of our hostname for DDNS.hostname# Use the hardware address of the interface for the Client ID.clientid# or# Use the same DUID + IAID as set in DHCPv6 for DHCPv4 ClientID as per RFC4361.# Some non-RFC compliant DHCP servers do not reply with this set.# In this case, comment out duid and enable clientid above.#duid# Persist interface configuration when dhcpcd exits.persistent# Rapid commit support.# Safe to enable by default because it requires the equivalent option set# on the server to actually work.option rapid_commit# A list of options to request from the DHCP server.option domain_name_servers, domain_name, domain_search, host_nameoption classless_static_routes# Respect the network MTU. This is applied to DHCP routes.option interface_mtu# Most distributions have NTP support.#option ntp_servers# A ServerID is required by RFC2131.require dhcp_server_identifier# Generate SLAAC address using the Hardware Address of the interface#slaac hwaddr# OR generate Stable Private IPv6 Addresses based from the DUIDslaac private# Example static IP configuration:#interface eth0#static ip_address=192.168.0.10/24#static ip6_address=fd51:42f8:caae:d92e::ff/64#static routers=192.168.0.1#static domain_name_servers=192.168.0.1 8.8.8.8 fd51:42f8:caae:d92e::1# It is possible to fall back to a static IP if DHCP fails:# define static profile#profile static_eth0#static ip_address=192.168.1.23/24#static routers=192.168.1.1#static domain_name_servers=192.168.1.1# fallback to static profile on eth0#interface eth0#fallback static_eth0
配置文件的后两段提供了设置静态IP的例子,我们可以在配置文件中增加
interface eth0 //LAN口static ip_address=192.168.1.23/24 //想要设置的IPstatic routers=192.168.1.1 //网关,一般是路由器的IP,设置出错可能无法访问Internet,但是可以但访问路由器下的局域网static domain_name_servers=192.168.1.1 //DN
注意:手动静态IP不能根路由器DHCP所自动分配的IP冲突,否则无法联网。
可以查看路由器DHCP自动分配IP的范围,手动设置IP要避开自动分配的IP。
3、SSH服务
对于桌面版树莓派系统,官方
对于Server版树莓派系统,默认开启SSH, 默认端口22;
设置root用户远程登录SSH
(1)开启SSH
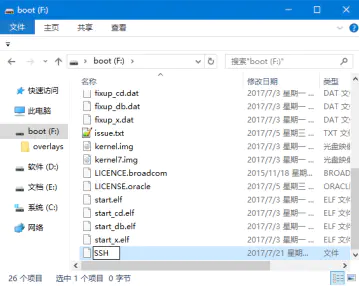
方法1 直接在SD卡根目录(boot中)新建“SSH”文件(无后缀)即可,如下图:
方法2 界面下 Raspberry Pi Configuration
a 、如下图,依次打开 菜单(Menu) > 首选项(Preferences) > Raspberry Pi Configuration: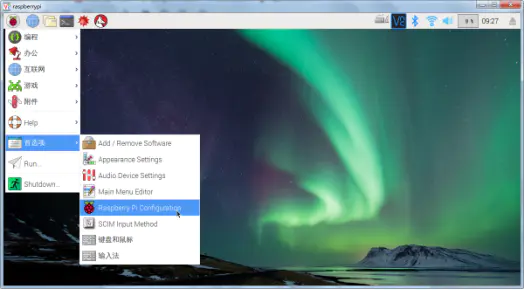
b、点击 Interfaces 栏,选择“enable” SSH服务。如下图: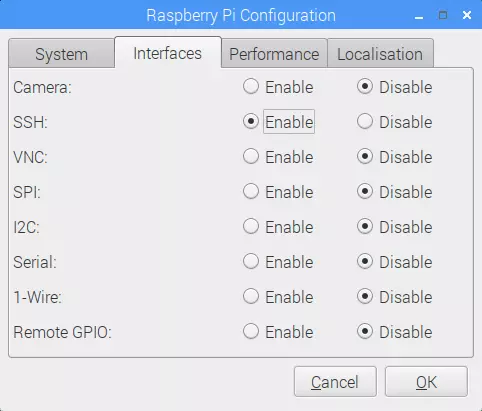
方法3 命令行下sudo raspi-config
a、在命令行输入:sudo raspi-config,然后回车,如下图:
b、选择第七项:“5 Interfacing Options”,回车,如下图: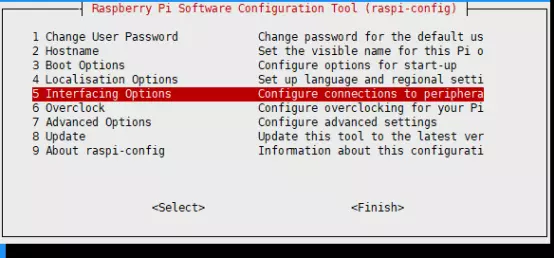
c、选择第二项:“SSH”,回车,如下图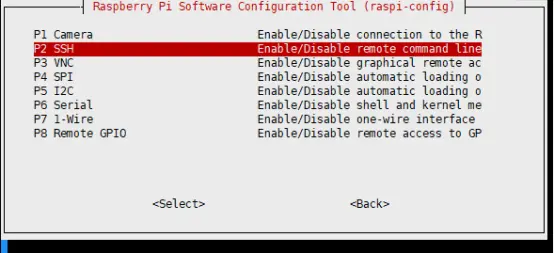
d、选择是,回车。如下图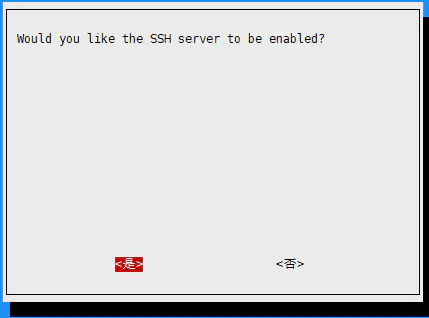
(2)远程连接树莓派
4、挂载硬盘
[Unit]Description=mount toshiba service[Service]Type=forkingWorkingDirectory=/home/pi/ExecStart=mount "UUID=64CE6C76CE6C4282" /home/pi/toshiba/SysVStartPriority=50[Install]WantedBy=multi-user.target
5、FTP服务
(1)安装
(2)修改配置文件:/etc/vsftpd.conf
(3)启动和自启
6、Samba服务
Samba是在Linux和UNIX系统上实现SMB协议的一个免费软件,由服务器及客户端程序构成。SMB(Server Messages Block,信息服务块)是一种在局域网上共享文件和打印机的一种通信协议,它为局域网内的不同计算机之间提供文件及打印机等资源的共享服务。SMB协议是客户机/服务器型协议,客户机通过该协议可以访问服务器上的共享文件系统、打印机及其他资源。
(1)安装 samba 和 samba-common-bin服务
sudo apt-get install samba samba-common-bin
(2)编辑smb.conf配置文件
Vim编辑器
sudo vim /etc/samba/smb.conf
(3)在文件最后添加
# 分享名称
[toshiba]
# 分享路径
path = /home/pi/toshiba
available = yes
# 可以访问的用户
valid users = pi
# 不止读
read only = no
# 可被其他人看到资源名称
browsable = yes
public = no
# 可写
writable = yes
(4)添加samba共享用户名为pi并设置pi用户的密码
sudo smbpasswd -a mate
PS:注意samba用户名为mate时密码与树莓派mate用户密码最好保持一致
(5)重启samba服务
sudo /etc/init.d/smbd restart
#或
sudo systemctl restart smbd.service
7、SVN服务自启配置
SVN服务配置
配置SVN服务
开机启动指定SVN服务svnserver.service
[Unit]
Description=SVN service
After=network.target mount_toshiba.service

[Service]
Type=forking
WorkingDirectory=/home/pi/OneDriver/SVN
ExecStart=svnserve -d -r ./
TimeoutSec=0
RemainAfterExit=yes

[Install]
WantedBy=multi-user.target
注意:SysVStartPriority=99字段在新版systemctl中已经失效
开启自启
[mate@localhost ~]$ sudo systemctl enable svnserver.service
8、Syncthing同步服务
(1)命令行安装
(2)开启自启
[mate@localhost ~]$ sudo systemctl enable syncthing@username.service
二、开发环境配置
1、JDK
2、MySQL数据库
3、Redis数据库
4、Tomcat服务器
参考资料

若有收获,就点个赞吧
0 人点赞
