一、基础配置
更换国内源
新版本Ubuntu自动选择国内源,不需要更换
Fedora:
- 中国科学技术大学(推荐使用)(阿里源、腾讯源存在连不上的问题)
官方教程:http://mirrors.ustc.edu.cn/help/fedora.html
- 清华源
官方教程:https://mirrors.tuna.tsinghua.edu.cn/help/fedora/
设置root密码
使用命令:
[mate@mate-learn ~]$ sudo passwd root
即可输入密码
添加rpmfusion源
fedora系统
sudo dnf install https://download1.rpmfusion.org/free/fedora/rpmfusion-free-release-$(rpm -E %fedora).noarch.rpm
sudo dnf install https://download1.rpmfusion.org/nonfree/fedora/rpmfusion-nonfree-release-$(rpm -E %fedora).noarch.rpm
Ubuntu系统
窗口上面没有最大最小化按钮Gnome桌面美化
#旧版本40版本之前
sudo dnf install gnome-tweak-tool
#新版本(40版本之后,包括40)
sudo dnf install gnome-tweaks                #fedora
sudo apt install gnome-tweaks                #Ubuntu
打开相应的设置栏进行设置即可
首先要安装gnome-tweak-tool工具,用来配置Gnome桌面的详细参数。
安装完毕之后在程序菜单中就可以找到,这个软件名字叫做优化。现在你就可以开启最小化、最大化按钮,顺便启用一些自己喜欢的功能。
apt(apt-get)与dnf(yum)
apt 是debian系发行版系统的软件包管理工具,debian系包括debian、ubuntu、kail、deeping等;
dnf是红帽系发行版系统的软件包管理工具,红帽系包括centos,redhat、fedora等。
注意:有些安装包的命令可能因为版本更新等缘故,安装包的名字发生变化,可以在官网或论坛查询最新的安装包名称。
apkg与rpm
注意:软件包尽量使用apkg或rpm命令安装,因为GUI软件商店安装可能忽略一些错误和选项。
二、开发环境配置
Chrome安装
下载rpm安装包:https://www.google.cn/intl/zh-CN/chrome/
下载完成后直接点击安装。
VScode安装
Fedora:
官网教程:https://code.visualstudio.com/docs/setup/linux#_rhel-fedora-and-centos-based-distributions可以在官网下载rpm安装包
Ubuntu:
Remmina安装
可在应用商店中安装或命令
 sudo dnf -y install remmina        #fedora
 sudo apt -y install remmina        #ubuntu
Filezilla安装
ftp、sftp工具(可以不安装,使用系统的文件管理)
sudo dnf -y install filezilla #fedora
GCC、make等工具安装
Ubuntu下有一个开发工具集合build-essential,我们可以查看下它包括了那些程序
#查看依赖
mate@mate-NUC10:~$ sudo apt depends build-essential
build-essential
 |Depends: libc6-dev
  Depends: <libc-dev>
    libc6-dev
  Depends: gcc (>= 4:10.2)
  Depends: g++ (>= 4:10.2)
  Depends: make
    make-guile
  Depends: dpkg-dev (>= 1.17.11)

#安装
mate@mate-NUC10:~$ sudo apt install build-essential
Fedora需要每个程序单独安装。
idea安装(安装目录/opt)(先安装JDK)
(1)去官网下载JBR:https://www.jetbrains.com/idea/download/#section=linux
(2)创建,并解压到/opt/clion目录下
#创建文件夹
sudo mkdir /opt/clion

#便于后期更新程序,更改文件夹拥有者为桌面用户
sudo chown mate:mate /opt/clion

#加压程序文件,因为目标目录/opt/clion是mate拥有,所以不用家sudo
tar -xzvf clion安装包文件名 -C /opt/clion
(3)进入解压后的bin目录 ./idea.sh启动后,设置进入即可。
注意:启动成功后可以在设置里添加启动图标(版本2020.1)
当然也可以手动添加启动图标,如下
[Desktop Entry]
Name=IntelliJ IDEA
Comment=Code Editing. Redefined.
GenericName=Text Editor
Exec=/opt/idea-IU-203.7717.56/bin/idea.sh %F
Icon=/opt/idea-IU-203.7717.56/bin/idea.svg
Type=Application
StartupNotify=false
StartupWMClass=jetbrains-idea
Categories=Utility;TextEditor;Development;IDE;
MimeType=text/plain;inode/directory;application/x-code-workspace;
Actions=new-empty-window;
Keywords=IDEA;

[Desktop Action new-empty-window]
Name=New Empty Window
Exec=/opt/idea-IU-203.7717.56/bin/idea.sh %F
Icon=/opt/idea-IU-203.7717.56/bin/idea.svg
Eclipse安装(先安装JDK)
使用Eclipse的主要原因是它可以根据你配置的头文件,链接的动态库自动帮你生成makefile,做到可视化开发调试,然后可以直接在目标机器上make编译运行。
(1)通过官方installer程序安装(最好用这种方式)
安装:https://www.eclipse.org/downloads/packages/
注意:不要用root权限,否则会因为环境变问题找不到相关的lib
(2)通过Flatpak或snap安装
Flatpak is installed by default on Fedora Workstation, Fedora Silverblue, and Fedora Kinoite. To get started, all you need to do is enable Flathub, which is the best way to get Flatpak apps. Just download and install the https://flathub.org/repo/flathub.flatpakrepo
Now all you have to do is install some apps!
The above links should work on the default GNOME and KDE Fedora installations, but if they fail for some reason you can manually add the Flathub remote by running:
flatpak remote-add --if-not-exists flathub https://flathub.org/repo/flathub.flatpakrepo
添加过源后直接在商店中浏览与安装
因为沙箱的缘故,有时候系统的环境变量获取不到,同时软件运行效率相比直接安装有所下降。
(2)通过应用商店安装(通过命令一样)
版本可能旧一点(2020年7月安装时提供的是2019年9月)
直接在商店中安装Eclipse和插件JDT
注意:在商店安装插件后无法正常启动Eclipse,需要执行:
[mate@localhost ~]$ eclipse -clean
删除整个目录/eclipse/configuration/org.eclipse.update/,重启Eclipse
建议通过Eclipse软件安装插件,在应用商店安装的插件会让软件无法启动。
通过点击 Help 菜单上的 Install New Software 菜单项来安装插件: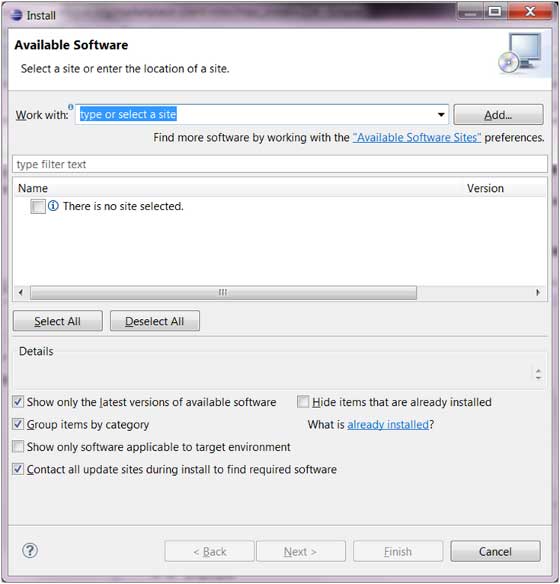
这种方式我们需要知道插件远程的安装地址,你可以通过点击 Add 按钮来提交 URL。
(3)通过官方的免安装压缩把(最新版)
下载网址:https://www.eclipse.org/downloads/
最新包对java(不是jdk)版本要求较高,我们可以开发用JDK1.8,支撑Eclipse运行用JDK(Java14)。
解压至目录(一般是/opt下)
[mate@fedora eclipse-cpp]$ cd eclipse/
[mate@fedora eclipse]$ ls
artifacts.xml  configuration  dropins  eclipse  eclipse.ini  features  icon.xpm  notice.html  p2  plugins  readme
[mate@fedora eclipse]$ pwd
/opt/eclipse-cpp/eclipse
启动图标
通过解压直接安装,不会创建菜单启动图标,需要自己手动添加,图标文件。
eclipse-cdt.desktop
[Desktop Entry]
Name=Eclipse CDT
Comment=Code Editing. Redefined.
GenericName=Text Editor
Exec=/opt/eclipse-cpp/eclipse/eclipse
Icon=/opt/eclipse-cpp/eclipse/icon.xpm
Type=Application
StartupNotify=false
Categories=Utility;TextEditor;Development;IDE;
MimeType=text/plain;inode/directory;application/x-code-workspace;
Actions=new-empty-window;
Keywords=ECLIPSE;

[Desktop Action new-empty-window]
Name=New Empty Window
Exec=/opt/eclipse-cpp/eclipse/eclipse
Icon=/opt/eclipse-cpp/eclipse/icon.xpm
将文件放在/usr/local/share/applications目录下。
(5)java路经问题
在应用商店安装Eclipse时会默认安装openjdk,但是openjdk稳定性不足,所以卸载了,安装oracle jdk。但是Eclipse启动时初始化的java路经还是在openjdk的路经,需要修改Eclipse的初始化文件
初始化文件位置
[mate@localhost eclipse]$ ls
artifacts.xml  dropins   eclipse      features  plugins  swt.jar
configuration  droplets  eclipse.ini  p2        readme
[mate@localhost eclipse]$ pwd
/usr/lib/eclipse
初始化文件内容
-protect
root
-startup
plugins/org.eclipse.equinox.launcher_1.5.701.v20200612-0706.jar
--launcher.library
plugins/org.eclipse.equinox.launcher.gtk.linux.x86_64_1.1.1200.v20200612-0706
--launcher.defaultAction
openFile
--launcher.appendVmargs
-vm
/usr/local/jdk/jdk-11.0.9/bin/java
-vmargs
-Dosgi.requiredJavaVersion=1.8
-Dosgi.dataAreaRequiresExplicitInit=true
-Xms512m
-Xmx1024m
--add-modules=ALL-SYSTEM
-Dorg.eclipse.swt.browser.UseWebKitGTK=true
-Dorg.eclipse.equinox.p2.reconciler.dropins.directory=/usr/share/eclipse/dropins
-Dp2.fragments=/usr/lib/eclipse/droplets,/usr/share/eclipse/droplets
-Declipse.p2.skipMovedInstallDetection=true
-Dosgi.resolver.usesMode=ignore
cmake安装
命令安装
sudo apt install cmake            #ubuntu
sudo dnf install cmake            #fedora
注意:嵌入式设备软件版本一般较旧,可以通过官网下载源码编译安装,这样可以保证各个设备的cmake版本一致,。
CMake是一个跨平台的安装(编译)工具,可以用简单的语句来描述所有平台的安装(编译过程)。他能够输出各种各样的makefile或者project文件,能测试编译器所支持的C++特性,类似UNIX下的automake。只是 CMake 的组态档取名为 CMakeLists.txt。Cmake 并不直接建构出最终的软件,而是产生标准的建构档(如 Unix 的 Makefile 或 Windows Visual C++ 的 projects/workspaces),然后再依一般的建构方式使用。
交叉编译器(嵌入式开发)
交叉编译器简介 在一种计算机环境中运行的编译程序,能编译出在另外一种环境下运行的代码。
所以注意交叉编译器要与嵌入式硬件匹配。根据项目开发环境需要,使用ZLG工控板提供的交叉编译器。
链接: https://pan.baidu.com/s/1lCD2qFseTI8J-lfdfn5ncA 提取码: kmsw
写了安装脚本
#!/bin/sh
# Program:
#   用与安装ARMlinux交叉编译器,以及设置相关环境变
# History:
# 2020/10/23 袁富林 添加环境变量时先检查源文件/etc/profile中有没有被修改,若为没有被修改,则复制备份文件进行修改
# Notice:
# 执行脚本时需要管理员权限
# 将arm-2011.03-41-arm-none-linux-gnueabi-i686-pc-linux-gnu.tar.bz2文件与脚本放在同一目录

#安装目录
DIRECTORY='/usr/local'
if [ ! -d $DIRECTORY ];
then
 mkdir $DIRECTORY
fi;

#解压文件到 DIRECTORY
sudo tar -xvf *arm-none-linux-gnueabi-i686-pc-linux-gnu.tar.bz2 -C $DIRECTORY &&

GCCHOME=$(dirname $DIRECTORY/arm*/bin)
GCCBIN=$GCCHOME/bin/

#修改环境变量
#修改/etc/profile
FIND_FILE='/etc/profile'
EDIT_FILE='profile'
FIND_STR='#ARM-Linux-GCC'

# 判断匹配函数,匹配函数不为0,则包含给定字符
if [ `grep -c "$FIND_STR" $FIND_FILE` -ne '0' ];then
    echo "$EDIT_FILE:The File Had edit!"
   else
    sudo cp $FIND_FILE /etc/profile.bak_`date +%Y%m%d%H%M%S` && sudo mv $FIND_FILE ./ &&

    echo  $FIND_STR  >> profile  &&
    echo 'export PATH=$PATH':$GCCBIN >> profile  &&                    # PATH是已存在变量,不使用export也是可以的
    echo 'echo: profile has eidit!'
    #重新加载profile
    sudo mv ./profile /etc/
    source /etc/profile
    echo $USER 'echo: /etc/profile has sourced!'

fi
安装32位的兼容库
如果前面的操作都能得到正确的现象,那么就该为自己庆祝一下了,因为交叉编译器已经安装完毕并且能够正确工作了。然而事情总有例外,很有可能在终端输入arm-none-linux-gnueabi-gcc命令后,得到的却是下面的结果:
-bash: ./arm-none-linux-gnueabi-gcc: No such file or directory
此时请确认:
在系统的某个目录下确实存在arm-none-linux-gnueabi-gcc文件;
在终端输入arm-none-linux-gnueabi-,按TAB键,能找到arm-none-linux-gnueabi-*系列命令。
如果以上两项经过检查都确认无误,那么就很有可能是由于系统与软件的预期架构不匹配所导致的。这种现象主要发生在运行64位操作系统的机器上,原因在于大多数交叉编译器为了适应性考虑,通常以32位形式发布软件,而用户实际的操作系统却是64位的,存在架构差异,所以不能执行。
解决办法很简单,安装32位的兼容库就好了。
在Fedora上的安装命令
[mate@DESKTOP-TT5APIG ~]$ sudo dnf install  glibc.i686
Last metadata expiration check: 2:08:33 ago on Fri 23 Oct 2020 08:18:57 AM CST.
Dependencies resolved.
================================================================================
 Package         Architecture  Version                   Repository        Size
================================================================================
Installing:
 glibc           i686          2.31-4.fc32               updates          3.3 M
Installing dependencies:
 libgcc          i686          10.2.1-5.fc32             updates          106 k

Transaction Summary
================================================================================
Install  2 Packages

Total download size: 3.4 M
Installed size: 15 M
Is this ok [y/N]: y
Downloading Packages:
(1/2): libgcc-10.2.1-5.fc32.i686.rpm            154 kB/s | 106 kB     00:00
(2/2): glibc-2.31-4.fc32.i686.rpm               462 kB/s | 3.3 MB     00:07
在Ubuntu主机上的安装命令:
vmuser@linux-compiler ~$sudo apt-get install lib32z1
Package ia32-libs is not available, but is referred to by another package.
This may mean that the package is missing, has been obsoleted, or
is only available from another source
However the following packages replace it:
  lib32z1
串口工具minicom
Ubuntu
mate@mate-ThinkPad:~$ sudo apt install minicom
- minicom配置
```bash
[mate@localhost ~]$ sudo minicom -s


            +-----[configuration]------+
            | Filenames and paths      |
            | File transfer protocols  |
            | Serial port setup        |
            | Modem and dialing        |
            | Screen and keyboard      |
            | Save setup as dfl        |
            | Save setup as..          |
            | Exit                     |
            | Exit from Minicom        |
            +--------------------------+
##对于计算机来说我们一般使用USB转串口,所以我们的默认串口设备为/dev/ttyUSB0,波特率根据连接的设备进行配置

配置过程[Serial port setup] >>>
    +-----------------------------------------------------------------------+
    | A -    Serial Device      : /dev/ttyUSB0                              |
    |                                                                       |
    | C -   Callin Program      :                                           |
    | D -  Callout Program      :                                           |
    | E -    Bps/Par/Bits       : 115200 8N1                                |
    | F - Hardware Flow Control : Yes                                       |
    | G - Software Flow Control : No                                        |
    |                                                                       |
    |    Change which setting?                                              |
    +-----------------------------------------------------------------------+
根据每行项的字符提示A C D E F G
A- [Serial Device]            : /dev/ttyUSB0
E- [Bps/Par/Bits ]            : 115200 8N1
按[Enter]确定设置,[Esc]放弃更改

最后光标移动到[Save setup as dfl],按[Enter]确定选项,保存配置
JDK8安装(不开发JAVA可以不安装)
MySQL服务器和开发环境
安装mysql-workbench可视化工具
sudo dnf install mysql-workbench-community        #fedora
sudo apt install mysql-workbench-community        #ubuntu
注:尽量安装社区版的,直接安装mysql-workbench可能会提示不兼容
Redis数据库
关于linux下程序寻找动态库路径
- 编译生成时,指定的搜索路径。
在makefile中,一般使用”-Wl -rpath”来指明程序运行时到哪个路径去找库。当指定多个动态库搜索路径时,路径之间用冒号隔开,不能有空格。
- 环境变量LD_LIBRARY_PATH中指定的路径。
可以使用 echo LD_LIBRARY_PATH查看。一般初始时/lib和/user/lib库包含在里面。用户可以往里面添加。
- /etc/ld.so.cache中缓存的路径。
/etc/ld.so.conf的第一行有一个引用命令:include ld.so.conf.d/*.conf, 所以可以通过修改/etc/ls.so.conf这个配置文件来增删路径,也可以增加一个.conf文件来配置特有的动态库路径。直接将寻库路径加进来即可,保存后需要运行一下ldconfig重载一下。
- 默认的/lib/和/usr/lib。
这两个路径是系统最初就添加在LD_LIBRARY_PATH中,所以将库移动到这里亦可以寻找到。
- 若还是会出现error while loading shared libraries: libhiredis.so.0.10: cannot open shared object file: No such file or directory 是动态库的问题,是系统找不到这个动态库,此时记住sudo /sbin/ldconfig下,更新一下系统动态库配置
- include
[mate@localhost ~]$ `gcc -print-prog-name=cc1plus` -v
ignoring nonexistent directory "/usr/lib/gcc/x86_64-redhat-linux/10/include-fixed"
ignoring nonexistent directory "/usr/lib/gcc/x86_64-redhat-linux/10/../../../../x86_64-redhat-linux/include"
#include "..." search starts here:
#include <...> search starts here:
/usr/lib/gcc/x86_64-redhat-linux/10/../../../../include/c++/10
/usr/lib/gcc/x86_64-redhat-linux/10/../../../../include/c++/10/x86_64-redhat-linux
/usr/lib/gcc/x86_64-redhat-linux/10/../../../../include/c++/10/backward
/usr/lib/gcc/x86_64-redhat-linux/10/include
/usr/local/include
/usr/include
End of search list.
三、常用软件配置
应用图标管理
.desktop文件存放路径
/usr/share/applications
/usr/local/share/applications
~/.local/share/applications/
很多时候,我们的软件是通过github项目或者解压zip tar包等获取的,系统是搜不到这个应用的,设置没有启动图标,每次都需要启动安装目录的运行文件./XXX
非常不方便,但我们是可以自行创建一个桌面启动器的,并能够在系统应用搜索中被发现的。
第一步:使用文本编译器创建XXX.desktop文件;也可以复制一个类似程序的.desktop文件,进行路径的简单修改
XXX.desktop
第二步:编辑XXX.desktop文件,上面的命令会打开该文件,如果没有则会创建一个空文件,添加如下信息。
[Desktop Entry]
Encoding=UTF-8
# Name :指定快捷方式名称。
Name=XXX
Comment=XXX Link
# Exec :应用程序可执行文件的绝对路径
Exec=/opt/XXX
# Icon :图标的绝对路径
Icon=/opt/XXXtest/XXX.png
#Terminal :指定 是否在终端窗口中运行。 true,则在终端窗口中运行。一般false
Terminal=false
StartupNotify=true
# Type : 指定菜单项的类型。 此值应为以下选项之一:
# Application: 对于启动应用程序的菜单项,应输入此选项。
# Link: 对于链接到文件、文件夹或 FTP 站点的菜单项,应输入此选项Application。
Type=Application
# 主要用于菜单展示归类
Categories=Application;Development;
第三步:在当前目录打开终端,执行以下命令:
#给予完全权限,包括读写权限,快捷图标才能运行可运行程序
chmod 777 XXX.desktop
尽量不要去安装NVIDIA显卡驱动
原因:
- 通过商店安装的Nvidia驱动在Security boot启动下不能加载进内核
- 通过安装包安装操作过程麻烦
VLC播放器安装(可去官网查看教程)
官方教程:https://www.videolan.org/vlc/#download
Fedora 22 and later (dnf)
Use RPM Fusion for Fedora (available for x86, x86_64, armhfp)
Install rpmfusion-free-release-stable.noarch.rpm for currently maintained fedora.
sudo dnf install https://download1.rpmfusion.org/free/fedora/rpmfusion-free-release-$(rpm -E %fedora).noarch.rpm
sudo dnf install https://download1.rpmfusion.org/nonfree/fedora/rpmfusion-nonfree-release-$(rpm -E %fedora).noarch.rpm
sudo dnf install vlc
dnf install python-vlc (optional)
百度网盘安装
注意:官网说明软件是针对中标麒麟开发的,其实就是cenos,由于centos较fedora系统内核版本较老,故需要将较老的动态库复制到百度网盘的安装目录下。(已把相关文件打包)
Syncthing文件同步
官方网站:https://syncthing.net/
可以使用命令行安装
[mate@localhost ~]$ sudo dnf install syncthing
SVN文件版本控制
Gnome只需安装rabbitvcs-cli、 rabbitvcs-nautilus
rabbitvcs-thunar-0.18-2.fc33.noarch 不需要安装:Thunar是运行于搭载X11的GNU/Linux和类UNIX平台上的文件管理器。Thunar主要使用GTK+2编写,是XFCE中默认文件管理器。快速方便,具有Nautilus全部特性,但是依赖少得多 。
Thunar使用截图(4张)
Fedora
//GUI客户端
[mate@localhost ~]$  sudo dnf install rabbitvcs-cli rabbitvcs-nautilus
Ubuntu
mate@mate-ThinkPad:~$ sudo apt install rabbitvcs-cli rabbitvcs-nautilus
注:安装完后需要重新启动,才能在文件夹中出现rabbitvcs
添加中文字体
由于版权问题,在默认的情况下,Linux 下缺乏常见中文字体(如楷体、宋体、黑体等),Libreoffice使用的字体来自系统/usr/share/fonts下的字体,这样就导致Libreoffice打开中文文档时,字体不对; 或使用Libreoffice找不到中文字体。
常用字体与安装脚本:
添加常用的office字体
拷贝或下载windows系统的Fonts字体集到对应的linux系统下;
a、进入windows系统,到C:\Windows\Fonts目录,复制拷贝自己需要的字体(也可以全部拷贝,包含windows支持的所有中文字体);
常用字体
[mate@localhost fonts]$ ls -l
total 88888
-rwxrwxrwx. 1 mate mate 16829116 Dec  7  2019 msyhbd.ttc            #微软雅黑粗
-rwxrwxrwx. 1 mate mate 19647736 Dec  7  2019 msyh.ttc                #微软雅
-rwxrwxrwx. 1 mate mate 10578152 Oct 15  2019 simfang.ttf     #仿宋
-rwxrwxrwx. 1 mate mate  9753388 Oct 15  2019 simhei.ttf            #黑体
-rwxrwxrwx. 1 mate mate 11787328 Oct 15  2019 simkai.ttf            #楷体
-rwxrwxrwx. 1 mate mate 18214472 Dec  7  2019 simsun.ttc            #宋体
-rwxrwxrwx. 1 mate mate  1175904 Dec  7  2019 timesbd.ttf            #新罗加粗
-rwxrwxrwx. 1 mate mate   881860 Dec  7  2019 timesbi.ttf
-rwxrwxrwx. 1 mate mate   940288 Dec  7  2019 timesi.ttf
-rwxrwxrwx. 1 mate mate  1195688 Dec  7  2019 times.ttf                #新罗马
b、将需要的字体文件拷贝到libreoffice的配置文件路径 ~/.config/libreoffice/4/user/fonts下。如果没有fonts目录新建即可。
c、重启libreoffice
添加系统中文字体
如果将字体cp进/usr/share/fonts,整个系统就可以使用字体。
但是Eclipse显示的中文宋体实在难看,所以就只放进libeoffie中。尝试后发现微软雅黑字体在系统中显示效果最好故在系统字体目录/usr/share/fonts中新建一个个人字体文件夹,Fonts,在文件夹中放入雅黑字体
[mate@localhost Fonts]$ pwd
/usr/share/fonts/Fonts
[mate@localhost Fonts]$ ls
msyhbd.ttc  msyh.ttc

若有收获,就点个赞吧
0 人点赞
