粒子(Particles)
基础
在本章中,我们将添加粒子效果到游戏引擎中。有了这种效果,我们就能模拟关系、火、灰尘和云。这是一种简单的效果,将改善对任何游戏的图形方面。
在此之前值得一提的是,有很多方法可以实现不同效果的粒子效果。当前情况下,我们将使用面板粒子(Billboard Particle)。该技术使用移动的纹理四边形来表示一个粒子,它们总是面向观察者,在本例中,就是摄像机。你还可以使用面板技术在游戏项上显示信息面板,比如迷你HUD。
让我们开始定义粒子,粒子可以通过以下属性定义:
- 一个用于表示四边形顶点的网格。
- 一张纹理。
- 某一时刻的坐标。
- 缩放系数。
- 速度。
- 移动方向。
- 生存时间或存活时间。一旦该时间过去,粒子就不再存在。
前四项是GameItem类的一部分,但后三项不是。因此,我们要创建一个名为Particle的新类,它继承了GameItem类,其定义如下:
package org.lwjglb.engine.graph.particles;import org.joml.Vector3f;import org.lwjglb.engine.graph.Mesh;import org.lwjglb.engine.items.GameItem;public class Particle extends GameItem {private Vector3f speed;/*** 粒子存活的时间,以毫秒为单位*/private long ttl;public Particle(Mesh mesh, Vector3f speed, long ttl) {super(mesh);this.speed = new Vector3f(speed);this.ttl = ttl;}public Particle(Particle baseParticle) {super(baseParticle.getMesh());Vector3f aux = baseParticle.getPosition();setPosition(aux.x, aux.y, aux.z);aux = baseParticle.getRotation();setRotation(aux.x, aux.y, aux.z);setScale(baseParticle.getScale());this.speed = new Vector3f(baseParticle.speed);this.ttl = baseParticle.geTtl();}public Vector3f getSpeed() {return speed;}public void setSpeed(Vector3f speed) {this.speed = speed;}public long geTtl() {return ttl;}public void setTtl(long ttl) {this.ttl = ttl;}/*** 更新粒子的存活时间* @param elapsedTime 经过的时间(毫秒)* @return 粒子的存活时间*/public long updateTtl(long elapsedTime) {this.ttl -= elapsedTime;return this.ttl;}}
从上述代码可以看出,粒子的速度和运动方向可以表示为一个向量。该向量的方向决定了粒子的运动方向和速度。粒子存活时间(TTL)被设定为毫秒计数器,每当更新游戏状态时,它都会减少。该类还有一个复制构造函数,也就是说,一个构造函数接收另一个粒子实例来进行复制。
现在,我们需要创建一个粒子生成器或粒子发射器,即一个动态生成粒子、控制其生命周期并根据特定的模式更新其位置的类。我们可以创建很多实现,它们在粒子的创建方式和位置的更新方式(例如,是否考虑重力)方面各不相同。因此,为了保持游戏引擎的通用性,我们将创建一个所有粒子发射器必须要实现的接口。这个名为IParticleEmitter的接口定义如下:
package org.lwjglb.engine.graph.particles;import java.util.List;import org.lwjglb.engine.items.GameItem;public interface IParticleEmitter {void cleanup();Particle getBaseParticle();List<GameItem> getParticles();}
IParticleEmitter接口有一个清理资源的方法,名为cleanup,还有一个获取粒子列表的方法,名为getParticles。还有一个名为getBaseParticle的方法,但是这个方法是做什么的呢?一个粒子发射器将动态地产生许多例子。每当一个粒子过期,就会创建新的粒子。该粒子更新周期将使用基础粒子作为模板创建新的势力。这就是基础粒子的用途,这也是为什么Particle类定义了一个复制构造函数。
在游戏引擎的代码中,我们将只引用IParticleEmitter接口,因此基础代码将不依赖于特定的实现。不过,我们可以创建一个实现来模拟不受重力影响的粒子流。这个实现可以用来模拟光线或火焰,名为FlowParticleEmitter。
这个类的行为可以通过以下属性进行调整:
- 一次能存在的最大粒子数量
- 创建粒子的最短周期。粒子将在最短的时间内一个接一个地创建,以避免粒子爆发性创建。
- 一组范围,以随机粒子速度和位置。新粒子将使用基础粒子的位置和速度,可以在相应范围内取值,以分散光线。
该类的实现如下:
package org.lwjglb.engine.graph.particles;import java.util.ArrayList;import java.util.Iterator;import java.util.List;import org.joml.Vector3f;import org.lwjglb.engine.items.GameItem;public class FlowParticleEmitter implements IParticleEmitter {private int maxParticles;private boolean active;private final List<GameItem> particles;private final Particle baseParticle;private long creationPeriodMillis;private long lastCreationTime;private float speedRndRange;private float positionRndRange;private float scaleRndRange;public FlowParticleEmitter(Particle baseParticle, int maxParticles, long creationPeriodMillis) {particles = new ArrayList<>();this.baseParticle = baseParticle;this.maxParticles = maxParticles;this.active = false;this.lastCreationTime = 0;this.creationPeriodMillis = creationPeriodMillis;}@Overridepublic Particle getBaseParticle() {return baseParticle;}public long getCreationPeriodMillis() {return creationPeriodMillis;}public int getMaxParticles() {return maxParticles;}@Overridepublic List<GameItem> getParticles() {return particles;}public float getPositionRndRange() {return positionRndRange;}public float getScaleRndRange() {return scaleRndRange;}public float getSpeedRndRange() {return speedRndRange;}public void setCreationPeriodMillis(long creationPeriodMillis) {this.creationPeriodMillis = creationPeriodMillis;}public void setMaxParticles(int maxParticles) {this.maxParticles = maxParticles;}public void setPositionRndRange(float positionRndRange) {this.positionRndRange = positionRndRange;}public void setScaleRndRange(float scaleRndRange) {this.scaleRndRange = scaleRndRange;}public boolean isActive() {return active;}public void setActive(boolean active) {this.active = active;}public void setSpeedRndRange(float speedRndRange) {this.speedRndRange = speedRndRange;}public void update(long ellapsedTime) {long now = System.currentTimeMillis();if (lastCreationTime == 0) {lastCreationTime = now;}Iterator<? extends GameItem> it = particles.iterator();while (it.hasNext()) {Particle particle = (Particle) it.next();if (particle.updateTtl(ellapsedTime) < 0) {it.remove();} else {updatePosition(particle, ellapsedTime);}}int length = this.getParticles().size();if (now - lastCreationTime >= this.creationPeriodMillis && length < maxParticles) {createParticle();this.lastCreationTime = now;}}private void createParticle() {Particle particle = new Particle(this.getBaseParticle());// 添加一些随机的粒子float sign = Math.random() > 0.5d ? -1.0f : 1.0f;float speedInc = sign * (float)Math.random() * this.speedRndRange;float posInc = sign * (float)Math.random() * this.positionRndRange;float scaleInc = sign * (float)Math.random() * this.scaleRndRange;particle.getPosition().add(posInc, posInc, posInc);particle.getSpeed().add(speedInc, speedInc, speedInc);particle.setScale(particle.getScale() + scaleInc);particles.add(particle);}/*** 更新一个粒子的位置* @param particle 需要更新的粒子* @param elapsedTime 已经过的时间(毫秒)*/public void updatePosition(Particle particle, long elapsedTime) {Vector3f speed = particle.getSpeed();float delta = elapsedTime / 1000.0f;float dx = speed.x * delta;float dy = speed.y * delta;float dz = speed.z * delta;Vector3f pos = particle.getPosition();particle.setPosition(pos.x + dx, pos.y + dy, pos.z + dz);}@Overridepublic void cleanup() {for (GameItem particle : getParticles()) {particle.cleanup();}}}
现在,我们可以拓展Scene类中包含的数据,使其包含一个ParticleEmitter的实例数组。
package org.lwjglb.engine;// 这是导入……public class Scene {// 这有更多属性……private IParticleEmitter[] particleEmitters;
在该阶段,我们可以开始渲染粒子。粒子不会受到光的影响,也不会产生任何音乐。它们不会有任何骨骼动画,所以用特定的着色器渲染它们是没有意义的。着色器非常简单,它们只会使用投影和模型观察矩阵渲染顶点,并使用纹理设置颜色。
顶点着色器的定义如下:
#version 330layout (location=0) in vec3 position;layout (location=1) in vec2 texCoord;layout (location=2) in vec3 vertexNormal;out vec2 outTexCoord;uniform mat4 modelViewMatrix;uniform mat4 projectionMatrix;void main(){gl_Position = projectionMatrix * modelViewMatrix * vec4(position, 1.0);outTexCoord = texCoord;}
片元着色器的定义如下:
#version 330in vec2 outTexCoord;in vec3 mvPos;out vec4 fragColor;uniform sampler2D texture_sampler;void main(){fragColor = texture(texture_sampler, outTexCoord);}
如你所见,它们非常简单,就像渲染一章中使用的着色器。现在,和其他章节一样,我们需要在Renderer类中设置和使用这些着色器。着色器的设置将在一个名为setupParticlesShader的方法中完成,其定义如下:
private void setupParticlesShader() throws Exception {particlesShaderProgram = new ShaderProgram();particlesShaderProgram.createVertexShader(Utils.loadResource("/shaders/particles_vertex.vs"));particlesShaderProgram.createFragmentShader(Utils.loadResource("/shaders/particles_fragment.fs"));particlesShaderProgram.link();particlesShaderProgram.createUniform("projectionMatrix");particlesShaderProgram.createUniform("modelViewMatrix");particlesShaderProgram.createUniform("texture_sampler");}
现在我们可以在Renderer类中创建渲染方法renderParticles,定义如下:
private void renderParticles(Window window, Camera camera, Scene scene) {particlesShaderProgram.bind();particlesShaderProgram.setUniform("texture_sampler", 0);Matrix4f projectionMatrix = transformation.getProjectionMatrix();particlesShaderProgram.setUniform("projectionMatrix", projectionMatrix);Matrix4f viewMatrix = transformation.getViewMatrix();IParticleEmitter[] emitters = scene.getParticleEmitters();int numEmitters = emitters != null ? emitters.length : 0;for (int i = 0; i < numEmitters; i++) {IParticleEmitter emitter = emitters[i];Mesh mesh = emitter.getBaseParticle().getMesh();mesh.renderList((emitter.getParticles()), (GameItem gameItem) -> {Matrix4f modelViewMatrix = transformation.buildModelViewMatrix(gameItem, viewMatrix);particlesShaderProgram.setUniform("modelViewMatrix", modelViewMatrix);});}particlesShaderProgram.unbind();}
如果你努力阅读,上述代码应该是不言自明的,它只是设置必要的Uniform,并渲染每个粒子。现在,我们已经创建了测试粒子效果实现所需的所有方法,只需要修改DummyGame类,我们就可以创建粒子发射器和基本粒子的特性。
Vector3f particleSpeed = new Vector3f(0, 1, 0);particleSpeed.mul(2.5f);long ttl = 4000;int maxParticles = 200;long creationPeriodMillis = 300;float range = 0.2f;float scale = 0.5f;Mesh partMesh = OBJLoader.loadMesh("/models/particle.obj");Texture texture = new Texture("/textures/particle_tmp.png");Material partMaterial = new Material(texture, reflectance);partMesh.setMaterial(partMaterial);Particle particle = new Particle(partMesh, particleSpeed, ttl);particle.setScale(scale);particleEmitter = new FlowParticleEmitter(particle, maxParticles, creationPeriodMillis);particleEmitter.setActive(true);particleEmitter.setPositionRndRange(range);particleEmitter.setSpeedRndRange(range);this.scene.setParticleEmitters(new FlowParticleEmitter[] {particleEmitter});
我们现在使用一个普通填充圆作为粒子的纹理,以便更好地理解发生了什么。如果你运行它,你会看到如下所示的东西:
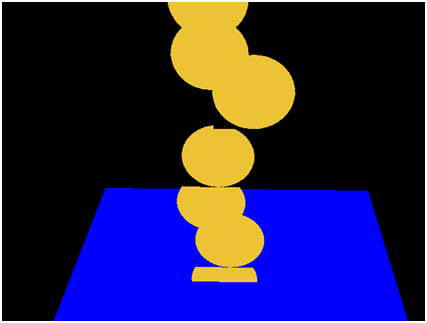
为什么一些粒子似乎被切断了?为什么透明的背景不能解决这个问题?原因是深度测试。粒子的一些片元被丢弃,因为它们具有比该区域的深度缓冲的当前值高的深度值。我们可以通过将其与摄像机之间的距离来排序粒子以解决这个问题,或者我们可以禁用深度写入。
在绘制粒子之前我们需要插入这一行代码:
glDepthMask(false);
然后在我们完成渲染之后还原为先前值:
glDepthMask(true);
然后我们会得到如下所示的东西:

好了,问题解决。然而,我们仍想应用另一种效果,我们希望颜色被混合,因此颜色将被添加,以达成更好的效果。这是在渲染前增加如下一行代码来实现的:
glBlendFunc(GL_SRC_ALPHA, GL_ONE);
与深度的情况一样,渲染完所有粒子后,我们将混合函数恢复为:
glBlendFunc(GL_SRC_ALPHA, GL_ONE_MINUS_SRC_ALPHA);
现在我们得到这样的效果:

但我们还没有完成它。如果你把摄像机移到蓝色正方形的上方往下看,你可能会得到这样的东西:
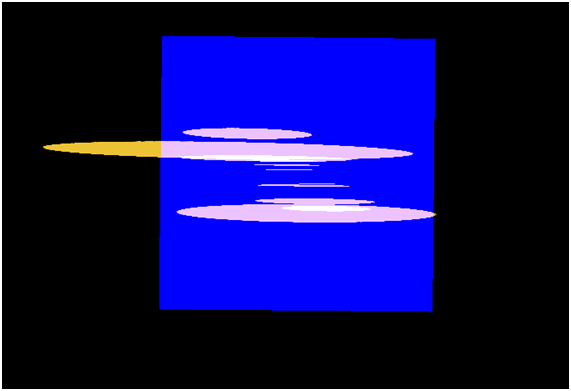
这些粒子看起来不太好,它们应该是圆的,但现在看起来像一张纸。在此之上,我们应该应用面板技术。用于渲染粒子的四边形应该始终面向摄像机,与摄像机方向完全垂直,就好像根本没有旋转一样。摄像机的矩阵将位移和旋转应用于场景中的每一个对象,我们想跳过将要应用的旋转。
警告:在讲数学知识时,如果你觉得不舒服,你可以跳过它。让我们再次回顾那个观察矩阵。该矩阵可以像这样表示(没有应用任何缩放)。
$ \begin{bmatrix} \color{red}{r{00}} & \color{red}{r{10}} & \color{red}{r{20}} & \color{blue}{dx} \ \color{red}{r{01}} & \color{red}{r{11}} & \color{red}{r{21}} & \color{blue}{dy} \ \color{red}{r{02}} & \color{red}{r{12}} & \color{red}{r_{22}} & \color{blue}{dz} \ 0 & 0 & 0 & 1 \end{bmatrix} $
红色的元素代表摄像机的旋转,蓝色的元素代表位移。我们需要取消观察矩阵中的左上角3x3矩阵的旋转效果,所以它会变成这样:
$ \begin{bmatrix} \color{red}{1} & \color{red}{0} & \color{red}{0} & \color{blue}{dx} \ \color{red}{0} & \color{red}{1} & \color{red}{0} & \color{blue}{dy} \ \color{red}{0} & \color{red}{0} & \color{red}{1} & \color{blue}{dz} \ 0 & 0 & 0 & 1 \end{bmatrix} $
在左上角的红色部分,我们有一个3x3矩阵,把它命名为$M{r}$并且我们想把它转换成单位矩阵:$I$。任何矩阵乘以它的逆矩阵都会得到单位矩阵:$M{r} \times M{r}^{-1} = I$。我们只需要从观察矩阵中取左上角的3x3矩阵,然后乘以它的逆矩阵,但是还可以优化他。一个旋转矩阵有一个有趣的定理,它的逆矩阵与其转置矩阵相等。即:$M{r} \times M{r}^{-1} = M{r} \times M_{r}^{T} = I$。转置矩阵比逆矩阵更容易计算。矩阵的转置就像将其反转过来,将每一列与每一行替换。
$ \begin{bmatrix} r{00} & r{10} & r{20} \ r{01} & r{11} & r{21} \ r{02} & r{12} & r{22} \end{bmatrix}^{T} = \begin{bmatrix} r{00} & r{01} & r{02} \ r{10} & r{11} & r{12} \ r{20} & r{21} & r{22} \end{bmatrix} $
好的,让我们总结一下。我们有该变换:$V \times M$,其中$V$是观察矩阵,$M$是模型矩阵。我们可以这样表达:
$ \begin{bmatrix} \color{red}{v{00}} & \color{red}{v{10}} & \color{red}{v{20}} & v{30} \ \color{red}{v{01}} & \color{red}{v{11}} & \color{red}{v{21}} & v{31} \ \color{red}{v{02}} & \color{red}{v{12}} & \color{red}{v{22}} & v{32} \ v{03} & v{13} & v{23} & v{33} \end{bmatrix} \times \begin{bmatrix} \color{red}{m{00}} & \color{red}{m{10}} & \color{red}{m{20}} & m{30} \ \color{red}{m{01}} & \color{red}{m{11}} & \color{red}{m{21}} & m{31} \ \color{red}{m{02}} & \color{red}{m{12}} & \color{red}{m{22}} & m{32} \ m{03} & m{13} & m{23} & m{33} \end{bmatrix} $
我们想要取消观察矩阵的旋转,得到这样的结果:
$ \begin{bmatrix} \color{red}{1} & \color{red}{0} & \color{red}{0} & mv{30} \ \color{red}{0} & \color{red}{1} & \color{red}{0} & mv{31} \ \color{red}{0} & \color{red}{0} & \color{red}{1} & mv{32} \ mv{03} & mv{13} & mv{23} & mv_{33} \end{bmatrix} $
所以我们只需要将模型矩阵的左上3x3矩阵设为观察矩阵上3x3部分的转置矩阵。
$ \begin{bmatrix} \color{red}{v{00}} & \color{red}{v{10}} & \color{red}{v{20}} & v{30} \ \color{red}{v{01}} & \color{red}{v{11}} & \color{red}{v{21}} & v{31} \ \color{red}{v{02}} & \color{red}{v{12}} & \color{red}{v{22}} & v{32} \ v{03} & v{13} & v{23} & v{33} \end{bmatrix} \times \begin{bmatrix} \color{red}{v{00}} & \color{red}{v{01}} & \color{red}{v{02}} & m{30} \ \color{red}{v{10}} & \color{red}{v{11}} & \color{red}{v{12}} & m{31} \ \color{red}{v{20}} & \color{red}{v{21}} & \color{red}{v{22}} & m{32} \ m{03} & m{13} & m{23} & m{33} \end{bmatrix} $
但在这之后,我们去掉了缩放,实际上真正想要达到的结果是这样:
$\begin{bmatrix} \color{red}{sx} & \color{red}{0} & \color{red}{0} & mv{30} \ \color{red}{0} & \color{red}{sy} & \color{red}{0} & mv{31} \ \color{red}{0} & \color{red}{0} & \color{red}{sz} & mv{32} \ mv{03} & mv{13} & mv{23} & mv_{33} \end{bmatrix}$
其中sx,sy和sz就是缩放系数。因此,当我们将模型矩阵的左上3x3矩阵设置为观察矩阵的转置矩阵后,我们需要再次应用缩放。
就这些,我们只需要在renderParticlesMethod中像这样修改:
for (int i = 0; i < numEmitters; i++) {IParticleEmitter emitter = emitters[i];Mesh mesh = emitter.getBaseParticle().getMesh();mesh.renderList((emitter.getParticles()), (GameItem gameItem) -> {Matrix4f modelMatrix = transformation.buildModelMatrix(gameItem);viewMatrix.transpose3x3(modelMatrix);Matrix4f modelViewMatrix = transformation.buildModelViewMatrix(modelMatrix, viewMatrix);modelViewMatrix.scale(gameItem.getScale());particlesShaderProgram.setUniform("modelViewMatrix", modelViewMatrix);});}
我们还在Transformation类中添加了另一种方法,使用两个矩阵来构造模型观察矩阵,而不是使用GameItem和观察矩阵。
有了如上更改,当从上方观察粒子时,我们就得到如下结果:

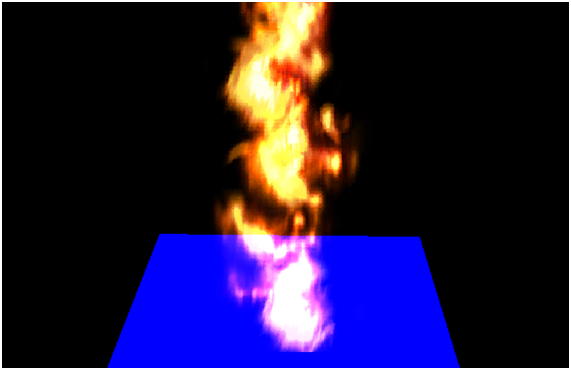
现在集齐了创建一个更真实的粒子效果所需要的所有要素,所以让我们将其改为更精细的纹理。我们将使用如下图片(它是由GIMP创作的,带有光照和阴影过滤器):

有了如上纹理,我们会得到如下所示的粒子:
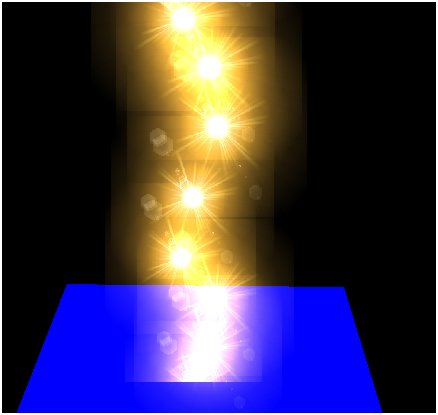
现在更好了!你可能会注意到我们需要调整缩放,因为粒子现在总是对着摄像机,显示的面积总是最大的。
最后,再提一点,为了得到可以在任何场景使用的完美的效果,你需要实现粒子排序和启用深度缓冲区。无论如何,这里有一个示例可以将这种效果囊括到你的游戏中。
纹理集(Texture Atlas)
现在我们已经做好了粒子效果的基础建设,现在可以为它添加一些动画效果了。为了实现它,我们将支持纹理集。纹理集(Texture Atlas)是一个包含所有将要使用的纹理的大型图片。使用纹理集,我们就只需要加载一个大的图片,然后再绘制游戏项时,选择该图像的一部分作为纹理。例如,当我们想用不同的纹理多次渲染相同的模型时(例如树或岩石),可以使用这种技术。我们可以使用相同的纹理集并选择适当的坐标,而不是使用很多纹理实例并在它们之间切换(记住,切换状态总是很慢的)。
在此情况下,我们将使用纹理坐标来添加粒子动画。我们遍历不同的纹理来为粒子动画建模,所有这些纹理将被分到一个像这样的纹理集:
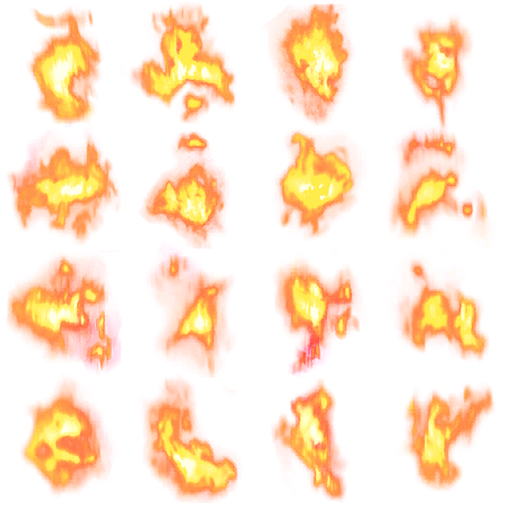
纹理集可以被划分为多个方形片段。我们将一个方形片段坐标分配到一个粒子上,并随着时间推移改变它以表示动画。让我们开始吧。我们要做的第一件事是修改Texture类来指定纹理集可以拥有的行数和列数。
package org.lwjglb.engine.graph;// .. 这里是导入public class Texture {// 无关属性省略private int numRows = 1;private int numCols = 1;// 无关代码省略public Texture(String fileName, int numCols, int numRows) throws Exception {this(fileName);this.numCols = numCols;this.numRows = numRows;}
默认情况下,我们处理的纹理的列数和行数等于1。我们还添加了另一个构造函数来指定行和列。
然后,我们需要追踪一个GameItem在纹理集中的坐标,因此只需向该类添加另一个属性,默认值为0。
package org.lwjglb.engine.items;import org.joml.Vector3f;import org.lwjglb.engine.graph.Mesh;public class GameItem {// 更多属性省略private int textPos;
然后我们修改Particle类,以便能够通过纹理集自动迭代。
package org.lwjglb.engine.graph.particles;import org.joml.Vector3f;import org.lwjglb.engine.graph.Mesh;import org.lwjglb.engine.graph.Texture;import org.lwjglb.engine.items.GameItem;public class Particle extends GameItem {private long updateTextureMillis;private long currentAnimTimeMillis;
属性updateTextureMillis定义移动到纹理集中下一个坐标的时间(以毫秒为单位)。数值月底,粒子在纹理上变化的速度就越快。属性currentAnimTimeMillis只是跟踪纹理持续当前纹理坐标的时间。
因此,我们需要修改Particle类构造函数来设置这些值。我们还计算了纹理集的片段数量,它是由属性animFrames定义的。
public Particle(Mesh mesh, Vector3f speed, long ttl, long updateTextureMillis) {super(mesh);this.speed = new Vector3f(speed);this.ttl = ttl;this.updateTextureMills = updateTextureMills;this.currentAnimTimeMillis = 0;Texture texture = this.getMesh().getMaterial().getTexture();this.animFrames = texture.getNumCols() * texture.getNumRows();}
现在,我们只需要修改检查粒子是否已经过期的方法,来检查是否需要更新纹理坐标。
public long updateTtl(long elapsedTime) {this.ttl -= elapsedTime;this.currentAnimTimeMillis += elapsedTime;if ( this.currentAnimTimeMillis >= this.getUpdateTextureMillis() && this.animFrames > 0 ) {this.currentAnimTimeMillis = 0;int pos = this.getTextPos();pos++;if ( pos < this.animFrames ) {this.setTextPos(pos);} else {this.setTextPos(0);}}return this.ttl;}
除此之外,我们还修改了FlowRangeEmitter类,在应该改变粒子纹理坐标的时间周期上增加了一些随机性。你可以在源代码上查看它。
现在,我们可以使用这些数据来设置合适的纹理坐标。我们将在顶点着色器中进行这一操作,因为它输出了要在片元着色器中使用的那些值。这个新着色器的定义如下:
#version 330layout (location=0) in vec3 position;layout (location=1) in vec2 texCoord;layout (location=2) in vec3 vertexNormal;out vec2 outTexCoord;uniform mat4 modelViewMatrix;uniform mat4 projectionMatrix;uniform float texXOffset;uniform float texYOffset;uniform int numCols;uniform int numRows;void main(){gl_Position = projectionMatrix * modelViewMatrix * vec4(position, 1.0);// Support for texture atlas, update texture coordinatesfloat x = (texCoord.x / numCols + texXOffset);float y = (texCoord.y / numRows + texYOffset);outTexCoord = vec2(x, y);}
如你所见,我们现在有三个新Uniform。UniformnumCols和numRows只储存纹理集的列和行数。为了计算纹理坐标,首先必须缩小这些参数。每个片段的宽度为$1 / numCols$,高度为$1 / numRows$,如下图所示。

然后我们只需要根据行和列应用和偏移,这是由texXOffset和texYOffsetUniform定义的。
我们将在Renderer类中计算这些偏移量,如下述代码所示。我们根据每个粒子的坐标计算它们所处的行和列,并将偏移量计算为片段高度和宽度的倍数。
mesh.renderList((emitter.getParticles()), (GameItem gameItem) -> {int col = gameItem.getTextPos() % text.getNumCols();int row = gameItem.getTextPos() / text.getNumCols();float textXOffset = (float) col / text.getNumCols();float textYOffset = (float) row / text.getNumRows();particlesShaderProgram.setUniform("texXOffset", textXOffset);particlesShaderProgram.setUniform("texYOffset", textYOffset);
注意,如果你只需要支持正方形纹理集,你只需要两个Uniform。最终的效果是这样的:
现在,我们有了粒子动画。在下章中,我们讲学习如何优化渲染流程。我们正在渲染具有相同网格的多个元素,并为每个元素进行绘制调用。在下章中,我们讲学习如何在单个调用中渲染它们。这种技术不仅适用于粒子,也适用于渲染共享同一模型,但被放在不同位置或具有不同纹理的多个元素的场景。

若有收获,就点个赞吧
0 人点赞
