摄像机(Camera)
本章中我们将学习如何在渲染的三维场景中移动。该功能就像是有一台可以在三维世界中运动的摄像机,然而事实上摄像机就是描述该功能的术语。
但如果你尝试在OpenGL寻找摄像机功能,你会发现没有摄像机这个概念,换句话说,摄像机一直是固定在屏幕中心的以(0, 0, 0)为中心点的位置。
因此,我们需要模拟出一个可以在三维空间中移动的摄像。但要怎么做呢?摄像机是不能移动的,因此我们必须要移动世界中的全部物体。换句话说,如果移动不了摄像机就移动整个世界。
假设摄像机从(Cx, Cy, Cz)沿着Z轴移动到(Cx, Cy, Cz+dz),从而靠近在(Ox, Oy, Oz)放置的物体。
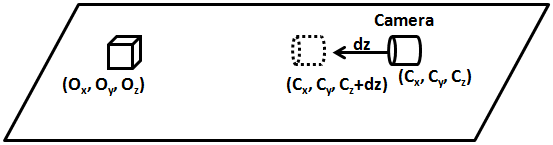
我们实际上做的是将物体(在三维空间中的所有物体)按摄像机应移动的相反方向移动。其实物体就像是放在跑步机上一样向后退。

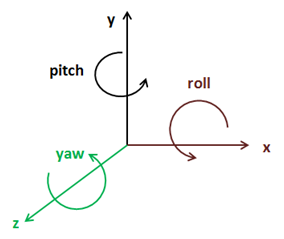
摄像机可以沿着三个轴(X、Y和Z)移动,也可以绕着它们旋转(翻滚(Roll)、俯仰(Pitch)和偏航(Yaw))。
基本上要做的就是让移动和旋转应用于三维世界全部物体。那要怎么做呢?答案是应用另一种变换,该变换将所有物体的所有顶点按摄像机移动的相反方向平移,再根据摄像机的旋转来旋转它们。当然,这将用到另一个矩阵,即所谓的观察矩阵(View Matrix)来完成。这个矩阵首先进行平移,然后沿着轴线进行旋转。
来看看如何构造这个矩阵。如果你想起变换一章(第6章),其中的变换方程如下所示:
$$ \begin{array}{lcl} Transf & = & \lbrack 投影矩阵 \rbrack \cdot \lbrack 位移矩阵 \rbrack \cdot \lbrack 旋转矩阵 \rbrack \cdot \lbrack 缩放矩阵 \rbrack \ & = & \lbrack 投影矩阵 \rbrack \cdot \lbrack 世界矩阵 \rbrack \end{array} $$
观察矩阵应在应用投影矩阵之前应用,因此我们的方程应如下所示:
$$ \begin{array}{lcl} Transf & = & \lbrack 投影矩阵 \rbrack \cdot \lbrack 观察矩阵 \rbrack \cdot \lbrack 位移矩阵 \rbrack \cdot \lbrack 旋转矩阵 \rbrack \cdot \lbrack 缩放矩阵 \rbrack \ & = & \lbrack 投影矩阵 \rbrack \cdot \lbrack 观察矩阵 \rbrack \cdot \lbrack 世界矩阵 \rbrack \end{array} $$
现在有三个矩阵了,我们应稍微思考一下这些矩阵的生命周期。在游戏运行时,投影矩阵应该不会有太多的变化,最坏的情况下,每次渲染可能改变一次。如果摄像机移动,则观察矩阵在每次渲染时可能改变一次。每渲染一个GameItem实例世界矩阵都会改变一次,一次每次渲染调用都会改变多次。
因此我们应该将多少矩阵传递到顶点着色器呢?你可能会看到一些代码,为三个矩阵分别定义一个Uniform,但理论上最有效的方法是将投影矩阵和观察矩阵组合,将其称为pv矩阵,并传递world和pv矩阵到着色器。这样,我们可以使用世界坐标,并可以避免一些额外的运算。
但实际上,最方便的方法是将观察矩阵与世界矩阵组合。为什么这样?因为要记住整个摄像机概念就是个骗局,我们所做的是移动整个世界来模拟摄像机的位移,并仅显示一小部分的三维世界。因此,如果直接处理世界坐标,可能会让远离原点的世界坐标遇到一些精度问题。如果在所谓的摄像机空间中处理,我们将处理的点虽然远离世界原点,但也靠近摄像机。可以将观察矩阵和世界矩阵组合的矩阵称为模型观察矩阵(Model View Matrix)。
让我们开始修改代码以支持摄像机吧。先创建一个名为Camera的类,它将储存摄像机的位置与旋转状态。该类将提供设置位置或旋转状态的方法(setPosition或setRotation),或在当前状态下用偏移量更新这些值的方法(movePosition或moveRotation)。
package org.lwjglb.engine.graph;import org.joml.Vector3f;public class Camera {private final Vector3f position;private final Vector3f rotation;public Camera() {position = new Vector3f(0, 0, 0);rotation = new Vector3f(0, 0, 0);}public Camera(Vector3f position, Vector3f rotation) {this.position = position;this.rotation = rotation;}public Vector3f getPosition() {return position;}public void setPosition(float x, float y, float z) {position.x = x;position.y = y;position.z = z;}public void movePosition(float offsetX, float offsetY, float offsetZ) {if ( offsetZ != 0 ) {position.x += (float)Math.sin(Math.toRadians(rotation.y)) * -1.0f * offsetZ;position.z += (float)Math.cos(Math.toRadians(rotation.y)) * offsetZ;}if ( offsetX != 0) {position.x += (float)Math.sin(Math.toRadians(rotation.y - 90)) * -1.0f * offsetX;position.z += (float)Math.cos(Math.toRadians(rotation.y - 90)) * offsetX;}position.y += offsetY;}public Vector3f getRotation() {return rotation;}public void setRotation(float x, float y, float z) {rotation.x = x;rotation.y = y;rotation.z = z;}public void moveRotation(float offsetX, float offsetY, float offsetZ) {rotation.x += offsetX;rotation.y += offsetY;rotation.z += offsetZ;}}
接下来在Transformation中,将定义一个新矩阵来储存观察矩阵。
private final Matrix4f viewMatrix;
我们要提供一个更新这个值的方法。与投影矩阵相似,这个矩阵对于渲染周期中渲染的所有物体都是相同的。
public Matrix4f getViewMatrix(Camera camera) {Vector3f cameraPos = camera.getPosition();Vector3f rotation = camera.getRotation();viewMatrix.identity();// 首先进行旋转,使摄像机在其位置上旋转viewMatrix.rotate((float)Math.toRadians(rotation.x), new Vector3f(1, 0, 0)).rotate((float)Math.toRadians(rotation.y), new Vector3f(0, 1, 0));// 然后做位移viewMatrix.translate(-cameraPos.x, -cameraPos.y, -cameraPos.z);return viewMatrix;}
如你所见,我们首先需要做旋转,然后位移。如果操作顺序相反,我们将不会沿着摄像机位置旋转,而是沿着坐标原点旋转。请注意,在Camera类的movePosition方法中,我们不只是简单地增加摄像机位置的偏移量。我们还考虑了沿Y轴的旋转,也就是偏航,以便计算最终位置。如果只是通过偏移来增加摄像机的位置,摄像机就不会朝着它所朝向的方向移动。
除了上述所说的,我们现在还没有得到一个可以完全自由移动的摄像机(例如,如果我们沿着X轴旋转,当向前移动时,摄像机不会在空间中向上或向下移动),这将在此后的章节中完成,因为这有点复杂。
最后,我们将移除之前的getWorldMatrix方法,并添加一个名为getModelViewMatrix的新方法。
public Matrix4f getModelViewMatrix(GameItem gameItem, Matrix4f viewMatrix) {Vector3f rotation = gameItem.getRotation();modelViewMatrix.set(viewMatrix).translate(gameItem.getPosition()).rotateX((float)Math.toRadians(-rotation.x)).rotateY((float)Math.toRadians(-rotation.y)).rotateZ((float)Math.toRadians(-rotation.z)).scale(gameItem.getScale());return modelViewMatrix;}
每个GameItem实例都将调用一次getModelViewMatrix方法。
Renderer类的render方法中,我们只需要根据摄像机的值,在投影矩阵更新之后更新观察矩阵。
// 更新投影矩阵Matrix4f projectionMatrix = transformation.getProjectionMatrix(FOV, window.getWidth(), window.getHeight(), Z_NEAR, Z_FAR);shaderProgram.setUniform("projectionMatrix", projectionMatrix);// 更新观察矩阵Matrix4f viewMatrix = transformation.getViewMatrix(camera);shaderProgram.setUniform("texture_sampler", 0);// 渲染每个游戏项for(GameItem gameItem : gameItems) {// 为该项设置模型观察矩阵Matrix4f modelViewMatrix = transformation.getModelViewMatrix(gameItem, viewMatrix);shaderProgram.setUniform("modelViewMatrix", modelViewMatrix);// 渲染该游戏项的网格gameItem.getMesh().render();}
这就是实现摄像机概念的基本代码,现在需要使用它。我们可以修改输入处理和更新摄像机的方式,将设置如下按键:
- “A”和“D”键使摄像机左右(X轴)移动。
- “W”和“S”键使摄像机前后(Z轴)移动。
- “Z”和“X”键使摄像机上下(Y轴)移动。
当鼠标按下右键时,我们将使用鼠标位置沿X和Y轴旋转摄像机。
如你所见,我们将首次使用鼠标,创建一个名为MouseInput的新类,该类将封装鼠标访问。该类代码如下所示:
package org.lwjglb.engine;import org.joml.Vector2d;import org.joml.Vector2f;import static org.lwjgl.glfw.GLFW.*;public class MouseInput {private final Vector2d previousPos;private final Vector2d currentPos;private final Vector2f displVec;private boolean inWindow = false;private boolean leftButtonPressed = false;private boolean rightButtonPressed = false;public MouseInput() {previousPos = new Vector2d(-1, -1);currentPos = new Vector2d(0, 0);displVec = new Vector2f();}public void init(Window window) {glfwSetCursorPosCallback(window.getWindowHandle(), (windowHandle, xpos, ypos) -> {currentPos.x = xpos;currentPos.y = ypos;});glfwSetCursorEnterCallback(window.getWindowHandle(), (windowHandle, entered) -> {inWindow = entered;});glfwSetMouseButtonCallback(window.getWindowHandle(), (windowHandle, button, action, mode) -> {leftButtonPressed = button == GLFW_MOUSE_BUTTON_1 && action == GLFW_PRESS;rightButtonPressed = button == GLFW_MOUSE_BUTTON_2 && action == GLFW_PRESS;});}public Vector2f getDisplVec() {return displVec;}public void input(Window window) {displVec.x = 0;displVec.y = 0;if (previousPos.x > 0 && previousPos.y > 0 && inWindow) {double deltax = currentPos.x - previousPos.x;double deltay = currentPos.y - previousPos.y;boolean rotateX = deltax != 0;boolean rotateY = deltay != 0;if (rotateX) {displVec.y = (float) deltax;}if (rotateY) {displVec.x = (float) deltay;}}previousPos.x = currentPos.x;previousPos.y = currentPos.y;}public boolean isLeftButtonPressed() {return leftButtonPressed;}public boolean isRightButtonPressed() {return rightButtonPressed;}}
MouseInput类提供了一个应在在初始化阶段调用的init方法,并注册一组回调以处理鼠标事件:
glfwSetCursorPosCallback:注册一个回调,该回调将在鼠标移动时被调用。glfwSetCursorEnterCallback:注册一个回调,该回调将在鼠标进入窗口时被调用。即使鼠标不在窗口内,我们也会收到鼠标事件。我们使用这个回调来确认鼠标进入窗口。glfwSetMouseButtonCallback:注册一个回调,该回调在按下鼠标按钮时被调用。
MouseInput类提供了一个input方法,在处理游戏输入时应调用该方法。该方法计算鼠标从上一个位置的位移,并将其存储到Vector2f类型的displVec变量中,以便游戏使用它。
MouseInput类将在GameEngine类中实例化,并且将作为参数传递给游戏实现的init和update方法(因此需要相应地更改IGameLogic接口)。
void input(Window window, MouseInput mouseInput);void update(float interval, MouseInput mouseInput);
鼠标输入将在GameEngine类的input方法中被处理,而最终的控制将交由游戏实现。
protected void input() {mouseInput.input(window);gameLogic.input(window, mouseInput);}
现在已经准备好修改DummyGame类来处理键盘和鼠标输入了。该类的输入方法如下所示:
@Overridepublic void input(Window window, MouseInput mouseInput) {cameraInc.set(0, 0, 0);if (window.isKeyPressed(GLFW_KEY_W)) {cameraInc.z = -1;} else if (window.isKeyPressed(GLFW_KEY_S)) {cameraInc.z = 1;}if (window.isKeyPressed(GLFW_KEY_A)) {cameraInc.x = -1;} else if (window.isKeyPressed(GLFW_KEY_D)) {cameraInc.x = 1;}if (window.isKeyPressed(GLFW_KEY_Z)) {cameraInc.y = -1;} else if (window.isKeyPressed(GLFW_KEY_X)) {cameraInc.y = 1;}}
这只是更新一个名为cameraInc的Vector3f变量,它储存了摄像机应用的位移。
DummyGame类的update方法将根据处理的键盘和鼠标事件,修改摄像机的位置和旋转。
@Overridepublic void update(float interval, MouseInput mouseInput) {// 更新摄像机位置camera.movePosition(cameraInc.x * CAMERA_POS_STEP,cameraInc.y * CAMERA_POS_STEP,cameraInc.z * CAMERA_POS_STEP);// 基于鼠标更新摄像机if (mouseInput.isRightButtonPressed()) {Vector2f rotVec = mouseInput.getDisplVec();camera.moveRotation(rotVec.x * MOUSE_SENSITIVITY, rotVec.y * MOUSE_SENSITIVITY, 0);}}
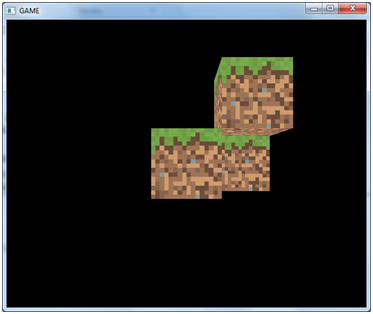
现在可以添加更多的立方体到世界中,缩放它们,将它们设置在特定位置,并使用新摄像机游玩。如你所见,所有的立方体共享相同的网格。
GameItem gameItem1 = new GameItem(mesh);gameItem1.setScale(0.5f);gameItem1.setPosition(0, 0, -2);GameItem gameItem2 = new GameItem(mesh);gameItem2.setScale(0.5f);gameItem2.setPosition(0.5f, 0.5f, -2);GameItem gameItem3 = new GameItem(mesh);gameItem3.setScale(0.5f);gameItem3.setPosition(0, 0, -2.5f);GameItem gameItem4 = new GameItem(mesh);gameItem4.setScale(0.5f);gameItem4.setPosition(0.5f, 0, -2.5f);gameItems = new GameItem[]{gameItem1, gameItem2, gameItem3, gameItem4};
你会得到如下所示的结果。

若有收获,就点个赞吧
0 人点赞
