- 1 理论基础
- 2 代码实践
- 使用迭代最近点算法(ICP) How to use iterative closest point">1 使用迭代最近点算法(ICP) How to use iterative closest point
- 代码实现
- 输出结果
- 实现效果
- How to incrementally register pairs of clouds">2 如何逐步匹配多幅点云 How to incrementally register pairs of clouds
- 代码实现
- 输出结果
- 实现效果
- 04-配准之交互式ICP Interactive Iterative Closest Point">3 04-配准之交互式ICP Interactive Iterative Closest Point
- 代码实现
- 输出结果
- 实现效果
- 正态分布变换配准(NDT) How to use Normal Distributions Transform">4 正态分布变换配准(NDT) How to use Normal Distributions Transform
- 代码实现
- 输出结果
- 实现效果
- 刚性物体的鲁棒姿态估计 Robust pose estimation of rigid objects">5 刚性物体的鲁棒姿态估计 Robust pose estimation of rigid objects
- 代码实现
- 输出结果
- 实现效果
- https://pcl.readthedocs.io/projects/tutorials/en/latest/in_hand_scanner.html#in-hand-scanner)">
6 手持式小型物品扫描仪 ~~[In-hand scanner for small objects理论 无代码~~](https://pcl.readthedocs.io/projects/tutorials/en/latest/in_hand_scanner.html#in-hand-scanner)
https://pcl.readthedocs.io/projects/tutorials/en/latest/#registration
https://pointcloudlibrary.github.io/documentation/group__registration.html
- The PCL Registration API官网理论
- 使用迭代最近点算法(ICP) How to use iterative closest point
- 如何逐步匹配多幅点云 How to incrementally register pairs of clouds
- 04-配准之交互式ICP Interactive Iterative Closest Point
- 正态分布变换配准(NDT) How to use Normal Distributions Transform
- 手持式小型物品扫描仪 In-hand scanner for small objects
- 刚性物体的鲁棒姿态估计 Robust pose estimation of rigid objects
黑马机器人 | PCL-3D点云
PCL中的点云ICP配准(附源代码和数据)_qq_29462849的 …
此模块个人代码:https://github.com/HuangCongQing/pcl-learning/tree/master/14registration
1 理论基础
The PCL Registration API官网理论
02-点云配准原理概述
点云配准概念
由于三维扫描仪设备受到测量方式和被测物体形状的条件限制,一次扫描往往只能获取到局部的点云信息,进而需要进行多次扫描,然后每次扫描时得到的点云都有独立的坐标系,不可以直接进行拼接。
在逆向工程、计算机视觉、文物数字化等领域中,由于点云的不完整、旋转错位、平移错位等,使得要得到完整点云就需要对多个局部点云进行配准。
为了得到被测物体的完整数据模型,需要确定一个合适的坐标变换 ,**将从各个视角得到的点集合并到一个统一的坐标系下形成一个完整的数据点云**,然后就可以方便地进行可视化等操作,这就是点云数据的配准。
点云配准方法
点云配准步骤上可以分为粗配准(Coarse Registration)和精配准(Fine Registration)两个阶段。
粗配准
粗配准是指在点云相对位姿完全未知的情况下对点云进行配准,找到一个可以让两块点云相对近似的旋转平移变换矩阵,进而将待配准点云数据转换到统一的坐标系内,可以为精配准提供良好的初始值。常见粗配准算法:
- 基于特征匹配(PFH)的配准算法:
- SAC-IA 采样一致性初始配准算法(Sample Consensus Initial Alignment)PCL库已实现,基于FPFH
基于穷举搜索的配准算法:
ICP 迭代最近点算法(Iterative Cloest Point)
- GICP
- NICP
- MBICP
- NDT 正态分布变换算法(Normal Distributions Transform)
其他配准:
- 依赖平台设备:将被测物体放在平台上,利用控制器对平台进行控制,使之按照指定角度转动,通过多次测量可以得到不同视角下的点云,由于提前获知了距离及角度信息,则可以直接对所有点云进行配准。
- 辅助标志点:通过在被测物体表面粘贴标签,将这些标签作为标志点,对多次测量得到的点云数据进行配准时,对这些有显著特征的标签进行识别配准,代替了对整体点云的配准,提高效率,精确度。
自动配准技术
通常所说的点云配准就是指自动配准,点云自动配准技术是通过一定的算法或者统计学规律,利用计算机计算两块点云之间的错位,从而达到把两片点云自动配准的效果。本质上就是把不同坐标系中测量得到的数据点云进行坐标变换,从而得到整体的数据模型。
即求得坐标变换参数 R( 旋转矩阵)和 T(平移向量),使得两视角下测得的三维数据经坐标变换后的距离最小。
配准算法按照实现过程可以分为整体配准和局部配准。
PCL实现的配准算法
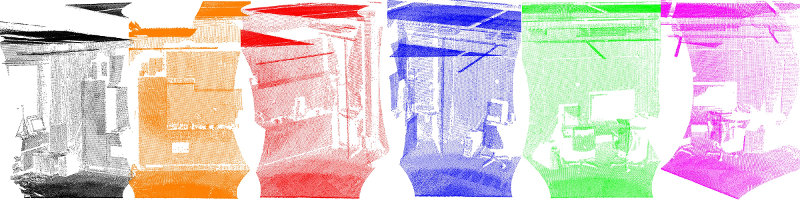
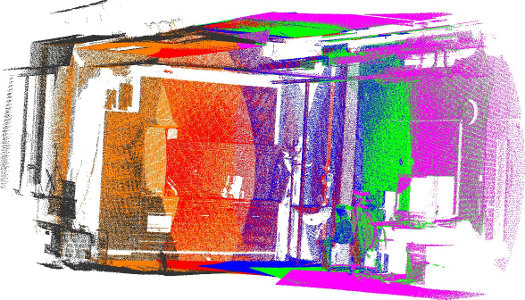
上图中给出了示例,使用倾斜的2D激光设备获取了六个独立数据集。由于每个单独的扫描仅代表周围世界的一小部分,因此必须找到将它们配准在一起的方法,从而创建完整的点云模型,如下图所示。
PCL提供的配准库算法是通过在给定的输入数据集中找到正确的点对应关系,并将每个单独的数据集转换为一致的全局坐标系的刚性变换。理想情况下,如果在输入数据集中完全知道点对应关系,则该配准范式可以轻松解决。这意味着一个数据集中选定的关键点列表必须与另一个数据集中的点列表“重合”。此外,如果估计的对应关系“完美”匹配,则配准问题具有封闭式解决方案。 PCL包含一组功能强大的算法,这些算法可以估算多组对应关系,排除不良对应关系,从而以可靠的方式估算转换关系方法。以下将分别描述它们:
两两配准步骤
两两配准(pairwise registration):我们称一对点云数据集的配准问题为两两配准(pairwise registration)。通常通过应用一个估算得到的表示平移和旋转的 4 × 4 刚体变换矩阵来使一个点云数据集精确地与另一个点云数据集(目标数据集)进行完美配准。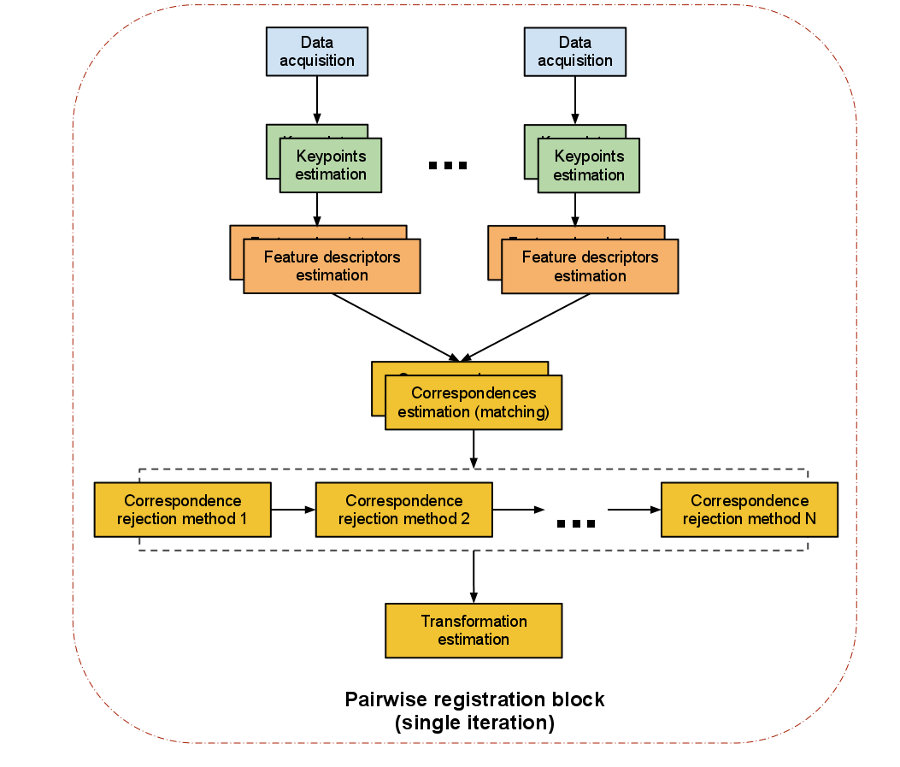
具体实现步骤如下 :
- 首先从两个数据集中按照同样的关键点选取标准,提取关键点。
- 对选择的所有关键点分别计算其特征描述子。
- 结合特征描述子在两个数据集中的坐标的位置,以两者之间特征和位置的相似度为基础,估算它们的对应关系,初步估计对应点对。
- 假定数据是有噪声的,除去对配准有影响的错误的对应点对。
- 利用剩余的正确对应关系来估算刚体变换,完成配准。
整个配准过程最重要的是关键点的提取以及关键点的特征描述,以确保对应估计的准确性和效率,这样才能保证后续流程中的刚体变换矩阵估计的无误性。接下来我们对单次迭代的每一步进行解读:
1.关键点提取
关键点是在场景中具有“特殊属性”的兴趣点,例如书的一角或书上写有“ PCL”的字母“ P”。 PCL中有许多不同的关键点提取技术,如NARF,SIFT和FAST。另外,您也可以将每个点或子集作为关键点。如果不进行关键点提取,直接“将两个kinect数据集执行对应估计”会产生的问题是:每帧中有300k点,因此可以有300k^2个对应关系,这个数量太庞大不利于计算。
2.特征描述子
基于找到的关键点,我们必须提取特征,在此我们封装解析点云数据并生成向量以相互比较。同样,有许多特征描述符提取技术可供选择,例如NARF,FPFH,BRIEF或SIFT。
所谓局部特征描述子就是用来刻画图像中的这些局部共性的,而我们也可以将一幅图像映射(变换)为一个局部特征的集合。理想的局部特征应具有平移、缩放、旋转不变性,同时对光照变化、仿射及投影影响也应有很好的鲁棒性。传统的局部特征往往是直接提取角点或边缘,对环境的适应能力较差。1999年British Columbia大学 David G.Lowe 教授总结了现有的基于不变量技术的特征检测方法,并正式提出了一种基于尺度空间的、对图像缩放、旋转甚至仿射变换保持不变性的图像局部特征描述算子-SIFT(尺度不变特征变换),这种算法在2004年被加以完善。
3. 对应关系估计
对应关系估计(correspondences estimation)
假设我们已经得到由两次扫描的点云数据获得的两组特征向量,在此基础上,我们必须找到相似特征再确定数据的重叠部分才能进行配准。根据特征的类型,PCL 使用不同方法来搜索特征之间的对应关系。
- 进行点匹配point matching时(使用点的 xyz 三维坐标作为特征值),针对有序点云数据和无序点云数据有不同的处理策略:
- 穷举配准( brute force matching)简称BFMatching,或称野蛮匹配。
- kd-tree最近邻查询,Fast Library for Approximate Nearest Neighbors.( FLANN )。
- 在有序点云数据的图像空间中查找。
- 在无序点云 数据的索引空间中查找。
- 进行特征匹配feature matching时(不使用点的坐标,而是某些由查询点邻域确定的特征,如法向量、局部或全局形状直方图等),有以下几种方法:
- 穷举配准( brute force matching)简称BFMatching,或称野蛮匹配。
- kd-tree最近邻查询,Fast Library for Approximate Nearest Neighbors.( FLANN )。
- 除了搜索之外,对应估计也区分了两种类型:
- 直接对应估计(默认):为点云 A 中的每一个点搜索点云 B 中的对应点,确认最终对应点对。
- “相互”( Reciprocal )对应估计 : 首先为点云 A 中的点到点云 B 搜索对应点 ,然后又从点云 B 到点云 A 搜索对应点,最后只取交集作为对应点对。
所有这些在 PCL 类设计和实现中都以函数的形式让用户可以自由设定和使用。
4. 对应关系去除
对应关系去除(correspondences rejection)
由于噪声的影响,通常并不是所有估计的对应关系都是正确的 。由于错误的对应关系对于最终的刚体变换矩阵的估算会产生负面的影响,所以必须去除它们,于是我们使用随机采样一致性( Random Sample Consensus , RANSAC )估算或者其他方法剔除错误对应关系,最终只保留一定比例的对应关系,这样即能提高变换矩阵的估算精度也可以提高配准速度。 遇到有一对多对应关系的特例情况,即目标模型中的一个点在源中有若干个点与之对应。可以通过只取与其距离最近的对应点或者检查附近的其他匹配的滤波方法过滤掉其他伪对应关系。同样地针对对应关系的去除,PCL 有单独设计类与之对应 。
5. 变换矩阵估算
最后一步就是计算实际的转换关系
- 根据对应关系评估误差值
- 估算相机位姿之间的刚性变换,并最小化误差指标
- 优化点的结构
- 使用刚性变换将源旋转/变换到目标上
- 迭代此过程直到满足预定的收敛标准
2 代码实践
类&函数:https://pointclouds.org/documentation/group__registration.html
1 使用迭代最近点算法(ICP) How to use iterative closest point
迭代最近点算法(Iterative Closest Point,简称ICP算法)
| class | pcl::IterativeClosestPoint< PointSource, PointTarget, Scalar > |
|---|---|
| IterativeClosestPoint provides a base implementation of the Iterative Closest Point algorithm. More… 提供了迭代最近点算法的基本实现 |
Usage example:
IterativeClosestPoint<PointXYZ, PointXYZ> icp;// Set the input source and targeticp.setInputCloud (cloud_source);icp.setInputTarget (cloud_target);// Set the max correspondence distance to 5cm (e.g., correspondences with higher distances will be ignored)icp.setMaxCorrespondenceDistance (0.05); // 距离较大的距离将被忽略// Set the maximum number of iterations (criterion 1)icp.setMaximumIterations (50);// Set the transformation epsilon (criterion 2)icp.setTransformationEpsilon (1e-8);// Set the euclidean distance difference epsilon (criterion 3)icp.setEuclideanFitnessEpsilon (1);// Perform the alignmenticp.align (cloud_source_registered);// Obtain the transformation that aligned cloud_source to cloud_source_registeredEigen::Matrix4f transformation = icp.getFinalTransformation ();
代码实现
实例分析:如何使用迭代最近点算法:在代码中使用ICP迭代最近点算法,程序随机生成一个点与作为源点云,并将其沿x轴平移后作为目标点云,然后利用ICP估计源到目标的刚体变换橘子,中间对所有信息都打印出来
创建文件:iterative_closest_point.cpp
准备资源:无
编译执行:./iterative_closest_point ../bunny.pcd
个人代码:14registration配准
/** @Description:使用迭代最近点算法(ICP)* http://robot.czxy.com/docs/pcl/chapter03/registration/* https://www.cnblogs.com/li-yao7758258/p/6489585.html* @Author: HCQ* @Company(School): UCAS* @Email: 1756260160@qq.com* @Date: 2020-10-22 16:50:22* @LastEditTime: 2020-10-22 17:05:21* @FilePath: /pcl-learning/14registration配准/1使用迭代最近点算法(ICP)/iterative_closest_point.cpp*/#include <iostream> //标准输入输出头文件#include <pcl/io/pcd_io.h> //I/O操作头文件#include <pcl/point_types.h> //点类型定义头文件#include <pcl/registration/icp.h> //ICP配准类相关头文件int main(int argc, char **argv){// 定义输入和输出点云pcl::PointCloud<pcl::PointXYZ>::Ptr cloud_in(new pcl::PointCloud<pcl::PointXYZ>);pcl::PointCloud<pcl::PointXYZ>::Ptr cloud_out(new pcl::PointCloud<pcl::PointXYZ>);// 随机填充无序点云cloud_in->width = 5; //设置点云宽度cloud_in->height = 1; //设置点云为无序点cloud_in->is_dense = false;cloud_in->points.resize(cloud_in->width * cloud_in->height);for (size_t i = 0; i < cloud_in->points.size(); ++i){cloud_in->points[i].x = 1024 * rand() / (RAND_MAX + 1.0f);cloud_in->points[i].y = 1024 * rand() / (RAND_MAX + 1.0f);cloud_in->points[i].z = 1024 * rand() / (RAND_MAX + 1.0f);}std::cout << "Saved " << cloud_in->points.size() << " data points to input:" //打印点云总数<< std::endl;for (size_t i = 0; i < cloud_in->points.size(); ++i) //打印坐标std::cout << " " << cloud_in->points[i].x << " " << cloud_in->points[i].y << " " << cloud_in->points[i].z << std::endl;*cloud_out = *cloud_in;std::cout << "size:" << cloud_out->points.size() << std::endl;// //实现一个简单的点云刚体变换,以构造目标点云,将cloud_out中的x平移0.7f米,然后再次输出数据值。for (size_t i = 0; i < cloud_in->points.size(); ++i)cloud_out->points[i].x = cloud_in->points[i].x + 0.7f;// 打印这些点std::cout << "Transformed " << cloud_in->points.size() << " data points:"<< std::endl;for (size_t i = 0; i < cloud_out->points.size(); ++i) //打印构造出来的目标点云std::cout << " " << cloud_out->points[i].x << " " << cloud_out->points[i].y << " " << cloud_out->points[i].z << std::endl;// 创建IterativeClosestPoint的实例// setInputSource将cloud_in作为输入点云// setInputTarget将平移后的cloud_out作为目标点云pcl::IterativeClosestPoint<pcl::PointXYZ, pcl::PointXYZ> icp;icp.setInputSource(cloud_in);icp.setInputTarget(cloud_out);// 创建一个 pcl::PointCloud<pcl::PointXYZ>实例 Final 对象,存储配准变换后的源点云,// 应用 ICP 算法后, IterativeClosestPoint 能够保存结果点云集,如果这两个点云匹配正确的话// (即仅对其中一个应用某种刚体变换,就可以得到两个在同一坐标系下相同的点云),那么 icp. hasConverged()= 1 (true),// 然后会输出最终变换矩阵的匹配分数和变换矩阵等信息。pcl::PointCloud<pcl::PointXYZ> Final;icp.align(Final);std::cout << "has converged:" << icp.hasConverged() << " score: " << icp.getFitnessScore() << std::endl;const pcl::Registration<pcl::PointXYZ, pcl::PointXYZ, float>::Matrix4 &matrix = icp.getFinalTransformation();std::cout << matrix << std::endl;return (0);}
输出结果
可以由试验结果看得出变换后的点云只是在x轴的值增加了固定的值0.7,然后由这目标点云与源点云计算出它的旋转与平移,明显可以看出最后一行的x值为0.7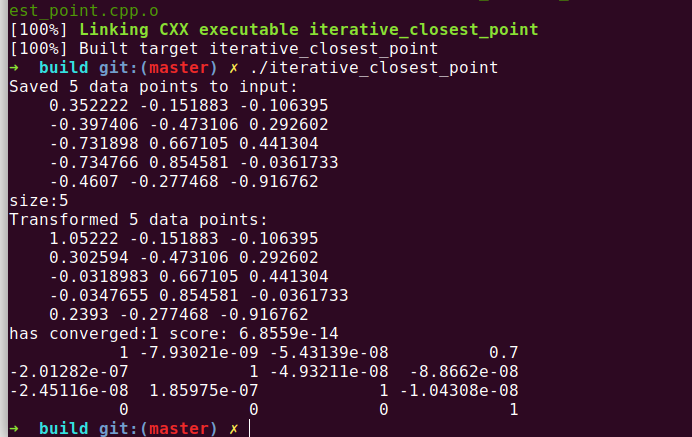
实现效果
2 如何逐步匹配多幅点云 How to incrementally register pairs of clouds
本实例是使用迭代最近点算法,逐步实现地对一系列点云进行两两匹配,他的思想是对所有的点云进行变换,使得都与第一个点云统一坐标系中,在每个连贯的有重叠的点云之间找出最佳的变换,并积累这些变换到全部的点云,能够进行ICP算法的点云需要粗略的预匹配(比如在一个机器人的量距内或者在地图的框架内),并且一个点云与另一个点云需要有重叠的部分。
代码实现
创建文件:pairwise_incremental_registration.cpp
准备资源:frame_00000.pcd capture0001.pcd capture0002.pcd capture0004.pcd capture0005.pcd
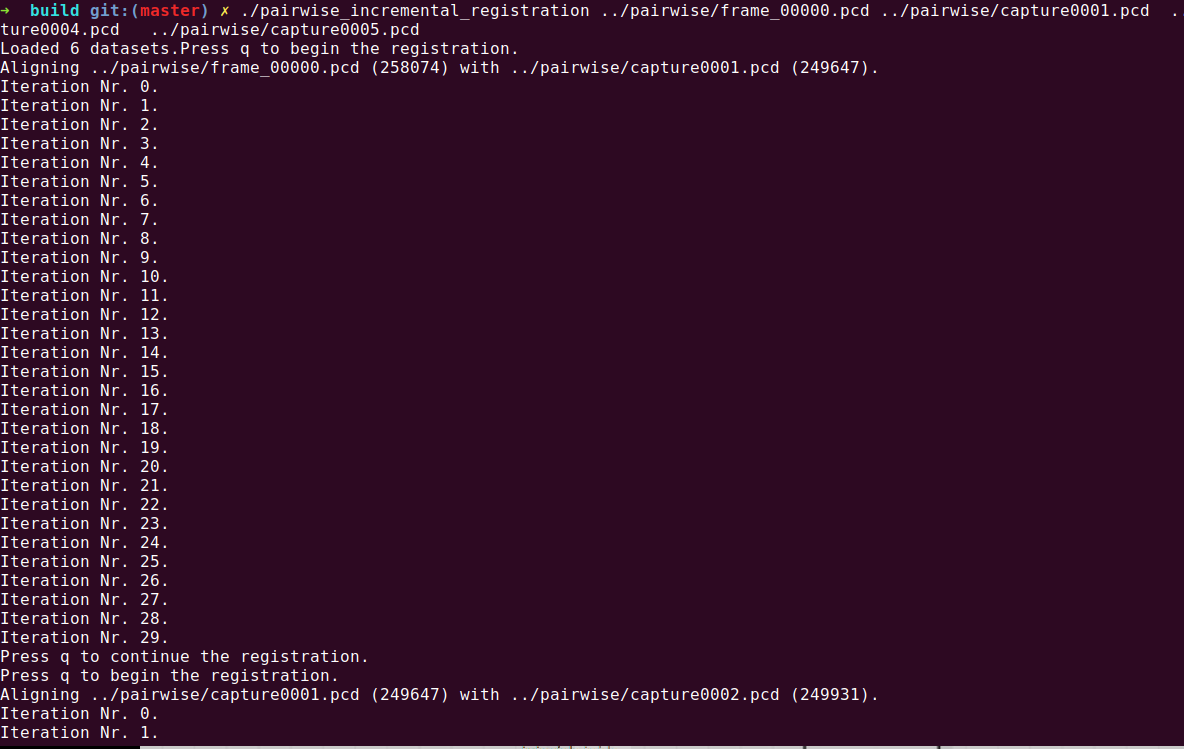
编译执行:./pairwise_incremental_registration ../pairwise/frame_00000.pcd ../pairwise/capture0001.pcd ../pairwise/capture0002.pcd ../pairwise/capture0003.pcd ../pairwise/capture0004.pcd ../pairwise/capture0005.pcd
个人代码:14registration配准
/** @Description: 如何逐步匹配多幅点云 https://www.cnblogs.com/li-yao7758258/p/6489585.html* 编译执行: ./pairwise_incremental_registration ../pairwise/frame_00000.pcd ../pairwise/capture0001.pcd ../pairwise/capture0002.pcd ../pairwise/capture0003.pcd ../pairwise/capture0004.pcd ../pairwise/capture0005.pcd* @Author: HCQ* @Company(School): UCAS* @Email: 1756260160@qq.com* @Date: 2020-10-22 17:20:55* @LastEditTime: 2020-10-22 18:23:55* @FilePath: /pcl-learning/14registration配准/2如何逐步匹配多幅点云/pairwise_incremental_registration.cpp*/#include <boost/make_shared.hpp> //boost指针相关头文件#include <pcl/point_types.h> //点类型定义头文件#include <pcl/point_cloud.h> //点云类定义头文件#include <pcl/point_representation.h> //点表示相关的头文件#include <pcl/io/pcd_io.h> //PCD文件打开存储类头文件#include <pcl/filters/voxel_grid.h> //用于体素网格化的滤波类头文件#include <pcl/filters/filter.h> //滤波相关头文件#include <pcl/features/normal_3d.h> //法线特征头文件#include <pcl/registration/icp.h> //ICP类相关头文件#include <pcl/registration/icp_nl.h> //非线性ICP 相关头文件#include <pcl/registration/transforms.h> //变换矩阵类头文件#include <pcl/visualization/pcl_visualizer.h> //可视化类头文件using pcl::visualization::PointCloudColorHandlerCustom;using pcl::visualization::PointCloudColorHandlerGenericField;//定义typedef pcl::PointXYZ PointT;typedef pcl::PointCloud<PointT> PointCloud; //申明pcl::PointXYZ数据typedef pcl::PointNormal PointNormalT;typedef pcl::PointCloud<PointNormalT> PointCloudWithNormals;// 申明一个全局可视化对象变量,定义左右视点分别显示配准前和配准后的结果点云pcl::visualization::PCLVisualizer *p; //创建可视化对象int vp_1, vp_2; //定义存储 左 右视点的ID//申明一个结构体方便对点云以文件名和点云对象进行成对处理和管理点云,处理过程中可以同时接受多个点云文件的输入struct PCD{PointCloud::Ptr cloud; //点云共享指针std::string f_name; //文件名称PCD() : cloud(new PointCloud){};};struct PCDComparator //文件比较处理{bool operator()(const PCD &p1, const PCD &p2){return (p1.f_name < p2.f_name);}};// 以< x, y, z, curvature >形式定义一个新的点表示class MyPointRepresentation : public pcl::PointRepresentation<PointNormalT>{using pcl::PointRepresentation<PointNormalT>::nr_dimensions_;public:MyPointRepresentation(){nr_dimensions_ = 4; //定义点的维度}// 重载copyToFloatArray方法将点转化为四维数组virtual void copyToFloatArray(const PointNormalT &p, float *out) const{// < x, y, z, curvature >out[0] = p.x;out[1] = p.y;out[2] = p.z;out[3] = p.curvature; // 曲率}};/** \左视图用来显示未匹配的源和目标点云*/void showCloudsLeft(const PointCloud::Ptr cloud_target, const PointCloud::Ptr cloud_source){p->removePointCloud("vp1_target");p->removePointCloud("vp1_source");PointCloudColorHandlerCustom<PointT> tgt_h(cloud_target, 0, 255, 0);PointCloudColorHandlerCustom<PointT> src_h(cloud_source, 255, 0, 0);p->addPointCloud(cloud_target, tgt_h, "vp1_target", vp_1);p->addPointCloud(cloud_source, src_h, "vp1_source", vp_1);PCL_INFO("Press q to begin the registration.\n");p->spin();}/** \右边显示配准后的源和目标点云*/void showCloudsRight(const PointCloudWithNormals::Ptr cloud_target, const PointCloudWithNormals::Ptr cloud_source){p->removePointCloud("source");p->removePointCloud("target");PointCloudColorHandlerGenericField<PointNormalT> tgt_color_handler(cloud_target, "curvature");if (!tgt_color_handler.isCapable())PCL_WARN("Cannot create curvature color handler!");PointCloudColorHandlerGenericField<PointNormalT> src_color_handler(cloud_source, "curvature");if (!src_color_handler.isCapable())PCL_WARN("Cannot create curvature color handler!");p->addPointCloud(cloud_target, tgt_color_handler, "target", vp_2);p->addPointCloud(cloud_source, src_color_handler, "source", vp_2);p->spinOnce();}/////////////////////////////////////////////////////////////////////////////////** \brief Load a set of PCD files that we want to register together* \param argc the number of arguments (pass from main ())* \param argv the actual command line arguments (pass from main ())* \param models the resultant vector of point cloud datasets*/void loadData(int argc, char **argv, std::vector<PCD, Eigen::aligned_allocator<PCD>> &models){std::string extension(".pcd");// 第一个参数是命令本身,所以要从第二个参数开始解析for (int i = 1; i < argc; i++){std::string fname = std::string(argv[i]);// PCD文件名至少为5个字符大小字符串(因为后缀名.pcd就已经占了四个字符位置)if (fname.size() <= extension.size())continue;std::transform(fname.begin(), fname.end(), fname.begin(), (int (*)(int))tolower);//检查参数是否为一个pcd后缀的文件if (fname.compare(fname.size() - extension.size(), extension.size(), extension) == 0){//加载点云并保存在总体的点云列表中PCD m;m.f_name = argv[i];pcl::io::loadPCDFile(argv[i], *m.cloud);//从点云中移除NAN点也就是无效点std::vector<int> indices;pcl::removeNaNFromPointCloud(*m.cloud, *m.cloud, indices);models.push_back(m);}}}/////////////////////////////////////////////////////////////////////////////////** \brief Align a pair of PointCloud datasets and return the result* \param cloud_src the source PointCloud* \param cloud_tgt the target PointCloud* \param output the resultant aligned source PointCloud* \param final_transform the resultant transform between source and target*////实现匹配,其中参数有输入一组需要配准的点云,以及是否需要进行下采样,其他参数输出配准后的点云以及变换矩阵void pairAlign (const PointCloud::Ptr cloud_src, const PointCloud::Ptr cloud_tgt, PointCloud::Ptr output, Eigen::Matrix4f &final_transform, bool downsample = false){// Downsample for consistency and speed// \note enable this for large datasetsPointCloud::Ptr src(new PointCloud); //存储滤波后的源点云PointCloud::Ptr tgt(new PointCloud); //存储滤波后的目标点云pcl::VoxelGrid<PointT> grid; //滤波处理对象if (downsample){grid.setLeafSize(0.05, 0.05, 0.05); //设置滤波时采用的体素大小grid.setInputCloud(cloud_src);grid.filter(*src);grid.setInputCloud(cloud_tgt);grid.filter(*tgt);}else{src = cloud_src;tgt = cloud_tgt;}// 计算表面的法向量和曲率PointCloudWithNormals::Ptr points_with_normals_src(new PointCloudWithNormals);PointCloudWithNormals::Ptr points_with_normals_tgt(new PointCloudWithNormals);pcl::NormalEstimation<PointT, PointNormalT> norm_est; //点云法线估计对象pcl::search::KdTree<pcl::PointXYZ>::Ptr tree(new pcl::search::KdTree<pcl::PointXYZ>());norm_est.setSearchMethod(tree);norm_est.setKSearch(30);norm_est.setInputCloud(src);norm_est.compute(*points_with_normals_src);pcl::copyPointCloud(*src, *points_with_normals_src);norm_est.setInputCloud(tgt);norm_est.compute(*points_with_normals_tgt);pcl::copyPointCloud(*tgt, *points_with_normals_tgt);//// Instantiate our custom point representation (defined above) ...MyPointRepresentation point_representation;// ... and weight the 'curvature' dimension so that it is balanced against x, y, and zfloat alpha[4] = {1.0, 1.0, 1.0, 1.0};point_representation.setRescaleValues(alpha);//// 配准pcl::IterativeClosestPointNonLinear<PointNormalT, PointNormalT> reg; // 配准对象reg.setTransformationEpsilon(1e-6);//设置收敛判断条件,越小精度越大,收敛也越慢// Set the maximum distance between two correspondences (src<->tgt) to 10cm大于此值的点对不考虑// Note: adjust this based on the size of your datasetsreg.setMaxCorrespondenceDistance(0.1);// 设置点表示reg.setPointRepresentation(boost::make_shared<const MyPointRepresentation>(point_representation));reg.setInputSource(points_with_normals_src); // 设置源点云reg.setInputTarget(points_with_normals_tgt); // 设置目标点云//// Run the same optimization in a loop and visualize the resultsEigen::Matrix4f Ti = Eigen::Matrix4f::Identity(), prev, targetToSource;PointCloudWithNormals::Ptr reg_result = points_with_normals_src;reg.setMaximumIterations(2); ////设置最大的迭代次数,即每迭代两次就认为收敛,停止内部迭代for (int i = 0; i < 30; ++i) //手动迭代,每手动迭代一次,在配准结果视口对迭代的最新结果进行刷新显示{PCL_INFO("Iteration Nr. %d.\n", i);// 存储点云以便可视化points_with_normals_src = reg_result;// Estimatereg.setInputSource(points_with_normals_src);reg.align(*reg_result);//accumulate transformation between each IterationTi = reg.getFinalTransformation() * Ti;//if the difference between this transformation and the previous one//is smaller than the threshold, refine the process by reducing//the maximal correspondence distanceif (fabs((reg.getLastIncrementalTransformation() - prev).sum()) < reg.getTransformationEpsilon())reg.setMaxCorrespondenceDistance(reg.getMaxCorrespondenceDistance() - 0.001);prev = reg.getLastIncrementalTransformation();// visualize current stateshowCloudsRight(points_with_normals_tgt, points_with_normals_src);}//// Get the transformation from target to sourcetargetToSource = Ti.inverse(); //deidao//// Transform target back in source framepcl::transformPointCloud(*cloud_tgt, *output, targetToSource);p->removePointCloud("source");p->removePointCloud("target");PointCloudColorHandlerCustom<PointT> cloud_tgt_h(output, 0, 255, 0);PointCloudColorHandlerCustom<PointT> cloud_src_h(cloud_src, 255, 0, 0);p->addPointCloud(output, cloud_tgt_h, "target", vp_2);p->addPointCloud(cloud_src, cloud_src_h, "source", vp_2);PCL_INFO("Press q to continue the registration.\n");p->spin();p->removePointCloud("source");p->removePointCloud("target");//add the source to the transformed target*output += *cloud_src;final_transform = targetToSource;}int main(int argc, char **argv){// 存储管理所有打开的点云std::vector<PCD, Eigen::aligned_allocator<PCD>> data;loadData(argc, argv, data); // 加载所有点云到data// 检查输入if (data.empty()){PCL_ERROR("Syntax is: %s <source.pcd> <target.pcd> [*]", argv[0]);PCL_ERROR("[*] - multiple files can be added. The registration results of (i, i+1) will be registered against (i+2), etc");return (-1);}PCL_INFO("Loaded %d datasets.", (int)data.size());// 创建PCL可视化对象p = new pcl::visualization::PCLVisualizer(argc, argv, "Pairwise Incremental Registration example");p->createViewPort(0.0, 0, 0.5, 1.0, vp_1); //用左半窗口创建视口vp_1p->createViewPort(0.5, 0, 1.0, 1.0, vp_2); //用右半窗口创建视口vp_2PointCloud::Ptr result(new PointCloud), source, target;Eigen::Matrix4f GlobalTransform = Eigen::Matrix4f::Identity(), pairTransform;for (size_t i = 1; i < data.size(); ++i) //循环处理所有点云================重点======================================{source = data[i - 1].cloud; //连续配准target = data[i].cloud; // 相邻两组点云showCloudsLeft(source, target); //可视化为配准的源和目标点云//调用子函数完成一组点云的配准,temp返回配准后两组点云在第一组点云坐标下的点云PointCloud::Ptr temp(new PointCloud);PCL_INFO("Aligning %s (%d) with %s (%d).\n", data[i - 1].f_name.c_str(), source->points.size(), data[i].f_name.c_str(), target->points.size());// pairTransform返回从目标点云target到source的变换矩阵pairAlign(source, target, temp, pairTransform, true); // ===================重点=========================//把当前两两配准后的点云temp转化到全局坐标系下返回resultpcl::transformPointCloud(*temp, *result, GlobalTransform);//用当前的两组点云之间的变换更新全局变换GlobalTransform = GlobalTransform * pairTransform;//保存转换到第一个点云坐标下的当前配准后的两组点云result到文件i.pcdstd::stringstream ss;ss << i << ".pcd";pcl::io::savePCDFile(ss.str(), *result, true);}}/* ]--- */
输出结果
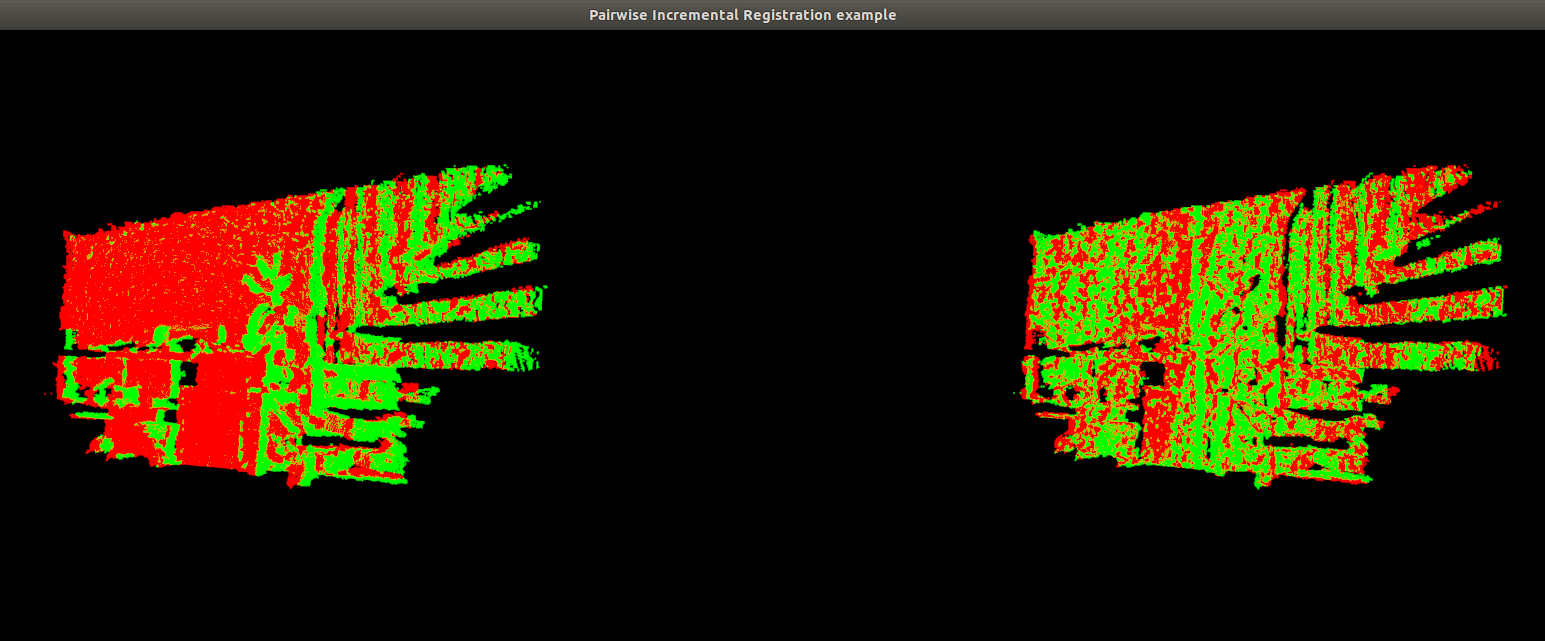
实现效果
如果观察不到结果,就按键R来重设摄像头,调整角度可以观察到有红绿两组点云显示在窗口的左边,红色为源点云,将看到下面的类似结果,命令行提示需要执行配准按下Q,按下后可以发现左边的窗口不断的调整点云,其实是配准过程中的迭代中间结果的输出,在迭代次数小于设定的次数之前,右边会不断刷新最新的配准结果,直到收敛,迭代次数30次完成整个匹配的过程,再次按下Q后会看到存储的1.pcd文件,此文件为第一个和第二个点云配准后与第一个输入点云在同一个坐标系下的点云。
3 04-配准之交互式ICP Interactive Iterative Closest Point
本教程将教您如何编写交互式ICP查看器。 该程序将加载点云并对其施加刚性变换。 之后,ICP算法会将变换后的点云与原始对齐。 每次用户按下“空格”,都会进行一次ICP迭代,并刷新查看器。
代码实现
创建文件:interactive_icp.cpp
准备资源:../monkey.ply
编译执行:./interactive_icp ../monkey.ply 1(数字为迭代次数)
个人代码:14registration配准
/*
 * @Description: 交互式ICP   http://robot.czxy.com/docs/pcl/chapter03/registration_interactive_icp/
 * @Author: HCQ
 * @Company(School): UCAS
 * @Email: 1756260160@qq.com
 * @Date: 2020-10-22 18:45:48
 * @LastEditTime: 2020-10-22 18:46:52
 * @FilePath: /pcl-learning/14registration配准/3配准之交互式ICP/interactive_icp.cpp
 */


//
// Created by ty on 20-5-29.
//

#include <string>

#include <pcl/io/ply_io.h>
#include <pcl/point_types.h>
#include <pcl/registration/icp.h>
#include <pcl/visualization/pcl_visualizer.h>
#include <pcl/console/time.h>   // TicToc

typedef pcl::PointXYZ PointT;
typedef pcl::PointCloud<PointT> PointCloudT;

bool next_iteration = false;

void
print4x4Matrix (const Eigen::Matrix4d & matrix)
{
    printf ("Rotation matrix :\n");
    printf ("    | %6.3f %6.3f %6.3f | \n", matrix (0, 0), matrix (0, 1), matrix (0, 2));
    printf ("R = | %6.3f %6.3f %6.3f | \n", matrix (1, 0), matrix (1, 1), matrix (1, 2));
    printf ("    | %6.3f %6.3f %6.3f | \n", matrix (2, 0), matrix (2, 1), matrix (2, 2));
    printf ("Translation vector :\n");
    printf ("t = < %6.3f, %6.3f, %6.3f >\n\n", matrix (0, 3), matrix (1, 3), matrix (2, 3));
}
/**
 * 此函数是查看器的回调。 当查看器窗口位于顶部时,只要按任意键,就会调用此函数。 如果碰到“空格”; 将布尔值设置为true。
 * @param event
 * @param nothing
 */
void
keyboardEventOccurred (const pcl::visualization::KeyboardEvent& event,
                       void* nothing)
{
    if (event.getKeySym () == "space" && event.keyDown ())
        next_iteration = true;
}

int
main (int argc,
      char* argv[])
{
    // The point clouds we will be using
    PointCloudT::Ptr cloud_in (new PointCloudT);  // Original point cloud
    PointCloudT::Ptr cloud_tr (new PointCloudT);  // Transformed point cloud
    PointCloudT::Ptr cloud_icp (new PointCloudT);  // ICP output point cloud

//    我们检查程序的参数,设置初始ICP迭代的次数,然后尝试加载PLY文件。
    // Checking program arguments
    if (argc < 2)
    {
        printf ("Usage :\n");
        printf ("\t\t%s file.ply number_of_ICP_iterations\n", argv[0]);
        PCL_ERROR ("Provide one ply file.\n");
        return (-1);
    }

    int iterations = 1;  // Default number of ICP iterations
    if (argc > 2)
    {
        // If the user passed the number of iteration as an argument
        iterations = atoi (argv[2]);
        if (iterations < 1)
        {
            PCL_ERROR ("Number of initial iterations must be >= 1\n");
            return (-1);
        }
    }

    pcl::console::TicToc time;
    time.tic ();
    if (pcl::io::loadPLYFile (argv[1], *cloud_in) < 0)
    {
        PCL_ERROR ("Error loading cloud %s.\n", argv[1]);
        return (-1);
    }
    std::cout << "\nLoaded file " << argv[1] << " (" << cloud_in->size () << " points) in " << time.toc () << " ms\n" << std::endl;

    // 我们使用刚性矩阵变换来变换原始点云。
    // cloud_in包含原始点云。
    // cloud_tr和cloud_icp包含平移/旋转的点云。
    // cloud_tr是我们将用于显示的备份(绿点云)。

    // Defining a rotation matrix and translation vector
    Eigen::Matrix4d transformation_matrix = Eigen::Matrix4d::Identity ();

    // A rotation matrix (see https://en.wikipedia.org/wiki/Rotation_matrix)
    double theta = M_PI / 8;  // The angle of rotation in radians
    transformation_matrix (0, 0) = std::cos (theta);
    transformation_matrix (0, 1) = -sin (theta);
    transformation_matrix (1, 0) = sin (theta);
    transformation_matrix (1, 1) = std::cos (theta);

    // A translation on Z axis (0.4 meters)
    transformation_matrix (2, 3) = 0.4;

    // Display in terminal the transformation matrix
    std::cout << "Applying this rigid transformation to: cloud_in -> cloud_icp" << std::endl;
    print4x4Matrix (transformation_matrix);

    // Executing the transformation
    pcl::transformPointCloud (*cloud_in, *cloud_icp, transformation_matrix);
    *cloud_tr = *cloud_icp;  // We backup cloud_icp into cloud_tr for later use

    // 这是ICP对象的创建。 我们设置ICP算法的参数。
    // setMaximumIterations(iterations)设置要执行的初始迭代次数(默认值为1)。
    // 然后,我们将点云转换为cloud_icp。 第一次对齐后,我们将在下一次使用该ICP对象时(当用户按下“空格”时)将ICP最大迭代次数设置为1。

    // The Iterative Closest Point algorithm
    time.tic ();
    pcl::IterativeClosestPoint<PointT, PointT> icp;
    icp.setMaximumIterations (iterations);
    icp.setInputSource (cloud_icp);
    icp.setInputTarget (cloud_in);
    icp.align (*cloud_icp);
    icp.setMaximumIterations (1);  // We set this variable to 1 for the next time we will call .align () function
    std::cout << "Applied " << iterations << " ICP iteration(s) in " << time.toc () << " ms" << std::endl;

    // 检查ICP算法是否收敛; 否则退出程序。 如果返回true,我们将转换矩阵存储在4x4矩阵中,然后打印刚性矩阵转换。
    if (icp.hasConverged ())
    {
        std::cout << "\nICP has converged, score is " << icp.getFitnessScore () << std::endl;
        std::cout << "\nICP transformation " << iterations << " : cloud_icp -> cloud_in" << std::endl;
        transformation_matrix = icp.getFinalTransformation ().cast<double>();
        print4x4Matrix (transformation_matrix);
    }
    else
    {
        PCL_ERROR ("\nICP has not converged.\n");
        return (-1);
    }

    // Visualization
    pcl::visualization::PCLVisualizer viewer ("ICP demo");
    // Create two vertically separated viewports
    int v1 (0);
    int v2 (1);
    viewer.createViewPort (0.0, 0.0, 0.5, 1.0, v1);
    viewer.createViewPort (0.5, 0.0, 1.0, 1.0, v2);

    // The color we will be using
    float bckgr_gray_level = 0.0;  // Black
    float txt_gray_lvl = 1.0 - bckgr_gray_level;

    // Original point cloud is white
    pcl::visualization::PointCloudColorHandlerCustom<PointT> cloud_in_color_h (cloud_in, (int) 255 * txt_gray_lvl, (int) 255 * txt_gray_lvl,
                                                                               (int) 255 * txt_gray_lvl);
    viewer.addPointCloud (cloud_in, cloud_in_color_h, "cloud_in_v1", v1);
    viewer.addPointCloud (cloud_in, cloud_in_color_h, "cloud_in_v2", v2);

    // Transformed point cloud is green
    pcl::visualization::PointCloudColorHandlerCustom<PointT> cloud_tr_color_h (cloud_tr, 20, 180, 20);
    viewer.addPointCloud (cloud_tr, cloud_tr_color_h, "cloud_tr_v1", v1);

    // ICP aligned point cloud is red
    pcl::visualization::PointCloudColorHandlerCustom<PointT> cloud_icp_color_h (cloud_icp, 180, 20, 20);
    viewer.addPointCloud (cloud_icp, cloud_icp_color_h, "cloud_icp_v2", v2);

    // Adding text descriptions in each viewport
    viewer.addText ("White: Original point cloud\nGreen: Matrix transformed point cloud", 10, 15, 16, txt_gray_lvl, txt_gray_lvl, txt_gray_lvl, "icp_info_1", v1);
    viewer.addText ("White: Original point cloud\nRed: ICP aligned point cloud", 10, 15, 16, txt_gray_lvl, txt_gray_lvl, txt_gray_lvl, "icp_info_2", v2);

    std::stringstream ss;
    ss << iterations;
    std::string iterations_cnt = "ICP iterations = " + ss.str ();
    viewer.addText (iterations_cnt, 10, 60, 16, txt_gray_lvl, txt_gray_lvl, txt_gray_lvl, "iterations_cnt", v2);

    // Set background color
    viewer.setBackgroundColor (bckgr_gray_level, bckgr_gray_level, bckgr_gray_level, v1);
    viewer.setBackgroundColor (bckgr_gray_level, bckgr_gray_level, bckgr_gray_level, v2);

    // Set camera position and orientation
    viewer.setCameraPosition (-3.68332, 2.94092, 5.71266, 0.289847, 0.921947, -0.256907, 0);
    viewer.setSize (1280, 1024);  // Visualiser window size

    // Register keyboard callback :
    viewer.registerKeyboardCallback (&keyboardEventOccurred, (void*) NULL);

    // Display the visualiser
    while (!viewer.wasStopped ())
    {
        viewer.spinOnce ();

        // The user pressed "space" :
        if (next_iteration)
        {
            // The Iterative Closest Point algorithm
            time.tic ();
            // 如果用户按下键盘上的任意键,则会调用keyboardEventOccurred函数。 此功能检查键是否为“空格”。
            // 如果是,则全局布尔值next_iteration设置为true,从而允许查看器循环输入代码的下一部分:调用ICP对象以进行对齐。
            // 记住,我们已经配置了该对象输入/输出云,并且之前通过setMaximumIterations将最大迭代次数设置为1。

            icp.align (*cloud_icp);
            std::cout << "Applied 1 ICP iteration in " << time.toc () << " ms" << std::endl;

            // 和以前一样,我们检查ICP是否收敛,如果不收敛,则退出程序。
            if (icp.hasConverged ())
            {
                // printf(“ 033 [11A”); 在终端增加11行以覆盖显示的最后一个矩阵是一个小技巧。
                // 简而言之,它允许替换文本而不是编写新行; 使输出更具可读性。 我们增加迭代次数以更新可视化器中的文本值。
                printf ("\033[11A");  // Go up 11 lines in terminal output.
                printf ("\nICP has converged, score is %+.0e\n", icp.getFitnessScore ());

                // 这意味着,如果您已经完成了10次迭代,则此函数返回矩阵以将点云从迭代10转换为11。
                std::cout << "\nICP transformation " << ++iterations << " : cloud_icp -> cloud_in" << std::endl;

                // 函数getFinalTransformation()返回在迭代过程中完成的刚性矩阵转换(此处为1次迭代)。
                transformation_matrix *= icp.getFinalTransformation ().cast<double>();  // WARNING /!\ This is not accurate! For "educational" purpose only!
                print4x4Matrix (transformation_matrix);  // Print the transformation between original pose and current pose

                ss.str ("");
                ss << iterations;
                std::string iterations_cnt = "ICP iterations = " + ss.str ();
                viewer.updateText (iterations_cnt, 10, 60, 16, txt_gray_lvl, txt_gray_lvl, txt_gray_lvl, "iterations_cnt");
                viewer.updatePointCloud (cloud_icp, cloud_icp_color_h, "cloud_icp_v2");
            }
            else
            {
                PCL_ERROR ("\nICP has not converged.\n");
                return (-1);
            }

            //这不是我们想要的。 如果我们将最后一个矩阵与新矩阵相乘,那么结果就是从开始到当前迭代的转换矩阵。
        }
        next_iteration = false;
    }
    return (0);
}
输出结果
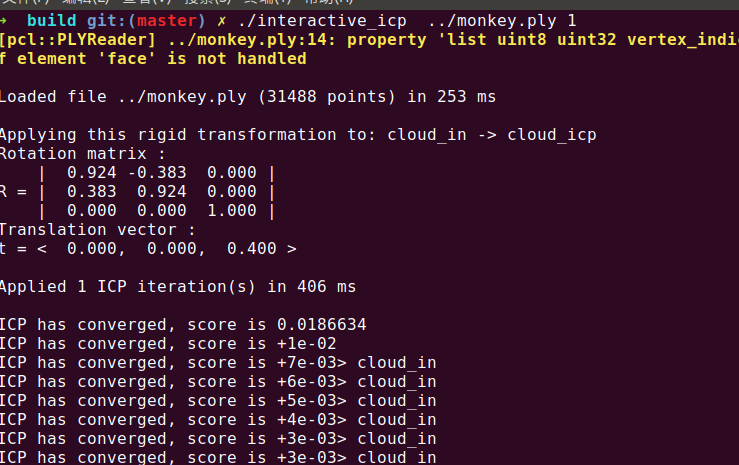
执行以下命令:./interactive_icp monkey.ply 1
请记住,如果您过多的通过按“空格”进行多次迭代,则显示的矩阵可能不是很准确。
如果ICP表现出色,则两个矩阵的值应完全相同,并且ICP找到的矩阵的对角线外的符号应相反。 例如
|  0.924 -0.383  0.000 |
R = |  0.383  0.924  0.000 |
    |  0.000  0.000  1.000 |
Translation vector :
t = <  0.000,  0.000,  0.400 >
    |  0.924  0.383  0.000 |
R = | -0.383  0.924  0.000 |
    |  0.000  0.000  1.000 |
Translation vector :
t = <  0.000,  0.000, -0.400 >

实现效果

4 正态分布变换配准(NDT) How to use Normal Distributions Transform
正态分布变换配准(NDT)
PCL点云配准(2)
用正态分布变换算法来确定两个大型点云(都超过 100 000个点)之间的刚体变换。正态分布变换算法是一个配准算法 , 它应用于 三维点的统计模型,使用标准最优化技术来确定两个点云间的最优的匹配,因为其在配准过程中不利用对应点的特征计算和匹配,所以时间比其他方法快,更多关于正态分布变换算法的详细的信息,请看 Martin Magnusson 博士的博士毕业论文“The Three-Dimensional Normal Distributions Transform – an Efficient Representation for Registration, Surface Analysis, and Loop Detection.”。
点此下载房间扫描 文件一,文件二
代码实现
创建文件:normal_distributions_transform.cpp
准备资源:../room_scan1.pcd ../room_scan2.pcd
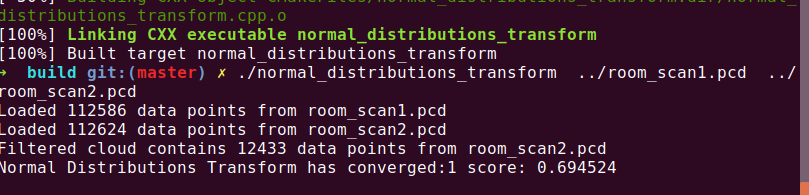
编译执行:./normal_distributions_transform ../room_scan1.pcd ../room_scan2.pcd
个人代码:14registration配准
/*
 * @Description:  使用正态分布变换进行配准
 * https://www.cnblogs.com/li-yao7758258/p/6554582.html
 * http://robot.czxy.com/docs/pcl/chapter03/registration/#ndt
 * @Author: HCQ
 * @Company(School): UCAS
 * @Email: 1756260160@qq.com
 * @Date: 2020-10-22 19:20:43
 * @LastEditTime: 2020-10-22 19:26:04
 * @FilePath: /pcl-learning/14registration配准/4正态分布变换配准(NDT)/normal_distributions_transform.cpp
 */
/*
使用正态分布变换进行配准的实验 。其中room_scan1.pcd  room_scan2.pcd这些点云包含同一房间360不同视角的扫描数据
*/
#include <iostream>
#include <pcl/io/pcd_io.h>
#include <pcl/point_types.h>

#include <pcl/registration/ndt.h>      //NDT(正态分布)配准类头文件
#include <pcl/filters/approximate_voxel_grid.h>   //滤波类头文件  (使用体素网格过滤器处理的效果比较好)

#include <pcl/visualization/pcl_visualizer.h>
#include <boost/thread/thread.hpp>

int
main (int argc, char** argv)
{
  // 加载房间的第一次扫描点云数据作为目标
  pcl::PointCloud<pcl::PointXYZ>::Ptr target_cloud (new pcl::PointCloud<pcl::PointXYZ>);
  if (pcl::io::loadPCDFile<pcl::PointXYZ> ("../room_scan1.pcd", *target_cloud) == -1)
  {
    PCL_ERROR ("Couldn't read file room_scan1.pcd \n");
    return (-1);
  }
  std::cout << "Loaded " << target_cloud->size () << " data points from room_scan1.pcd" << std::endl;

  // 加载从新视角得到的第二次扫描点云数据作为源点云
  pcl::PointCloud<pcl::PointXYZ>::Ptr input_cloud (new pcl::PointCloud<pcl::PointXYZ>);
  if (pcl::io::loadPCDFile<pcl::PointXYZ> ("../room_scan2.pcd", *input_cloud) == -1)
  {
    PCL_ERROR ("Couldn't read file room_scan2.pcd \n");
    return (-1);
  }
  std::cout << "Loaded " << input_cloud->size () << " data points from room_scan2.pcd" << std::endl;
  //以上的代码加载了两个PCD文件得到共享指针,后续配准是完成对源点云到目标点云的参考坐标系的变换矩阵的估计,得到第二组点云变换到第一组点云坐标系下的变换矩阵
  // 将输入的扫描点云数据过滤到原始尺寸的10%以提高匹配的速度,只对源点云进行滤波,减少其数据量,而目标点云不需要滤波处理
  //因为在NDT算法中在目标点云对应的体素网格数据结构的统计计算不使用单个点,而是使用包含在每个体素单元格中的点的统计数据
  pcl::PointCloud<pcl::PointXYZ>::Ptr filtered_cloud (new pcl::PointCloud<pcl::PointXYZ>);
  pcl::ApproximateVoxelGrid<pcl::PointXYZ> approximate_voxel_filter;
  approximate_voxel_filter.setLeafSize (0.2, 0.2, 0.2);
  approximate_voxel_filter.setInputCloud (input_cloud);
  approximate_voxel_filter.filter (*filtered_cloud);
  std::cout << "Filtered cloud contains " << filtered_cloud->size ()
            << " data points from room_scan2.pcd" << std::endl;

  // 初始化正态分布(NDT)对象
  pcl::NormalDistributionsTransform<pcl::PointXYZ, pcl::PointXYZ> ndt;

  // 根据输入数据的尺度设置NDT相关参数

  ndt.setTransformationEpsilon (0.01);   //为终止条件设置最小转换差异

  ndt.setStepSize (0.1);    //为more-thuente线搜索设置最大步长

  ndt.setResolution (1.0);   //设置NDT网格网格结构的分辨率(voxelgridcovariance)
  //以上参数在使用房间尺寸比例下运算比较好,但是如果需要处理例如一个咖啡杯子的扫描之类更小的物体,需要对参数进行很大程度的缩小

  //设置匹配迭代的最大次数,这个参数控制程序运行的最大迭代次数,一般来说这个限制值之前优化程序会在epsilon变换阀值下终止
  //添加最大迭代次数限制能够增加程序的鲁棒性阻止了它在错误的方向上运行时间过长
  ndt.setMaximumIterations (35);

  ndt.setInputSource (filtered_cloud);  //源点云
  // Setting point cloud to be aligned to.
  ndt.setInputTarget (target_cloud);  //目标点云

  // 设置使用机器人测距法得到的粗略初始变换矩阵结果
  Eigen::AngleAxisf init_rotation (0.6931, Eigen::Vector3f::UnitZ ());
  Eigen::Translation3f init_translation (1.79387, 0.720047, 0);
  Eigen::Matrix4f init_guess = (init_translation * init_rotation).matrix ();

  // 计算需要的刚体变换以便将输入的源点云匹配到目标点云
  pcl::PointCloud<pcl::PointXYZ>::Ptr output_cloud (new pcl::PointCloud<pcl::PointXYZ>);
  ndt.align (*output_cloud, init_guess);
   //这个地方的output_cloud不能作为最终的源点云变换,因为上面对点云进行了滤波处理
  std::cout << "Normal Distributions Transform has converged:" << ndt.hasConverged ()
            << " score: " << ndt.getFitnessScore () << std::endl;

  // 使用创建的变换对为过滤的输入点云进行变换
  pcl::transformPointCloud (*input_cloud, *output_cloud, ndt.getFinalTransformation ());

  // 保存转换后的源点云作为最终的变换输出
  pcl::io::savePCDFileASCII ("room_scan2_transformed.pcd", *output_cloud);

  // 初始化点云可视化对象
  boost::shared_ptr<pcl::visualization::PCLVisualizer>
  viewer_final (new pcl::visualization::PCLVisualizer ("3D Viewer"));
  viewer_final->setBackgroundColor (0, 0, 0);  //设置背景颜色为黑色

  // 对目标点云着色可视化 (red).
  pcl::visualization::PointCloudColorHandlerCustom<pcl::PointXYZ>
  target_color (target_cloud, 255, 0, 0);
  viewer_final->addPointCloud<pcl::PointXYZ> (target_cloud, target_color, "target cloud");
  viewer_final->setPointCloudRenderingProperties (pcl::visualization::PCL_VISUALIZER_POINT_SIZE,
                                                  1, "target cloud");

  // 对转换后的源点云着色 (green)可视化.
  pcl::visualization::PointCloudColorHandlerCustom<pcl::PointXYZ>
  output_color (output_cloud, 0, 255, 0);
  viewer_final->addPointCloud<pcl::PointXYZ> (output_cloud, output_color, "output cloud");
  viewer_final->setPointCloudRenderingProperties (pcl::visualization::PCL_VISUALIZER_POINT_SIZE,
                                                  1, "output cloud");

  // 启动可视化
  viewer_final->addCoordinateSystem (1.0);  //显示XYZ指示轴
  viewer_final->initCameraParameters ();   //初始化摄像头参数

  // 等待直到可视化窗口关闭
  while (!viewer_final->wasStopped ())
  {
    viewer_final->spinOnce (100);
    boost::this_thread::sleep (boost::posix_time::microseconds (100000));
  }

  return (0);
}
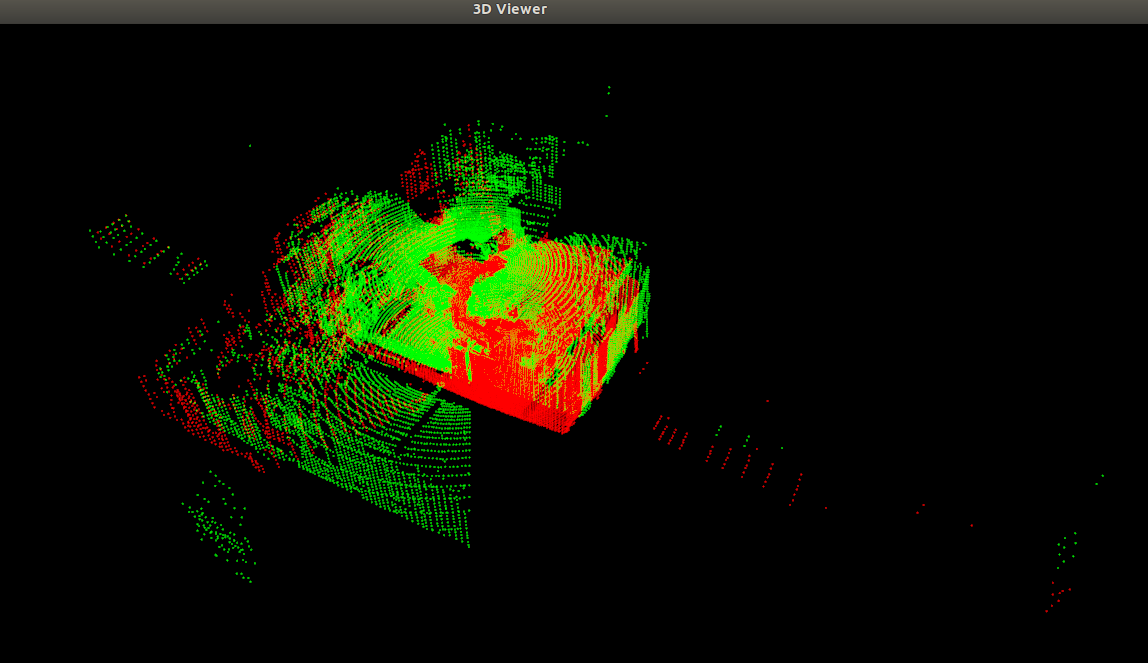
输出结果
实现效果
5 刚性物体的鲁棒姿态估计 Robust pose estimation of rigid objects
刚性物体的鲁棒姿态估计
在本教程中,我们将展示如何在具有杂波和遮挡的场景中找到刚体的对齐姿势。
资源准备:对象模型 和 场景模型
代码实现
创建文件:alignment_prerejective.cpp
准备资源:../data/chef.pcd ../data/rs1.pcd
编译执行:./alignment_prerejective ../chef.pcd ../rs1.pcd
个人代码:14registration配准
/*
 * @Description:  5刚性物体的鲁棒姿态估计  http://robot.czxy.com/docs/pcl/chapter03/registration/#_9
 * https://blog.csdn.net/zfjBIT/article/details/94566603
 * @Author: HCQ
 * @Company(School): UCAS
 * @Email: 1756260160@qq.com
 * @Date: 2020-10-22 19:29:32
 * @LastEditTime: 2020-10-23 10:36:17
 * @FilePath: /pcl-learning/14registration配准/5刚性物体的鲁棒姿态估计/alignment_prerejective.cpp
 */

#include <Eigen/Core>
#include <pcl/point_types.h>
#include <pcl/point_cloud.h>
#include <pcl/common/time.h>
#include <pcl/console/print.h>
#include <pcl/features/normal_3d_omp.h>
#include <pcl/features/fpfh_omp.h>
#include <pcl/filters/filter.h>
#include <pcl/filters/voxel_grid.h>
#include <pcl/io/pcd_io.h>
#include <pcl/registration/icp.h>
#include <pcl/registration/sample_consensus_prerejective.h>
#include <pcl/segmentation/sac_segmentation.h>
#include <pcl/visualization/pcl_visualizer.h>

// 首先从定义类型开始,以免使代码混乱
// Types
typedef pcl::PointNormal PointNT;
typedef pcl::PointCloud<PointNT> PointCloudT;
typedef pcl::FPFHSignature33 FeatureT;
typedef pcl::FPFHEstimationOMP<PointNT,PointNT,FeatureT> FeatureEstimationT;
typedef pcl::PointCloud<FeatureT> FeatureCloudT;
typedef pcl::visualization::PointCloudColorHandlerCustom<PointNT> ColorHandlerT;

// Align a rigid object to a scene with clutter and occlusions
int
main (int argc, char **argv)
{
  // 然后,我们实例化必要的数据容器,检查输入参数并加载对象和场景点云。
  // Point clouds
  PointCloudT::Ptr object (new PointCloudT);
  PointCloudT::Ptr object_aligned (new PointCloudT);
  PointCloudT::Ptr scene (new PointCloudT);
  FeatureCloudT::Ptr object_features (new FeatureCloudT);
  FeatureCloudT::Ptr scene_features (new FeatureCloudT);

  // Get input object and scene
  if (argc != 3)
  {
    pcl::console::print_error ("Syntax is: %s object.pcd scene.pcd\n", argv[0]);
    return (1);
  }

  // Load object and scene
  pcl::console::print_highlight ("Loading point clouds...\n");
  if (pcl::io::loadPCDFile<PointNT> (argv[1], *object) < 0 ||  pcl::io::loadPCDFile<PointNT> (argv[2], *scene) < 0) // 判断加载点云文件失败
  {
    pcl::console::print_error ("Error loading object/scene file!\n");
    return (1);
  }

  // 1 Downsample 下采样:使用0.005提速分辨率对目标物体和场景点云进行空间下采样
  // 为了加快处理速度,我们使用PCL的:pcl::VoxelGrid类将对象和场景点云的采样率下采样至5 mm。
  pcl::console::print_highlight ("Downsampling...\n");
  pcl::VoxelGrid<PointNT> grid;
  const float leaf = 0.005f;
  grid.setLeafSize (leaf, leaf, leaf);
  grid.setInputCloud (object);  // 对象下采样
  grid.filter (*object);
  grid.setInputCloud (scene); // 场景下采样
  grid.filter (*scene);

  // 2 估计场景法线 Estimate normals for scene
  pcl::console::print_highlight ("Estimating scene normals...\n");
  pcl::NormalEstimationOMP<PointNT,PointNT> nest;
  nest.setRadiusSearch (0.01);
  nest.setInputCloud (scene);
  nest.compute (*scene);

  // 3 特征估计 Estimate features
  // 对于下采样点云中的每个点,我们现在使用PCL的pcl::FPFHEstimationOMP<>类来计算用于对齐过程中用于匹配的快速点特征直方图(FPFH)描述符。
  pcl::console::print_highlight ("Estimating features...\n");
  FeatureEstimationT fest;
  fest.setRadiusSearch (0.025);
  fest.setInputCloud (object);
  fest.setInputNormals (object);
  fest.compute (*object_features);
  fest.setInputCloud (scene);
  fest.setInputNormals (scene);
  fest.compute (*scene_features);

  // 4 对齐配准对象创建与配置  实施配准Perform alignment
  // SampleConsensusPrerejective 实现了有效的RANSAC姿势估计循环
  pcl::console::print_highlight ("Starting alignment...\n");
  pcl::SampleConsensusPrerejective<PointNT,PointNT,FeatureT> align; // //基于采样一致性的位姿估计
  align.setInputSource (object); // 对象
  align.setSourceFeatures (object_features); // 对象特征
  align.setInputTarget (scene);  // 场景
  align.setTargetFeatures (scene_features); //  场景特征
  align.setMaximumIterations (50000); // 采样一致性迭代次数 Number of RANSAC iterations
  align.setNumberOfSamples (3); // 在对象和场景之间进行采样的点对应数。 至少需要3个点才能计算姿势。Number of points to sample for generating/prerejecting a pose
  align.setCorrespondenceRandomness (5); //  使用的临近特征点的数目 Number of nearest features to use
  align.setSimilarityThreshold (0.9f); // 多边形边长度相似度阈值 Polygonal edge length similarity threshold
  align.setMaxCorrespondenceDistance (2.5f * leaf); // 判断是否为内点的距离阈值 Inlier threshold
  align.setInlierFraction (0.25f); //  接受位姿假设所需的内点比例 Required inlier fraction for accepting a pose hypothesis
  {
    pcl::ScopeTime t("Alignment");
    align.align (*object_aligned); // 对齐的对象存储在点云object_aligned中。
  }

  if (align.hasConverged ())
  {
    // Print results
    printf ("\n");
    Eigen::Matrix4f transformation = align.getFinalTransformation ();
    pcl::console::print_info ("    | %6.3f %6.3f %6.3f | \n", transformation (0,0), transformation (0,1), transformation (0,2));
    pcl::console::print_info ("R = | %6.3f %6.3f %6.3f | \n", transformation (1,0), transformation (1,1), transformation (1,2));
    pcl::console::print_info ("    | %6.3f %6.3f %6.3f | \n", transformation (2,0), transformation (2,1), transformation (2,2));
    pcl::console::print_info ("\n");
    pcl::console::print_info ("t = < %0.3f, %0.3f, %0.3f >\n", transformation (0,3), transformation (1,3), transformation (2,3));
    pcl::console::print_info ("\n");
    pcl::console::print_info ("Inliers: %i/%i\n", align.getInliers ().size (), object->size ()); // Inliers: 1384/3432

    // Show alignment
    pcl::visualization::PCLVisualizer visu("Alignment-刚性物体的鲁棒姿态估计");
    visu.addPointCloud (scene, ColorHandlerT (scene, 0.0, 255.0, 0.0), "scene");
    visu.addPointCloud (object_aligned, ColorHandlerT (object_aligned, 0.0, 0.0, 255.0), "object_aligned");
    visu.spin ();
  }
  else
  {
    pcl::console::print_error ("Alignment failed!\n");
    return (1);
  }

  return (0);
}
输出结果
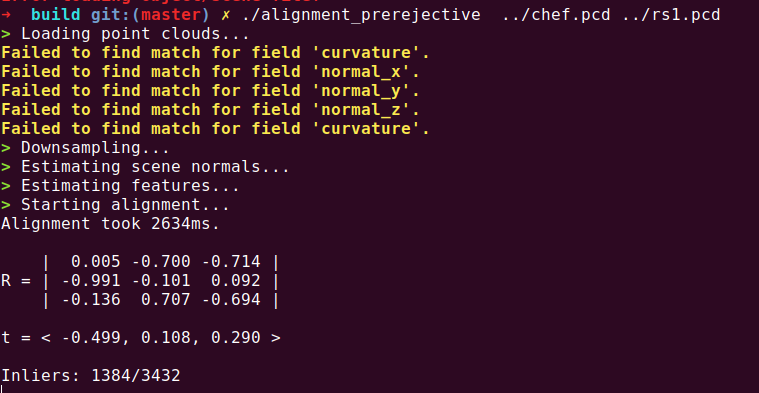
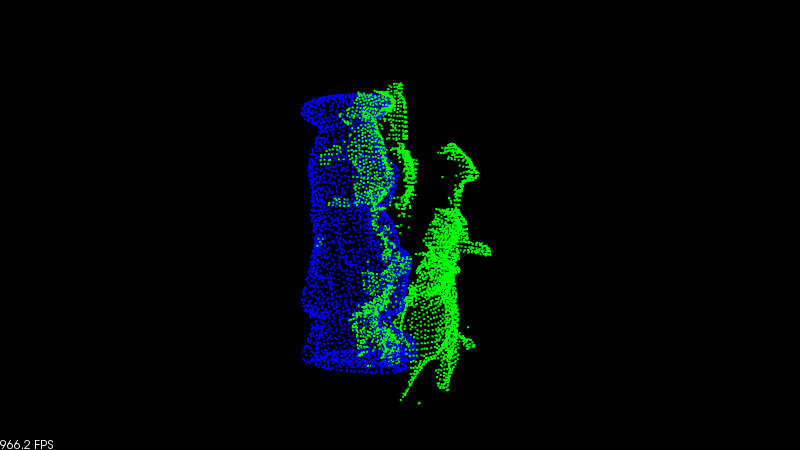
实现效果
可视化窗口应该如下图所示。场景显示为绿色,对齐的对象模型显示为蓝色。注意大量不可见的对象点。
**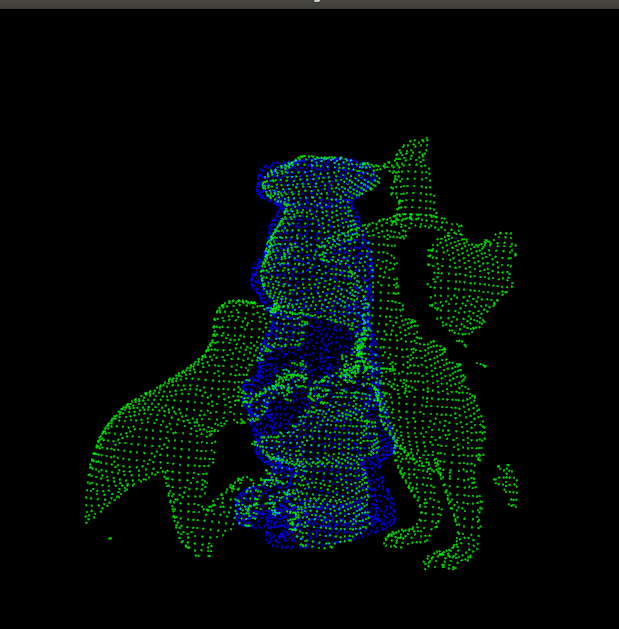

- 前视图
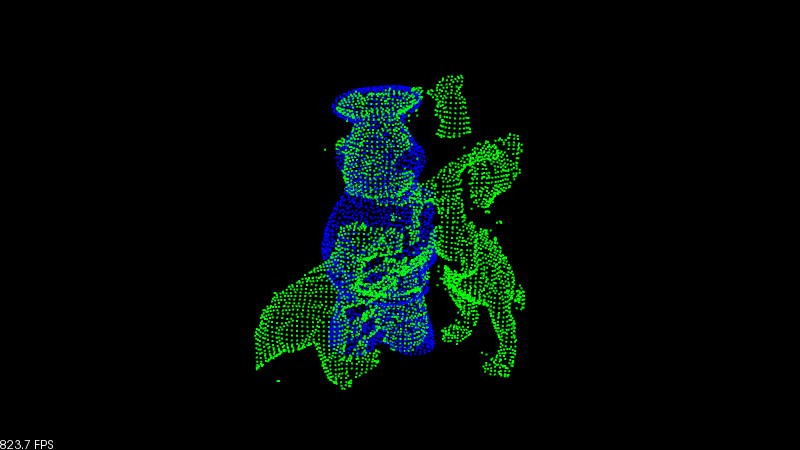
- 侧视图
6 手持式小型物品扫描仪 ~~[In-hand scanner for small objects理论 无代码~~](https://pcl.readthedocs.io/projects/tutorials/en/latest/in_hand_scanner.html#in-hand-scanner)
如何使用手持式扫描仪应用程序通过RGB-D相机获取小物体的彩色模型。

若有收获,就点个赞吧
0 人点赞
