一、线程相关概念
1.1 程序
程序是为了完成特定任务,用某种语言编写的一组指令的集合。
简单来说,就是我们写的代码
1.2 进程
- 进程是指运行中的程序,比如我们使用QQ,就启动了一个进程,操作系统就会为该进程分配内存空间。当我们打开另一个程序,比如运行迅雷,就启动了另一个进程,操作系统也会为迅雷分配新的内存空间
- 进程是程序的一次执行过程,或者理解为正在运行的一个程序。是一个动态的过程:即有创建、存在和消亡的状态和过程。
1.3 线程
- 线程是由进程创建的,是进程的一个实体
- 一个进程可以拥有多个线程
1.4 其他相关概念
- 单线程:同一个时刻,只允许执行一个线程
- 多线程,同一个时刻,允许多个线程并发执行。比如:一个QQ进程,可以同时打开多个聊天窗口,一个迅雷进程,可以同时下载多个文件
- 并发:同一个极短时间段内,多个任务交替执行,感觉就像在同一时刻同时执行,一般来说,单核CPU实现的多任务就是并发。
- 并行:同一时刻,多个任务同时执行。多核CPU可以实现并行,可以并发和并行同时工作
二、线程基本使用
2.1 创建线程的两种方式
- 继承 Thread类,重写 run 方法
- 实现 Runnable 接口,重写 run 方法
2.2 线程应用案例1 - 继承 Thread 类
- 请编写程序,开启一个线程,该线程每隔1秒。在控制台输出“喵喵,我是小猫咪”
- 对上题改进:当输出80次 “喵喵,我是小猫咪”,结束该线程
- 使用 JConsole 监控线程执行情况,并画出程序示意图 ```java package com.hspedu.thread.threaduse;
/**
- @author HarborGao
- @version 1.0
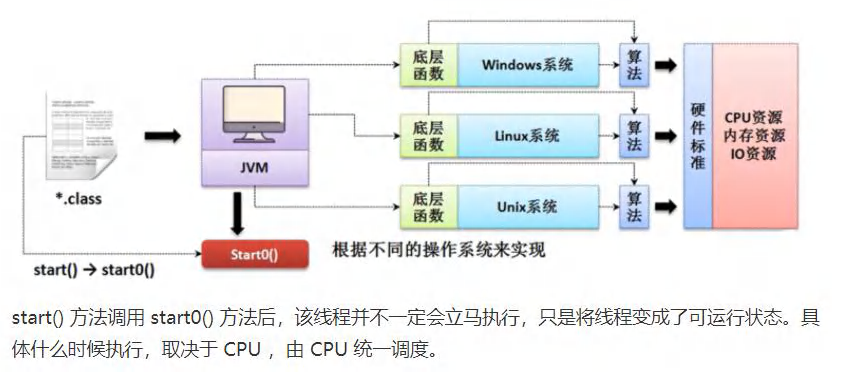
演示通过继承 Thread 类创建线程 */ public class Thread01 { public static void main(String[] args) {
//创建 Cat对象,可以当作线程使用Cat cat = new Cat();//源码解读/*(1) public synchronized void start() {...start0();...}(2) start0() 是本地方法,是JVM调用,底层是 C/C++实现真正实现多线程的效果,是start0(),而不是 runprivate native void start0();*/cat.start(); //启动线程//cat.run(); //run方法就是一个普通的方法,并没有真正的启动一个线程,main会执行完这句之后再执行后面的语句,相当于还在main线程//说明:当 main线程启动一个子线程 Thread-0,主线程不会阻塞,会继续执行//这时,主线程和子线程是交替执行的System.out.println("主线程继续执行" + Thread.currentThread().getName());//名字 mainfor(int i = 0; i < 60; i++) {System.out.println("主线程 i=" + i);//让主线程休眠Thread.sleep(1000);}
} }
//说明 //1. 当一个类继承了 Thread类,该类就可以当作线程使用 //2. 我们会重写 run方法,写上自己的业务代码 //3. run Thread类,实现了Runnable 接口的 run方法 / @Override public void run() { if (target != null) { target.run(); } } / class Cat extends Thread { int times = 0;
@Overridepublic void run() { //重写 run方法,写上自己的业务逻辑while (true) {//该线程每隔1秒。在控制台输出“喵喵,我是小猫咪”System.out.println("喵喵,我是小猫咪" + (++times));//让该线程休眠1秒钟 ctrl + alt + t 抓取Exceptiontry {Thread.sleep(1000);} catch (InterruptedException e) {e.printStackTrace();}if (times == 20) {break; //当times到20,就退出循环,这时线程也就退出了}}}
}
<br />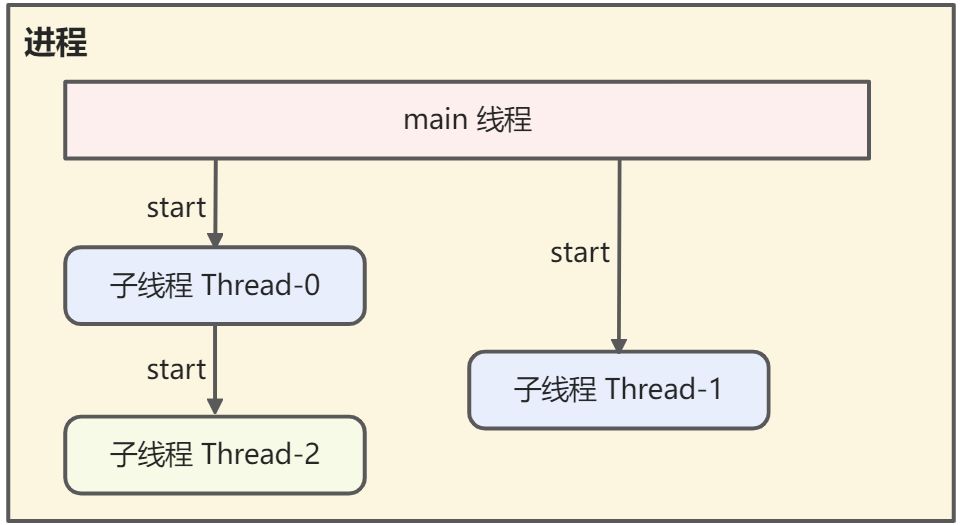<br />说明:1. main线程可以启动多个子线程1. 子线程也可以启动子线程1. 即使main线程退出了,只要还有子线程在工作,进程依旧存在**使用 JConsole 监控线程**<br />( 1 ) Run 我们编写的程序<br /> <br />( 2 ) 控制台选择 Terminal,键入 jconsole 并回车<br />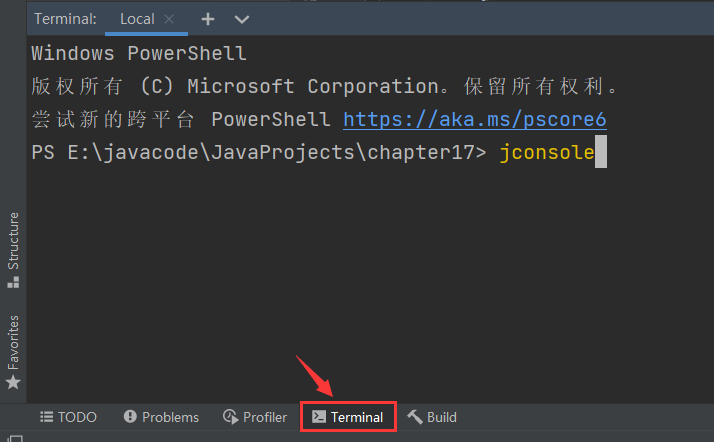<br />( 3 ) 选择本地连接,选中运行的代码文件,点击连接,点击不安全的连接<br />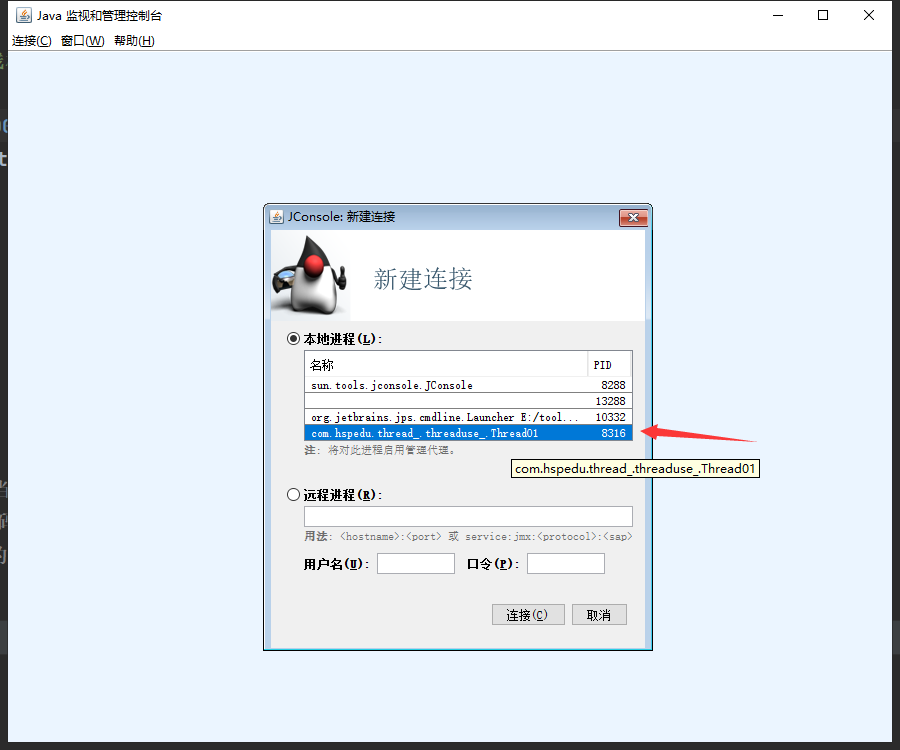<br />注意:如果本地进程列表为空,说明JConsole本地文件夹读写权限不够,解决方案:1. 先定位到这个文件夹下 C:\Users\%USER%\AppData\Local\Temp <br />%USER%是你的系统登录用户名,一般为 Administrator,下同1. 找到 hsperfdata_%USER% 目录,右键属性 -> 安全1. 点击 编辑 然后给相关用户添加完全控制的权限,应用,确定( 4 ) 选择线程,就可以进行监控了<br />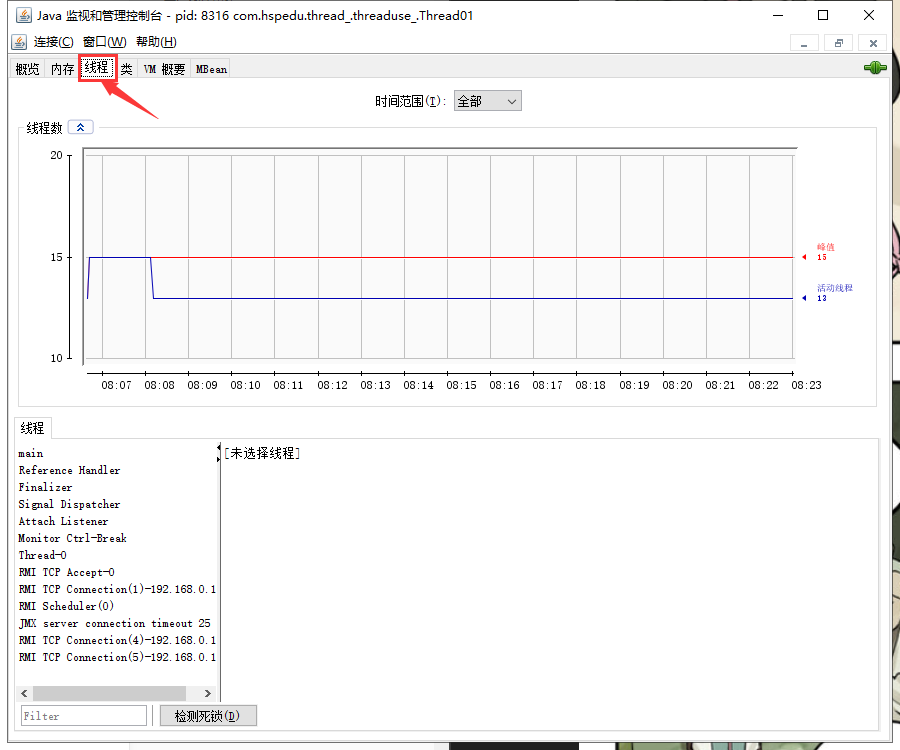<a name="aamKh"></a>#### 2.3 线程应用案例2 - 实现 Runnable 接口1. Java是单继承的,在某些情况下一个类可能已经继承了一个父类,这时在用继承Thread类的方法来创建线程显然不可能了1. Java设计者们提供了另外一个方式创建线程,就是通过实现 Runnable 接口来创建线程快速上手 - 案例编写程序,该程序每隔一秒,在控制台输出 “hi~”,当输出10次后,自动退出,请使用 Runnable接口的方式实现。```javapackage com.hspedu.thread_.threaduse_;/*** @author HarborGao* @version 1.0* 通过实现接口 Runnable 来开发线程*/public class Runnable01 {public static void main(String[] args) {Dog dog = new Dog();//注意:这里不能使用 dog.start(); 的方式启动线程//创建 Thread 对象,把 dog 对象(实现 Runnable),放入 ThreadThread thread = new Thread(dog);thread.start();}}class Animal{}class Dog extends Animal implements Runnable{private int count;@Overridepublic void run() {while (true) {System.out.println(Thread.currentThread().getName() + " hi~ " + (++count));try {Thread.sleep(1000);} catch (InterruptedException e) {e.printStackTrace();}if (count == 10) {break;}}}}
使用实现Runnable接口的方式创建线程,其实底层是使用了代理模式这种设计模式,在后面设计模式会详细介绍,这里演示一个简单的案例。
package com.hspedu.thread_.threaduse_;/*** @author HarborGao* @version 1.0*/public class Proxy_ {public static void main(String[] args) {Tiger tiger = new Tiger();ThreadProxy threadProxy = new ThreadProxy(tiger);threadProxy.start();}}class Tiger extends Animal implements Runnable{private int count;@Overridepublic void run() {while (true) {System.out.println("老虎叫" + (++count) + "声~");try {Thread.sleep(500);} catch (InterruptedException e) {e.printStackTrace();}if (count == 10) break;}}}//代理模式 极简案例class ThreadProxy implements Runnable { //模拟Threadprivate Runnable target = null;public ThreadProxy(Runnable i) { //传入实现了Runnable的tigerthis.target = i;}@Overridepublic void run() {if (target != null) {target.run(); //动态绑定(类型是Tiger)}}public void start() {start0(); //这个方法时真正实现多线程方法}public void start0() {run();}}
2.4 线程使用应用案例 - 多线程执行
编写一个程序,创建两个线程,一个线程每隔1秒输出”hello,world”,输出10次退出;另一个线程每隔1秒输出”hello,java”,输出5次退出。
package com.hspedu.thread_.threaduse_;/*** @author HarborGao* @version 1.0*/public class Thread02 {public static void main(String[] args) {PrintHello printHello = new PrintHello();PrintJava printJava = new PrintJava();printHello.start();printJava.start();}}class PrintHello extends Thread {private int count;@Overridepublic void run() {while (true) {System.out.println("hello,world " + (++count));try {Thread.sleep(1000);} catch (InterruptedException e) {e.printStackTrace();}if (count == 10) break;}}}class PrintJava extends Thread {private int count;@Overridepublic void run() {while (true) {System.out.println("hello,java " + (++count));try {Thread.sleep(1000);} catch (InterruptedException e) {e.printStackTrace();}if (count == 5) break;}}}
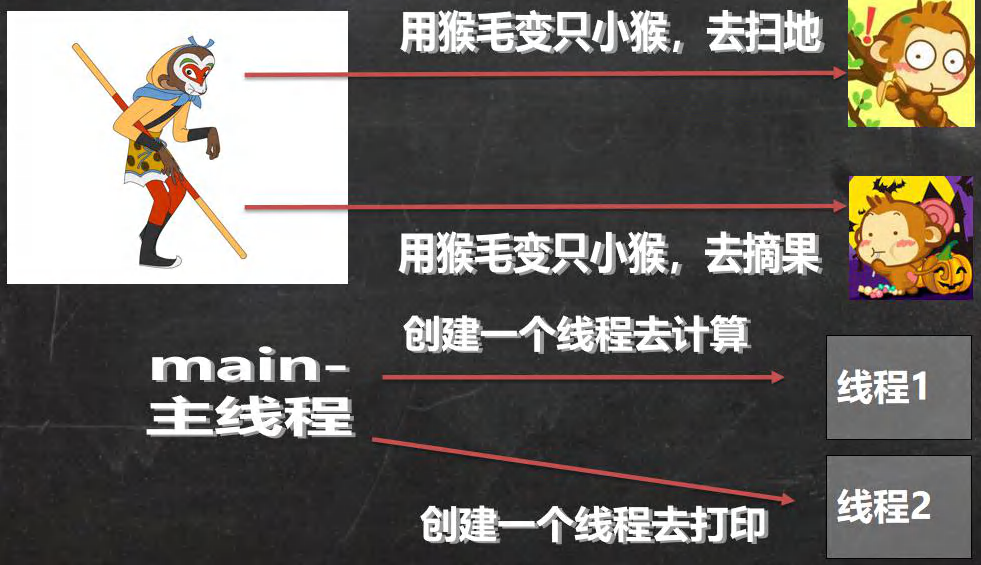
2.5 如何理解线程
2.6 继承 Thread 和实现 Runnable 接口的区别
- 从Java的设计来看,通过继承 Thread 或者实现 Runnable 接口来创建线程本质上没有区别,从 jdk帮助文档我们可以看到 Thread 类本身就实现了 Runnable 接口。
- 实现 Runnable 接口方式更加适合多个线程共享一个资源的情况,且避免了单继承的限制,建议用Runnable
案例演示:售票系统
编程模拟三个售票窗口售票100张,分别使用 继承Thread 和 实现 Runnable 方式 模拟,并分析存在的问题。
package com.hspedu.thread_.threaduse_;/*** @author HarborGao* @version 1.0、* 使用多线程,模拟三个窗口同时售票 100 张*/public class TicketSell {public static void main(String[] args) {/*//使用 ThreadThreadSell threadSell1 = new ThreadSell();ThreadSell threadSell2 = new ThreadSell();ThreadSell threadSell3 = new ThreadSell();threadSell1.start();threadSell2.start();threadSell3.start();*///使用 RunnableRunSell runSell = new RunSell();new Thread(runSell).start();new Thread(runSell).start();new Thread(runSell).start();}}class ThreadSell extends Thread {private static int tickets = 10;@Overridepublic void run() {while (true) {if (tickets > 0) {System.out.println(Thread.currentThread().getName() + " 窗口售出了一张票,剩余门票 " + (--tickets));try {Thread.sleep(50);} catch (InterruptedException e) {e.printStackTrace();}} else {System.out.println("票已售完...");break;}}}}class RunSell implements Runnable {private static int tickets = 100;@Overridepublic void run() {while (true) {if (tickets > 0) {System.out.println(Thread.currentThread().getName() + " 窗口售出了一张票,剩余门票 " + (--tickets));try {Thread.sleep(50);} catch (InterruptedException e) {e.printStackTrace();}} else {System.out.println("票已售完...");break;}}}}
均存在的问题:售出票的总数大于实际票数,可能出现剩余票数为负数的情况
三、线程终止
3.1 基本说明
- 当线程完成任务后,会自动退出
- 还可以通过使用变量来控制 run 方法退出的方式停止线程,即通知方式
应用案例 - 使用通知方式控制线程停止
package com.hspedu.thread_.threaduse_;/*** @author HarborGao* @version 1.0*/public class BreakThread {public static void main(String[] args) {WhileAll whileAll = new WhileAll();whileAll.start();//10秒后停止子线程try {Thread.sleep(10000);} catch (InterruptedException e) {e.printStackTrace();}whileAll.setLoop(false);}}class WhileAll extends Thread {private int time;private boolean loop = true;@Overridepublic void run() {while (loop) {System.out.println(Thread.currentThread().getName() + " 线程已经运行 " + (++time) + " 秒");try {Thread.sleep(1000);} catch (InterruptedException e) {e.printStackTrace();}}}public void setLoop(boolean loop) {this.loop = loop;}}
四、线程常用方法
4.1 常用方法第一组
| setName | 设置线程名称,使之与参数 name 相同 |
|---|---|
| getName | 返回该线程的名称 |
| start | 使该线程开始执行,即在JVM底层调用该线程的 start0 方法 |
| run | 调用线程对象 run 方法 |
| setPriority | 更改线程的优先级 |
| getPriority | 获取线程的优先级 |
| sleep | 在指定的毫秒数内让当前正在执行的线程休眠(暂停执行) |
| interrupt | 中断线程(并非终止) |
注意事项:
- start 底层会创建新的线程,调用 run,run就是一个简单的方法调用,不会启动新线程
- 线程优先级的范围
MIN_PRIORITY = 1 最低优先级
NORM_PRIORITY = 5 普通优先级
MAX_PRIORITY = 10 最高优先级
- interrupt:中断线程,但并没有真正的结束线程。一般用于中断正在休眠的线程使继续执行
- sleep:线程的静态方法,使当前线程休眠
应用案例:
package com.hspedu.thread_.threaduse_;/*** @author HarborGao* @version 1.0*/public class ThreadMethod01 {public static void main(String[] args) throws InterruptedException {ThreadDemo01 td = new ThreadDemo01();td.setName("小笼包");td.setPriority(Thread.MIN_PRIORITY);td.start();//测试优先级System.out.println("默认优先级 = " + Thread.currentThread().getPriority());//测试interruptThread.sleep(15000);td.interrupt();}}class ThreadDemo01 extends Thread {@Overridepublic void run() {for (int i = 0; i < 5; i++) {System.out.println(Thread.currentThread().getName() + "吃包子~~~" + i);try {System.out.println(Thread.currentThread().getName() + "休眠中...");Thread.sleep(10000);} catch (InterruptedException e) {System.out.println(Thread.currentThread().getName() + "被 interrupt 了");}}}}
4.3 常用方法第二组
| yield | 线程礼让。让出cpu,让其他线程执行,但礼让不一定成功,因为线程够用的情况下,不需要让出 |
|---|---|
| join | 线程插队。插入的线程一旦插队成功,则肯定先执行完插入的线程所有的任务 |
案例演示:
package com.hspedu.thread_.threaduse_;/*** @author HarborGao* @version 1.0*/public class ThreadMethod02 {public static void main(String[] args) throws InterruptedException {ThreadDemo02 tm = new ThreadDemo02();tm.start();// tm.join(); //线程插队for (int i = 0; i < 20; i++) {System.out.println("Main "+i);Thread.sleep(1000);}}}class ThreadDemo02 extends Thread {@Overridepublic void run() {for (int i = 0; i < 20; i++) {// Thread.yield(); //线程礼让try {Thread.sleep(500);} catch (InterruptedException e) {e.printStackTrace();}System.out.println("JohnThread------" + i);}}}
小练习
- 主线程每隔1s,输出hi ,一共10次
- 当输出到hi 5时,启动一个子线程(要求实现Runnable),每隔1s输出hello ,等该线程输出10次hello后,退出
- 主线程继续输出hi,直到主线程退出. ```java package com.hspedu.thread.threaduse;
/**
- @author HarborGao
- @version 1.0
*/
public class ThreadExercise01 {
public static void main(String[] args) throws InterruptedException {
} } class T implements Runnable{ @Override public void run() {T t = new T();Thread thread = new Thread(t);for (int i = 0; i < 10; i++) {System.out.println("主线程hi" + (i+1));Thread.sleep(1000);if (i == 4) {System.out.println("启动子线程");thread.start();System.out.println("子线程插队");thread.join();}}
} } ```for (int i = 0; i < 10; i++) {System.out.println("子线程hello" + (i+1));try {Thread.sleep(1000);} catch (InterruptedException e) {e.printStackTrace();}}
4.4 用户线程和守护线程
- 用户线程:也叫工作线程,当线程的任务执行完成或通知方式结束
- 守护线程:一般是为工作线程服务的,当所有的用户线程结束,守护线程自动结束
- 常见的守护线程:垃圾回收机制
应用案例:
package com.hspedu.thread_.threaduse_;/*** @author HarborGao* @version 1.0*/public class ThreadMethod03 {public static void main(String[] args) throws InterruptedException {MyDaemonThread dt = new MyDaemonThread();//将 dt 设置为守护线程,当所有线程结束后,dt也就自动结束//如果没有设置,那么即使 main线程执行完毕,dt也不退出dt.setDaemon(true);dt.start();for (int i = 0; i < 10; i++) {Thread.sleep(1000);System.out.println("沸羊羊在和灰太狼战斗... " + i);}}}class MyDaemonThread extends Thread {@Overridepublic void run() {for (;;) {try {Thread.sleep(700);} catch (InterruptedException e) {e.printStackTrace();}System.out.println("喜羊羊与美羊羊在快乐的聊天~~~");}}}
五、线程的生命周期
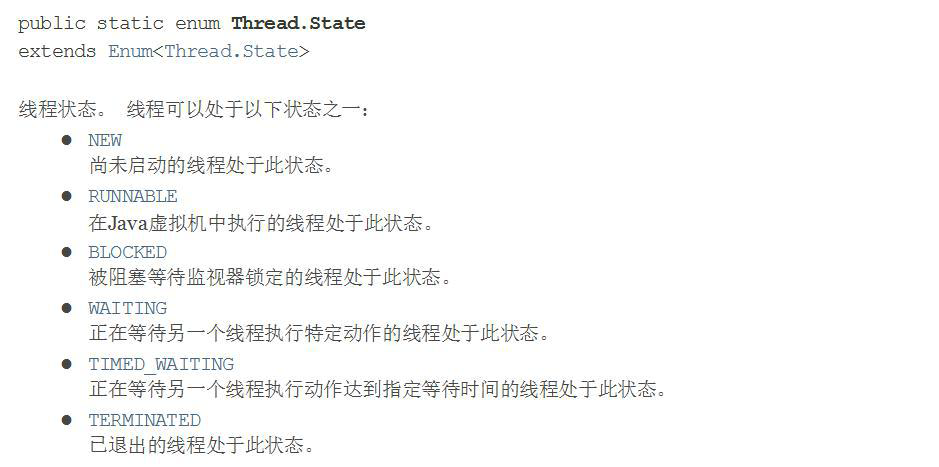
5.1 JDK 中用 Thread.State 枚举了线程的几种状态
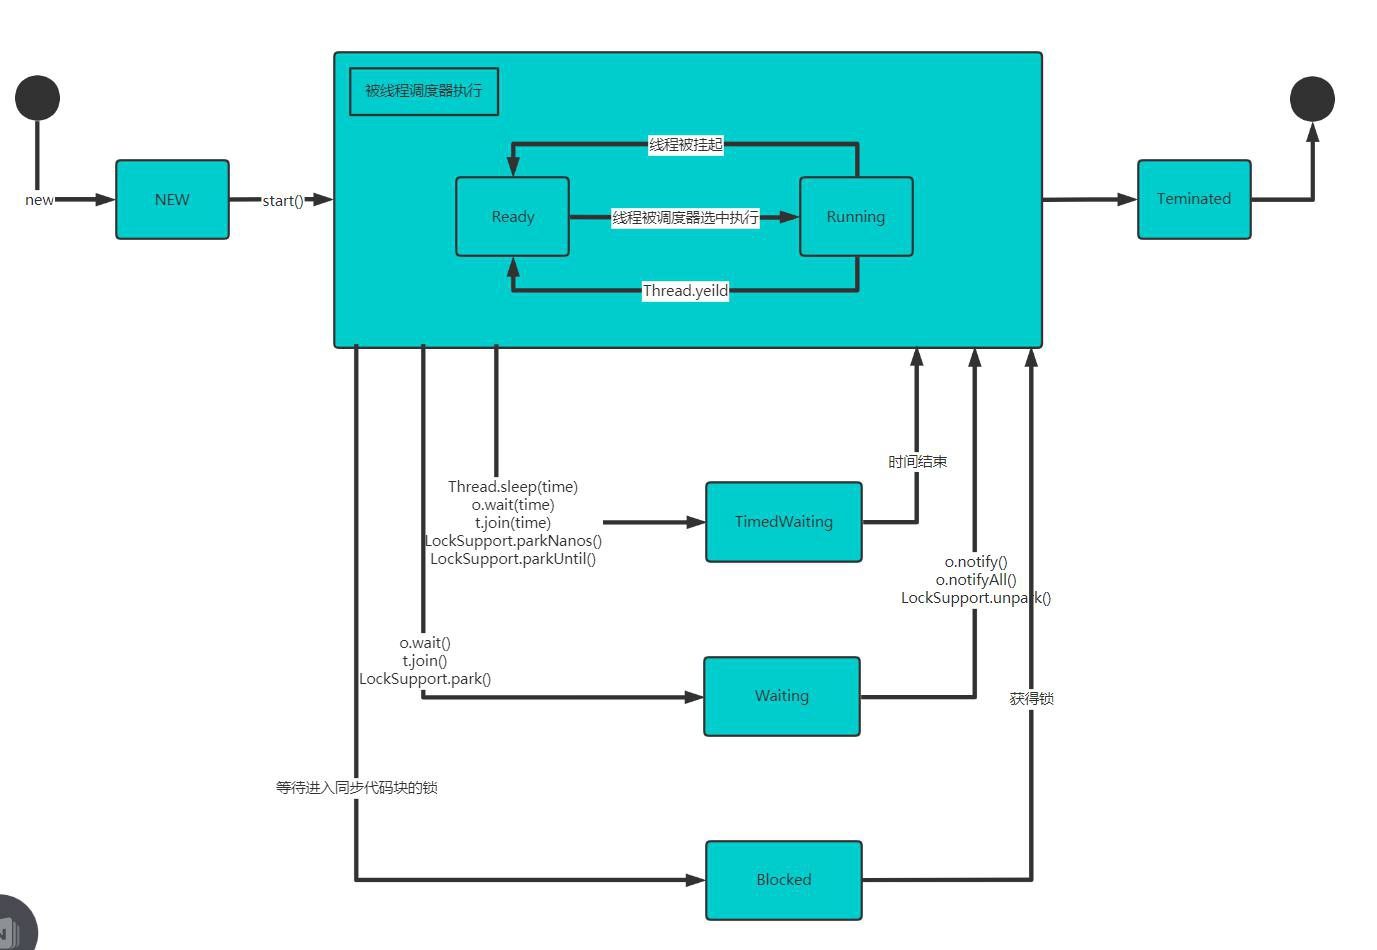
5.2 线程状态的转换图
5.3 案例演示 - 查看线程状态
package com.hspedu.thread_.state_;/*** @author HarborGao* @version 1.0*/public class ThreadState {public static void main(String[] args) throws InterruptedException {T t = new T();System.out.println(t.getName() + " 状态 " + t.getState());t.start();while (Thread.State.TERMINATED != t.getState()) {System.out.println(t.getName() + " 状态 " + t.getState());Thread.sleep(500);}System.out.println(t.getName() + " 状态 " + t.getState());}}class T extends Thread {@Overridepublic void run() {while (true) {for (int i = 0; i < 10; i++) {System.out.println("hi " + i);try {Thread.sleep(1000);} catch (InterruptedException e) {e.printStackTrace();}}break;}}}
六、Synchronized
6.1 线程同步机制
- 在多线程编程,一些敏感数据不允许被多个线程同时访问,此时就使用同步访问技术,保证数据在任何时刻,最多有一个线程访问,以保证数据的完整性。
- 也可以这样理解:线程同步,即当有一个线程在对内存进行操作时,其他线程都不可以对这个内存地址进行操作,直到该线程完成操作,其他线程才能对该内存地址进行操作。
6.2 同步的具体方法 - Synchronized
- 同步代码块
synchronized (对象) { //得到对象的锁,才能操作同步代码
//需要被同步的代码
} - synchronized 还可以放在方法声明中,表示整个方法 - 为同步方法
public synchronized void m (String name) {
//需要被同步的代码
}
- 如何理解:
就好像某个小伙伴上厕所前把门关上(上锁),上完厕所再出来(解锁),其他小伙伴才可以依次使用厕所
6.3 使用 synchronized 解决前面的售票问题
package com.hspedu.thread_.threaduse_;/*** @author HarborGao* @version 1.0*/public class TicketSell {public static void main(String[] args) {//使用 RunnableRunSell runSell = new RunSell();new Thread(runSell).start();new Thread(runSell).start();new Thread(runSell).start();}}class RunSell implements Runnable {private static int tickets = 10;@Overridepublic void run() {while (true) {synchronized (this) {if (tickets > 0) {System.out.println(Thread.currentThread().getName() + " 窗口售出了一张票,剩余门票 " + (--tickets));try {Thread.sleep(50);} catch (InterruptedException e) {e.printStackTrace();}} else {System.out.println("票已售完...");break;}}}}}
七、互斥锁
7.1 基本介绍
- Java语言中,引入了对象互斥锁的概念,来保证共享数据操作的完整性。
- 每个对象都对应一个可称为“互斥锁”的标记,这个标记用来保证在任一时刻,只能有一个线程访问该对象
- 关键字 synchronized 来与对象的互斥锁联系。当某个对象用 synchronized 修饰时,表明该对象在任一时刻只能由一个线程访问
- 同步的局限性:导致程序的执行效率要降低
- 同步方法(非静态的)的锁可以是 this,也可以是其他对象(要求是同一个对象启动的不同线程)
- 同步方法(静态的)的锁为当前类本身
7.2 代码演示
package com.hspedu.syn;public class SellTicket {public static void main(String[] args) {SellTicket03 sellTicket03 = new SellTicket03();new Thread(sellTicket03).start();//第1个线程-窗口new Thread(sellTicket03).start();//第2个线程-窗口new Thread(sellTicket03).start();//第3个线程-窗口}}//实现接口方式, 使用synchronized实现线程同步class SellTicket03 implements Runnable {private int ticketNum = 100;//让多个线程共享 ticketNumprivate boolean loop = true;//控制run方法变量Object object = new Object();//同步方法(静态的)的锁为当前类本身//解读//1. public synchronized static void m1() {} 锁是加在 SellTicket03.class//2. 如果在静态方法中,实现一个同步代码块./*synchronized (SellTicket03.class) {System.out.println("m2");}*/public synchronized static void m1() {}public static void m2() {synchronized (SellTicket03.class) {System.out.println("m2");}}//说明//1. public synchronized void sell() {} 就是一个同步方法//2. 这时锁在 this对象//3. 也可以在代码块上写 synchronize ,同步代码块, 互斥锁还是在this对象public /*synchronized*/ void sell() { //同步方法, 在同一时刻, 只能有一个线程来执行sell方法synchronized (/*this*/ object) {if (ticketNum <= 0) {System.out.println("售票结束...");loop = false;return;}//休眠50毫秒, 模拟try {Thread.sleep(50);} catch (InterruptedException e) {e.printStackTrace();}System.out.println("窗口 " + Thread.currentThread().getName() + " 售出一张票"+ " 剩余票数=" + (--ticketNum));//1 - 0 - -1 - -2}}@Overridepublic void run() {while (loop) {sell();//sell方法是一共同步方法}}}
7.3 注意事项和细节
- 同步方法如果没有使用 static 修饰:默认锁对象为 this
- 如果方法使用 static 修饰,默认锁对象:当前类.class
- 实现的落地步骤:
- 需要先分析上锁的代码
- 选择同步代码块或者同步方法
- 要求多个线程的锁对象为同一个即可
八、死锁
8.1 基本介绍
多个线程都占用了对方的锁资源,但不肯相让,导致了死锁,在编程时一定要避免死锁的发生
用一个例子体会:
妈妈:你先完成作业,才让你玩手机
小明:你先让我玩手机,我才完成作业
8.2 代码演示
package com.hspedu.thread_.lock_;/*** @author HarborGao* @version 1.0*/public class DeadLock_ {public static void main(String[] args) {//模拟死锁现象DeadLockDemo A = new DeadLockDemo(true);DeadLockDemo B = new DeadLockDemo(false);A.start();B.start();}}class DeadLockDemo extends Thread {static Object o1 = new Object();static Object o2 = new Object();boolean flag;public DeadLockDemo(boolean flag) {this.flag = flag;}@Overridepublic void run() {if (flag) {synchronized (o1) { //对象互斥锁,下面就是同步代码System.out.println(Thread.currentThread().getName() + "进入 o1");synchronized (o2) { //这里获得li对象的监视权System.out.println(Thread.currentThread().getName() + "进入 o2");}}} else {synchronized (o2) {System.out.println(Thread.currentThread().getName() + "进入 o2");synchronized (o1) { //这里获得li对象的监视权System.out.println(Thread.currentThread().getName() + "进入 o1");}}}}}
8.3 释放锁
下面操作会释放锁:
- 当前线程的同步方法、同步代码块执行结束
- 当前线程在同步代码块、同步方法中遇到 break、return
- 当前线程在同步代码块、同步方法中出现了未处理的 Error 或 Exception,导致异常结束
- 当前线程在同步代码块、同步方法中执行了线程对象的 wait() 方法,当前线程暂停,并释放锁
下面的操作不会释放锁:
- 线程执行同步代码块或同步方法时,程序调用 Thread.sleep()、Thread.yield() 方法暂停当前线程的执行
- 线程执行同步代码块时,其他线程调用了该线程的 suspend() 方法将该线程挂起
提示:应尽量避免使用 suspend() 和 resume() 来控制线程,方法不再推荐使用
九、本章作业
- 编程题
- 在 main 方法中启动两个线程
- 第一个线程循环随机打印100以内的整数
- 直到第二个线程从键盘读取了”Q”命令 ```java package com.hspedu.thread_.homework; import javax.swing.*; import java.awt.event.KeyEvent; import java.awt.event.KeyListener; import java.util.Scanner;
/**
- @author HarborGao
@version 1.0 */ public class Homework01 extends JFrame { public static void main(String[] args) {
A a = new A();B b = new B(a);a.start();b.start();
} } class A extends Thread { private boolean loop = true; @Override public void run() {
while (loop) {System.out.println((int)(Math.random() * 100 + 1));try {Thread.sleep(1000);} catch (InterruptedException e) {e.printStackTrace();}}System.out.println("a线程退出..");
}
public void setLoop(boolean loop) {
this.loop = loop;
} }
class B extends Thread { private A a; private Scanner scanner = new Scanner(System.in);
public B(A a) {this.a = a;}@Overridepublic void run() {while (true) {System.out.println("请输入你的指令(Q表示退出)");char key = scanner.next().toUpperCase().charAt(0);if (key == 'Q') {a.setLoop(false);System.out.println("b线程退出...");break;}}}
}
2. 编程题1. 有2个用户分别从同一个卡上取钱(总额:10000)1. 每次都取1000,当余额不足时,就不能取款了1. 不能出现超取现象```javapackage com.hspedu.thread_.homework;/*** @author HarborGao* @version 1.0*/public class Homework02 {public static void main(String[] args) {Bank bank = new Bank();new Thread(bank).start();new Thread(bank).start();}}class Bank implements Runnable {private static double money = 10000;@Overridepublic void run() {while (true) {synchronized (this) {if (money <= 0) {System.out.println("余额不足...");break;}money -= 1000;System.out.println(Thread.currentThread().getName() + "取1000,剩余余额=" + money);}try {Thread.sleep(100);} catch (InterruptedException e) {e.printStackTrace();}}}}
学习参考(致谢):
- B站 @程序员鱼皮 Java学习一条龙
- B站 @韩顺平 零基础30天学会Java

若有收获,就点个赞吧
0 人点赞
