一、Python测试框架,主要特点有以下几点:
●简单灵活,容易上手;
●支持参数化;
●能够支持简单的单元测试和复杂的功能测试,还可以用来做selenium/appnium等自动化测试、接口自动化测试(pytest+requests);
●pytest具有很多第三方插件,并且可以自定义扩展,比较好用的如pytest-selenium(集成selenium)、pytest-html(html测试报告生成)、pytest-rerunfailures(失败case重复执行)、pytest-xdist(多CPU分发)、allure-pytest(生成测试报告)等;
●测试用例的skip和xfail处理;
●可以很好的和jenkins集成;
●pytest默认执行顺序是按照case顺序位置先后执行的;
●pytest.ini和conftest.py文件要放在执行的同级目录(根目录)
二、安装pytest
1、命令行安装:pip install pytest
2、通过pycharm 【File】-【settings】-【Python Interpreter】搜索后安装;
通过命令行pytest执行test_mod1.py文件中的代码
import pytestdef test_one():print("执行测试用例test_one")def test_second():print("执行测试用例test_second")
在pycharm命令行中输入:pytest -v test_mod1.py输出:collected 2 itemstest_mod1.py::test_one PASSED [ 50%]test_mod1.py::test_second PASSED
通过pytest.main( )执行test_mod1.py的代码
import pytestdef test_one():print("执行测试用例test_one")def test_second():print("执行测试用例test_second")if __name__ == '__main__':pytest.main(['-vs'])结果:collecting ... collected 2 itemstest_mod1.py::test_one PASSED [ 50%]执行测试用例test_onetest_mod1.py::test_second PASSED [100%]执行测试用例test_second
三、识别case的规则
- 如果pytest命令行有指定目录,则从该目录中开始查找测试用例文件,如果没有指定,则从当前运行目录开始查找文件。注意,该查找是递归查找,子目录中的文件也会被查找到。
- 并不是能够查找到目录下的所有文件,只有符合命名规则的文件才会被查找。默认规则是以test_开头或者以_test结尾的.py文件。
- 在测试文件中查找Test开头的类,以及类中以test开头的方法,查找测试文件中test开头的函数
文件目录结构如下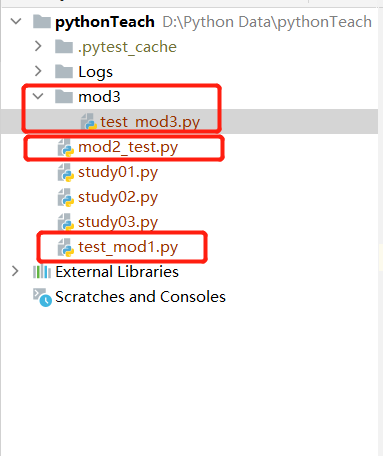
在命令行中执行 pytest -vs
D:\Python Data\pythonTeach>pytest -vs
# test_mod3.pyimport pytestclass TestMod3:def test_five(self):print("执行测试用例test_five")def test_six(self):print("执行测试用例test_six")
# mod2_test.pyimport pytestdef test_three():print("执行测试用例test_three")def test_four():print("执行测试用例test_four")
# test_mod1.pyimport pytestdef test_one():print("执行测试用例test_one")def test_second():print("执行测试用例test_second")if __name__ == '__main__':pass
执行结果
mod2_test.py::test_three 执行测试用例test_threePASSEDmod2_test.py::test_four 执行测试用例test_fourPASSEDtest_mod1.py::test_one 执行测试用例test_onePASSEDtest_mod1.py::test_second 执行测试用例test_secondPASSEDmod3/test_mod3.py::TestMod3::test_five 执行测试用例test_fivePASSEDmod3/test_mod3.py::TestMod3::test_six 执行测试用例test_sixPASSED
因为 pytest -vs 该命令没有指定目录,则从 D:\Python Data\pythonTeach 文件夹(运行目录)递归查找以test开头或者以_test结尾的.py文件,在测试文件中查找Test开头的类,以及类中以test开头的方法,查找测试文件中test_开头的函数;
pytest 执行指定文件夹
pytest -vs ./mod3/结果:collected 2 itemsmod3/test_mod3.py::TestMod3::test_five 执行测试用例test_fivePASSEDmod3/test_mod3.py::TestMod3::test_six 执行测试用例test_sixPASSED
递归执行mod3文件夹下的所有以test开头或者以_test结尾的.py文件,在测试文件中查找Test开头的类,以及类中以test开头的方法,查找测试文件中test_开头的函数;
三、pytest 执行case时可选参数
-v: #打印详细运行的日志信息-s: pytest -s xxx.py #输出case中print的内容-m: pytest -m “tag名称” #运行指定tag名称的用例,也就是运行有@pytest.mark.[标记名]这个标记的case-k: # pytest -k “类名、方法名、类名 and not 方法名” 运行指定case的用例-x: #遇到失败的case就是停止执行--lf: #只重新运行上次运行失败的用例(或如果没有失败的话会全部跑)--ff: #运行所有测试,但首先运行上次运行失败的测试(这可能会重新测试,从而导致重复的fixture setup/teardown)--maxfail=num: #当用例失败个数达到num时,停止运行--collect-only: #收集测试用例,展示出哪些用例会被执行(只是展示不会执行case)--junit-xml:--junit-xml=path/name.xml #在指定目录或当前目录下生成xml格式的报告(需要在pytest.ini文件内声明格式:junit_family=xunit2)--steup-show #完整展示每个用例的fixture调用顺序命令行执行:pytest test_quick_start.py --junit-xml=report.xmlmain执行:pytest.main(["-s", "TestCalc.py", "-m", "div", "--junit-xml=report.xml"])pytest.main(["-vsx", "TestCalc.py", "-m", "div"])
@pytest.mark.标记名 为测试用例指定 tag 名称
import pytestdef test_one():print("执行测试用例test_one")@pytest.mark.smoke # 为test_second()测试用例指定名称为smoke的tagdef test_second():print("执行测试用例test_second")
D:\Python Data\pythonTeach>pytest -vsm "smoke"
通过 -m “标记名” 指定执行用例
结果:test_mod1.py::test_second 执行测试用例test_secondPASSED
通过pytest.main( )执行标记的用例
# run_test.pyimport pytestif __name__ == '__main__':pytest.main(["-vsm"," smoke","test_mod1.py"])
通过-k指定测试用例执行
D:\Buyer_test_code\testteach>pytest -vs -k "test_three"
执行结果
mod2_test.py::test_three 执行测试用例test_threePASSED
上述命令行中加入了-k参数,-k “类名、方法名、类名 and not 方法名”来运行指定的case
任务:
1、编写test_demo1.py文件,文件中包含test_01, test_02,test_03函数,通过命令行执行test_demo1.py中的所有test开头的函数;
2、在项目目录下新建一个demo的文件夹,demo文件夹下新建test_demo2.py,test_demo2.py下包含test_04,test05函数,通过命令行执行该项目目录下所有test开头的.py文件;通过命令行只执行demo文件夹下的test开头的.py文件;
3、在命令行中分别加入-v, -s, -k 参数来执行case

若有收获,就点个赞吧
0 人点赞
