
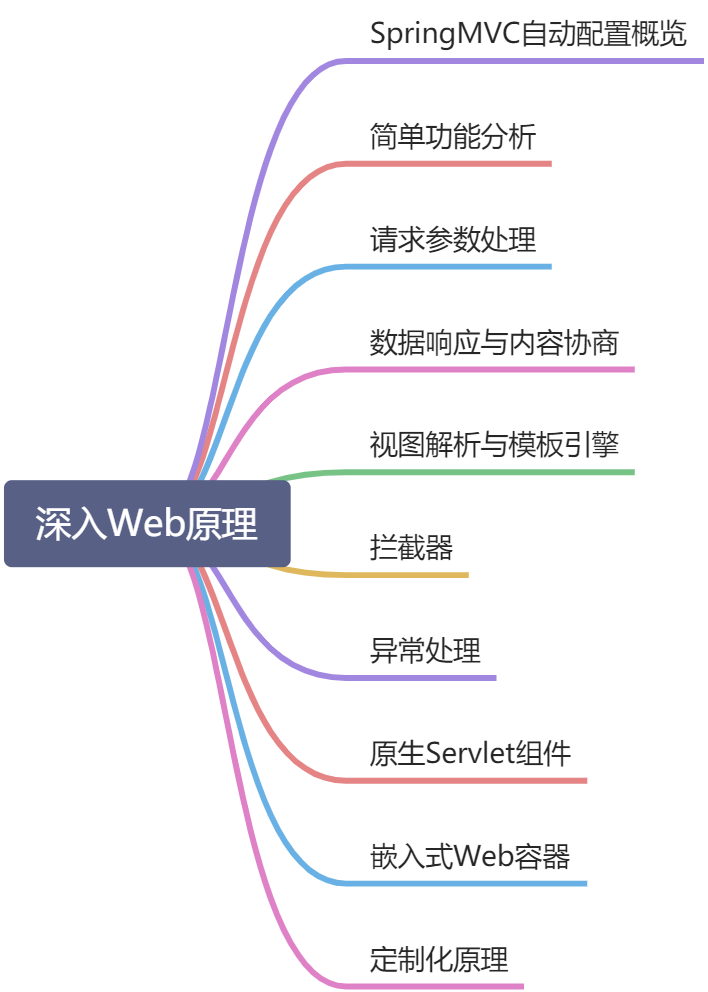
Web开发
1、SpringMVC自动配置概览
Spring Boot provides auto-configuration for Spring MVC that works well with most applications.(大多场景我们都无需自定义配置)
The auto-configuration adds the following features on top of Spring’s defaults:
- Inclusion of ContentNegotiatingViewResolver and BeanNameViewResolver beans.
- 内容协商视图解析器和BeanName视图解析器
- Support for serving static resources, including support for WebJars (covered later in this document)).
- 静态资源(包括webjars)
- Automatic registration of Converter, GenericConverter, and Formatter beans.
- 自动注册 Converter,GenericConverter,Formatter
- Support for HttpMessageConverters (covered later in this document).
- 支持 HttpMessageConverters (后来我们配合内容协商理解原理)
- Automatic registration of MessageCodesResolver (covered later in this document).
- 自动注册 MessageCodesResolver (国际化用)
- Static index.html support.
- 静态index.html 页支持
- Custom Favicon support (covered later in this document).
- 自定义 Favicon
- Automatic use of a ConfigurableWebBindingInitializer bean (covered later in this document).
- 自动使用 ConfigurableWebBindingInitializer ,(DataBinder负责将请求数据绑定到JavaBean上)
If you want to keep those Spring Boot MVC customizations and make more MVC customizations (interceptors, formatters, view controllers, and other features), you can add your own @Configuration class of type WebMvcConfigurer but without@EnableWebMvc. 不用@EnableWebMvc注解。使用 @Configuration + WebMvcConfigurer 自定义规则
If you want to provide custom instances of RequestMappingHandlerMapping, RequestMappingHandlerAdapter, or ExceptionHandlerExceptionResolver, and still keep the Spring Boot MVC customizations, you can declare a bean of type WebMvcRegistrations and use it to provide custom instances of those components. 声明 WebMvcRegistrations 改变默认底层组件
If you want to take complete control of Spring MVC, you can add your own @Configuration annotated with @EnableWebMvc, or alternatively add your own @Configuration-annotated DelegatingWebMvcConfiguration as described in the Javadoc of @EnableWebMvc. 使用 @EnableWebMvc+@Configuration+DelegatingWebMvcConfiguration 全面接管SpringMVC
2、简单功能分析
2.1、静态资源访问
1、静态资源目录
只要静态资源放在类路径下: called /static (or /public or /resources or /META-INF/resources
访问 : 当前项目根路径/ + 静态资源名
原理: 静态映射/**。
请求进来,先去找Controller看能不能处理。不能处理的所有请求又都交给静态资源处理器。静态资源也找不到则响应404页面
改变默认的静态资源路径
spring:mvc:static-path-pattern: /res/**resources:static-locations: [classpath:/haha/]
2、静态资源访问前缀
默认无前缀
spring:mvc:static-path-pattern: /res/**
当前项目 + static-path-pattern + 静态资源名 = 静态资源文件夹下找
3、webjar
自动映射 /webjars/**
https://www.webjars.org/
<dependency><groupId>org.webjars</groupId><artifactId>jquery</artifactId><version>3.5.1</version></dependency>
访问地址:http://localhost:8080/webjars/jquery/3.5.1/jquery.js 后面地址要按照依赖里面的包路径
2.2、欢迎页支持
静态资源路径下 index.html
- 可以配置静态资源路径
- 但是不可以配置静态资源的访问前缀。否则导致 index.html不能被默认访问
```yaml
spring:
mvc:
static-path-pattern: /res/** 这个会导致welcome page功能失效
resources: static-locations: [classpath:/haha/] ```
-
2.3、自定义 Favicon
favicon.ico 放在静态资源目录下即可。
spring:# mvc:# static-path-pattern: /res/** 这个会导致 Favicon 功能失效
2.4、静态资源配置原理
SpringBoot启动默认加载 xxxAutoConfiguration 类(自动配置类)
SpringMVC功能的自动配置类 WebMvcAutoConfiguration,生效
@Configuration(proxyBeanMethods = false)@ConditionalOnWebApplication(type = Type.SERVLET)@ConditionalOnClass({ Servlet.class, DispatcherServlet.class, WebMvcConfigurer.class })@ConditionalOnMissingBean(WebMvcConfigurationSupport.class)@AutoConfigureOrder(Ordered.HIGHEST_PRECEDENCE + 10)@AutoConfigureAfter({ DispatcherServletAutoConfiguration.class, TaskExecutionAutoConfiguration.class,ValidationAutoConfiguration.class })public class WebMvcAutoConfiguration {}
给容器中配了什么。
@Configuration(proxyBeanMethods = false)@Import(EnableWebMvcConfiguration.class)@EnableConfigurationProperties({ WebMvcProperties.class, ResourceProperties.class })@Order(0)public static class WebMvcAutoConfigurationAdapter implements WebMvcConfigurer {}
配置文件的相关属性和xxx进行了绑定。
- WebMvcProperties==spring.mvc、
- ResourceProperties==spring.resources
1、配置类只有一个有参构造器
//有参构造器所有参数的值都会从容器中确定//ResourceProperties resourceProperties;获取和spring.resources绑定的所有的值的对象//WebMvcProperties mvcProperties 获取和spring.mvc绑定的所有的值的对象//ListableBeanFactory beanFactory Spring的beanFactory//HttpMessageConverters 找到所有的HttpMessageConverters//ResourceHandlerRegistrationCustomizer 找到 资源处理器的自定义器。=========//DispatcherServletPath//ServletRegistrationBean 给应用注册Servlet、Filter....public WebMvcAutoConfigurationAdapter(ResourceProperties resourceProperties, WebMvcProperties mvcProperties,ListableBeanFactory beanFactory, ObjectProvider<HttpMessageConverters> messageConvertersProvider,ObjectProvider<ResourceHandlerRegistrationCustomizer> resourceHandlerRegistrationCustomizerProvider,ObjectProvider<DispatcherServletPath> dispatcherServletPath,ObjectProvider<ServletRegistrationBean<?>> servletRegistrations) {this.resourceProperties = resourceProperties;this.mvcProperties = mvcProperties;this.beanFactory = beanFactory;this.messageConvertersProvider = messageConvertersProvider;this.resourceHandlerRegistrationCustomizer = resourceHandlerRegistrationCustomizerProvider.getIfAvailable();this.dispatcherServletPath = dispatcherServletPath;this.servletRegistrations = servletRegistrations;}
2、资源处理的默认规则
@Overridepublic void addResourceHandlers(ResourceHandlerRegistry registry) {if (!this.resourceProperties.isAddMappings()) {logger.debug("Default resource handling disabled");return;}Duration cachePeriod = this.resourceProperties.getCache().getPeriod();CacheControl cacheControl = this.resourceProperties.getCache().getCachecontrol().toHttpCacheControl();//webjars的规则if (!registry.hasMappingForPattern("/webjars/**")) {customizeResourceHandlerRegistration(registry.addResourceHandler("/webjars/**").addResourceLocations("classpath:/META-INF/resources/webjars/").setCachePeriod(getSeconds(cachePeriod)).setCacheControl(cacheControl));}//String staticPathPattern = this.mvcProperties.getStaticPathPattern();if (!registry.hasMappingForPattern(staticPathPattern)) {customizeResourceHandlerRegistration(registry.addResourceHandler(staticPathPattern).addResourceLocations(getResourceLocations(this.resourceProperties.getStaticLocations())).setCachePeriod(getSeconds(cachePeriod)).setCacheControl(cacheControl));}}
spring:# mvc:# static-path-pattern: /res/**resources:add-mappings: false 禁用所有静态资源规则
@ConfigurationProperties(prefix = "spring.resources", ignoreUnknownFields = false)public class ResourceProperties {private static final String[] CLASSPATH_RESOURCE_LOCATIONS = { "classpath:/META-INF/resources/","classpath:/resources/", "classpath:/static/", "classpath:/public/" };/*** Locations of static resources. Defaults to classpath:[/META-INF/resources/,* /resources/, /static/, /public/].*/private String[] staticLocations = CLASSPATH_RESOURCE_LOCATIONS;
3、欢迎页的处理规则
HandlerMapping:处理器映射。保存了每一个Handler能处理哪些请求。@Beanpublic WelcomePageHandlerMapping welcomePageHandlerMapping(ApplicationContext applicationContext,FormattingConversionService mvcConversionService, ResourceUrlProvider mvcResourceUrlProvider) {WelcomePageHandlerMapping welcomePageHandlerMapping = new WelcomePageHandlerMapping(new TemplateAvailabilityProviders(applicationContext), applicationContext, getWelcomePage(),this.mvcProperties.getStaticPathPattern());welcomePageHandlerMapping.setInterceptors(getInterceptors(mvcConversionService, mvcResourceUrlProvider));welcomePageHandlerMapping.setCorsConfigurations(getCorsConfigurations());return welcomePageHandlerMapping;}WelcomePageHandlerMapping(TemplateAvailabilityProviders templateAvailabilityProviders,ApplicationContext applicationContext, Optional<Resource> welcomePage, String staticPathPattern) {if (welcomePage.isPresent() && "/**".equals(staticPathPattern)) {//要用欢迎页功能,必须是/**logger.info("Adding welcome page: " + welcomePage.get());setRootViewName("forward:index.html");}else if (welcomeTemplateExists(templateAvailabilityProviders, applicationContext)) {// 调用Controller /indexlogger.info("Adding welcome page template: index");setRootViewName("index");}}
4、favicon
3、请求参数处理
0、请求映射
1、rest使用与原理
- @xxxMapping;
Rest风格支持(使用HTTP请求方式动词来表示对资源的操作)
- 以前:/getUser 获取用户 /deleteUser 删除用户 /editUser 修改用户 /saveUser 保存用户
- 现在: /user GET-获取用户 DELETE-删除用户 PUT-修改用户 POST-保存用户
- 核心Filter;HiddenHttpMethodFilter
- 用法: 表单method=post,隐藏域 _method=put
- SpringBoot中手动开启
扩展:如何把_method 这个名字换成我们自己喜欢的。 ```java @RequestMapping(value = “/user”,method = RequestMethod.GET) public String getUser(){ return “GET-张三”; }
@RequestMapping(value = “/user”,method = RequestMethod.POST) public String saveUser(){ return “POST-张三”; }
@RequestMapping(value = "/user",method = RequestMethod.PUT)public String putUser(){return "PUT-张三";}@RequestMapping(value = "/user",method = RequestMethod.DELETE)public String deleteUser(){return "DELETE-张三";}@Bean@ConditionalOnMissingBean(HiddenHttpMethodFilter.class)@ConditionalOnProperty(prefix = "spring.mvc.hiddenmethod.filter", name = "enabled", matchIfMissing = false)public OrderedHiddenHttpMethodFilter hiddenHttpMethodFilter() {return new OrderedHiddenHttpMethodFilter();}
//自定义filter @Bean public HiddenHttpMethodFilter hiddenHttpMethodFilter(){ HiddenHttpMethodFilter methodFilter = new HiddenHttpMethodFilter(); methodFilter.setMethodParam(“_m”); return methodFilter; }
Rest原理(表单提交要使用REST的时候)- 表单提交会带上**_method=PUT**- **请求过来被**HiddenHttpMethodFilter拦截- 请求是否正常,并且是POST- 获取到**_method**的值。- 兼容以下请求;**PUT**.**DELETE**.**PATCH**- **原生request(post),包装模式requesWrapper重写了getMethod方法,返回的是传入的值。**- **过滤器链放行的时候用wrapper。以后的方法调用getMethod是调用requesWrapper的。****Rest使用客户端工具,**- 如PostMan直接发送Put、delete等方式请求,无需Filter。```yamlspring:mvc:hiddenmethod:filter:enabled: true #开启页面表单的Rest功能
2、请求映射原理

SpringMVC功能分析都从 org.springframework.web.servlet.DispatcherServlet-》doDispatch()
protected void doDispatch(HttpServletRequest request, HttpServletResponse response) throws Exception {HttpServletRequest processedRequest = request;HandlerExecutionChain mappedHandler = null;boolean multipartRequestParsed = false;WebAsyncManager asyncManager = WebAsyncUtils.getAsyncManager(request);try {ModelAndView mv = null;Exception dispatchException = null;try {processedRequest = checkMultipart(request);multipartRequestParsed = (processedRequest != request);// 找到当前请求使用哪个Handler(Controller的方法)处理mappedHandler = getHandler(processedRequest);//HandlerMapping:处理器映射。/xxx->>xxxx
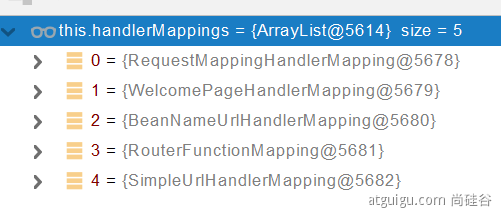
RequestMappingHandlerMapping:保存了所有@RequestMapping 和handler的映射规则。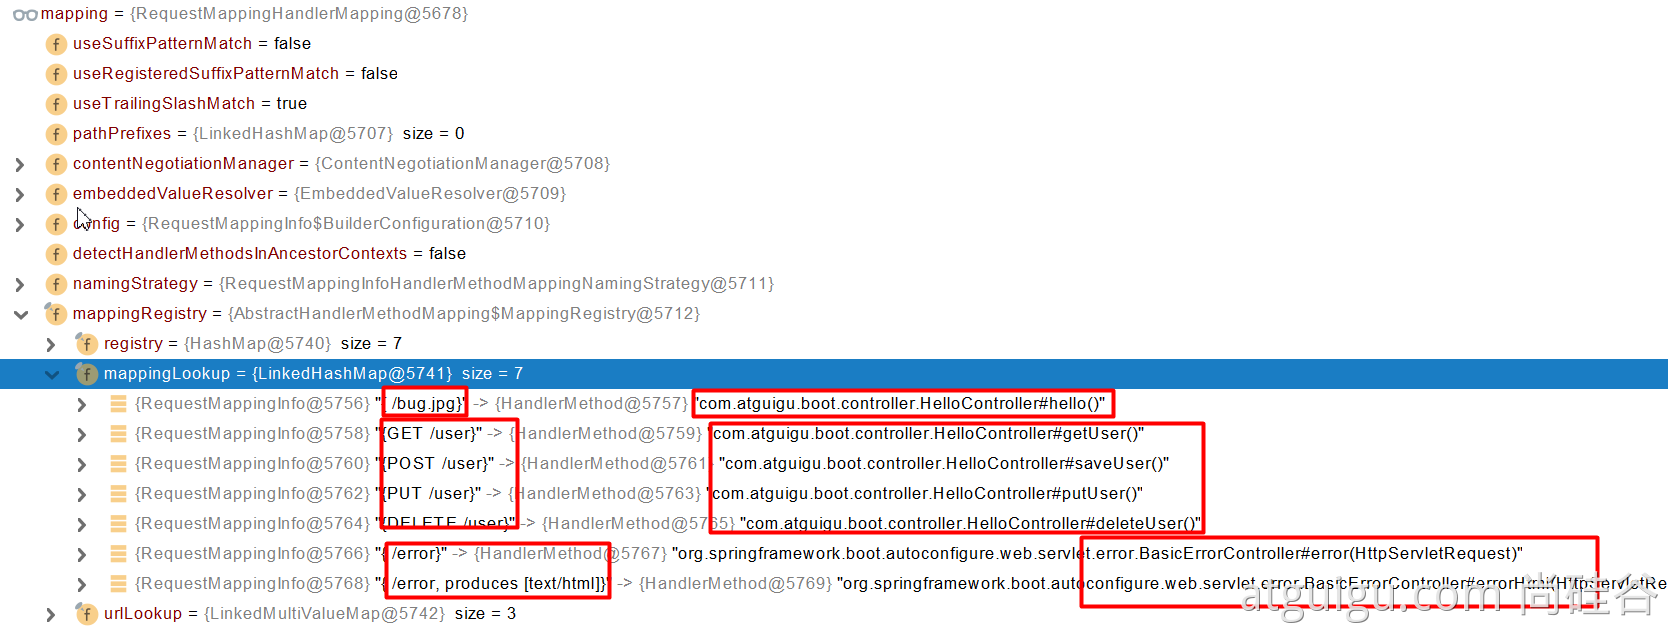
所有的请求映射都在HandlerMapping中。
- SpringBoot自动配置欢迎页的 WelcomePageHandlerMapping 。访问 /能访问到index.html;
- SpringBoot自动配置了默认 的 RequestMappingHandlerMapping
- 请求进来,挨个尝试所有的HandlerMapping看是否有请求信息。
- 如果有就找到这个请求对应的handler
- 如果没有就是下一个 HandlerMapping
- 我们需要一些自定义的映射处理,我们也可以自己给容器中放HandlerMapping。自定义 HandlerMapping
protected HandlerExecutionChain getHandler(HttpServletRequest request) throws Exception {if (this.handlerMappings != null) {for (HandlerMapping mapping : this.handlerMappings) {HandlerExecutionChain handler = mapping.getHandler(request);if (handler != null) {return handler;}}}return null;}
1、普通参数与基本注解
1.1、注解:
@PathVariable、@RequestHeader、@ModelAttribute、@RequestParam、@MatrixVariable、@CookieValue、@RequestBody ```java @RestController public class ParameterTestController {
// car/2/owner/zhangsan@GetMapping("/car/{id}/owner/{username}")public Map<String,Object> getCar(@PathVariable("id") Integer id,@PathVariable("username") String name,@PathVariable Map<String,String> pv,@RequestHeader("User-Agent") String userAgent,@RequestHeader Map<String,String> header,@RequestParam("age") Integer age,@RequestParam("inters") List<String> inters,@RequestParam Map<String,String> params,@CookieValue("_ga") String _ga,@CookieValue("_ga") Cookie cookie){Map<String,Object> map = new HashMap<>();
// map.put(“id”,id); // map.put(“name”,name); // map.put(“pv”,pv); // map.put(“userAgent”,userAgent); // map.put(“headers”,header); map.put(“age”,age); map.put(“inters”,inters); map.put(“params”,params); map.put(“_ga”,_ga); System.out.println(cookie.getName()+”===>”+cookie.getValue()); return map; }
@PostMapping("/save")public Map postMethod(@RequestBody String content){Map<String,Object> map = new HashMap<>();map.put("content",content);return map;}//1、语法: 请求路径:/cars/sell;low=34;brand=byd,audi,yd//2、SpringBoot默认是禁用了矩阵变量的功能// 手动开启:原理。对于路径的处理。UrlPathHelper进行解析。// removeSemicolonContent(移除分号内容)支持矩阵变量的//3、矩阵变量必须有url路径变量才能被解析@GetMapping("/cars/{path}")public Map carsSell(@MatrixVariable("low") Integer low,@MatrixVariable("brand") List<String> brand,@PathVariable("path") String path){Map<String,Object> map = new HashMap<>();map.put("low",low);map.put("brand",brand);map.put("path",path);return map;}// /boss/1;age=20/2;age=10@GetMapping("/boss/{bossId}/{empId}")public Map boss(@MatrixVariable(value = "age",pathVar = "bossId") Integer bossAge,@MatrixVariable(value = "age",pathVar = "empId") Integer empAge){Map<String,Object> map = new HashMap<>();map.put("bossAge",bossAge);map.put("empAge",empAge);return map;}
}
<a name="LU2AG"></a>### 1.2、Servlet API:WebRequest、ServletRequest、MultipartRequest、 HttpSession、javax.servlet.http.PushBuilder、Principal、InputStream、Reader、HttpMethod、Locale、TimeZone、ZoneId<br />**ServletRequestMethodArgumentResolver 以上的部分参数**```java@Overridepublic boolean supportsParameter(MethodParameter parameter) {Class<?> paramType = parameter.getParameterType();return (WebRequest.class.isAssignableFrom(paramType) ||ServletRequest.class.isAssignableFrom(paramType) ||MultipartRequest.class.isAssignableFrom(paramType) ||HttpSession.class.isAssignableFrom(paramType) ||(pushBuilder != null && pushBuilder.isAssignableFrom(paramType)) ||Principal.class.isAssignableFrom(paramType) ||InputStream.class.isAssignableFrom(paramType) ||Reader.class.isAssignableFrom(paramType) ||HttpMethod.class == paramType ||Locale.class == paramType ||TimeZone.class == paramType ||ZoneId.class == paramType);}
1.3、复杂参数:
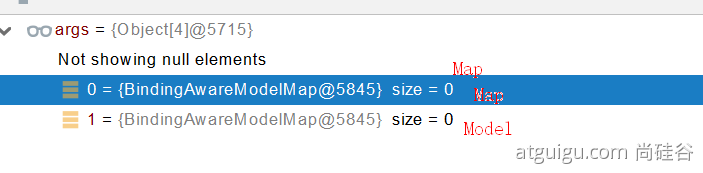
Map、Model(map、model里面的数据会被放在request的请求域 request.setAttribute)、Errors/BindingResult、RedirectAttributes( 重定向携带数据)、ServletResponse(response)、SessionStatus、UriComponentsBuilder、ServletUriComponentsBuilder
Map<String,Object> map, Model model, HttpServletRequest request 都是可以给request域中放数据,request.getAttribute();
Map、Model类型的参数,会返回 mavContainer.getModel();—-> BindingAwareModelMap 是Model 也是Map
mavContainer.getModel(); 获取到值的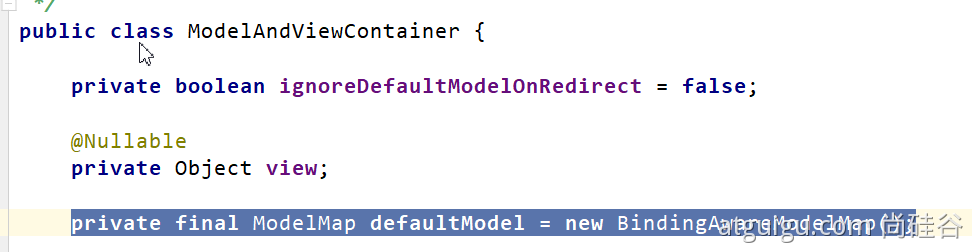
1.4、自定义对象参数:
可以自动类型转换与格式化,可以级联封装。
/*** 姓名: <input name="userName"/> <br/>* 年龄: <input name="age"/> <br/>* 生日: <input name="birth"/> <br/>* 宠物姓名:<input name="pet.name"/><br/>* 宠物年龄:<input name="pet.age"/>*/@Datapublic class Person {private String userName;private Integer age;private Date birth;private Pet pet;}@Datapublic class Pet {private String name;private String age;}result
2、POJO封装过程
ServletModelAttributeMethodProcessor
3、参数处理原理
HandlerMapping中找到能处理请求的Handler(Controller.method())
- 为当前Handler 找一个适配器 HandlerAdapter; RequestMappingHandlerAdapter
- 适配器执行目标方法并确定方法参数的每一个值
1、HandlerAdapter
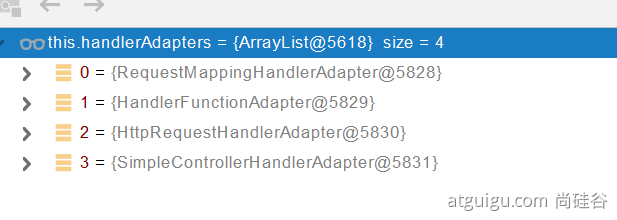
0 - 支持方法上标注@RequestMapping
1 - 支持函数式编程的
xxxxxx2、执行目标方法
```java mav = invokeHandlerMethod(request, response, handlerMethod); //执行目标方法// Actually invoke the handler.//DispatcherServlet -- doDispatchmv = ha.handle(processedRequest, response, mappedHandler.getHandler());
//ServletInvocableHandlerMethod Object returnValue = invokeForRequest(webRequest, mavContainer, providedArgs); //获取方法的参数值 Object[] args = getMethodArgumentValues(request, mavContainer, providedArgs);
<a name="MrIwI"></a>### 3、参数解析器-HandlerMethodArgumentResolver确定将要执行的目标方法的每一个参数的值是什么;<br />SpringMVC目标方法能写多少种参数类型。取决于参数解析器。<br /><br />- 当前解析器是否支持解析这种参数- 支持就调用 resolveArgument<a name="bL9KZ"></a>### 4、返回值处理器<a name="swVCE"></a>### 5、如何确定目标方法每一个参数的值```java============InvocableHandlerMethod==========================protected Object[] getMethodArgumentValues(NativeWebRequest request, @Nullable ModelAndViewContainer mavContainer,Object... providedArgs) throws Exception {MethodParameter[] parameters = getMethodParameters();if (ObjectUtils.isEmpty(parameters)) {return EMPTY_ARGS;}Object[] args = new Object[parameters.length];for (int i = 0; i < parameters.length; i++) {MethodParameter parameter = parameters[i];parameter.initParameterNameDiscovery(this.parameterNameDiscoverer);args[i] = findProvidedArgument(parameter, providedArgs);if (args[i] != null) {continue;}if (!this.resolvers.supportsParameter(parameter)) {throw new IllegalStateException(formatArgumentError(parameter, "No suitable resolver"));}try {args[i] = this.resolvers.resolveArgument(parameter, mavContainer, request, this.dataBinderFactory);}catch (Exception ex) {// Leave stack trace for later, exception may actually be resolved and handled...if (logger.isDebugEnabled()) {String exMsg = ex.getMessage();if (exMsg != null && !exMsg.contains(parameter.getExecutable().toGenericString())) {logger.debug(formatArgumentError(parameter, exMsg));}}throw ex;}}return args;}
5.1、挨个判断所有参数解析器那个支持解析这个参数
@Nullableprivate HandlerMethodArgumentResolver getArgumentResolver(MethodParameter parameter) {HandlerMethodArgumentResolver result = this.argumentResolverCache.get(parameter);if (result == null) {for (HandlerMethodArgumentResolver resolver : this.argumentResolvers) {if (resolver.supportsParameter(parameter)) {result = resolver;this.argumentResolverCache.put(parameter, result);break;}}}return result;}
5.2、解析这个参数的值
调用各自 HandlerMethodArgumentResolver 的 resolveArgument 方法即可
5.3、自定义类型参数 封装POJO
ServletModelAttributeMethodProcessor 这个参数处理器支持
是否为简单类型。
public static boolean isSimpleValueType(Class<?> type) {return (Void.class != type && void.class != type &&(ClassUtils.isPrimitiveOrWrapper(type) ||Enum.class.isAssignableFrom(type) ||CharSequence.class.isAssignableFrom(type) ||Number.class.isAssignableFrom(type) ||Date.class.isAssignableFrom(type) ||Temporal.class.isAssignableFrom(type) ||URI.class == type ||URL.class == type ||Locale.class == type ||Class.class == type));}
@Override@Nullablepublic final Object resolveArgument(MethodParameter parameter, @Nullable ModelAndViewContainer mavContainer,NativeWebRequest webRequest, @Nullable WebDataBinderFactory binderFactory) throws Exception {Assert.state(mavContainer != null, "ModelAttributeMethodProcessor requires ModelAndViewContainer");Assert.state(binderFactory != null, "ModelAttributeMethodProcessor requires WebDataBinderFactory");String name = ModelFactory.getNameForParameter(parameter);ModelAttribute ann = parameter.getParameterAnnotation(ModelAttribute.class);if (ann != null) {mavContainer.setBinding(name, ann.binding());}Object attribute = null;BindingResult bindingResult = null;if (mavContainer.containsAttribute(name)) {attribute = mavContainer.getModel().get(name);}else {// Create attribute instancetry {attribute = createAttribute(name, parameter, binderFactory, webRequest);}catch (BindException ex) {if (isBindExceptionRequired(parameter)) {// No BindingResult parameter -> fail with BindExceptionthrow ex;}// Otherwise, expose null/empty value and associated BindingResultif (parameter.getParameterType() == Optional.class) {attribute = Optional.empty();}bindingResult = ex.getBindingResult();}}if (bindingResult == null) {// Bean property binding and validation;// skipped in case of binding failure on construction.WebDataBinder binder = binderFactory.createBinder(webRequest, attribute, name);if (binder.getTarget() != null) {if (!mavContainer.isBindingDisabled(name)) {bindRequestParameters(binder, webRequest);}validateIfApplicable(binder, parameter);if (binder.getBindingResult().hasErrors() && isBindExceptionRequired(binder, parameter)) {throw new BindException(binder.getBindingResult());}}// Value type adaptation, also covering java.util.Optionalif (!parameter.getParameterType().isInstance(attribute)) {attribute = binder.convertIfNecessary(binder.getTarget(), parameter.getParameterType(), parameter);}bindingResult = binder.getBindingResult();}// Add resolved attribute and BindingResult at the end of the modelMap<String, Object> bindingResultModel = bindingResult.getModel();mavContainer.removeAttributes(bindingResultModel);mavContainer.addAllAttributes(bindingResultModel);return attribute;}
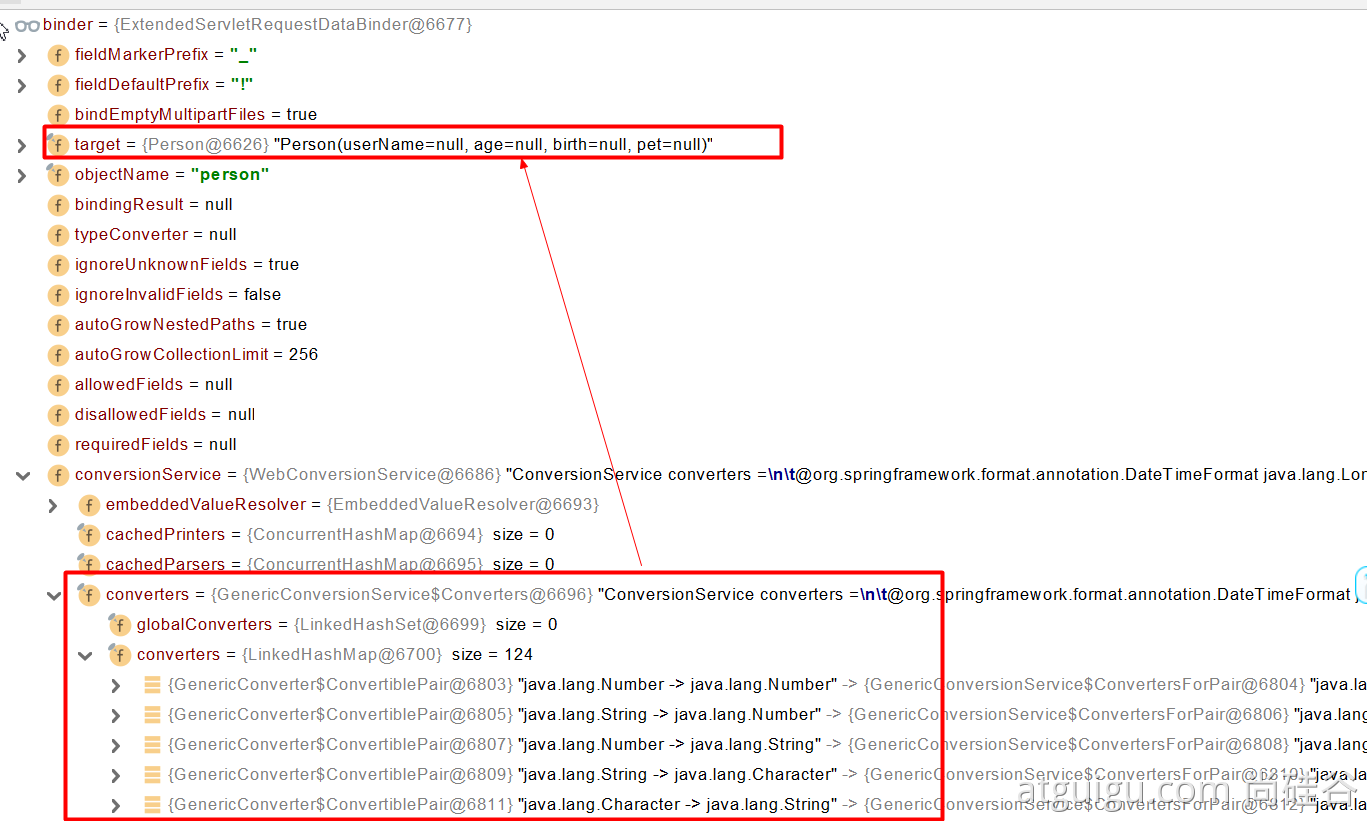
WebDataBinder binder = binderFactory.createBinder(webRequest, attribute, name);
WebDataBinder :web数据绑定器,将请求参数的值绑定到指定的JavaBean里面
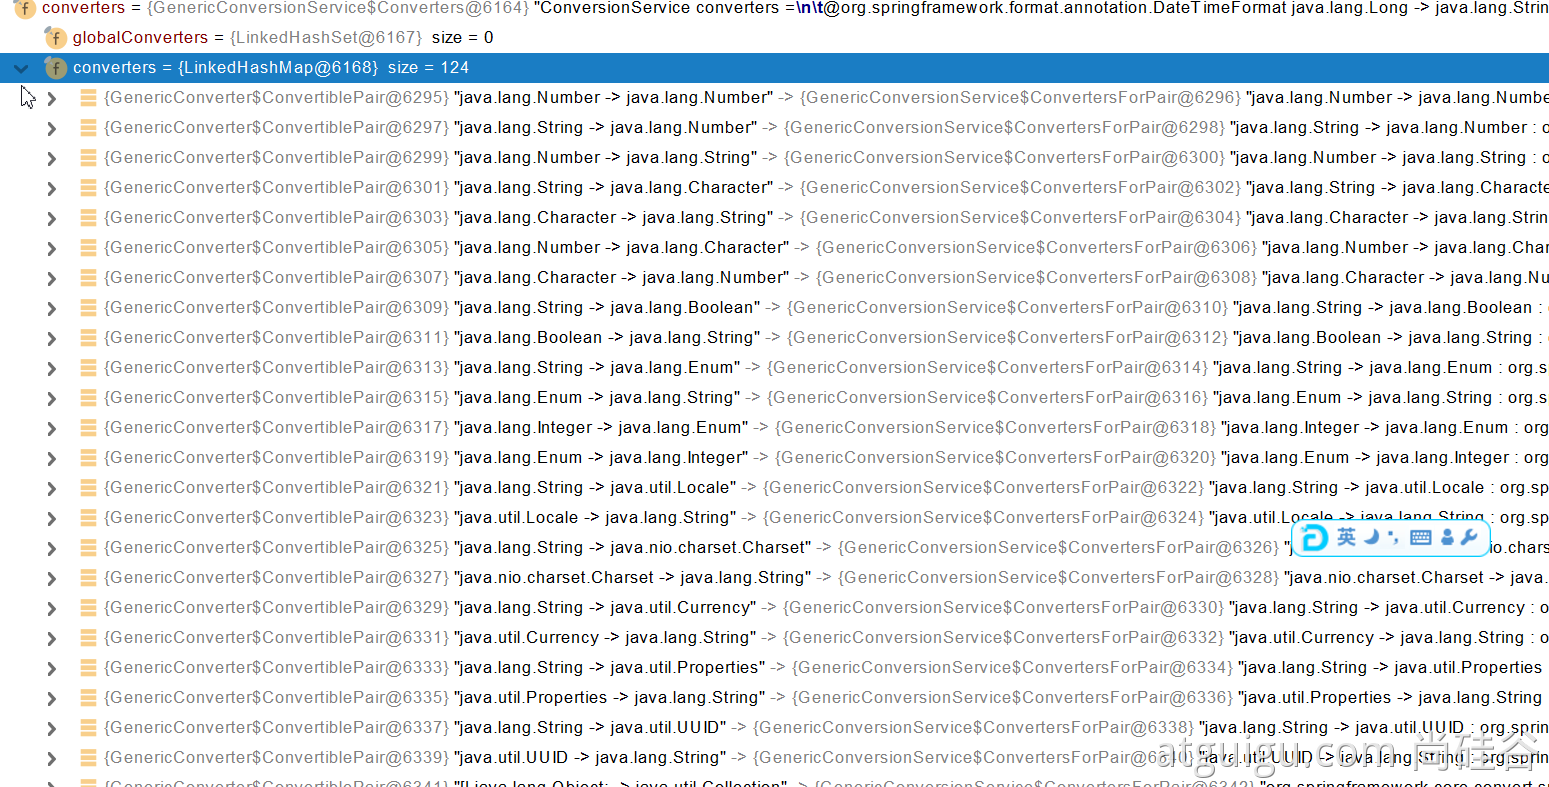
WebDataBinder 利用它里面的 Converters 将请求数据转成指定的数据类型。再次封装到JavaBean中
GenericConversionService:在设置每一个值的时候,找它里面的所有converter那个可以将这个数据类型(request带来参数的字符串)转换到指定的类型(JavaBean — Integer)
byte — > file
@FunctionalInterfacepublic interface Converter
未来我们可以给WebDataBinder里面放自己的Converter;
private static final class StringToNumber
//1、WebMvcConfigurer定制化SpringMVC的功能@Beanpublic WebMvcConfigurer webMvcConfigurer(){return new WebMvcConfigurer() {@Overridepublic void configurePathMatch(PathMatchConfigurer configurer) {UrlPathHelper urlPathHelper = new UrlPathHelper();// 不移除;后面的内容。矩阵变量功能就可以生效urlPathHelper.setRemoveSemicolonContent(false);configurer.setUrlPathHelper(urlPathHelper);}@Overridepublic void addFormatters(FormatterRegistry registry) {registry.addConverter(new Converter<String, Pet>() {@Overridepublic Pet convert(String source) {// 啊猫,3if(!StringUtils.isEmpty(source)){Pet pet = new Pet();String[] split = source.split(",");pet.setName(split[0]);pet.setAge(Integer.parseInt(split[1]));return pet;}return null;}});}};}
6、目标方法执行完成
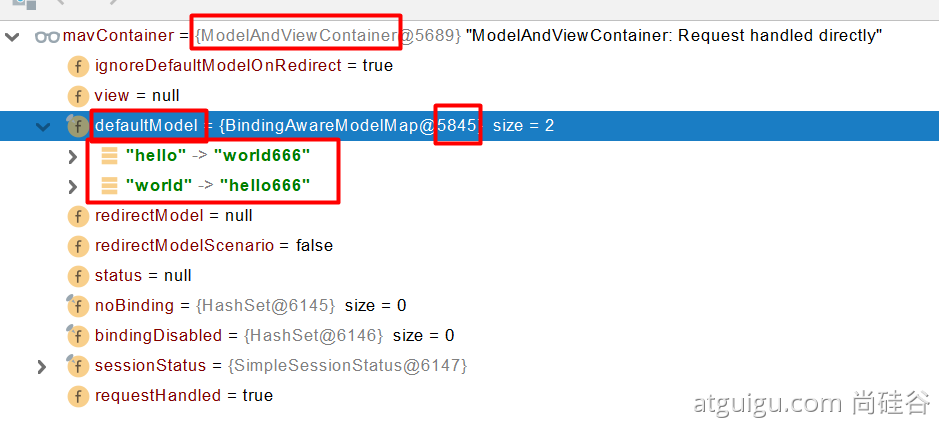
将所有的数据都放在 ModelAndViewContainer;包含要去的页面地址View。还包含Model数据。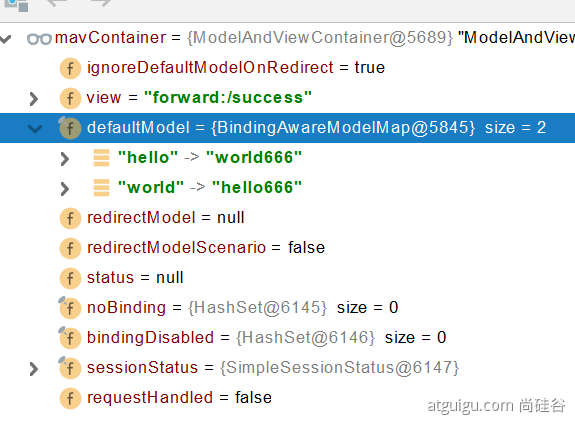
7、处理派发结果
processDispatchResult(processedRequest, response,
mappedHandler, mv, dispatchException);
renderMergedOutputModel(mergedModel,
getRequestToExpose(request), response);
InternalResourceView:@Overrideprotected void renderMergedOutputModel(Map<String, Object> model, HttpServletRequest request, HttpServletResponse response) throws Exception {// Expose the model object as request attributes.exposeModelAsRequestAttributes(model, request);// Expose helpers as request attributes, if any.exposeHelpers(request);// Determine the path for the request dispatcher.String dispatcherPath = prepareForRendering(request, response);// Obtain a RequestDispatcher for the target resource (typically a JSP).RequestDispatcher rd = getRequestDispatcher(request, dispatcherPath);if (rd == null) {throw new ServletException("Could not get RequestDispatcher for [" + getUrl() +"]: Check that the corresponding file exists within your web application archive!");}// If already included or response already committed, perform include, else forward.if (useInclude(request, response)) {response.setContentType(getContentType());if (logger.isDebugEnabled()) {logger.debug("Including [" + getUrl() + "]");}rd.include(request, response);}else {// Note: The forwarded resource is supposed to determine the content type itself.if (logger.isDebugEnabled()) {logger.debug("Forwarding to [" + getUrl() + "]");}rd.forward(request, response);}}
暴露模型作为请求域属性// Expose the model object as request attributes.exposeModelAsRequestAttributes(model, request);
protected void exposeModelAsRequestAttributes(Map<String, Object> model,HttpServletRequest request) throws Exception {//model中的所有数据遍历挨个放在请求域中model.forEach((name, value) -> {if (value != null) {request.setAttribute(name, value);}else {request.removeAttribute(name);}});}
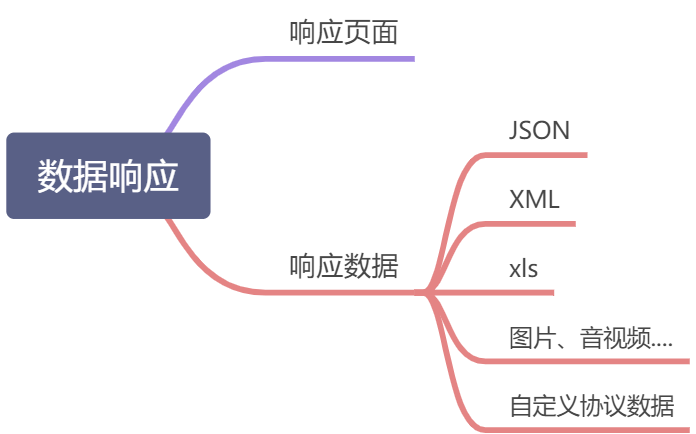
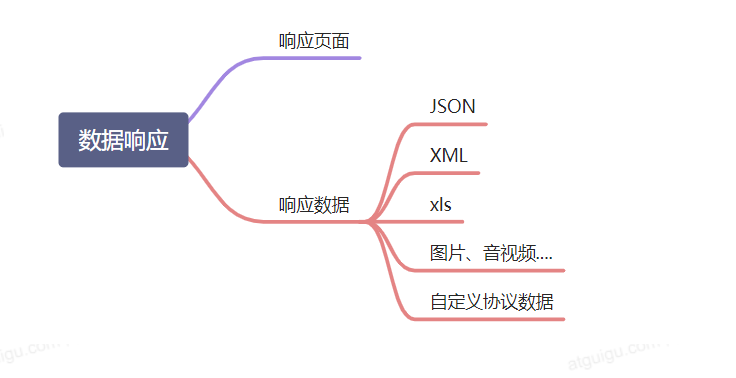
4、数据响应与内容协商
1、响应JSON
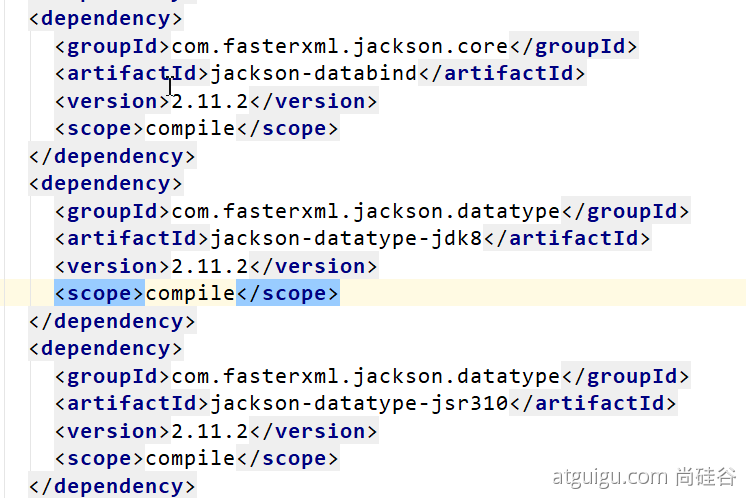
1.1、jackson.jar+@ResponseBody
<dependency><groupId>org.springframework.boot</groupId><artifactId>spring-boot-starter-web</artifactId></dependency>web场景自动引入了json场景<dependency><groupId>org.springframework.boot</groupId><artifactId>spring-boot-starter-json</artifactId><version>2.3.4.RELEASE</version><scope>compile</scope></dependency>
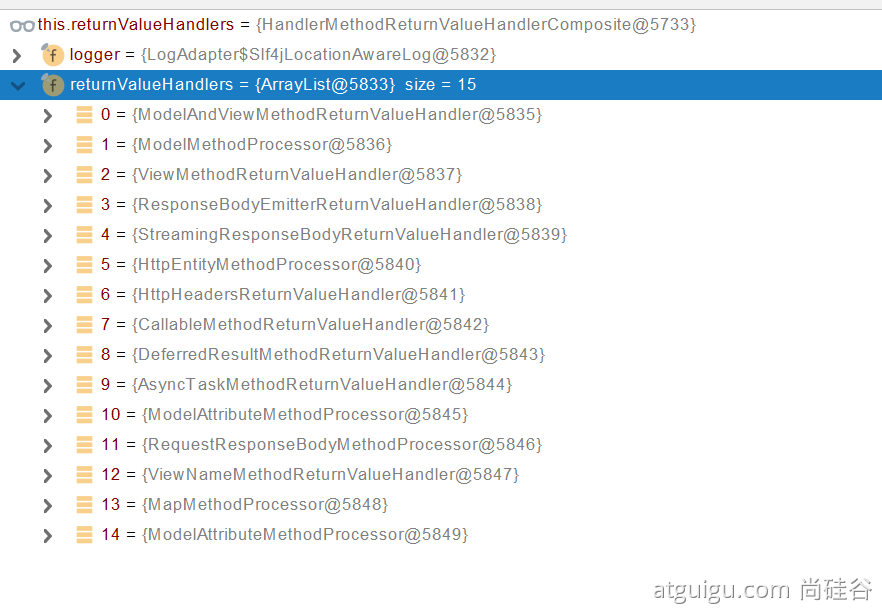
1、返回值解析器
try {this.returnValueHandlers.handleReturnValue(returnValue, getReturnValueType(returnValue), mavContainer, webRequest);}
@Overridepublic void handleReturnValue(@Nullable Object returnValue, MethodParameter returnType,ModelAndViewContainer mavContainer, NativeWebRequest webRequest) throws Exception {HandlerMethodReturnValueHandler handler = selectHandler(returnValue, returnType);if (handler == null) {throw new IllegalArgumentException("Unknown return value type: " + returnType.getParameterType().getName());}handler.handleReturnValue(returnValue, returnType, mavContainer, webRequest);}
RequestResponseBodyMethodProcessor@Overridepublic void handleReturnValue(@Nullable Object returnValue, MethodParameter returnType,ModelAndViewContainer mavContainer, NativeWebRequest webRequest)throws IOException, HttpMediaTypeNotAcceptableException, HttpMessageNotWritableException {mavContainer.setRequestHandled(true);ServletServerHttpRequest inputMessage = createInputMessage(webRequest);ServletServerHttpResponse outputMessage = createOutputMessage(webRequest);// Try even with null return value. ResponseBodyAdvice could get involved.// 使用消息转换器进行写出操作writeWithMessageConverters(returnValue, returnType, inputMessage, outputMessage);}
2、返回值解析器原理
- 1、返回值处理器判断是否支持这种类型返回值 supportsReturnType
- 2、返回值处理器调用 handleReturnValue 进行处理
- 3、RequestResponseBodyMethodProcessor 可以处理返回值标了@ResponseBody 注解的。
- 利用 MessageConverters 进行处理 将数据写为json
- 1、内容协商(浏览器默认会以请求头的方式告诉服务器他能接受什么样的内容类型)
- 2、服务器最终根据自己自身的能力,决定服务器能生产出什么样内容类型的数据,
- 3、SpringMVC会挨个遍历所有容器底层的 HttpMessageConverter ,看谁能处理?
- 1、得到MappingJackson2HttpMessageConverter可以将对象写为json
- 2、利用MappingJackson2HttpMessageConverter将对象转为json再写出去。
- 利用 MessageConverters 进行处理 将数据写为json

1.2、SpringMVC到底支持哪些返回值
ModelAndViewModelViewResponseEntityResponseBodyEmitterStreamingResponseBodyHttpEntityHttpHeadersCallableDeferredResultListenableFutureCompletionStageWebAsyncTask有 @ModelAttribute 且为对象类型的@ResponseBody 注解 ---> RequestResponseBodyMethodProcessor;
1.3、HTTPMessageConverter原理
1、MessageConverter规范
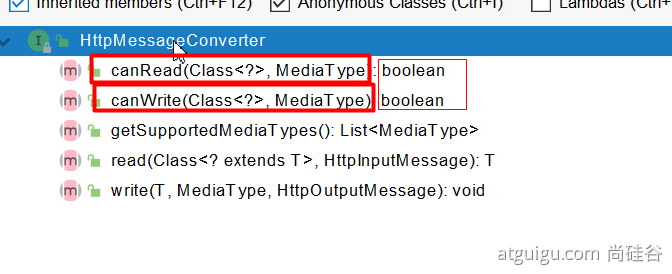
HttpMessageConverter: 看是否支持将 此 Class类型的对象,转为MediaType类型的数据。
例子:Person对象转为JSON。或者 JSON转为Person
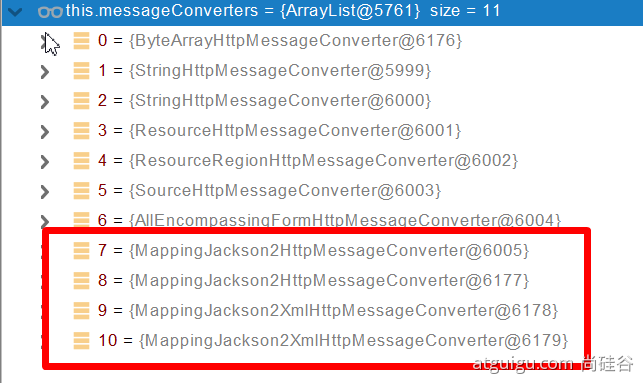
2、默认的MessageConverter
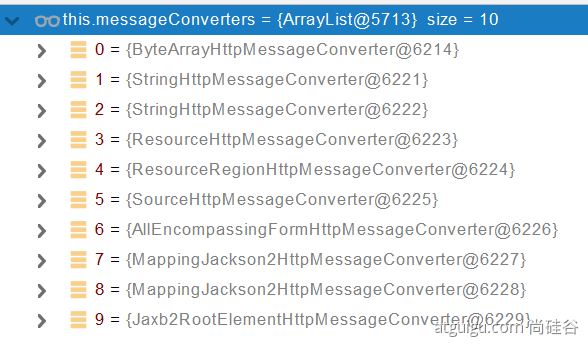
0 - 只支持Byte类型的
1 - String
2 - String
3 - Resource
4 - ResourceRegion
5 - DOMSource.class \ SAXSource.class) \ StAXSource.class \StreamSource.class \Source.class
6 - MultiValueMap
7 - true
8 - true
9 - 支持注解方式xml处理的。
最终 MappingJackson2HttpMessageConverter 把对象转为JSON(利用底层的jackson的objectMapper转换的)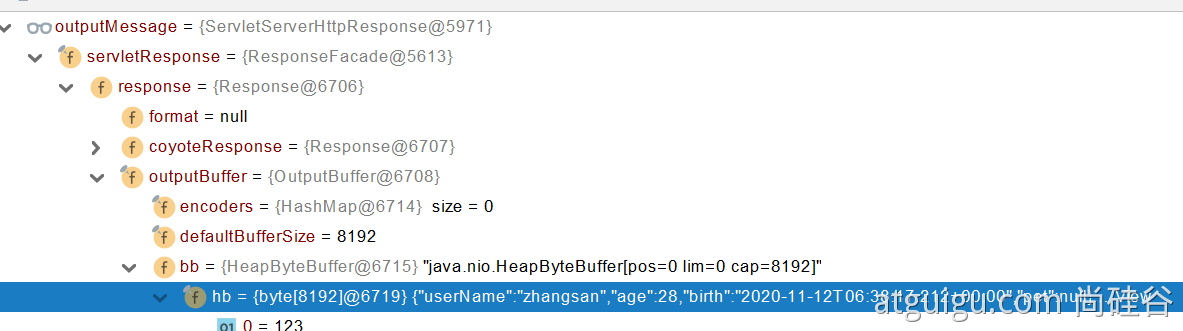
2、内容协商
1、引入xml依赖
<dependency><groupId>com.fasterxml.jackson.dataformat</groupId><artifactId>jackson-dataformat-xml</artifactId></dependency>
2、postman分别测试返回json和xml
只需要改变请求头中Accept字段。Http协议中规定的,告诉服务器本客户端可以接收的数据类型。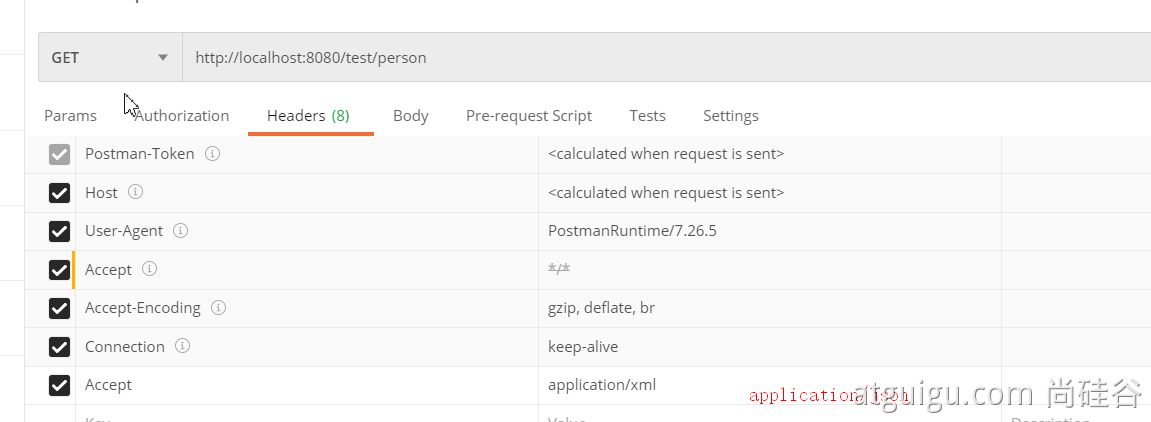
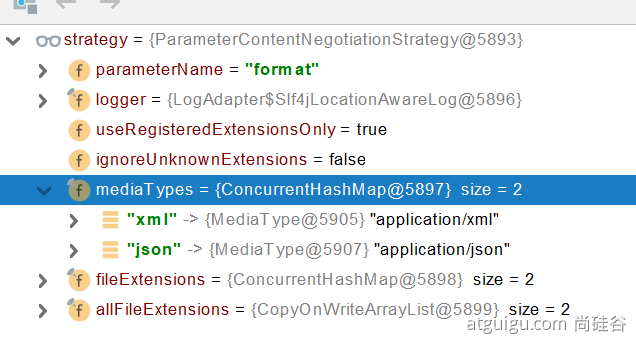
3、开启浏览器参数方式内容协商功能
为了方便内容协商,开启基于请求参数的内容协商功能。
spring: contentnegotiation: favor-parameter: true #开启请求参数内容协商模式
发请求: http://localhost:8080/test/person?format=json
http://localhost:8080/test/person?format=xml
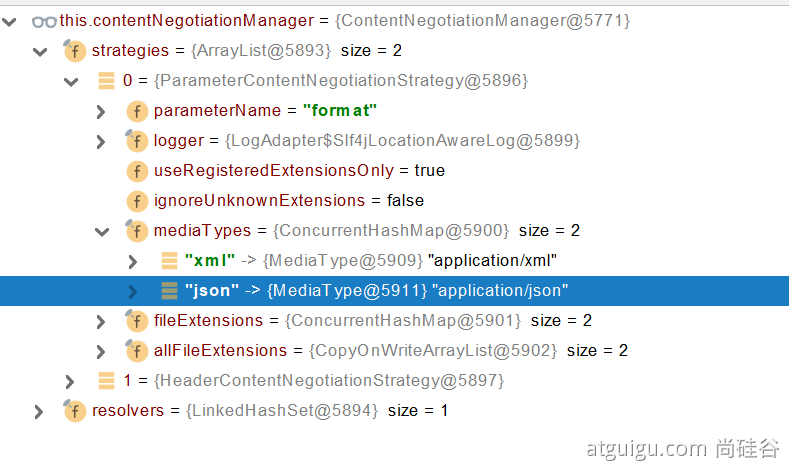
确定客户端接收什么样的内容类型;
1、Parameter策略优先确定是要返回json数据(获取请求头中的format的值)
2、最终进行内容协商返回给客户端json即可。
4、内容协商原理
- 1、判断当前响应头中是否已经有确定的媒体类型。MediaType
- 2、获取客户端(PostMan、浏览器)支持接收的内容类型。(获取客户端Accept请求头字段)【application/xml】
- contentNegotiationManager 内容协商管理器 默认使用基于请求头的策略

- HeaderContentNegotiationStrategy 确定客户端可以接收的内容类型

- 3、遍历循环所有当前系统的 MessageConverter,看谁支持操作这个对象(Person)
- 4、找到支持操作Person的converter,把converter支持的媒体类型统计出来。
- 5、客户端需要【application/xml】。服务端能力【10种、json、xml】
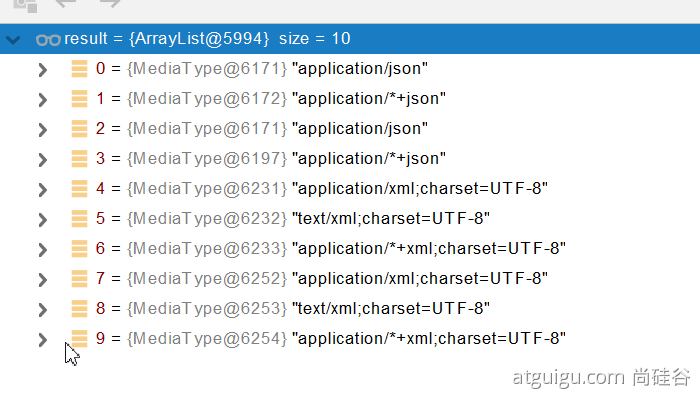
- 6、进行内容协商的最佳匹配媒体类型
- 7、用 支持 将对象转为 最佳匹配媒体类型 的converter。调用它进行转化 。
导入了jackson处理xml的包,xml的converter就会自动进来
WebMvcConfigurationSupportjackson2XmlPresent = ClassUtils.isPresent("com.fasterxml.jackson.dataformat.xml.XmlMapper", classLoader);if (jackson2XmlPresent) {Jackson2ObjectMapperBuilder builder = Jackson2ObjectMapperBuilder.xml();if (this.applicationContext != null) {builder.applicationContext(this.applicationContext);}messageConverters.add(new MappingJackson2XmlHttpMessageConverter(builder.build()));}
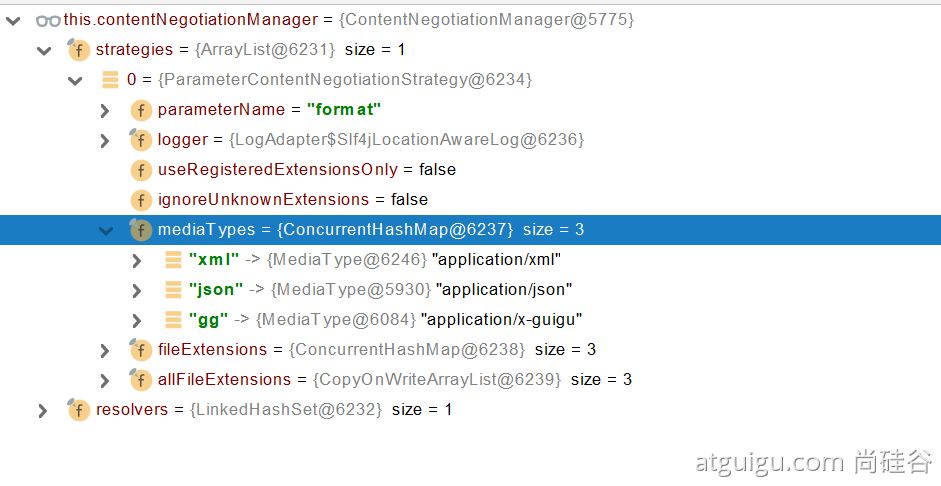
5、自定义 MessageConverter
实现多协议数据兼容。json、xml、x-guigu
0、@ResponseBody 响应数据出去 调用 RequestResponseBodyMethodProcessor 处理
1、Processor 处理方法返回值。通过 MessageConverter 处理
2、所有 MessageConverter 合起来可以支持各种媒体类型数据的操作(读、写)
3、内容协商找到最终的 messageConverter;
SpringMVC的什么功能。一个入口给容器中添加一个 WebMvcConfigurer
@Beanpublic WebMvcConfigurer webMvcConfigurer(){return new WebMvcConfigurer() {@Overridepublic void extendMessageConverters(List<HttpMessageConverter<?>> converters) {}}}
有可能我们添加的自定义的功能会覆盖默认很多功能,导致一些默认的功能失效。
大家考虑,上述功能除了我们完全自定义外?SpringBoot有没有为我们提供基于配置文件的快速修改媒体类型功能?怎么配置呢?【提示:参照SpringBoot官方文档web开发内容协商章节】
5、视图解析与模板引擎
视图解析:SpringBoot默认不支持 JSP,需要引入第三方模板引擎技术实现页面渲染。
1、视图解析
1、视图解析原理流程
1、目标方法处理的过程中,所有数据都会被放在 ModelAndViewContainer 里面。包括数据和视图地址
2、方法的参数是一个自定义类型对象(从请求参数中确定的),把他重新放在 ModelAndViewContainer
3、任何目标方法执行完成以后都会返回 ModelAndView(数据和视图地址)。
4、processDispatchResult 处理派发结果(页面改如何响应)
- 1、render(mv, request, response); 进行页面渲染逻辑
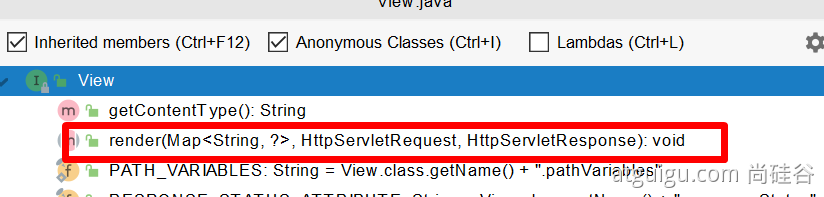
- 1、根据方法的String返回值得到 View 对象【定义了页面的渲染逻辑】
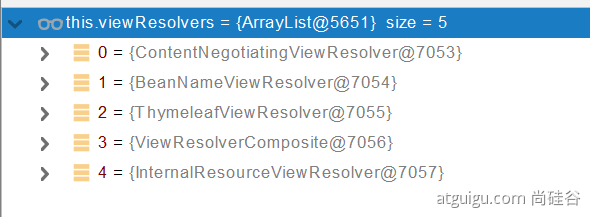
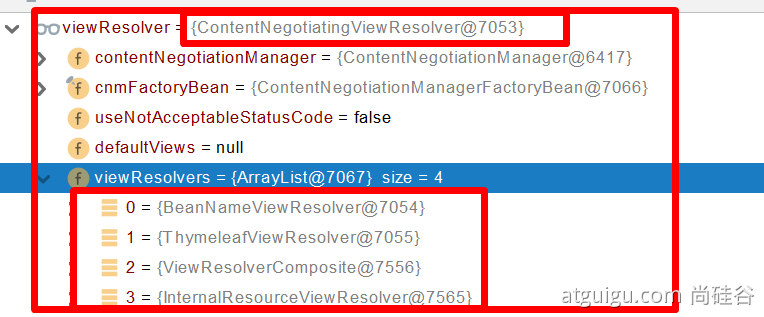
- 1、所有的视图解析器尝试是否能根据当前返回值得到View对象
- 2、得到了 redirect:/main.html —> Thymeleaf new RedirectView()
- 3、ContentNegotiationViewResolver 里面包含了下面所有的视图解析器,内部还是利用下面所有视图解析器得到视图对象。
- 4、view.render(mv.getModelInternal(), request, response); 视图对象调用自定义的render进行页面渲染工作
- RedirectView 如何渲染【重定向到一个页面】
- 1、获取目标url地址
- 2、response.sendRedirect(encodedURL);
- 1、根据方法的String返回值得到 View 对象【定义了页面的渲染逻辑】
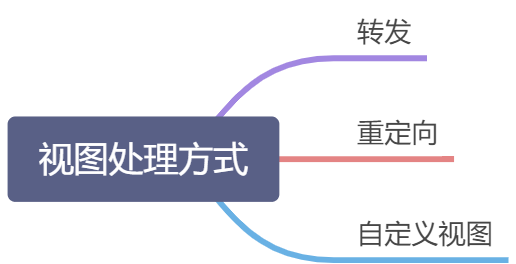
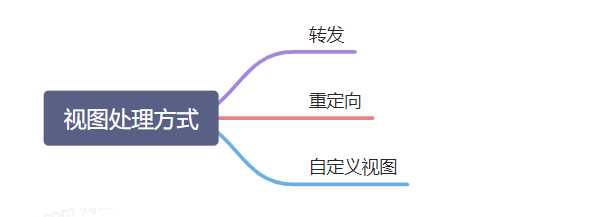
视图解析:
- 返回值以 forward: 开始: new InternalResourceView(forwardUrl); —> 转发request.getRequestDispatcher(path).forward(request, response);
- 返回值以 redirect: 开始: new RedirectView() —》 render就是重定向
- 返回值是普通字符串: new ThymeleafView()—->
自定义视图解析器+自定义视图; 大厂学院。
2、模板引擎-Thymeleaf
1、thymeleaf简介
Thymeleaf is a modern server-side Java template engine for both web and standalone environments, capable of processing HTML, XML, JavaScript, CSS and even plain text.
现代化、服务端Java模板引擎
2、基本语法
1、表达式
| 表达式名字 | 语法 | 用途 |
|---|---|---|
| 变量取值 | ${…} | 获取请求域、session域、对象等值 |
| 选择变量 | *{…} | 获取上下文对象值 |
| 消息 | #{…} | 获取国际化等值 |
| 链接 | @{…} | 生成链接 |
| 片段表达式 | ~{…} | jsp:include 作用,引入公共页面片段 |
2、字面量
文本值: ‘one text’ , ‘Another one!’ ,…数字: 0 , 34 , 3.0 , 12.3 ,…布尔值: true , false
空值: null
变量: one,two,…. 变量不能有空格
3、文本操作
字符串拼接: +
变量替换: |The name is ${name}|
4、数学运算
5、布尔运算
运算符: and , or
一元运算: ! , not
6、比较运算
比较: > , < , >= , <= ( gt , lt , ge , le )等式: == , != ( eq , ne )
7、条件运算
If-then: (if) ? (then)
If-then-else: (if) ? (then) : (else)
Default: (value) ?: (defaultvalue)
8、特殊操作
无操作: _
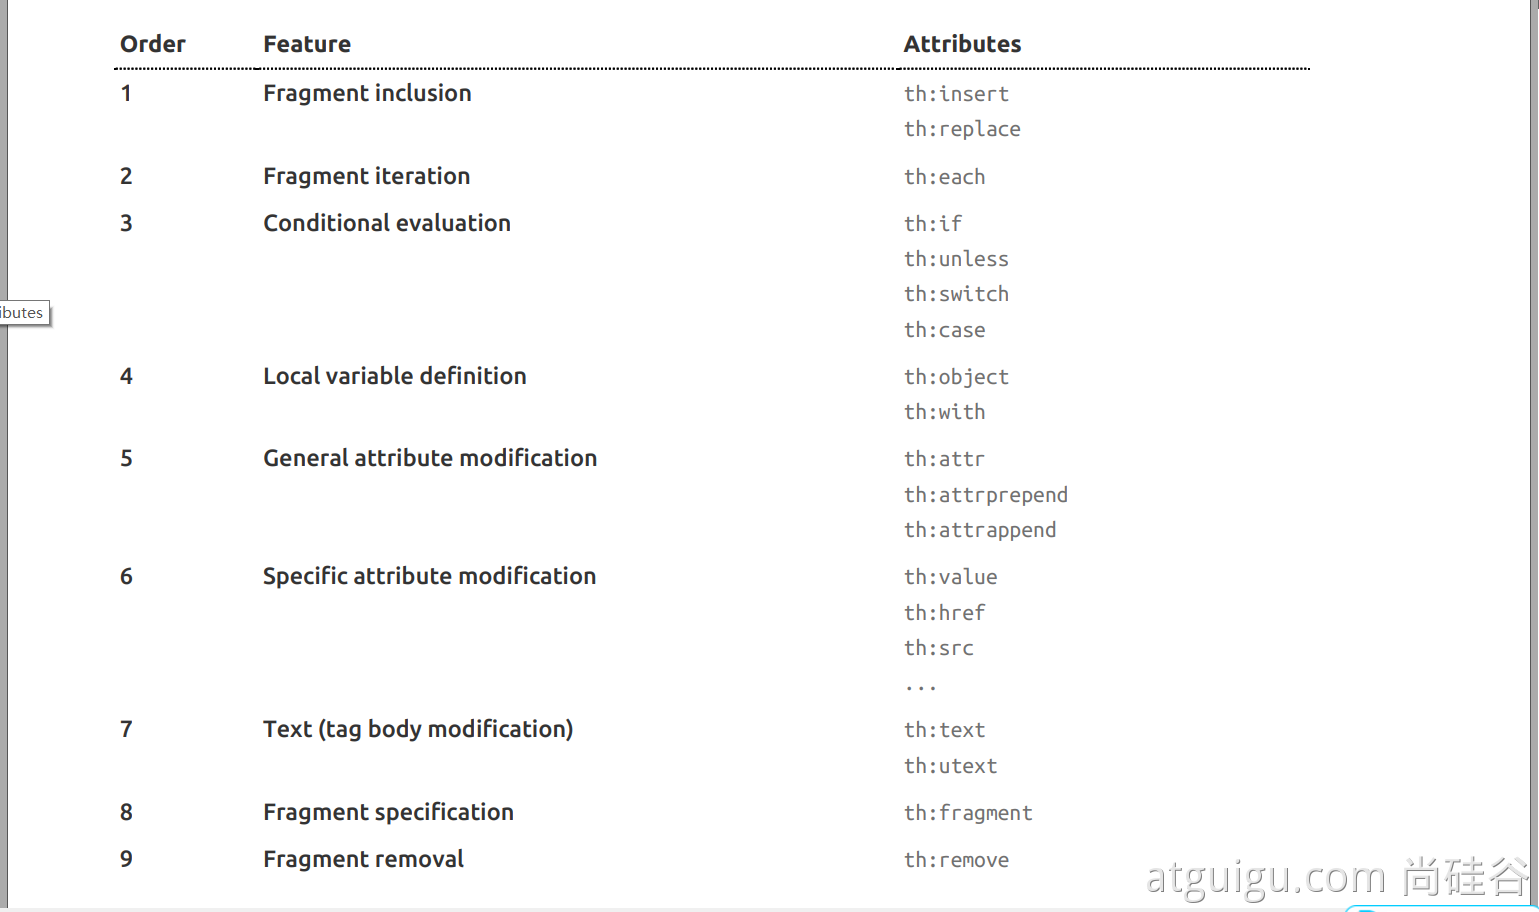
3、设置属性值-th:attr
设置单个值
<form action="subscribe.html" th:attr="action=@{/subscribe}"><fieldset><input type="text" name="email" /><input type="submit" value="Subscribe!" th:attr="value=#{subscribe.submit}"/></fieldset></form>
设置多个值
<img src="../../images/gtvglogo.png" th:attr="src=@{/images/gtvglogo.png},title=#{logo},alt=#{logo}" />
以上两个的代替写法 th:xxxx
<input type="submit" value="Subscribe!" th:value="#{subscribe.submit}"/><form action="subscribe.html" th:action="@{/subscribe}">
所有h5兼容的标签写法
https://www.thymeleaf.org/doc/tutorials/3.0/usingthymeleaf.html#setting-value-to-specific-attributes
4、迭代
<tr th:each="prod : ${prods}"><td th:text="${prod.name}">Onions</td><td th:text="${prod.price}">2.41</td><td th:text="${prod.inStock}? #{true} : #{false}">yes</td></tr>
<tr th:each="prod,iterStat : ${prods}" th:class="${iterStat.odd}? 'odd'"><td th:text="${prod.name}">Onions</td><td th:text="${prod.price}">2.41</td><td th:text="${prod.inStock}? #{true} : #{false}">yes</td></tr>
5、条件运算
<a href="comments.html"th:href="@{/product/comments(prodId=${prod.id})}"th:if="${not #lists.isEmpty(prod.comments)}">view</a>
<div th:switch="${user.role}"><p th:case="'admin'">User is an administrator</p><p th:case="#{roles.manager}">User is a manager</p><p th:case="*">User is some other thing</p></div>
6、属性优先级
3、thymeleaf使用
1、引入Starter
<dependency><groupId>org.springframework.boot</groupId><artifactId>spring-boot-starter-thymeleaf</artifactId></dependency>
2、自动配置好了thymeleaf
@Configuration(proxyBeanMethods = false)@EnableConfigurationProperties(ThymeleafProperties.class)@ConditionalOnClass({ TemplateMode.class, SpringTemplateEngine.class })@AutoConfigureAfter({ WebMvcAutoConfiguration.class, WebFluxAutoConfiguration.class })public class ThymeleafAutoConfiguration { }
自动配好的策略
- 1、所有thymeleaf的配置值都在 ThymeleafProperties
- 2、配置好了 SpringTemplateEngine
- 3、配好了 ThymeleafViewResolver
4、我们只需要直接开发页面
public static final String DEFAULT_PREFIX = "classpath:/templates/";public static final String DEFAULT_SUFFIX = ".html"; //xxx.html
3、页面开发
<!DOCTYPE html><html lang="en" xmlns:th="http://www.thymeleaf.org"><head><meta charset="UTF-8"><title>Title</title></head><body><h1 th:text="${msg}">哈哈</h1><h2><a href="www.atguigu.com" th:href="${link}">去百度</a> <br/><a href="www.atguigu.com" th:href="@{link}">去百度2</a></h2></body></html>
4、构建后台管理系统
1、项目创建
thymeleaf、web-starter、devtools、lombok
2、静态资源处理
自动配置好,我们只需要把所有静态资源放到 static 文件夹下
3、路径构建
th:action=”@{/login}”
4、模板抽取
th:insert/replace/include
5、页面跳转
@PostMapping("/login")public String main(User user, HttpSession session, Model model){if(StringUtils.hasLength(user.getUserName()) && "123456".equals(user.getPassword())){//把登陆成功的用户保存起来session.setAttribute("loginUser",user);//登录成功重定向到main.html; 重定向防止表单重复提交return "redirect:/main.html";}else {model.addAttribute("msg","账号密码错误");//回到登录页面return "login";}}
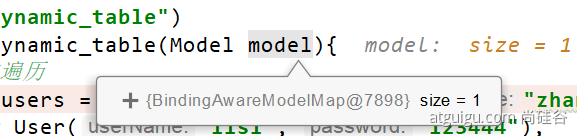
6、数据渲染
@GetMapping("/dynamic_table")public String dynamic_table(Model model){//表格内容的遍历List<User> users = Arrays.asList(new User("zhangsan", "123456"),new User("lisi", "123444"),new User("haha", "aaaaa"),new User("hehe ", "aaddd"));model.addAttribute("users",users);return "table/dynamic_table";}
<table class="display table table-bordered" id="hidden-table-info"><thead><tr><th>#</th><th>用户名</th><th>密码</th></tr></thead><tbody><tr class="gradeX" th:each="user,stats:${users}"><td th:text="${stats.count}">Trident</td><td th:text="${user.userName}">Internet</td><td >[[${user.password}]]</td></tr></tbody></table>
6、拦截器
1、HandlerInterceptor 接口
/*** 登录检查* 1、配置好拦截器要拦截哪些请求* 2、把这些配置放在容器中*/@Slf4jpublic class LoginInterceptor implements HandlerInterceptor {/*** 目标方法执行之前* @param request* @param response* @param handler* @return* @throws Exception*/@Overridepublic boolean preHandle(HttpServletRequest request, HttpServletResponse response, Object handler) throws Exception {String requestURI = request.getRequestURI();log.info("preHandle拦截的请求路径是{}",requestURI);//登录检查逻辑HttpSession session = request.getSession();Object loginUser = session.getAttribute("loginUser");if(loginUser != null){//放行return true;}//拦截住。未登录。跳转到登录页request.setAttribute("msg","请先登录");// re.sendRedirect("/");request.getRequestDispatcher("/").forward(request,response);return false;}/*** 目标方法执行完成以后* @param request* @param response* @param handler* @param modelAndView* @throws Exception*/@Overridepublic void postHandle(HttpServletRequest request, HttpServletResponse response, Object handler, ModelAndView modelAndView) throws Exception {log.info("postHandle执行{}",modelAndView);}/*** 页面渲染以后* @param request* @param response* @param handler* @param ex* @throws Exception*/@Overridepublic void afterCompletion(HttpServletRequest request, HttpServletResponse response, Object handler, Exception ex) throws Exception {log.info("afterCompletion执行异常{}",ex);}}
2、配置拦截器
/*** 1、编写一个拦截器实现HandlerInterceptor接口* 2、拦截器注册到容器中(实现WebMvcConfigurer的addInterceptors)* 3、指定拦截规则【如果是拦截所有,静态资源也会被拦截】*/@Configurationpublic class AdminWebConfig implements WebMvcConfigurer {@Overridepublic void addInterceptors(InterceptorRegistry registry) {registry.addInterceptor(new LoginInterceptor()).addPathPatterns("/**") //所有请求都被拦截包括静态资源.excludePathPatterns("/","/login","/css/**","/fonts/**","/images/**","/js/**"); //放行的请求}}
3、拦截器原理
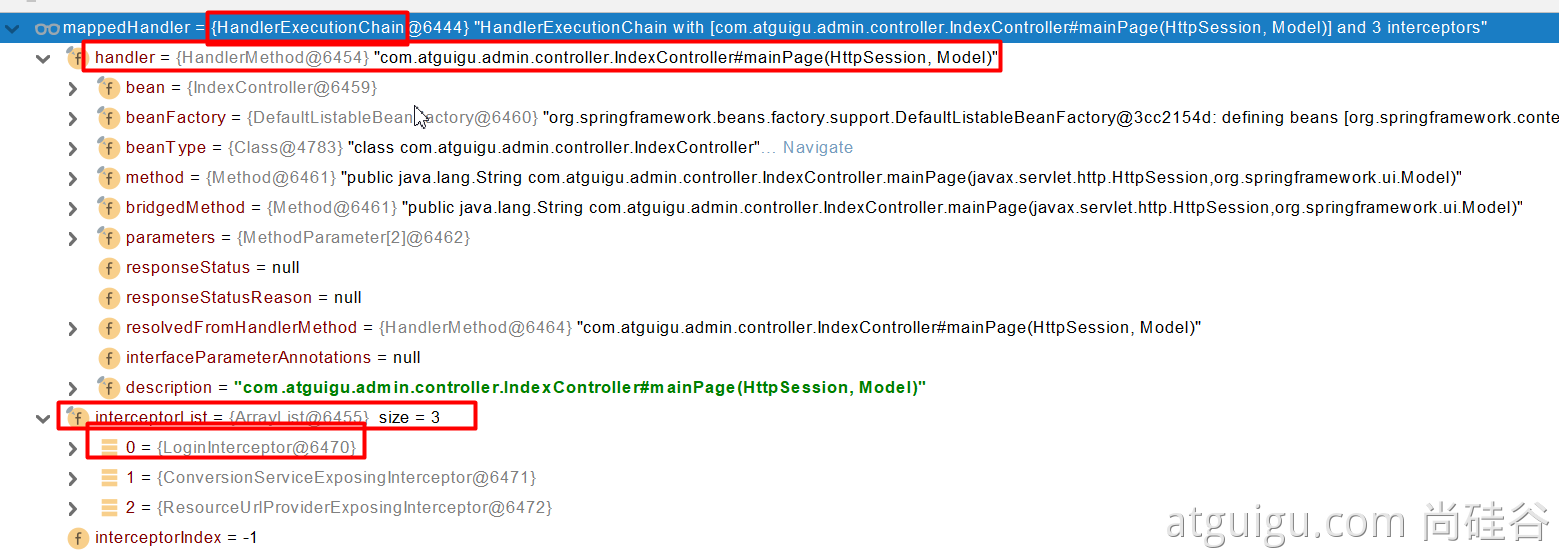
1、根据当前请求,找到HandlerExecutionChain【可以处理请求的handler以及handler的所有 拦截器】
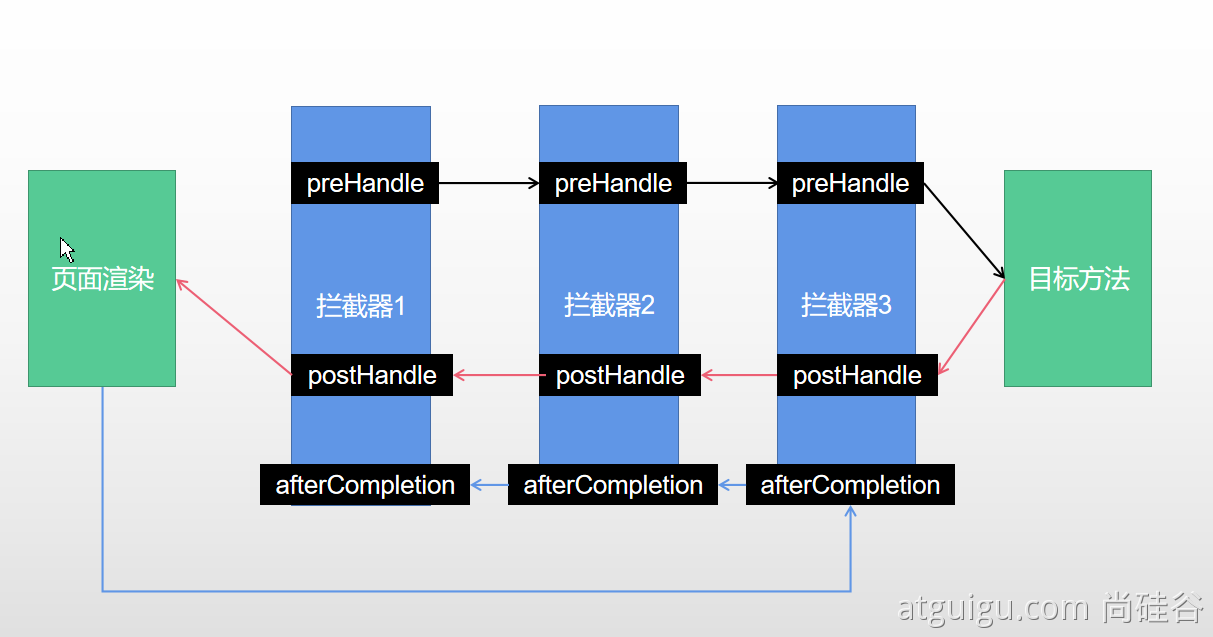
2、先来顺序执行 所有拦截器的 preHandle方法
- 1、如果当前拦截器prehandler返回为true。则执行下一个拦截器的preHandle
- 2、如果当前拦截器返回为false。直接 倒序执行所有已经执行了的拦截器的 afterCompletion;
3、如果任何一个拦截器返回false。直接跳出不执行目标方法
4、所有拦截器都返回True。执行目标方法
5、倒序执行所有拦截器的postHandle方法。
6、前面的步骤有任何异常都会直接倒序触发 afterCompletion
7、页面成功渲染完成以后,也会倒序触发 afterCompletion
7、文件上传
1、页面表单
<form method="post" action="/upload" enctype="multipart/form-data"><input type="file" name="file"><br><input type="submit" value="提交"></form>
2、文件上传代码
/*** MultipartFile 自动封装上传过来的文件* @param email* @param username* @param headerImg* @param photos* @return*/@PostMapping("/upload")public String upload(@RequestParam("email") String email,@RequestParam("username") String username,@RequestPart("headerImg") MultipartFile headerImg,@RequestPart("photos") MultipartFile[] photos) throws IOException {log.info("上传的信息:email={},username={},headerImg={},photos={}",email,username,headerImg.getSize(),photos.length);if(!headerImg.isEmpty()){//保存到文件服务器,OSS服务器String originalFilename = headerImg.getOriginalFilename();headerImg.transferTo(new File("H:\\cache\\"+originalFilename));}if(photos.length > 0){for (MultipartFile photo : photos) {if(!photo.isEmpty()){String originalFilename = photo.getOriginalFilename();photo.transferTo(new File("H:\\cache\\"+originalFilename));}}}return "main";}
3、自动配置原理
文件上传自动配置类-MultipartAutoConfiguration-MultipartProperties
- 自动配置好了 StandardServletMultipartResolver 【文件上传解析器】
- 原理步骤
- 1、请求进来使用文件上传解析器判断(isMultipart)并封装(resolveMultipart,返回MultipartHttpServletRequest)文件上传请求
- 2、参数解析器来解析请求中的文件内容封装成MultipartFile
- 3、将request中文件信息封装为一个Map;MultiValueMap
FileCopyUtils。实现文件流的拷贝
@PostMapping("/upload")public String upload(@RequestParam("email") String email,@RequestParam("username") String username,@RequestPart("headerImg") MultipartFile headerImg,@RequestPart("photos") MultipartFile[] photos)

8、异常处理
1、错误处理
1、默认规则
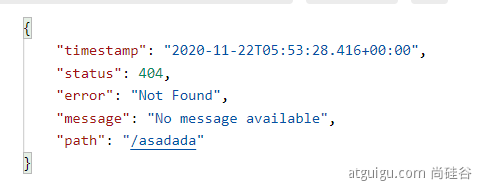
- 默认情况下,Spring Boot提供/error处理所有错误的映射
- 对于机器客户端,它将生成JSON响应,其中包含错误,HTTP状态和异常消息的详细信息。对于浏览器客户端,响应一个“ whitelabel”错误视图,以HTML格式呈现相同的数据

- **要对其进行自定义,添加View解析为error
- 要完全替换默认行为,可以实现 ErrorController 并注册该类型的Bean定义,或添加ErrorAttributes类型的组件以使用现有机制但替换其内容。
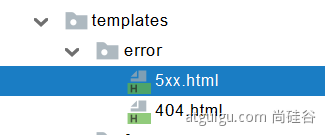
error/下的4xx,5xx页面会被自动解析;
自定义错误页
- error/404.html error/5xx.html;有精确的错误状态码页面就匹配精确,没有就找 4xx.html;如果都没有就触发白页
- @ControllerAdvice+@ExceptionHandler处理全局异常;底层是 ExceptionHandlerExceptionResolver 支持的
- @ResponseStatus+自定义异常 ;底层是 ResponseStatusExceptionResolver ,把responsestatus注解的信息底层调用 response.sendError(statusCode, resolvedReason);tomcat发送的/error
- Spring底层的异常,如 参数类型转换异常;DefaultHandlerExceptionResolver 处理框架底层的异常。
- response.sendError(HttpServletResponse.SC_BAD_REQUEST, ex.getMessage());

- 自定义实现 HandlerExceptionResolver 处理异常;可以作为默认的全局异常处理规则
- ErrorViewResolver实现自定义处理异常;
- response.sendError 。error请求就会转给controller
- 你的异常没有任何人能处理。tomcat底层 response.sendError。error请求就会转给controller
- basicErrorController 要去的页面地址是 ErrorViewResolver ;
3、异常处理自动配置原理
- ErrorMvcAutoConfiguration 自动配置异常处理规则
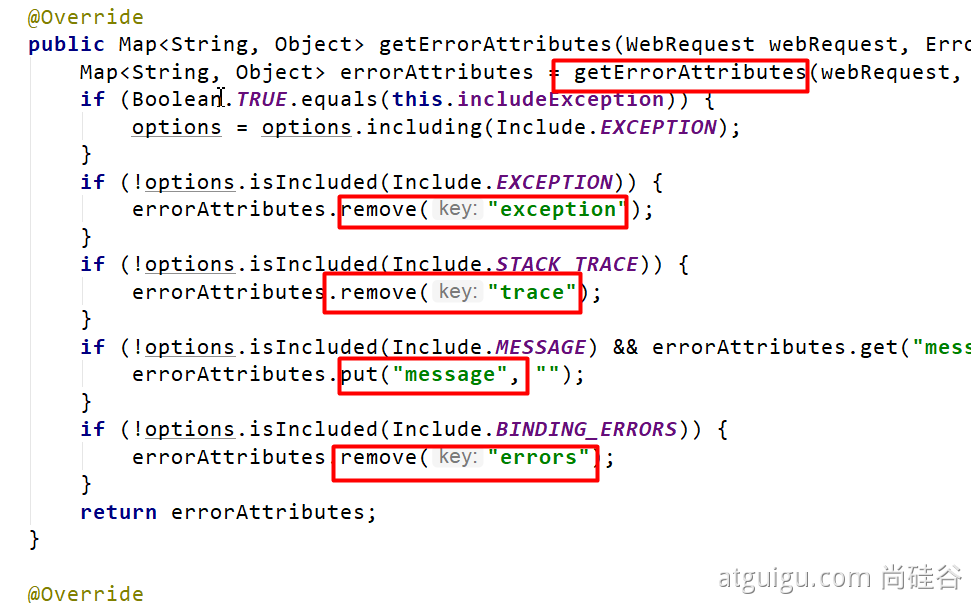
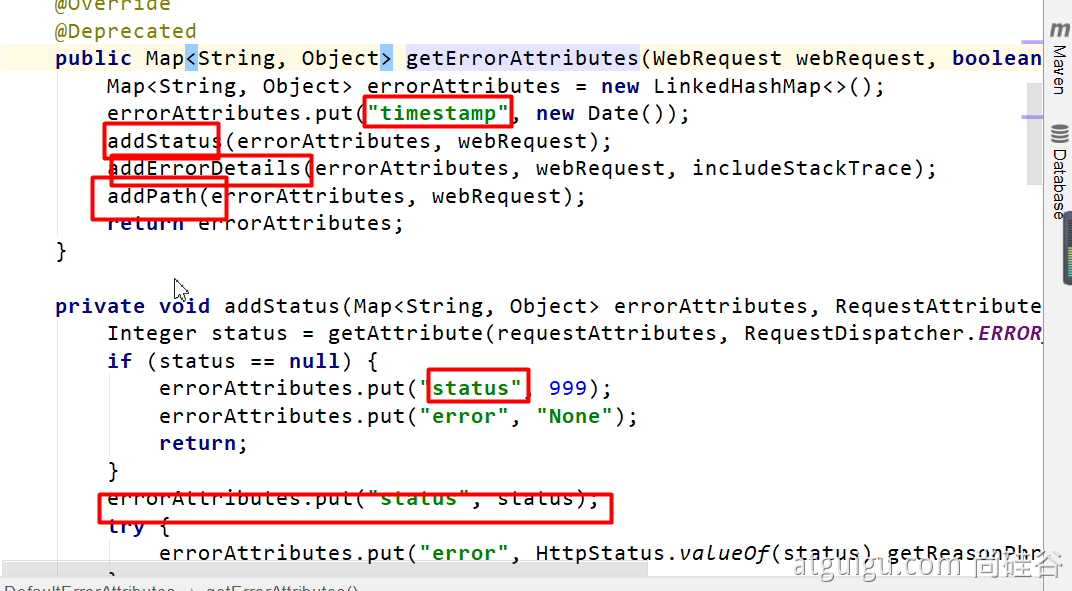
- 容器中的组件:类型:DefaultErrorAttributes -> id:errorAttributes
- public class DefaultErrorAttributes implements ErrorAttributes, HandlerExceptionResolver
- DefaultErrorAttributes:定义错误页面中可以包含哪些数据。
- 容器中的组件:类型:BasicErrorController —> id:basicErrorController(json+白页 适配响应)
- 处理默认 /error 路径的请求;页面响应 new ModelAndView(“error”, model);
- 容器中有组件 View->id是error;(响应默认错误页)
- 容器中放组件 BeanNameViewResolver(视图解析器);按照返回的视图名作为组件的id去容器中找View对象。
- 容器中的组件:类型:DefaultErrorViewResolver -> id:conventionErrorViewResolver
- 如果发生错误,会以HTTP的状态码 作为视图页地址(viewName),找到真正的页面
- error/404、5xx.html
- 容器中的组件:类型:DefaultErrorAttributes -> id:errorAttributes
如果想要返回页面;就会找error视图【StaticView】。(默认是一个白页)
 写出去json
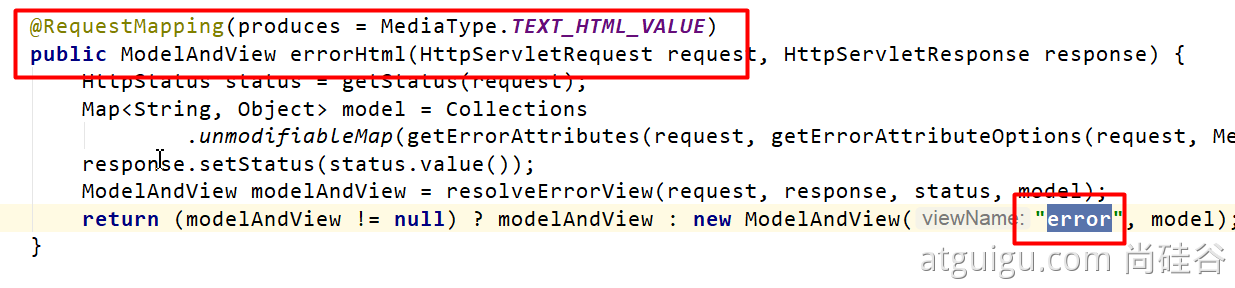 错误页
错误页
4、异常处理步骤流程
1、执行目标方法,目标方法运行期间有任何异常都会被catch、而且标志当前请求结束;并且用 dispatchException
2、进入视图解析流程(页面渲染?)
processDispatchResult(processedRequest, response, mappedHandler, mv, dispatchException);
3、mv = processHandlerException;处理handler发生的异常,处理完成返回ModelAndView;
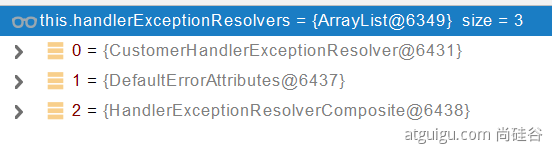
- 1、遍历所有的 handlerExceptionResolvers,看谁能处理当前异常【HandlerExceptionResolver处理器异常解析器】

- 2、系统默认的 异常解析器;
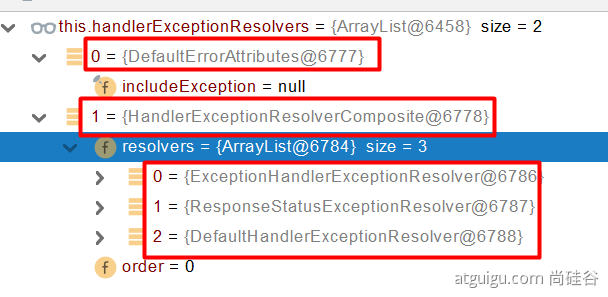
- 1、DefaultErrorAttributes先来处理异常。把异常信息保存到rrequest域,并且返回null;
- 2、默认没有任何人能处理异常,所以异常会被抛出
- 1、如果没有任何人能处理最终底层就会发送 /error 请求。会被底层的BasicErrorController处理
- 2、解析错误视图;遍历所有的 ErrorViewResolver 看谁能解析。

- 3、默认的 DefaultErrorViewResolver ,作用是把响应状态码作为错误页的地址,error/500.html
- 4、模板引擎最终响应这个页面 error/500.html
9、Web原生组件注入(Servlet、Filter、Listener)
1、使用Servlet API
@ServletComponentScan(basePackages = “com.atguigu.admin”) :指定原生Servlet组件都放在那里
@WebServlet(urlPatterns = “/my”):效果:直接响应,没有经过Spring的拦截器?
@WebFilter(urlPatterns={“/css/*”,“/images/*”})
@WebListener
推荐可以这种方式;
扩展:DispatchServlet 如何注册进来
- 容器中自动配置了 DispatcherServlet 属性绑定到 WebMvcProperties;对应的配置文件配置项是 spring.mvc。
- 通过 ServletRegistrationBean
把 DispatcherServlet 配置进来。 - 默认映射的是 / 路径。
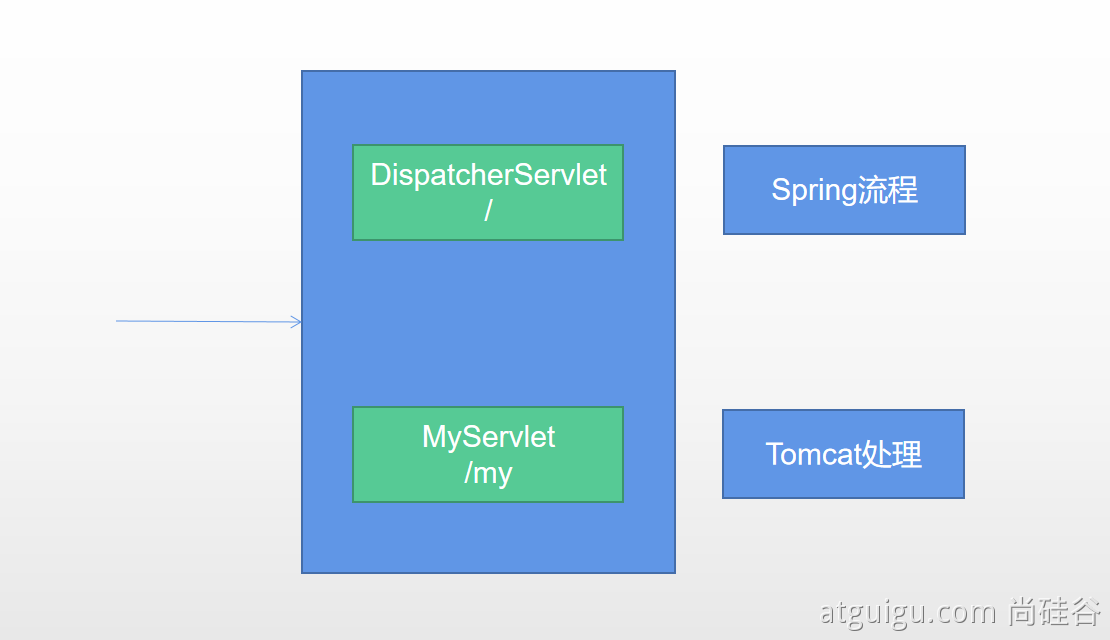
Tomcat-Servlet;
多个Servlet都能处理到同一层路径,精确优选原则
A: /my/
B: /my/1
2、使用RegistrationBean
@Configurationpublic class MyRegistConfig {@Beanpublic ServletRegistrationBean myServlet(){MyServlet myServlet = new MyServlet();return new ServletRegistrationBean(myServlet,"/my","/my02");}@Beanpublic FilterRegistrationBean myFilter(){MyFilter myFilter = new MyFilter();// return new FilterRegistrationBean(myFilter,myServlet());FilterRegistrationBean filterRegistrationBean = new FilterRegistrationBean(myFilter);filterRegistrationBean.setUrlPatterns(Arrays.asList("/my","/css/*"));return filterRegistrationBean;}@Beanpublic ServletListenerRegistrationBean myListener(){MySwervletContextListener mySwervletContextListener = new MySwervletContextListener();return new ServletListenerRegistrationBean(mySwervletContextListener);}}
10、嵌入式Servlet容器
1、切换嵌入式Servlet容器
- 默认支持的webServer
- Tomcat, Jetty, or Undertow
- ServletWebServerApplicationContext 容器启动寻找ServletWebServerFactory 并引导创建服务器
- 切换服务器

<dependency><groupId>org.springframework.boot</groupId><artifactId>spring-boot-starter-web</artifactId><exclusions><exclusion><groupId>org.springframework.boot</groupId><artifactId>spring-boot-starter-tomcat</artifactId></exclusion></exclusions></dependency>
- 原理
- SpringBoot应用启动发现当前是Web应用。web场景包-导入tomcat
- web应用会创建一个web版的ioc容器 ServletWebServerApplicationContext
- ServletWebServerApplicationContext 启动的时候寻找 ServletWebServerFactory(Servlet 的web服务器工厂—-> Servlet 的web服务器)
- SpringBoot底层默认有很多的WebServer工厂;TomcatServletWebServerFactory, JettyServletWebServerFactory, or UndertowServletWebServerFactory
- 底层直接会有一个自动配置类。ServletWebServerFactoryAutoConfiguration
- ServletWebServerFactoryAutoConfiguration导入了ServletWebServerFactoryConfiguration(配置类)
- ServletWebServerFactoryConfiguration 配置类 根据动态判断系统中到底导入了那个Web服务器的包。(默认是web-starter导入tomcat包),容器中就有 TomcatServletWebServerFactory
- TomcatServletWebServerFactory 创建出Tomcat服务器并启动;TomcatWebServer 的构造器拥有初始化方法initialize—-this.tomcat.start();
- 内嵌服务器,就是手动把启动服务器的代码调用(tomcat核心jar包存在)
2、定制Servlet容器
- 实现 WebServerFactoryCustomizer
- 把配置文件的值和ServletWebServerFactory 进行绑定
- 修改配置文件 server.xxx
- 直接自定义 ConfigurableServletWebServerFactory
xxxxxCustomizer:定制化器,可以改变xxxx的默认规则
import org.springframework.boot.web.server.WebServerFactoryCustomizer;import org.springframework.boot.web.servlet.server.ConfigurableServletWebServerFactory;import org.springframework.stereotype.Component;@Componentpublic class CustomizationBean implements WebServerFactoryCustomizer<ConfigurableServletWebServerFactory> {@Overridepublic void customize(ConfigurableServletWebServerFactory server) {server.setPort(9000);}}
11、定制化原理
1、定制化的常见方式
- 修改配置文件;
- xxxxxCustomizer;
- 编写自定义的配置类 xxxConfiguration;+ @Bean替换、增加容器中默认组件;视图解析器
Web应用 编写一个配置类实现 WebMvcConfigurer 即可定制化web功能;+ @Bean给容器中再扩展一些组件
@Configurationpublic class AdminWebConfig implements WebMvcConfigurer
@EnableWebMvc + WebMvcConfigurer —— @Bean可以全面接管SpringMVC,所有规则全部自己重新配置; 实现定制和扩展功能
- 原理
- 1、WebMvcAutoConfiguration 默认的SpringMVC的自动配置功能类。静态资源、欢迎页…..
- 2、一旦使用 @EnableWebMvc 、。会 @Import(DelegatingWebMvcConfiguration.class)
- 3、DelegatingWebMvcConfiguration 的 作用,只保证SpringMVC最基本的使用
- 把所有系统中的 WebMvcConfigurer 拿过来。所有功能的定制都是这些 WebMvcConfigurer 合起来一起生效
- 自动配置了一些非常底层的组件。RequestMappingHandlerMapping、这些组件依赖的组件都是从容器中获取
- public class DelegatingWebMvcConfiguration extends WebMvcConfigurationSupport
- 4、WebMvcAutoConfiguration 里面的配置要能生效 必须 @ConditionalOnMissingBean(WebMvcConfigurationSupport.class)
- 5、@EnableWebMvc 导致了 WebMvcAutoConfiguration 没有生效。
- … …
2、原理分析套路
场景starter - xxxxAutoConfiguration - 导入xxx组件 - 绑定xxxProperties — 绑定配置文件项

若有收获,就点个赞吧
0 人点赞
