一、Apollo
1、执行流程
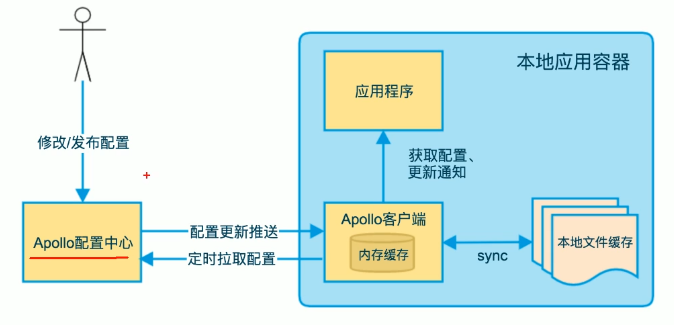
注:
应用程序连接的是Apollo的客户端
Apollo配置中心的配置数据存放在数据库当中
2、安装服务端Apollo
下载地址:https://github.com/apolloconfig/apollo/releases/tag/v1.3.0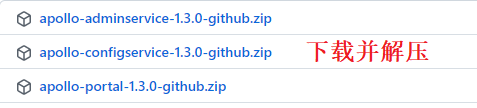
第一步:导入数据库脚本
第二步:启动apollo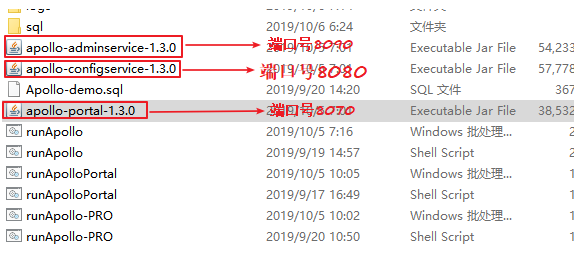
注:启动的方式如下:
1、确保端口号未被使用
2、在apollo的安装目录下执行cmd,并输入以下命令
启动第一个服务 configservicejava -Xms256m -Xmx256m -Dserver.port=8081 -Dspring.datasource.url=jdbc:mysql://localhost:3306/apolloconfigdb?characterEncoding=utf8 -Dspring.datasource.username=root -Dspring.datasource.password=123456 -jar apollo-configservice-1.3.0.jar启动第二个服务 adminsevicejava -Xms256m -Xmx256m -Dserver.port=8082 -Dspring.datasource.url=jdbc:mysql://localhost:3306/apolloconfigdb?characterEncoding=utf8 -Dspring.datasource.username=root -Dspring.datasource.password=123456 -jar apollo-adminservice-1.3.0.jar启动第三个服务 portaljava -Xms256m -Xmx256m -Ddev_meta=http://localhost:8080/ -Dserver.port=8083 -Dspring.datasource.url=jdbc:mysql://localhost:3306/apolloportaldb?characterEncoding=utf8 -Dspring.datasource.username=root -Dspring.datasource.password=123456 -jar apollo-portal-1.3.0.jar
3、进行登录到apollo 链接:localhost:8070 该端口号是apollo默认的端口号,登陆的账号和密码是:apollo admin 进入到主界面就是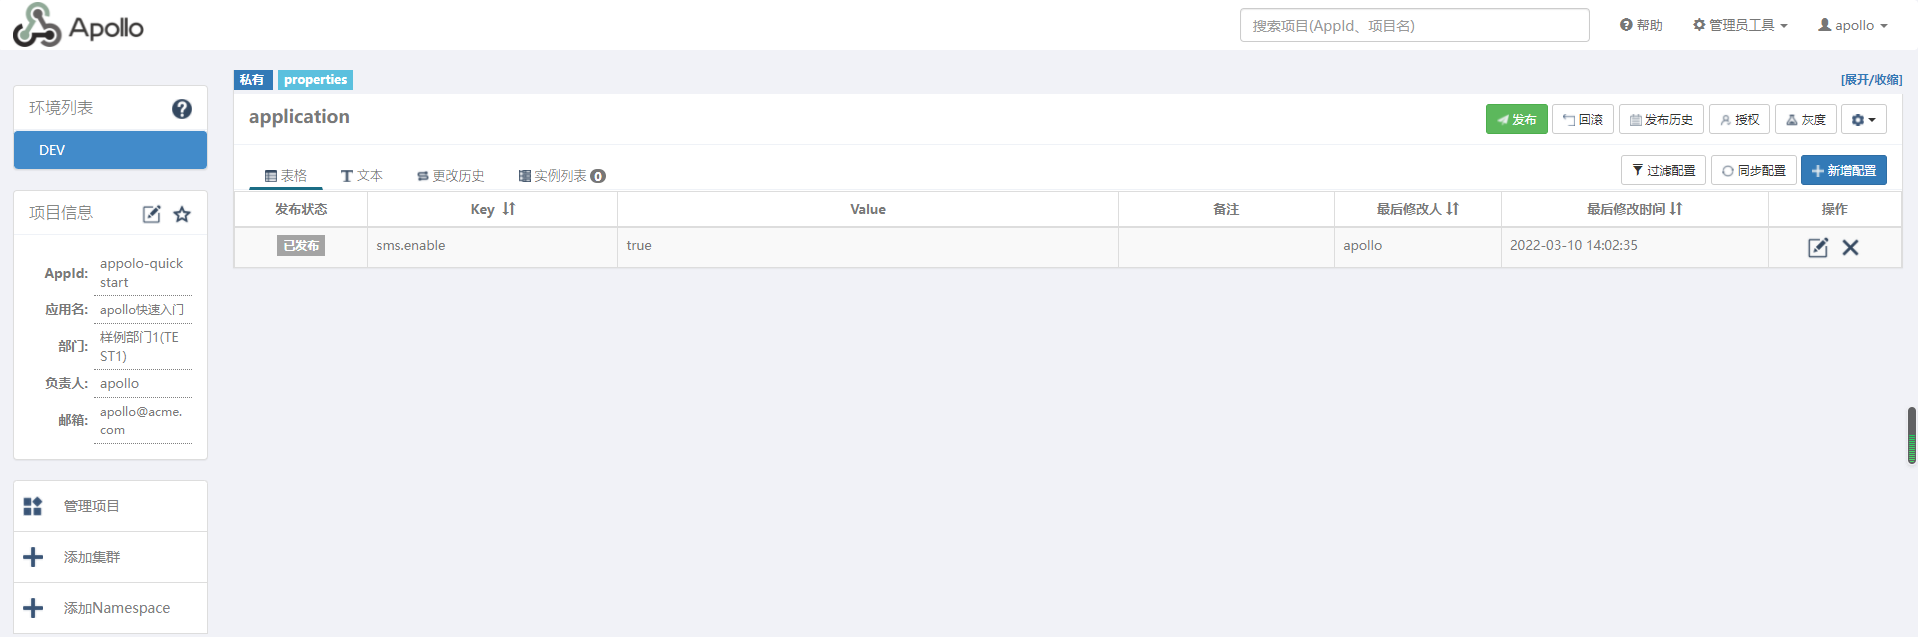
3、代码实现
3.1 发布配置
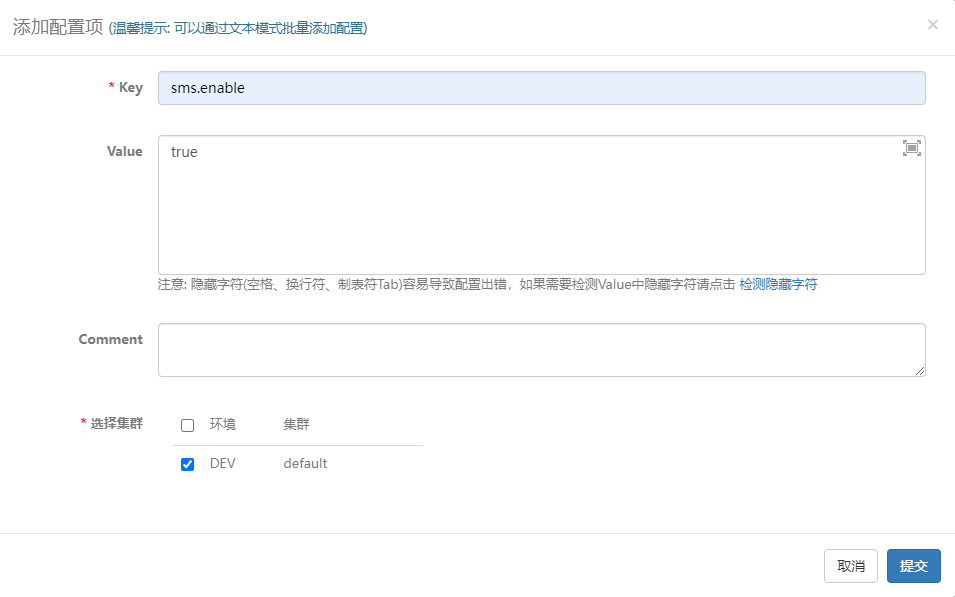
3.2 新增配置项
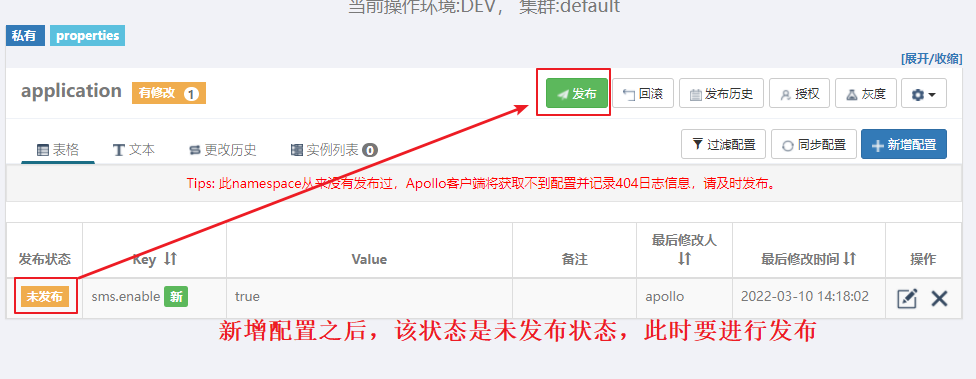
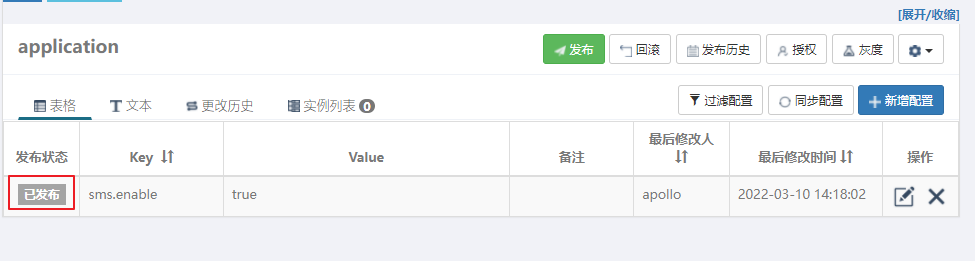
3.3 发布
3.4 新建maven工程
3.4.1 添加pom依赖
<dependencies><dependency><groupId>com.ctrip.framework.apollo</groupId><artifactId>apollo-client</artifactId><version>1.1.0</version></dependency><dependency><groupId>org.slf4j</groupId><artifactId>slf4j-simple</artifactId><version>1.7.28</version></dependency></dependencies><build><plugins><plugin><groupId>org.apache.maven.plugins</groupId><artifactId>maven-compiler-plugin</artifactId><configuration><source>8</source><target>8</target></configuration></plugin></plugins></build>
3.4.2 编写测试类
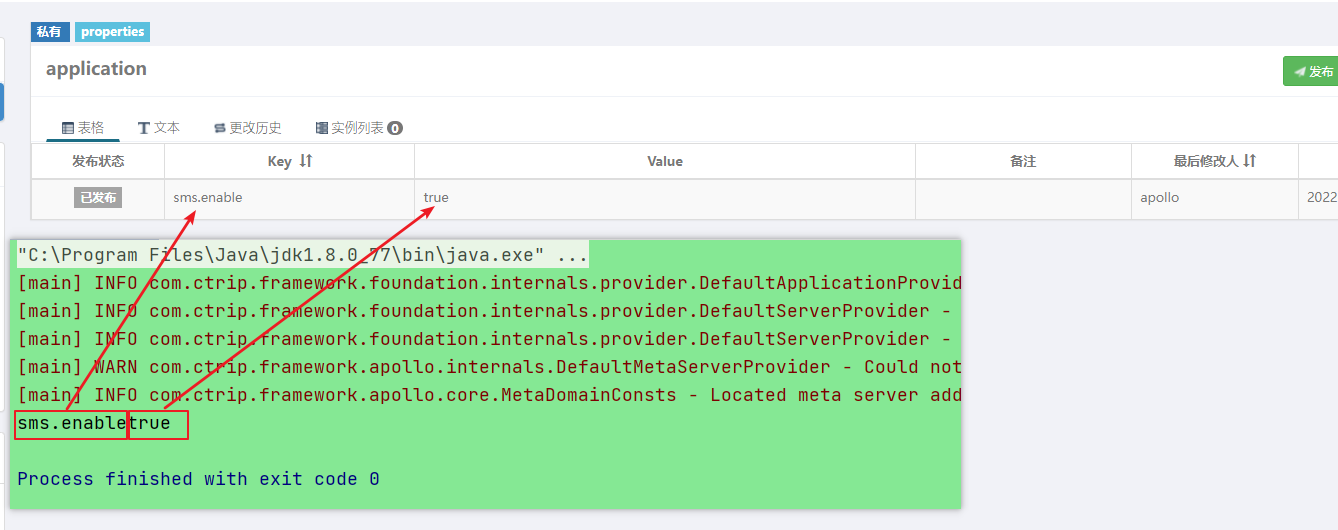
import com.ctrip.framework.apollo.Config;import com.ctrip.framework.apollo.ConfigService;/*** @Description 获取apollo中的配置信息* @Author dongxinxin@e6yun.com* @Created Date: 2022/3/10 14:24* @ClassName GetApolloConfigTest* @Remark*/public class GetApolloConfigTest {public static void main(String[] args) {Config config = ConfigService.getAppConfig();String someKey = "sms.enable";String value = config.getProperty(someKey, null);System.out.println("sms.enable" + value);}}
3.4.3 添加 VM 参数
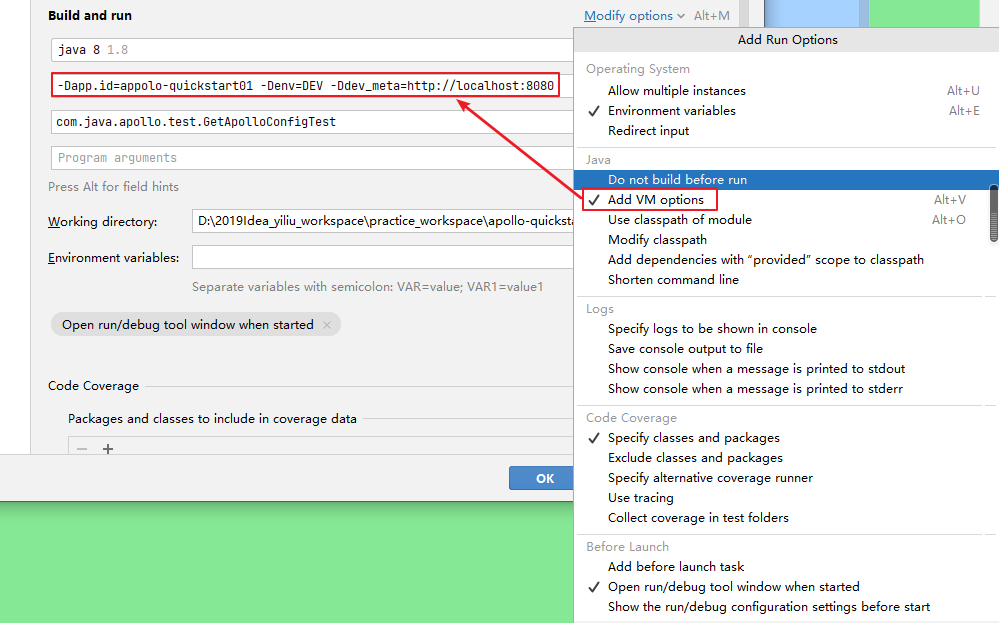
3.4.4 运行 得结果
4、Apollo 的工作原理
4.1 各模块的职责
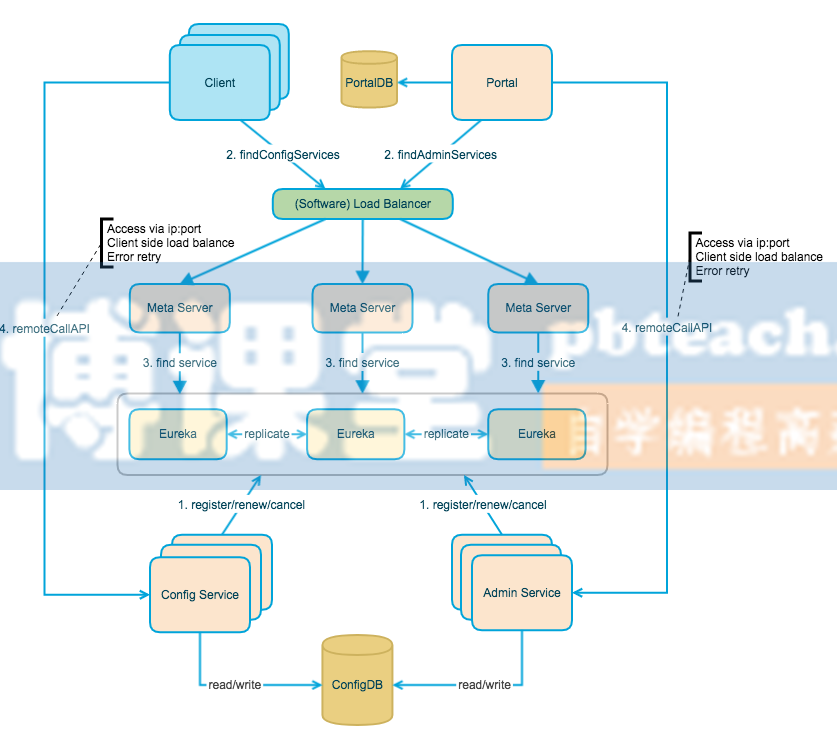
上图简要描述了Apollo的总体设计,我们可以从下往上看:
- Config Service提供配置的读取、推送等功能,服务对象是Apollo客户端
- Admin Service提供配置的修改、发布等功能,服务对象是Apollo Portal(管理界面)
- Eureka提供服务注册和发现,为了简单起见,目前Eureka在部署时和Config Service是在一个JVM进程中的
- Config Service和Admin Service都是多实例、无状态部署,所以需要将自己注册到Eureka中并保持心跳
- 在Eureka之上架了一层Meta Server用于封装Eureka的服务发现接口
- Client通过域名访问Meta Server获取Config Service服务列表(IP+Port),而后直接通过IP+Port访问服务,同时在Client侧会做load balance、错误重试
- Portal通过域名访问Meta Server获取Admin Service服务列表(IP+Port),而后直接通过IP+Port访问服务,同时在Portal侧会做load balance、错误重试
- 为了简化部署,我们实际上会把Config Service、Eureka和Meta Server三个逻辑角色部署在同一个JVM进程中
4.2 执行流程
- Apollo启动后,Config/Admin Service会自动注册到Eureka服务注册中心,并定期发送保活心跳。
- Apollo Client和Portal管理端通过配置的Meta Server的域名地址经由Software Load Balancer(软件负载均衡器)进行负载均衡后分配到某一个Meta Server
- Meta Server从Eureka获取Config Service和Admin Service的服务信息,相当于是一个Eureka Client
- Meta Server获取Config Service和Admin Service(IP+Port)失败后会进行重试
- 获取到正确的Config Service和Admin Service的服务信息后,Apollo Client通过Config Service为应用提供配置获取、实时更新等功能;Apollo Portal管理端通过Admin Service提供配置新增、修改、发布等功能
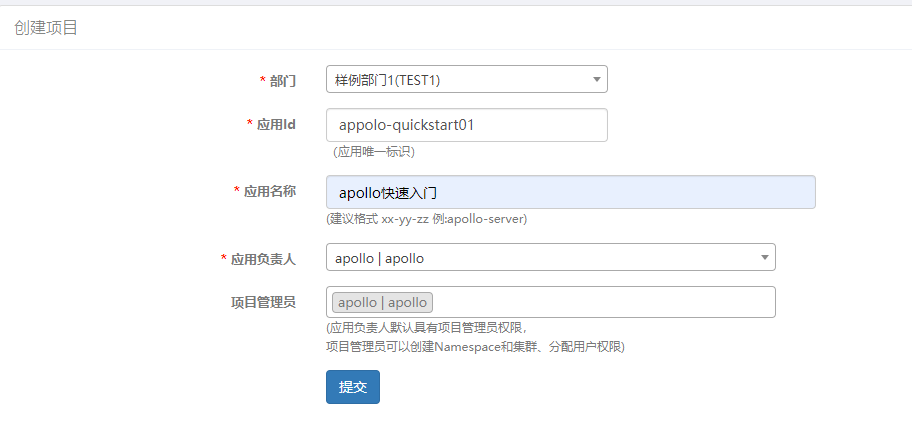
4.3 创建项目(核心名词的概念)
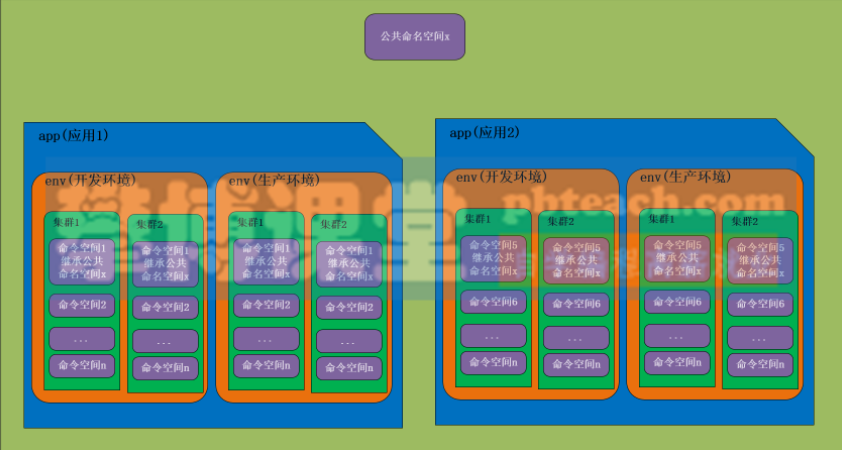
```xml application (应用)
这个很好理解,就是实际使用配置的应用,Apollo客户端在运行时需要知道当前应用是谁,从而可以去获取对应的配置
关键字:appId
environment (环境)
配置对应的环境,Apollo客户端在运行时需要知道当前应用处于哪个环境,从而可以去获取应用的配置
关键字:env
cluster (集群)
一个应用下不同实例的分组,比如典型的可以按照数据中心分,把上海机房的应用实例分为一个集群,把北京机房的应用实例分为另一个集群。
关键字:cluster
namespace (命名空间)
一个应用下不同配置的分组,可以简单地把namespace类比为文件,不同类型的配置存放在不同的文件中,如数据库配置文件,RPC配置文件,应用自身的配置文件等
关键字:namespaces
<a name="qP7yl"></a>## 5、项目管理<a name="kyIto"></a>### 5.1 基础配置添加部门<br />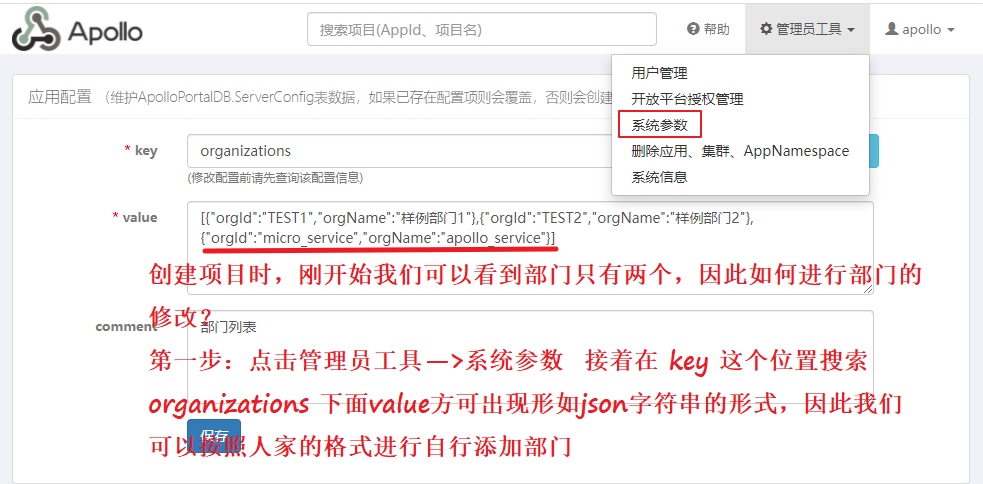<br />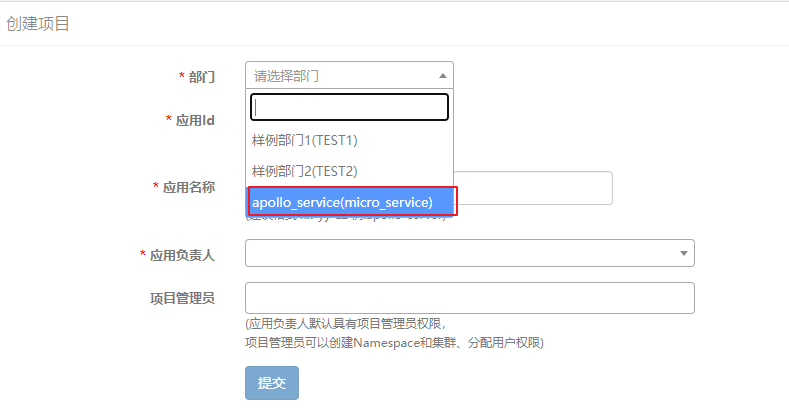<br />添加一个负责人<br />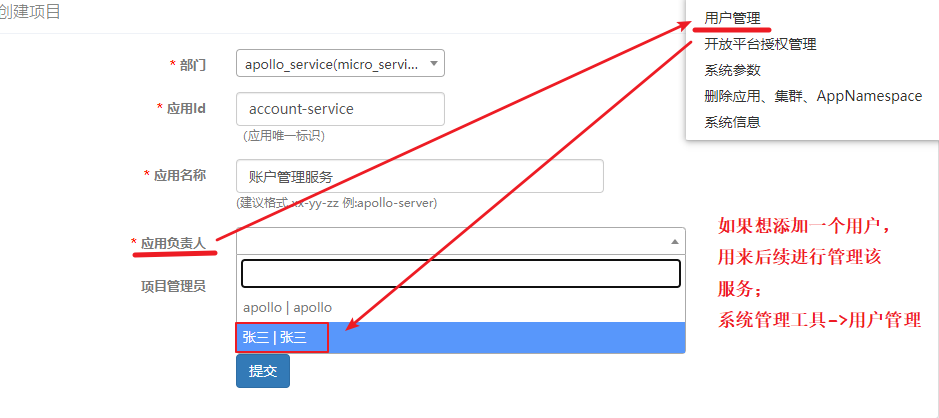<br />删除项目<br />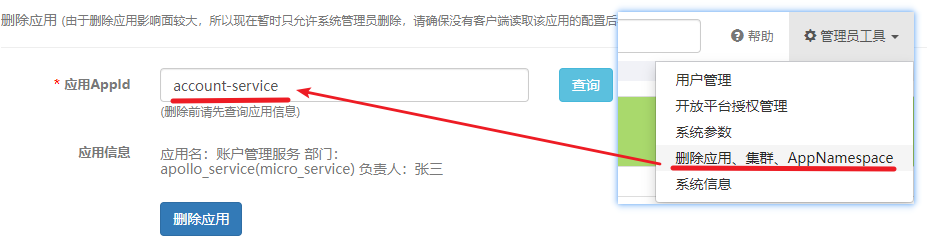<a name="K24Yk"></a>## 6、配置管理<a name="hRtpd"></a>### 6.1 添加配置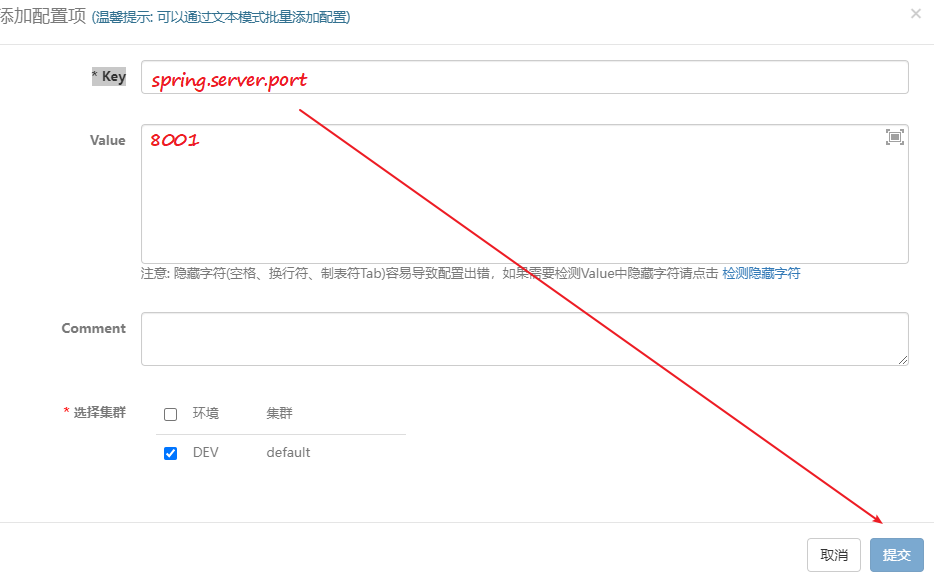<br />进行发布<br />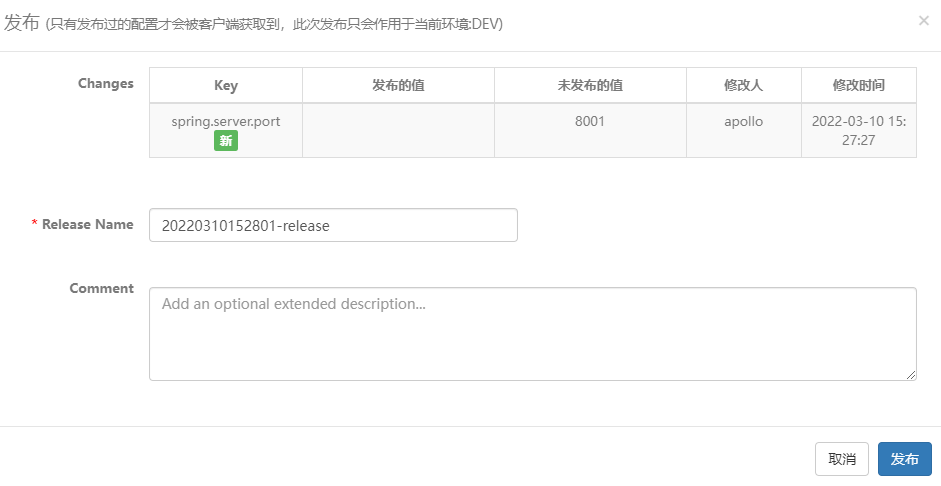<br />添加nanespace(分为:private 、public)<br />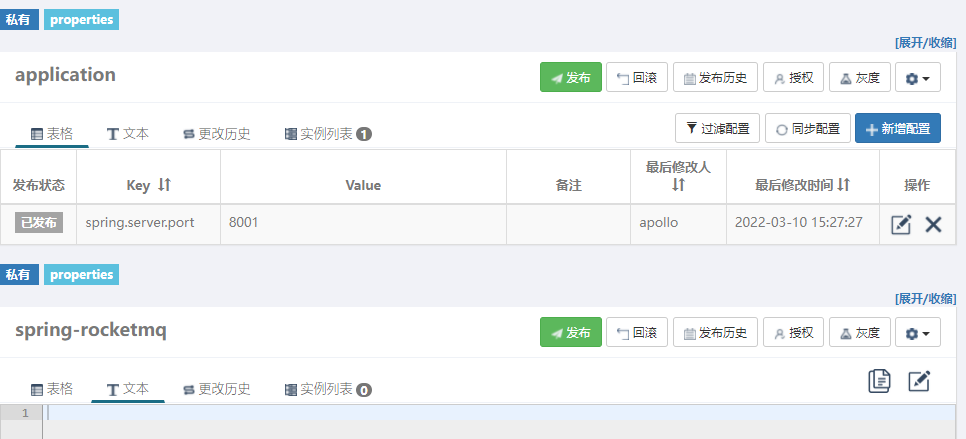<br />如果想把配置文件中的配置信息放到统一进行管理,则只需将配置文件复制,然后到 apollo 界面,到你的 namespace 中点击文本,再次点击左边的修改配置,将刚才复制的信息进行粘贴,然后打上对号。<br />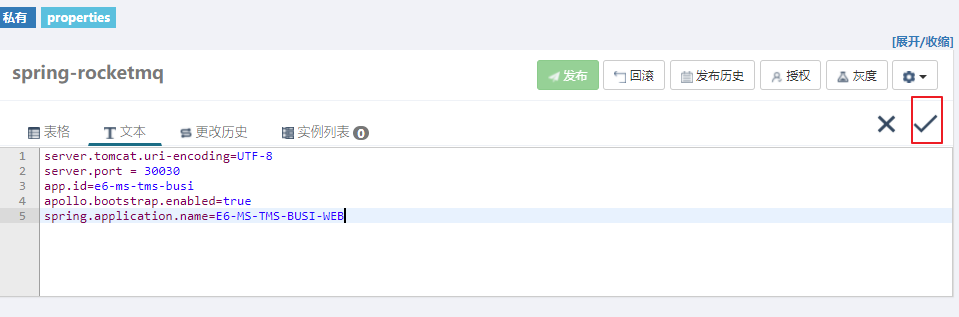<br />注:```java如果是默认的应用,没有namespace,则需要读取namespace中的配置信息// 获取配置类//Config config = ConfigService.getAppConfig();如果有namespace时// 如果有namespace,就不能使用ConfigService.getAppConfig();Config config1 = ConfigService.getConfig("spring-rocketmq");
7、添加集群
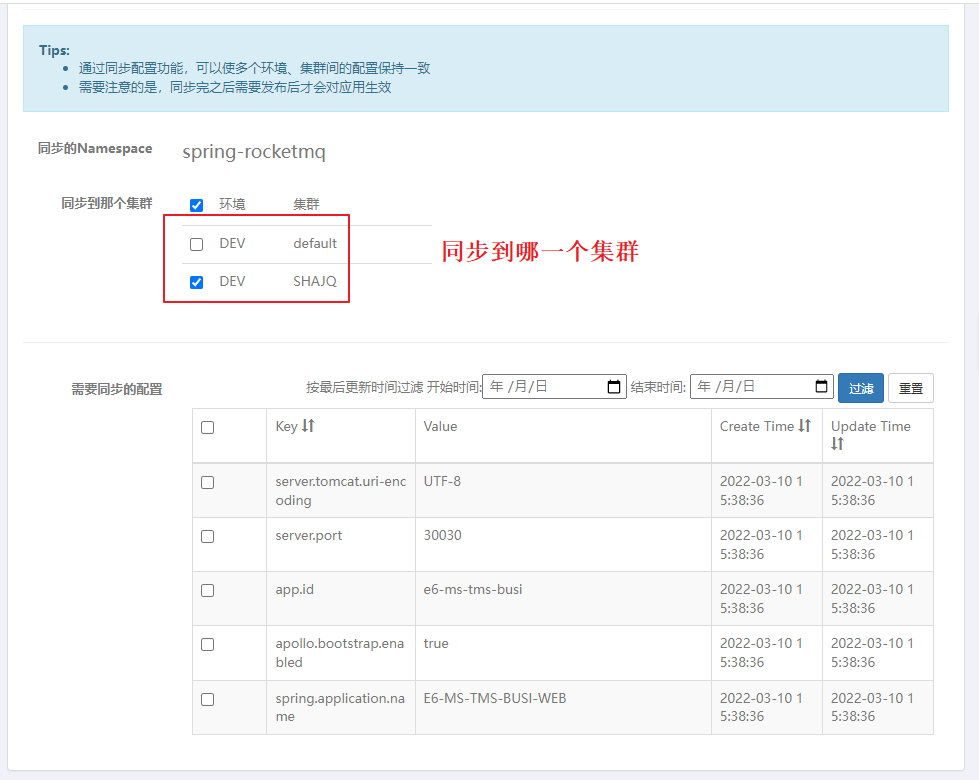
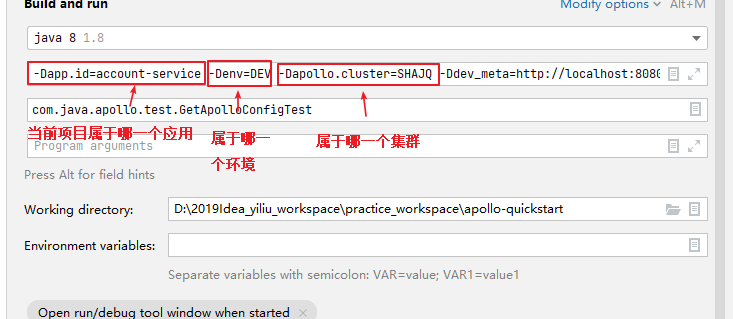
读取配置
读取某个集群的配置,需要启动应用时指定具体的应用、环境和集群。-Dapp.id=应用名称-Denv=环境名称-Dapollo.cluster=集群名称-D环境_meta=meta地址-Dapp.id=account-service -Denv=DEV -Dapollo.cluster=SHAJQ -Ddev_meta=http://localhost:8080
8、发布原理
在配置中心中,一个重要的功能就是配置发布后实时推送到客户端。下面我们简要看一下这块是怎么设计实现的。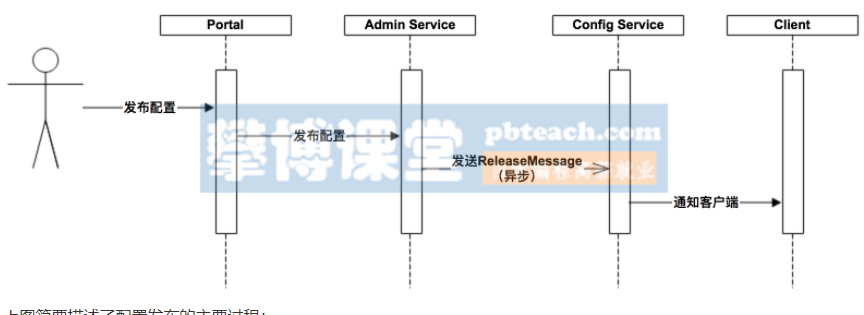
上图简要描述了配置发布的主要过程:
- 用户在Portal操作配置发布
- Portal调用Admin Service的接口操作发布
- Admin Service发布配置后,发送ReleaseMessage给各个Config Service
- Config Service收到ReleaseMessage后,通知对应的客户端
8.1 发送ReleaseMessage
Admin Service在配置发布后,需要通知所有的Config Service有配置发布,从而Config Service可以通知对应的客户端来拉取最新的配置。
从概念上来看,这是一个典型的消息使用场景,Admin Service作为producer(生产者)发出消息,各个Config Service作为consumer(消费者)消费消息。通过一个消息队列组件(Message Queue)就能很好的实现Admin Service和Config Service的解耦。
在实现上,考虑到Apollo的实际使用场景,以及为了尽可能减少外部依赖,我们没有采用外部的消息中间件,而是通过数据库实现了一个简单的消息队列。
具体实现方式如下:
- Admin Service在配置发布后会往ReleaseMessage表插入一条消息记录,消息内容就是配置发布的AppId+Cluster+Namespace
SELECT * FROM ApolloConfigDB.ReleaseMessage

若有收获,就点个赞吧
0 人点赞
