关键点说明
mediapipe姿态估计可以识别出身体的33个关键点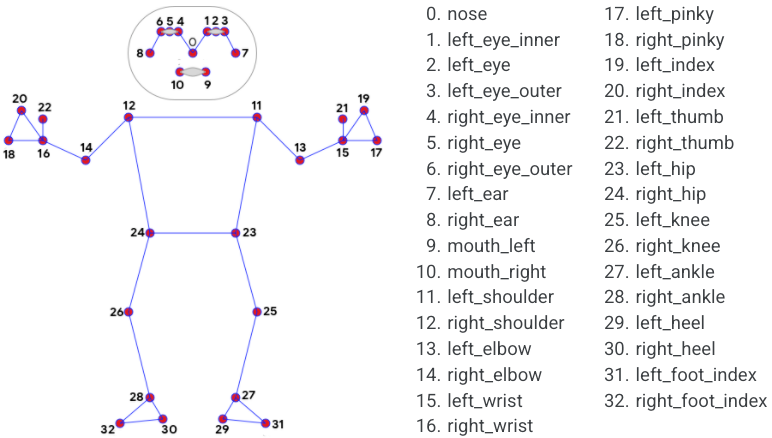
获取关键点坐标
模型给出的结果是归一化的坐标比例,要获取在图像中的坐标需要乘以图像的宽高
x = results.pose_landmarks.landmark[mp_pose.PoseLandmark.NOSE].x * image_widthy = results.pose_landmarks.landmark[mp_pose.PoseLandmark.NOSE].y * image_height
示例代码
import cv2import mediapipe as mpimport numpy as npKey_Esc = 27mp_drawing = mp.solutions.drawing_utilsmp_drawing_styles = mp.solutions.drawing_stylesmp_pose = mp.solutions.pose# For webcam input:cap = cv2.VideoCapture(0)with mp_pose.Pose(min_detection_confidence=0.5,min_tracking_confidence=0.5) as pose:while cap.isOpened():success, image = cap.read()if not success:print("Ignoring empty camera frame.")# If loading a video, use 'break' instead of 'continue'.continue# To improve performance, optionally mark the image as not writeable to# pass by reference.image.flags.writeable = Falseimage = cv2.cvtColor(image, cv2.COLOR_BGR2RGB)results = pose.process(image)# Draw the pose annotation on the image.image.flags.writeable = Trueimage = cv2.cvtColor(image, cv2.COLOR_RGB2BGR)mp_drawing.draw_landmarks(image,results.pose_landmarks,mp_pose.POSE_CONNECTIONS,landmark_drawing_spec=mp_drawing_styles.get_default_pose_landmarks_style())# Flip the image horizontally for a selfie-view display.cv2.imshow('MediaPipe Pose', np.rot90(cv2.resize(cv2.flip(image, 1), (320, 240))))if cv2.waitKey(5) == Key_Esc:breakcap.release()

若有收获,就点个赞吧
0 人点赞
