ByteBuffer是Buffer的一个子类,也是我们在平时使用最多的buffer,这里我们来看它是如何给出一些存取操作以及构造的逻辑的。
构造方法
ByteBuffer有两个构造方法:
ByteBuffer(int mark, int pos, int lim, int cap, // package-privatebyte[] hb, int offset){super(mark, pos, lim, cap);this.hb = hb;this.offset = offset;}// Creates a new buffer with the given mark, position, limit, and capacity//ByteBuffer(int mark, int pos, int lim, int cap) { // package-privatethis(mark, pos, lim, cap, null, 0);}
相比于父类Buffer,它多了两个参数hb和offset,我们不需要关心这两个参数,构造方法同样是package private的,并且它最终也是通过调用父类Buffer的构造方法来实现的,所以这两个构造方法也只是设置了mark、position、limit和capacity这四个参数而已,真正创建缓冲区的并不是构造方法。
通过allocate方法来创建缓冲区
我们一般会使用ByteBuffer的allocate来创建缓冲区,我们来看它的实现:
public static ByteBuffer allocate(int capacity) {if (capacity < 0)throw new IllegalArgumentException();return new HeapByteBuffer(capacity, capacity);}
它只介绍一个capacity也就是容量作为参数,然后直接创建了一个HeapByteBuffer,HeapByteBuffer从名字上来理解应该是在jvm的堆内存上创建的buffer,与之对应的是allocateDirect方法,它会直接在机器内存上创建缓存而不是jvm的堆上,相对于对内存而言,它会减少内存复制的开销,但同时创建的开销会增加,这里我们主要来看HeapByteBuffer,它的构造函数应该接收两个参数,这里都是capacity,我们来看:
class HeapByteBuffer extends ByteBuffer
这个类并非public,应该只是内部使用,它居然是ByteBuffer的子类。来看构造方法:
HeapByteBuffer(int cap, int lim) { // package-privatesuper(-1, 0, lim, cap, new byte[cap], 0);}
它的构造方法直接调用了父类ByteBuffer的构造方法。。。。。。 所以还是回到了ByteBuffer以及Buffer的构造方法上。
到现在为止,我们还是没看到这个buffer是怎么创建的,只是对position、capacity等属性进行了赋值,实际上,jvm会自动为我们实现buffer的创建,我们来看一下allocate方法的注释: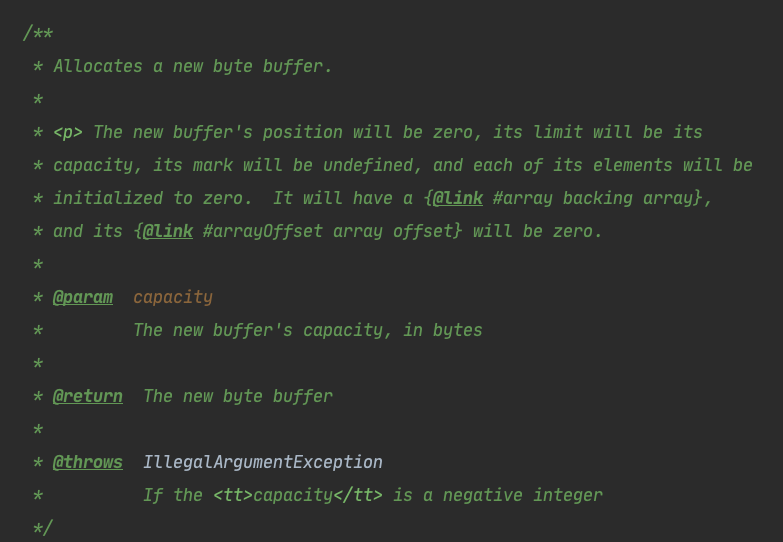
会创建一个新的byte buffer。新创建的buffer的position是0,limit是capacity,mark未定义,它会有一个背后的数组,并且每个元素会被初始化为零。
通过wrap方法来包装数组到缓冲区
除了通过allocate方法来直接创建buffer,我们还可以通过wrap方法来将一个字节数组包装成一个buffer:
public static ByteBuffer wrap(byte[] array,int offset, int length){try {return new HeapByteBuffer(array, offset, length);} catch (IllegalArgumentException x) {throw new IndexOutOfBoundsException();}}
它也是通过HeapByteBuffer实现的。我们需要看一下这个方法的注释: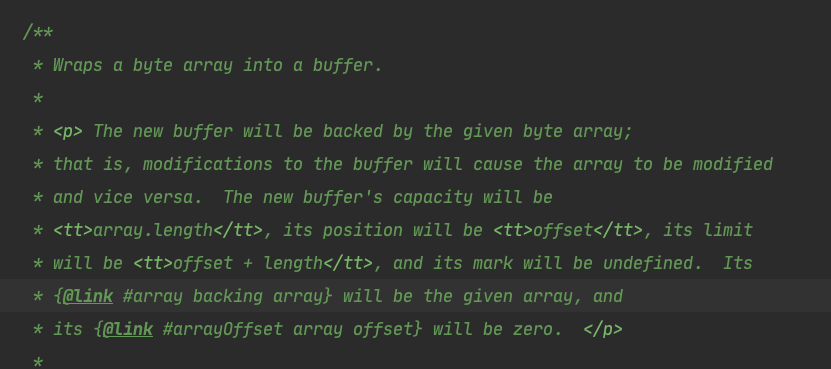
新的buffer会将参数中的字节数组作为背后的数组,对buffer的改动会反映到数组上,反之亦然。buffer的capacity是数组的长度,position是offset,它的limit是offset+length。
还有一个相对简单的wrap方法:
public static ByteBuffer wrap(byte[] array) {return wrap(array, 0, array.length);}
它是通过调用上面的wrap方法实现的。它的含义我们就不过多解释了。
获取元素
ByteBuffer有几个get方法来实现从buffer中获取元素的操作。对于获取元素,我们可以相对获取,就是每次都获取当前position位置的元素,然后将position增加,也可以绝对获取,就是直接获取指定位置的元素并且不影响position。
相对单个获取
相对获取使用没有参数的get方法实现:
/*** Relative <i>get</i> method. Reads the byte at this buffer's* current position, and then increments the position.** @return The byte at the buffer's current position** @throws BufferUnderflowException* If the buffer's current position is not smaller than its limit*/public abstract byte get();
绝对单个获取
绝对获取使用带有参数的get方法实现,它需要一个指定位置的参数:
/*** Absolute <i>get</i> method. Reads the byte at the given* index.** @param index* The index from which the byte will be read** @return The byte at the given index** @throws IndexOutOfBoundsException* If <tt>index</tt> is negative* or not smaller than the buffer's limit*/public abstract byte get(int index);
相对批量获取
相对批量获取就是从当前的position开始一次获取多个字节然后修改position的值,它是通过调用单个相对获取方法来实现的:
public ByteBuffer get(byte[] dst, int offset, int length) {checkBounds(offset, length, dst.length);if (length > remaining())throw new BufferUnderflowException();int end = offset + length;for (int i = offset; i < end; i++)dst[i] = get();return this;}
它接收三个参数,dst是保存获取的字节的字节数组,offset指从dst的哪个字节位置开始保存,length指定要获取的字节的数量。可以看到它循环调用了get方法。
注意ByteBuffer没有提供绝对批量获取方法。
添加元素
与获取元素类似,添加元素也可以相对添加和绝对添加。相对添加也支持批量操作。基本原理与获取元素一致,就不做过多解释了。
相对添加
/*** Relative <i>put</i> method <i>(optional operation)</i>.** <p> Writes the given byte into this buffer at the current* position, and then increments the position. </p>** @param b* The byte to be written** @return This buffer** @throws BufferOverflowException* If this buffer's current position is not smaller than its limit** @throws ReadOnlyBufferException* If this buffer is read-only*/public abstract ByteBuffer put(byte b);
绝对添加
/*** Absolute <i>put</i> method <i>(optional operation)</i>.** <p> Writes the given byte into this buffer at the given* index. </p>** @param index* The index at which the byte will be written** @param b* The byte value to be written** @return This buffer** @throws IndexOutOfBoundsException* If <tt>index</tt> is negative* or not smaller than the buffer's limit** @throws ReadOnlyBufferException* If this buffer is read-only*/public abstract ByteBuffer put(int index, byte b);
相对批量添加
public ByteBuffer put(byte[] src, int offset, int length) {checkBounds(offset, length, src.length);if (length > remaining())throw new BufferOverflowException();int end = offset + length;for (int i = offset; i < end; i++)this.put(src[i]);return this;}
直接添加ByteBuffer
批量添加还有一个以ByteBuffer作为参数的方法:
public ByteBuffer put(ByteBuffer src) {if (src == this)throw new IllegalArgumentException();if (isReadOnly())throw new ReadOnlyBufferException();int n = src.remaining();if (n > remaining())throw new BufferOverflowException();for (int i = 0; i < n; i++)put(src.get());return this;}
这个方法会将src从position到limit的字节添加到当前buffer的position开始的位置。
与其他原始类型相关的方法
因为java中的其他原始类型如int、long、char等都可以用字节表示,所以ByteBuffer提供了一些跟这些原始类型相关的方法,一般都是添加和获取方法: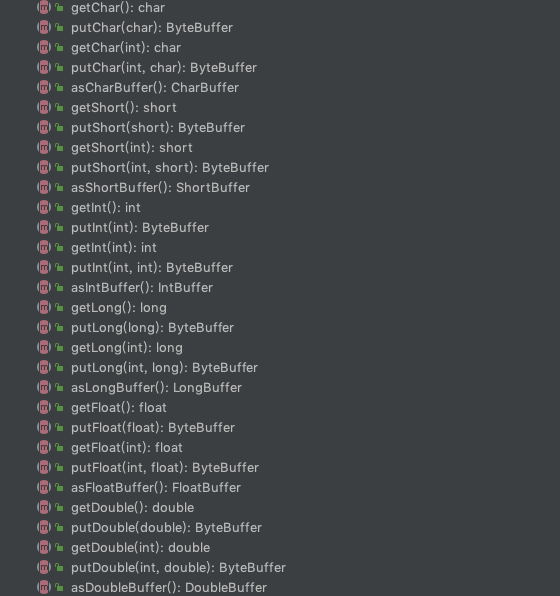
这些都是抽象方法,我们就不去罗列了。
抽象方法的最终实现
我们上面说到的各种添加元素、获取元素以及与其他原始类型相关的方法都是抽象的,那么它是怎么实现的?答案就是HeapByteBuffer和DirectByteBuffer。上面将allocate方法时我们看到,通过allocate方法创建的ByteBuffer实际上是它的子类HeapByteBuffer的实例,所以ByteBuffer的这些抽象方法都是HeapByteBuffer来实现的。
实际上,对于每个Buffer的子类,例如ByteBuffer、IntBuffer、CharBuffer等,都有一个对应的Heap-X-Buffer作为它们的实现类,在创建ByteBuffer、IntBuffer等的时候,实际上就是创建的它们对应的子类Heap-X-Buffer。这里我们以ByteBuffer为例进行了分析,其他的就不逐一解释了。

若有收获,就点个赞吧
0 人点赞
