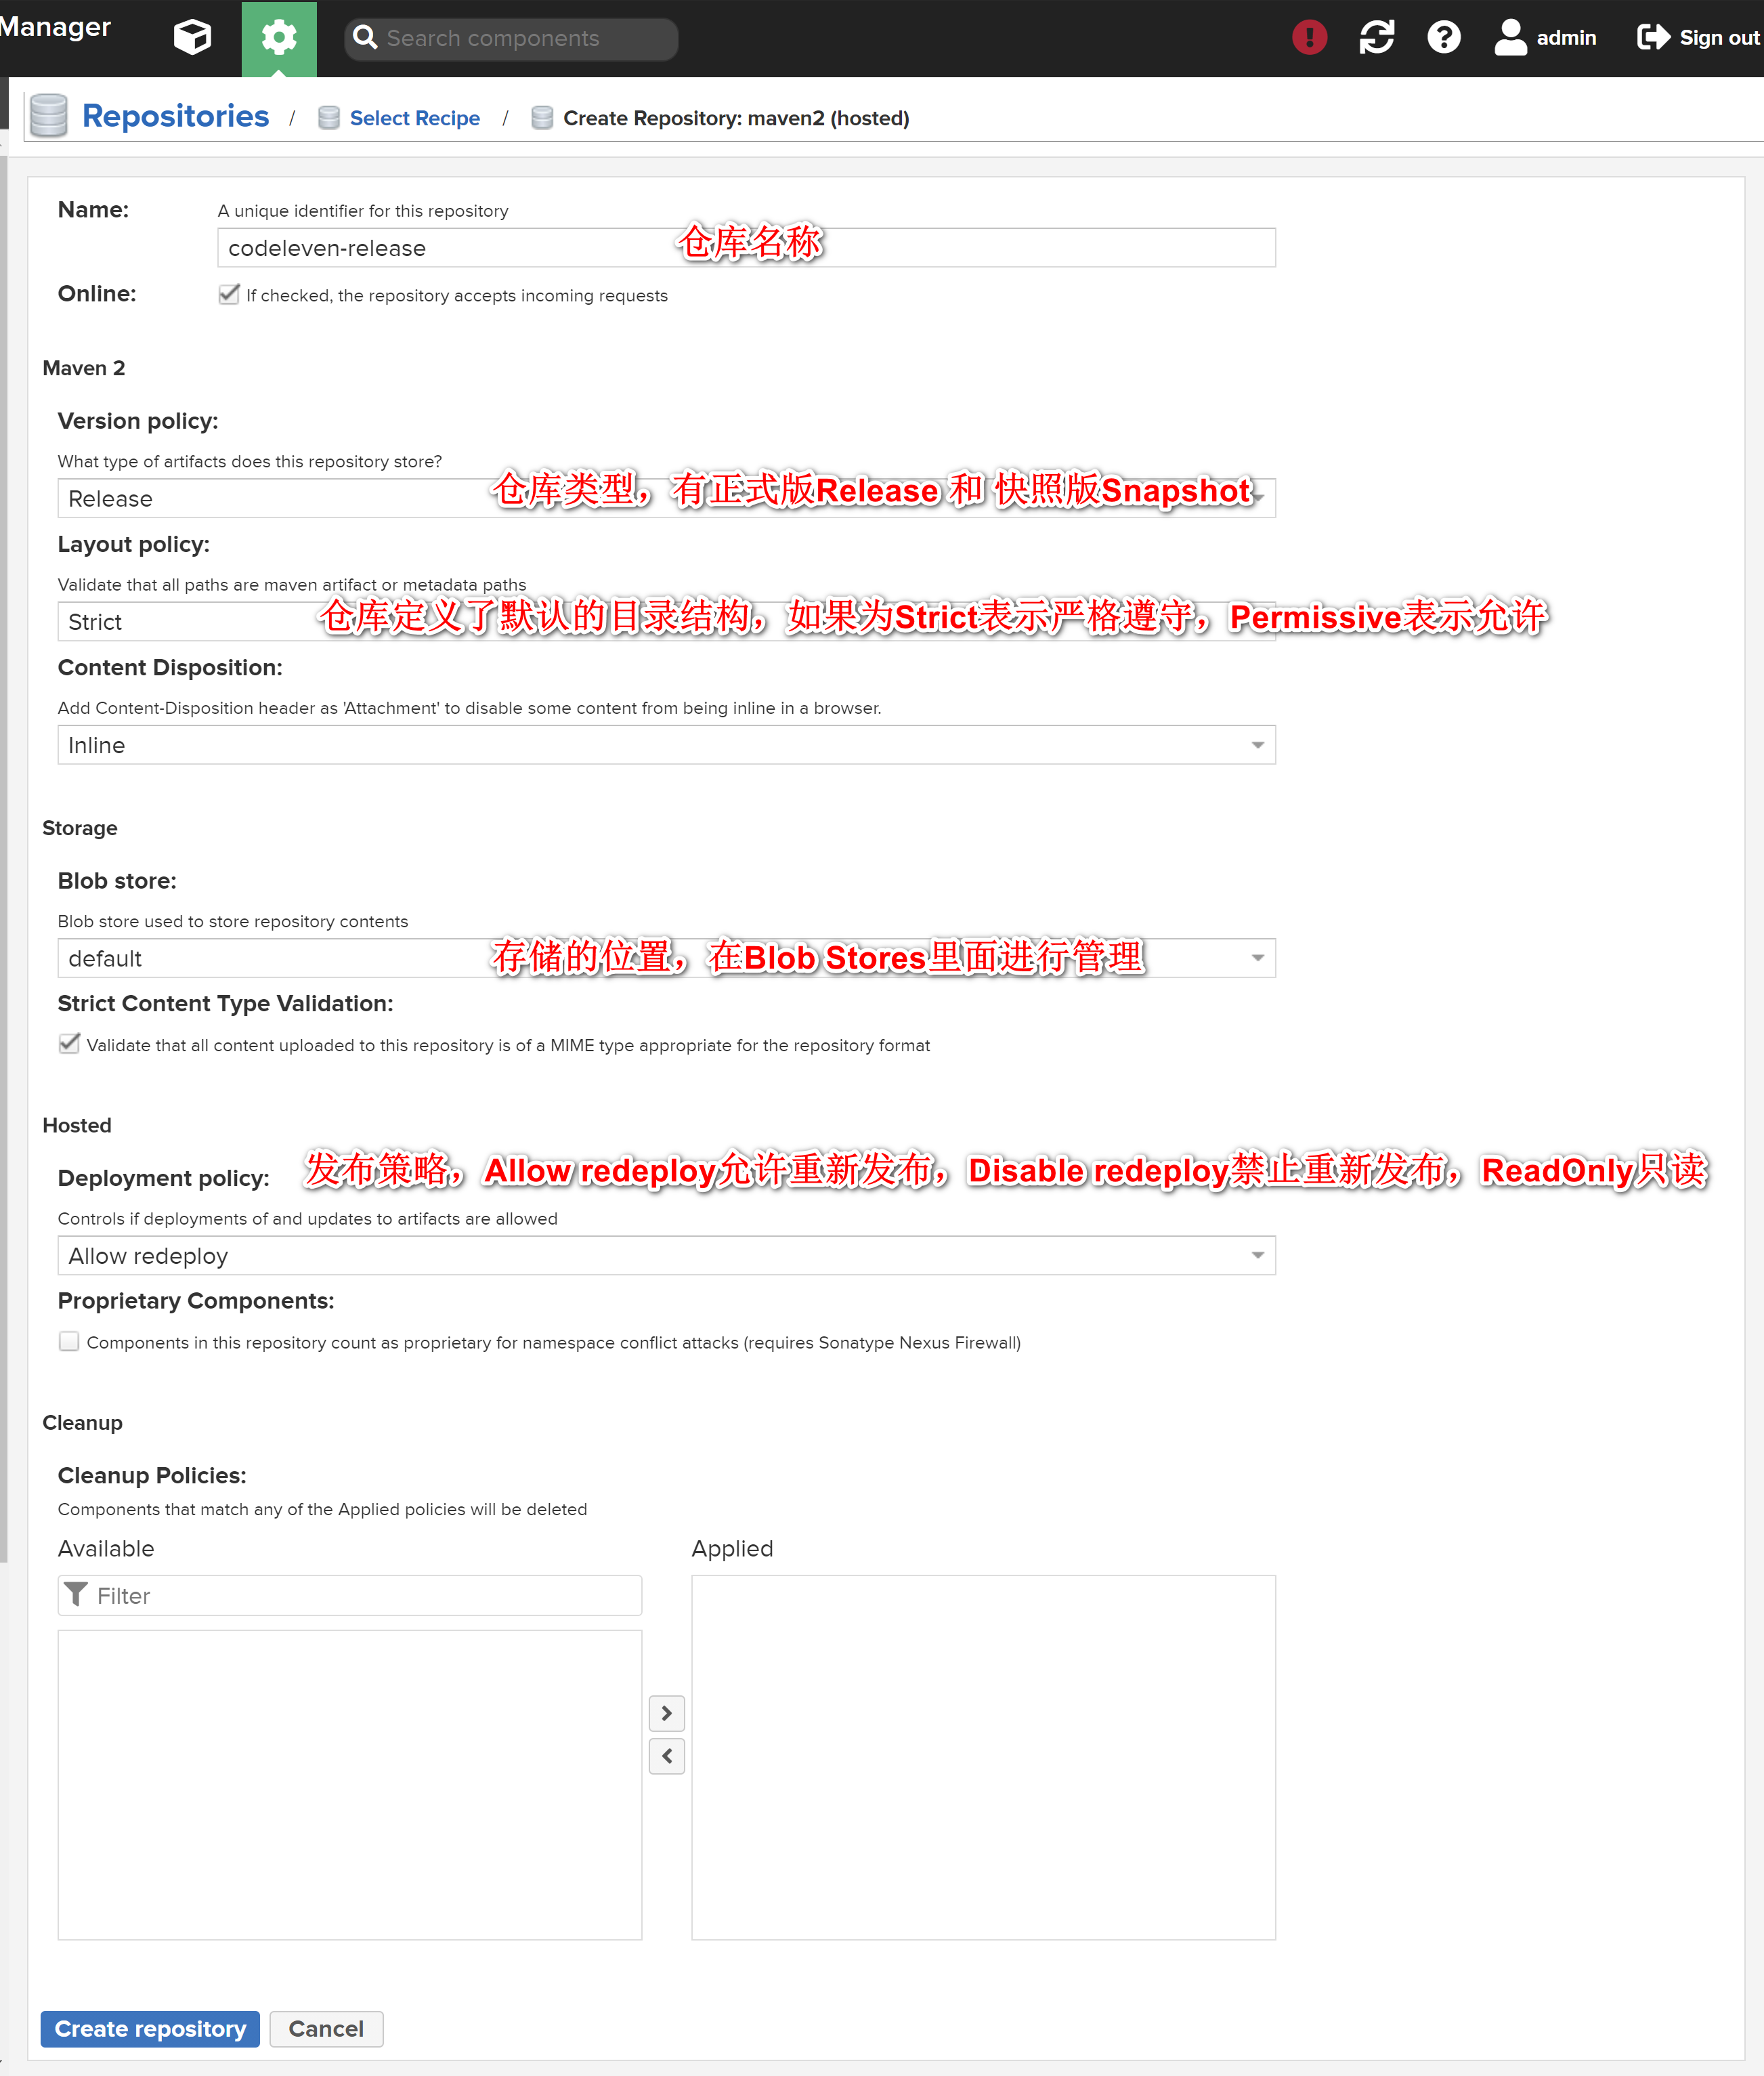
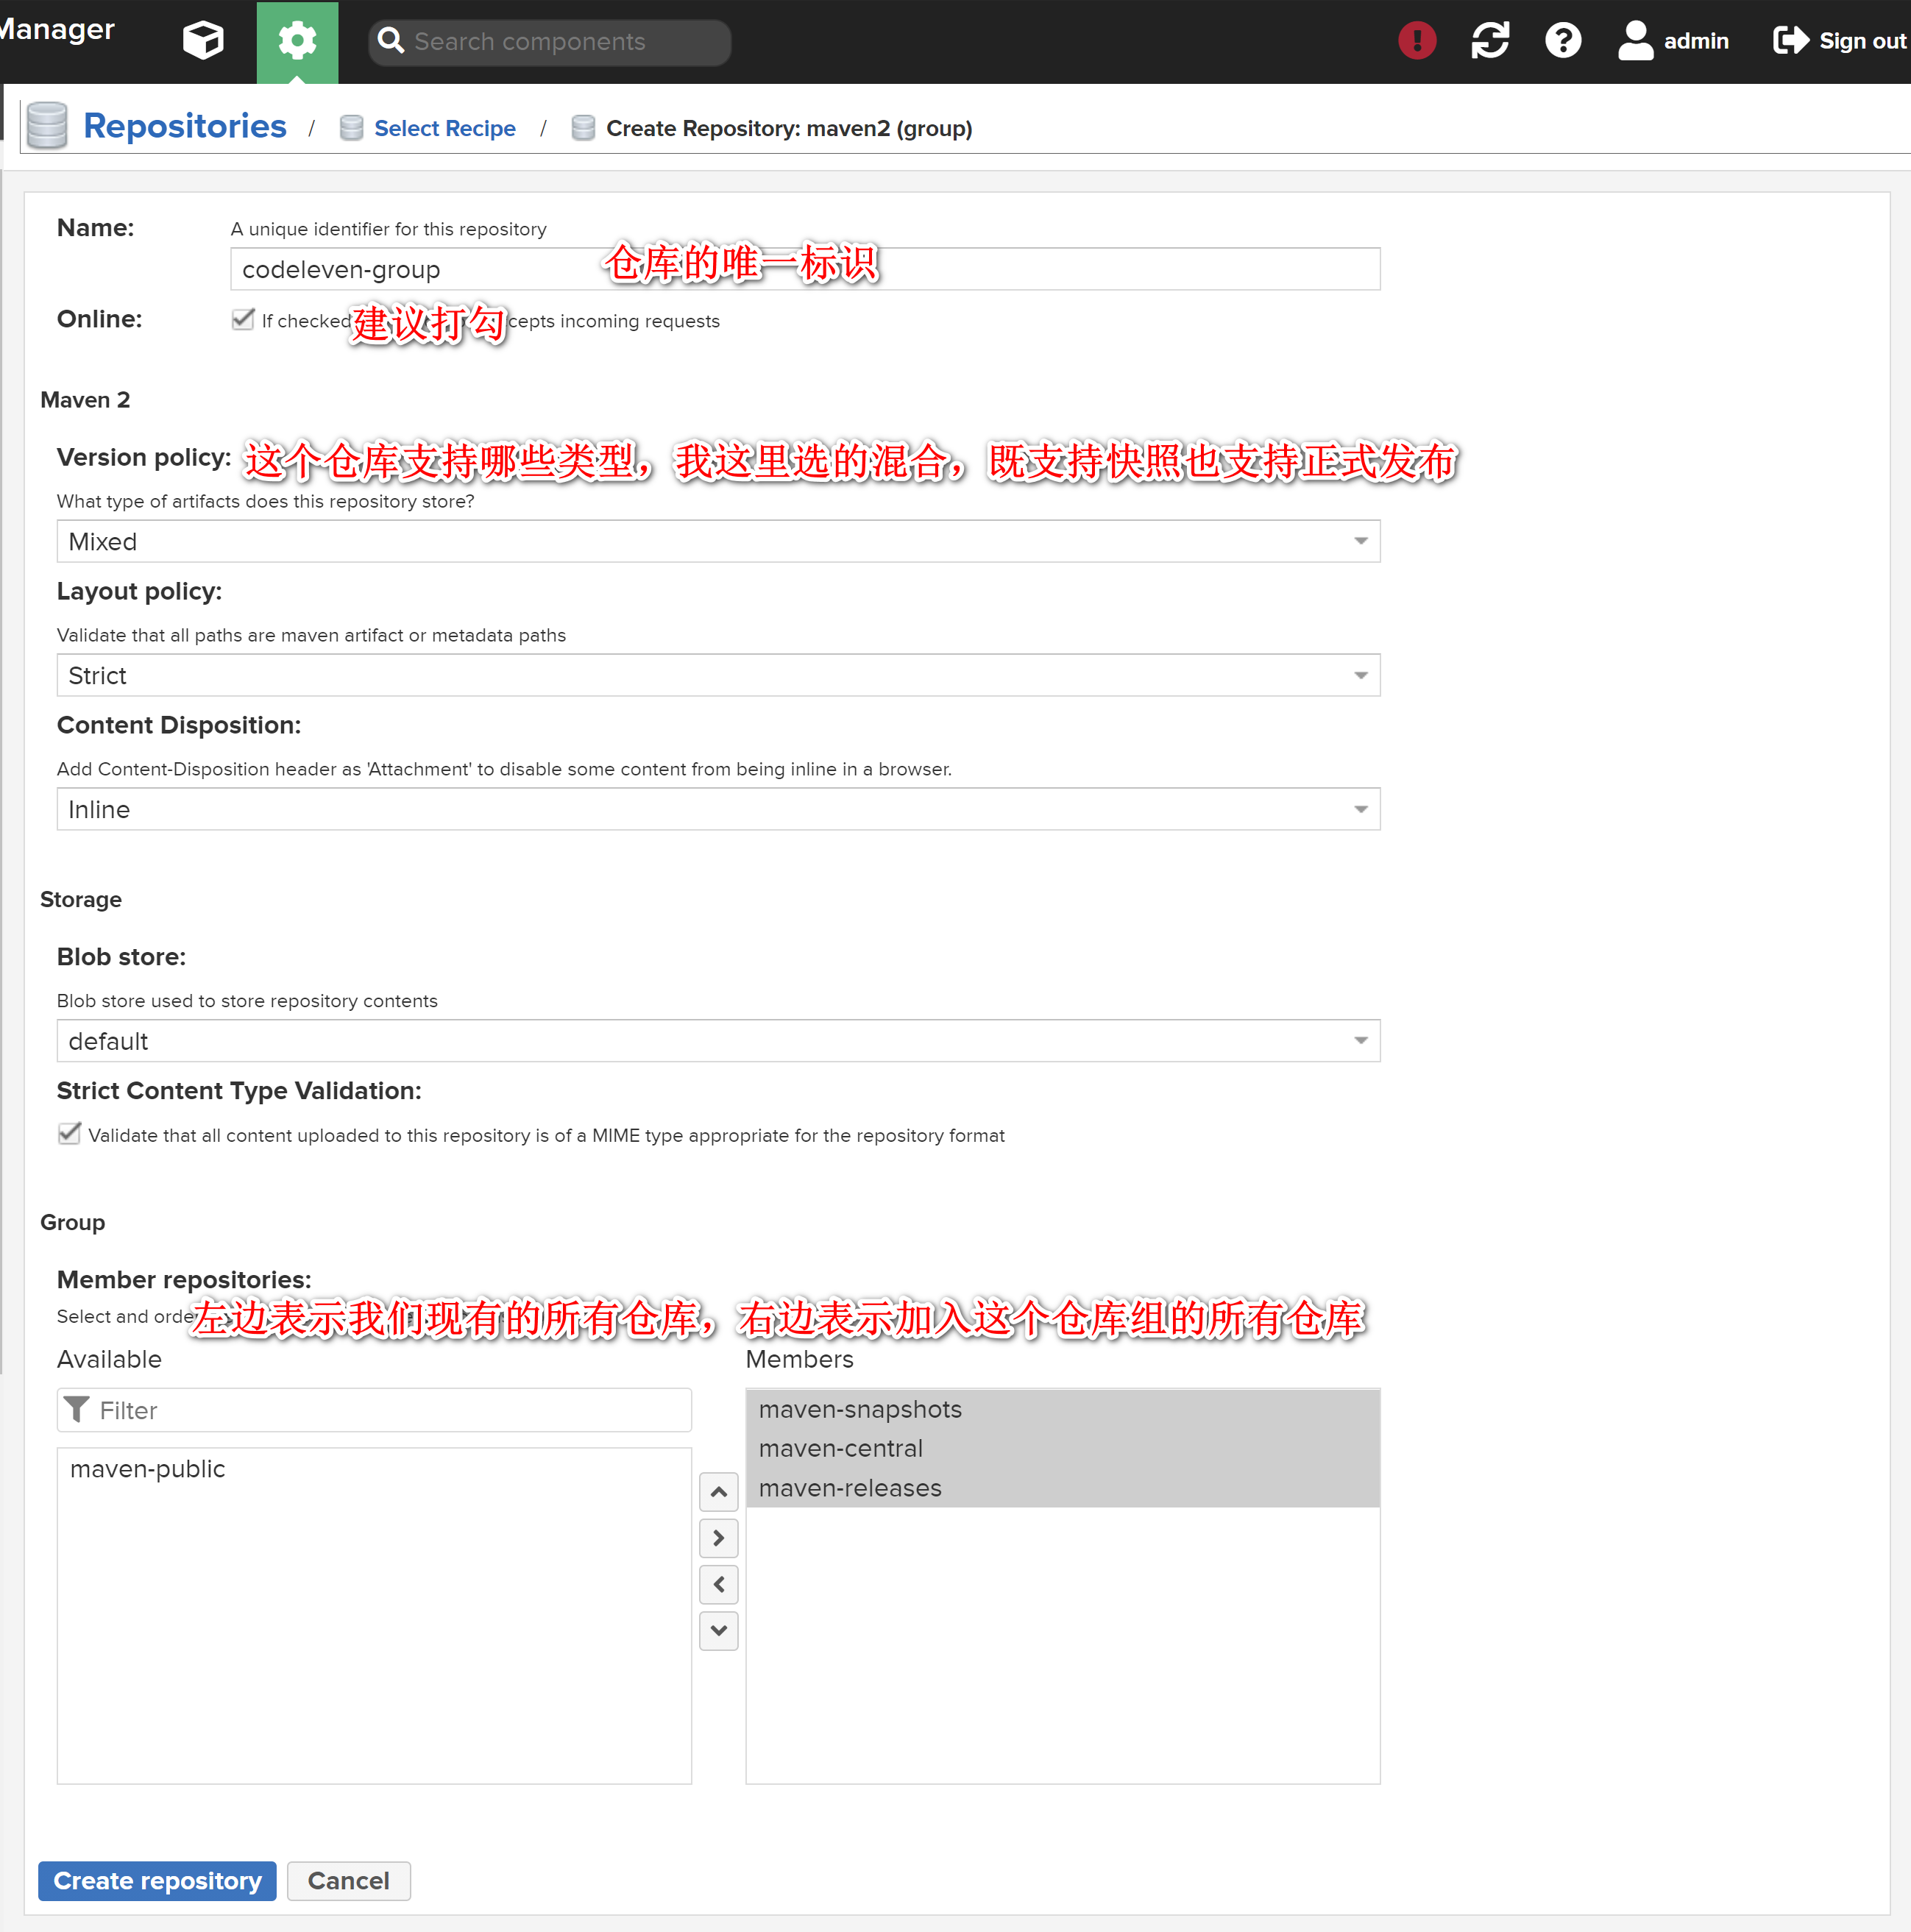
仓库类型
Nexus提供了三种仓库:
- 仓库组:逻辑仓库,用于包含一批宿主、代理仓库,开发者只需要单独引用仓库组就能使用一批组内的仓库
- 宿主仓库:数据存储在私服主机上的仓库。通常公司内部发版的包都部署在这里(第三方的包也发在这里)
- 代理仓库:类似于VPN,局域网中请求私服主机的代理仓库,这个代理仓库会转发我们的请求给真实的远程仓库
Maven可以直接从宿主仓库、代理仓库下载,但是这样我们要在settings.xml中配置许多个仓库,如果我们将所需的仓库添加到一个【仓库组】中,那么就仅需要配置一个仓库地址在settings.xml中就能用了。当Maven用到代理仓库时,代理仓库会把请求再转发给远程仓库。关系图如下所示: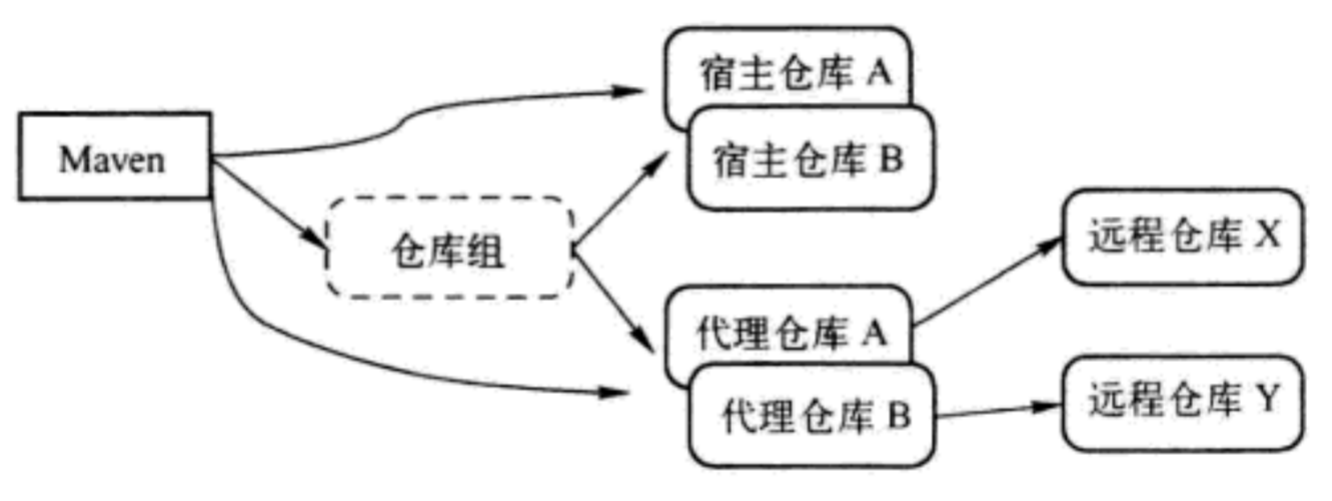
而我们常规开发时通常会这样使用这几种类型的仓库: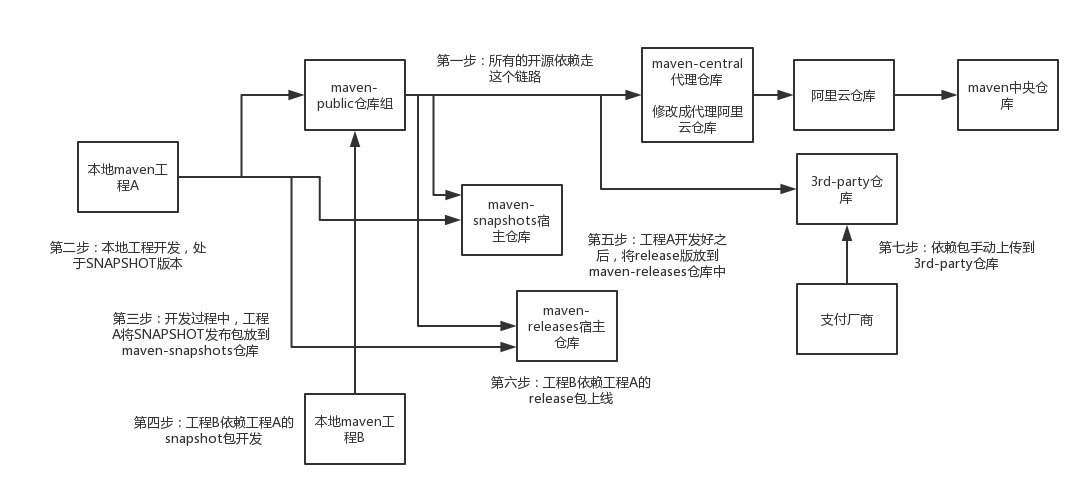
创建宿主仓库
创建代理仓库
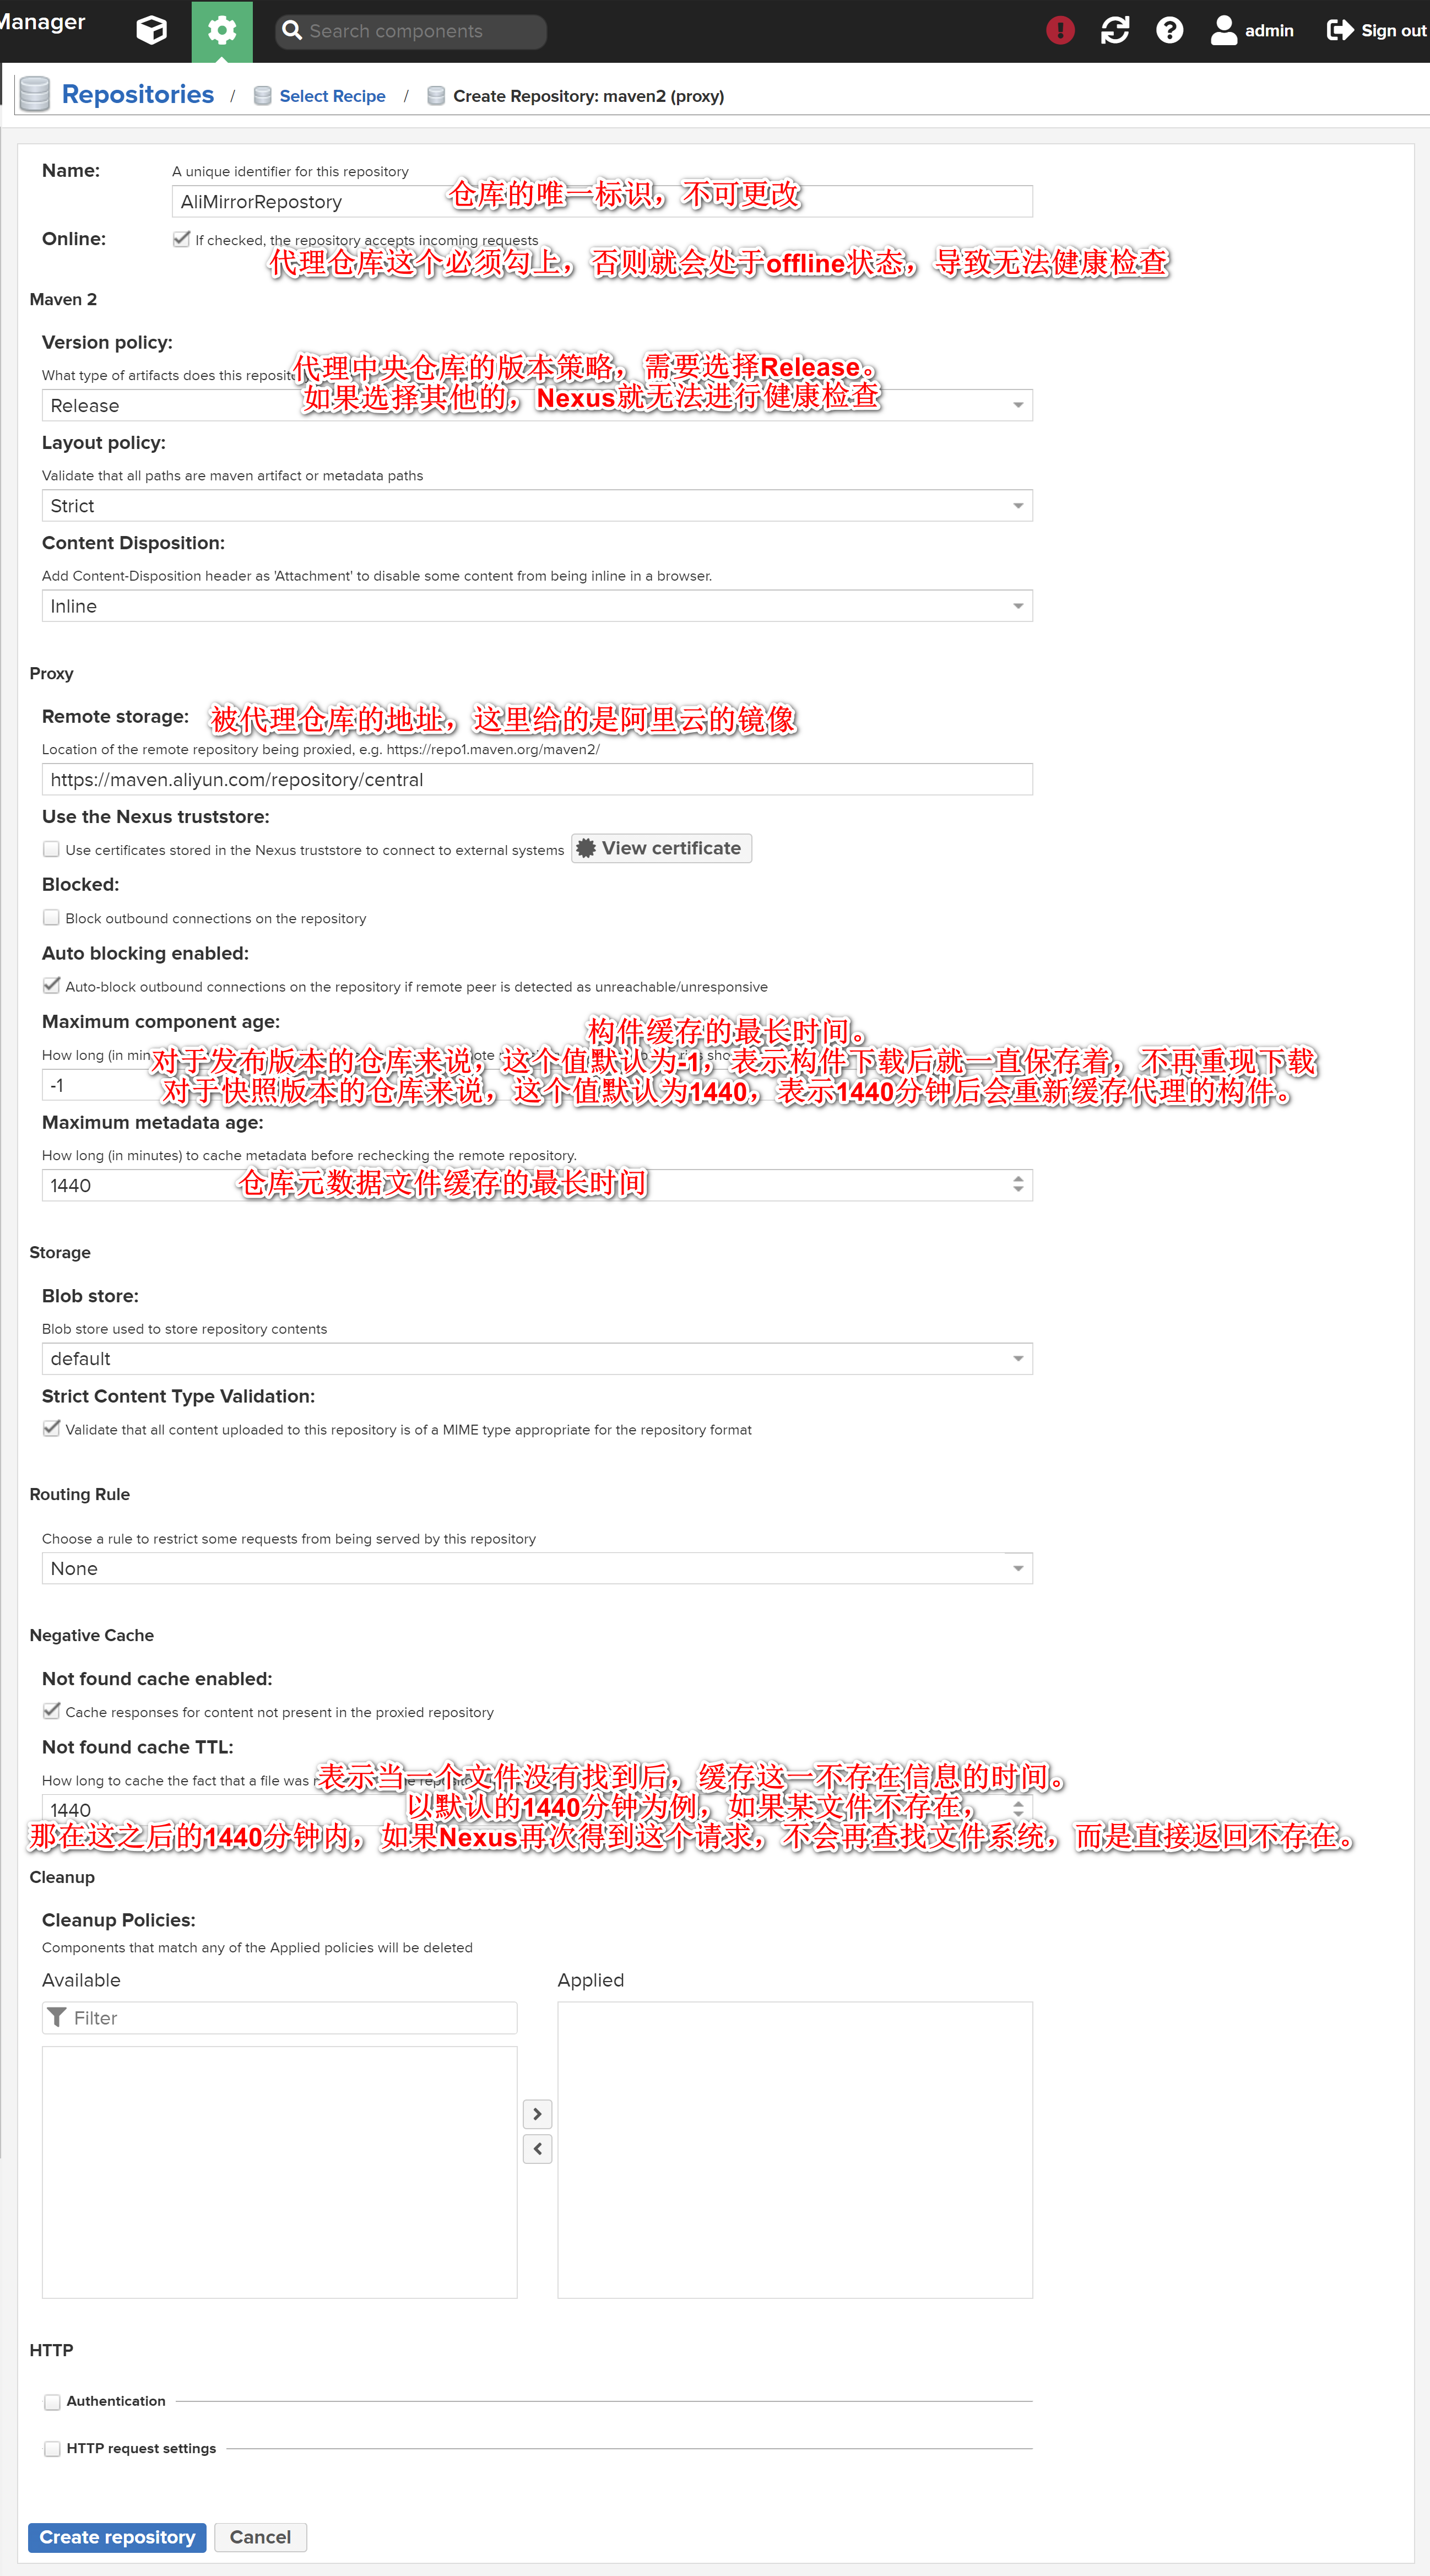
- 注意,如果
Online那一栏不勾上,外面会显示offline,就会导致无法进行Analyze。
创建仓库组
构建索引
在Nexus3.x版本下,已经不支持 构建远程索引实现搜索 功能了,换句话说就是不能同步远程仓库的索引文件了。
Nexus Repository Manager 3.x does NOT support usage of remote index for searches (and other purposes) at all. If you want this feature I suggest to stick with Nexus Repository Manager 2 for now.
权限管理
这部分内容比较单薄,主要 创建角色时能看懂权限 以及 创建用户时能分配角色就行了。
Privileges,具体的单项权限(会有释义),通过nexus后他的Security菜单里可以看到。Roles,角色Users,用户
使用
我给自己创建了一个用于发布包的角色,并把角色分配给了一个账号: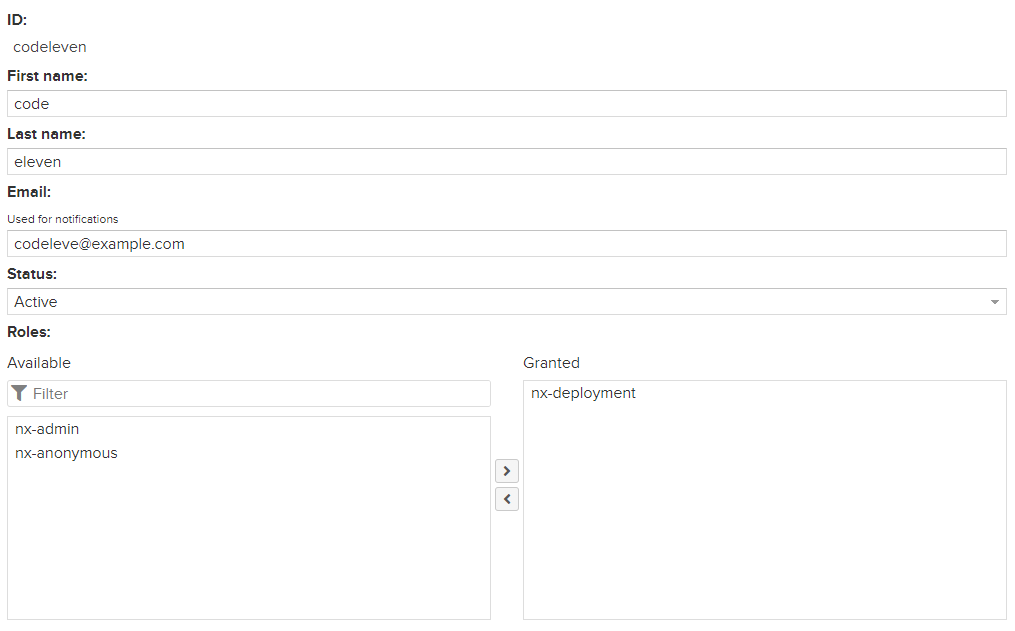
下面实战一下 私服仓库下载 以及 自动发布:
从私服仓库下载
在settings.xml配置文件中,为当前机器统一配置使用的私服仓库地址,而且一般使用私服中的仓库组。我们在settings.xml中的<profiles>里添加元素<profile>即可:
<profile><id>nexus</id><repositories><repository><id>nexus</id><name>Nexus</name><url>http://127.0.0.1:8082/repository/maven-public/</url><releases><enabled>true</enabled></releases><snapshots><enabled>true</enabled></snapshots></repository></repositories><pluginRepositories><pluginRepository><id>nexus</id><name>Nexus Plugin Repository</name><url>http://127.0.0.1:8082/repository/maven-public/</url><releases><enabled>true</enabled></releases><snapshots><enabled>true</enabled></snapshots></pluginRepository></pluginRepositories></profile>
然后在<activeProfiles>里添加<activeProfile>来激活某个<profile>:
<activeProfile>nexus</activeProfile>
<activeProfile>元素中使用<profile>元素的id属性。
但是更新pom.xml文件时,发现它还是从【Maven 中央仓库】里下载:
这是因为我们并没有强制走私服仓库,对于此时的Maven来说,私服的仓库也算是远程仓库。我们给它加上一个镜像,让镜像指向我们的私服,如此就强制让所有的请求都走镜像了,那么我们就得在<mirrors>元素中添加<mirror>元素了:
<mirror><id>nexus</id> <!-- 这是镜像的ID --><mirrorOf>*</mirrorOf> <!-- *表示对所有的请求都进行拦截 --><url>http://127.0.0.1:8082/repository/maven-public/</url></mirror>
然而这并没有结束,如果发生了maven-public查找不到的依赖(什么情况下会找不到呢?比如咱们的中央仓库),那么还会去查【Maven】自带的中央仓库。所以咱们需要禁止【Maven】自带的中央仓库:
将所有repository的id修改为central,直接覆盖【Maven】超级pom.xml中的中央仓库(在M2_HOME/lib/maven-model-builder.jar里的pom.xml里,定义了最顶级的中央仓库地址),相当于此时唯一的远程中央仓库变成了我们自己配置的两个仓库:
<profile><id>nexus</id><repositories><repository><id>central</id><name>Nexus</name><url>http://central/</url><releases><enabled>true</enabled></releases><snapshots><enabled>true</enabled></snapshots></repository></repositories><pluginRepositories><pluginRepository><id>central</id><name>Nexus Plugin Repository</name><url>http://central/</url><releases><enabled>true</enabled></releases><snapshots><enabled>true</enabled></snapshots></pluginRepository></pluginRepositories></profile>
http://central/地址没有什么意义,因为所有的下载请求都走镜像了。
配置pom.xml自动发布组件
我们需要做两个步骤:
配置项目
pom.xml,添加想要发布的地址:<distributionManagement><repository><id>nexus-releases</id><name>Nexus Release Repository</name><url>http://127.0.0.1:8082/repository/maven-releases/</url></repository><snapshotRepository><id>nexus-snapshots</id><name>Nexus Snapshot Repository</name><url>http://127.0.0.1:8082/repository/maven-snapshots/</url></snapshotRepository></distributionManagement>
在
settings.xml里面的<servers>元素里添加<server>,用于表明使用哪个账号上传:<server><id>nexus-releases</id><username>codeleven</username><password>111111</password></server><server><id>nexus-snapshots</id><username>codeleven</username><password>111111</password></server>
之后用
idea的deploy就行了:[INFO] --- maven-deploy-plugin:2.7:deploy (default-deploy) @ RookieMaven ---Downloading from nexus: http://127.0.0.1:8082/repository/maven-public/org/codehaus/plexus/plexus-utils/1.5.6/plexus-utils-1.5.6.pomDownloaded from nexus: http://127.0.0.1:8082/repository/maven-public/org/codehaus/plexus/plexus-utils/1.5.6/plexus-utils-1.5.6.pom (0 B at 0 B/s)Downloading from nexus: http://127.0.0.1:8082/repository/maven-public/org/codehaus/plexus/plexus/1.0.12/plexus-1.0.12.pomDownloaded from nexus: http://127.0.0.1:8082/repository/maven-public/org/codehaus/plexus/plexus/1.0.12/plexus-1.0.12.pom (0 B at 0 B/s)Downloading from nexus: http://127.0.0.1:8082/repository/maven-public/org/codehaus/plexus/plexus-utils/1.5.6/plexus-utils-1.5.6.jarDownloaded from nexus: http://127.0.0.1:8082/repository/maven-public/org/codehaus/plexus/plexus-utils/1.5.6/plexus-utils-1.5.6.jar (0 B at 0 B/s)Downloading from nexus-snapshots: http://127.0.0.1:8082/repository/maven-snapshots/com/codeleven/oa/RookieMaven/1.0-SNAPSHOT/maven-metadata.xmlDownloaded from nexus-snapshots: http://127.0.0.1:8082/repository/maven-snapshots/com/codeleven/oa/RookieMaven/1.0-SNAPSHOT/maven-metadata.xml (771 B at 23 kB/s)Uploading to nexus-snapshots: http://127.0.0.1:8082/repository/maven-snapshots/com/codeleven/oa/RookieMaven/1.0-SNAPSHOT/RookieMaven-1.0-20210908.141729-5.jarUploaded to nexus-snapshots: http://127.0.0.1:8082/repository/maven-snapshots/com/codeleven/oa/RookieMaven/1.0-SNAPSHOT/RookieMaven-1.0-20210908.141729-5.jar (2.6 kB at 33 kB/s)Uploading to nexus-snapshots: http://127.0.0.1:8082/repository/maven-snapshots/com/codeleven/oa/RookieMaven/1.0-SNAPSHOT/RookieMaven-1.0-20210908.141729-5.pomUploaded to nexus-snapshots: http://127.0.0.1:8082/repository/maven-snapshots/com/codeleven/oa/RookieMaven/1.0-SNAPSHOT/RookieMaven-1.0-20210908.141729-5.pom (1.6 kB at 49 kB/s)Downloading from nexus-snapshots: http://127.0.0.1:8082/repository/maven-snapshots/com/codeleven/oa/RookieMaven/maven-metadata.xmlDownloaded from nexus-snapshots: http://127.0.0.1:8082/repository/maven-snapshots/com/codeleven/oa/RookieMaven/maven-metadata.xml (285 B at 10 kB/s)Uploading to nexus-snapshots: http://127.0.0.1:8082/repository/maven-snapshots/com/codeleven/oa/RookieMaven/1.0-SNAPSHOT/maven-metadata.xmlUploaded to nexus-snapshots: http://127.0.0.1:8082/repository/maven-snapshots/com/codeleven/oa/RookieMaven/1.0-SNAPSHOT/maven-metadata.xml (771 B at 18 kB/s)Uploading to nexus-snapshots: http://127.0.0.1:8082/repository/maven-snapshots/com/codeleven/oa/RookieMaven/maven-metadata.xmlUploaded to nexus-snapshots: http://127.0.0.1:8082/repository/maven-snapshots/com/codeleven/oa/RookieMaven/maven-metadata.xml (285 B at 6.8 kB/s)[INFO] ------------------------------------------------------------------------[INFO] BUILD SUCCESS[INFO] ------------------------------------------------------------------------[INFO] Total time: 5.496 s[INFO] Finished at: 2021-09-08T22:17:29+08:00[INFO] ------------------------------------------------------------------------
或者使用
mvn clean deploy进行清理、编译、测试、打包、发布
手动部署组件
对于一些商用jar包,我们也常想上传到Nexus里,但是这货不能直接用mvn deploy进行自动发布。现在常用的有两种方法:
命令行:
mvn deploy:deploy-file -DgroupId=<组织ID> -DartifactId=<项目ID> -Dversion=<版本号> -Dpackaging=<打包方式,通常是jar> -Dfile=<要上传的包路径> -Durl=<要上传到哪个URL里> -DrepositoryId=<要上传的仓库ID>通过
Nexus Repostory Manager后台管理界面进行上传:
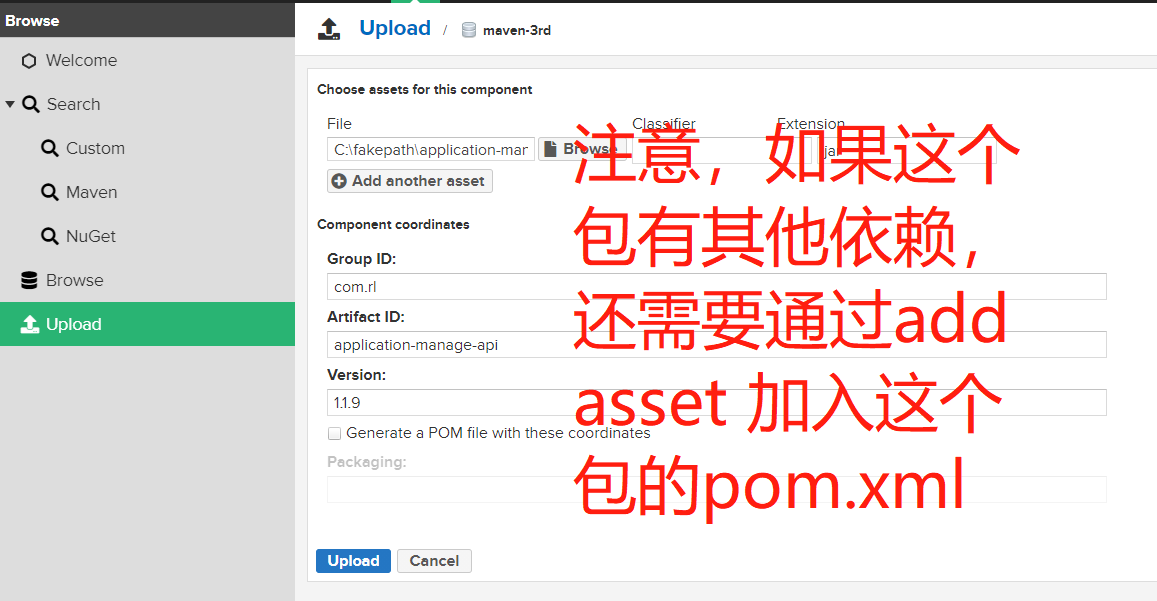
对于有其他依赖的**jar包**,需要这样上传。否则项目里使用这个jar包就不会下载传递性依赖: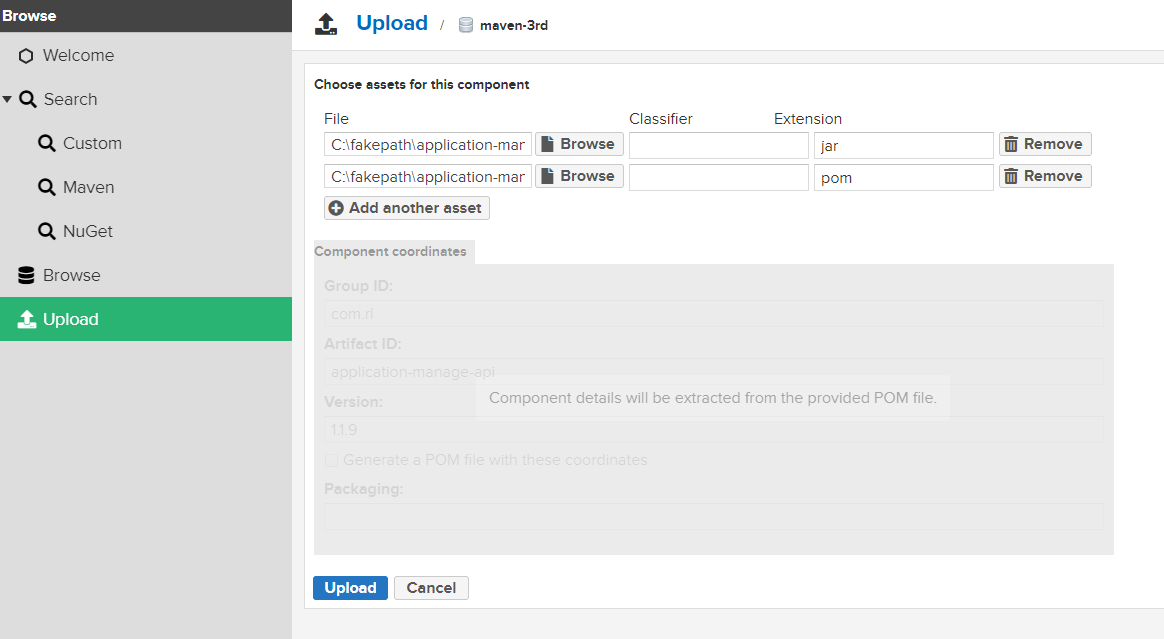
还得上传第三方jar包的pom.xml文件

