- Creating a component
- One-way binding
- Literals, expressions, and directives
- Component events
- Two-way binding
- Cascading values
- Code generated HTML attributes
- Capturing unexpected parameters
- Replace attribtues on child components
- Component lifecycles
- Component lifecycle diagram
- SetParametersAsync
- OnInitialized / OnInitializedAsync
- OnParametersSet / OnParametersSetAsync
- StateHasChanged
- ShouldRender
- BuildRenderTree
- OnAfterRender / OnAfterRenderAsync
- Dispose
- 👍Awaiting within Async lifecycle methods 在异步生命周期内等待方法
- 👍Component lifecycle with asynchronous awaits
- 👍Asynchronous methods and multiple awaits
- 👍Multi-threaded rendering
- Summary
- 👍Thread safety using InvokeAsync
Creating a component
- Create a new folder named Components
Create a file within it named MyFirstComponent.razor
<div><h2>This is my first component</h2></div>
Edit the Index.razor. At this point we can either reference the component with a fully qualified name:
<CreatingAComponent.Client.Components.MyFirstComponent />
Or edit /_Improts.razor and add
@using CreatingAComponent.Client.Components. The using statements here are cascaded into all Razor views - which means the mark-up to use the new component in /Pages/Index.razor no longer needs a namespace.<MyFirstComponent />
One-way binding
Decorate the component’s property with a
[Parameter]attribtue.Parameters must be
publicproperties.
Literals, expressions, and directives
Blazor 如何解释我们传递给组件的值取决于我们设置的[Parameter]的类型,以及我们是否通过使用@符号明确了我们的意图。
参数使用 name=value 格式分配,就像它们在 HTML 标记中一样。我们是否使用表达式(expression)来确定值、指令(directive)(特殊情况)或字面值取决于@符号的位置(或缺少)。
| Position | Type | Example |
|---|---|---|
| Absent | Literal | <MyComponent MyParameter=42/> |
| Right | Expression | <MyComponent Value=@SomeValue/> |
| Left | Directive | <MyComponent @Bind-Value=SomeValue/> |
与 HTML 标记一样,Blazor 标记允许我们选择是否将值放在引号中。下面是等价的。
<MyComponent Value=@SomeValue/><MyComponent Value="@SomeValue"/>
我个人的偏好是仅在传递字符串时才将参数值用引号括起来。
<MyHeader Text=HeaderText Visible=HeaderVisible/>HeaderText is a literal string, HeaderVisible is an expression.<MyHeader Text=@HeaderText Visible=”HeaderVisible“/>Both are expressions.
为了避免被推断的文字意外绊倒,我的建议是坚持使用Lightbulb方法。始终通过在表达式前面加上
**@**符号来使其显式。
Directives
指令是内置宏,可以改变从Razor标记生成的转换后的C#代码。指令是通过在标识符前面加上@符号来使用的,标识符通常是我们期望的HTML属性的名称或组件的属性的名称。
目前,与Angular等其他框架不同,Blazor不允许开发人员创建自己的指令。TODO: Really?
因为分配给指令的值的类型是已知的(它在C#代码中是强类型的),所以该值将被推断为表达式。因此,与组件属性一样,除非我们希望将表达式传递给需要字符串值的指令,否则没有必要在赋值的开头添加@。例外情况是当我们希望传递lambda时;lambdas必须用@符号转义并用方括号括起来。
@onclick=@( args => Debug.WriteLine("Clicked") )
下面的代码显示了如何使用@onclick指令将DOM onclick事件添加到呈现的h1元素。
// Razor mark-up with @ref directive<h1 @onclick=H1Clicked>Hello, world!</h1>@code{public void H1Clicked(MouseEventArgs args){System.Diagnostics.Debug.WriteLine("H1 clicked");}}// Transpiled C#public partial class Index : Microsoft.AspNetCore.Components.ComponentBase{protected override void BuildRenderTree(RenderTreeBuilder __builder){__builder.OpenElement(0, "h1");__builder.AddAttribute(1, "onclick", EventCallback.Factory.Create<Microsoft.AspNetCore.Components.Web.MouseEventArgs>(this, H1Clicked));__builder.AddContent(2, "Hello, world!");__builder.CloseElement();}}
适用于Razor文件本身的一些标准指令包括:
@code
此指令标识应按原样输出到生成的C#文件中的C#代码的挡路。在单个Razor标记文件中可以有多个@code指令;Blazor会将这些指令整理到已转换文件中的单个挡路C#代码中。
@page
此指令在转换后的类上生成[PageAttribute],使Blazor路由(稍后介绍)能够识别在URL中给定特定地址时呈现哪个组件(页面)。
@layout
在转置的类上生成[LayoutAttribute]。Blazor使用它来确定使用哪种布局(如果有的话)来包装页面内容。
@typeparam
指示Blazor从Razor标记生成泛型类。
@inject
允许组件在Blazor创建组件的新实例时指定它们需要由Blazor注入的依赖项。
@attribute
将指定的DotNet属性添加到生成的C#类。
以下是可以应用于当前Razor文件正在使用的组件和HTML元素的一小组指令示例。例如<h1 @ref=MyH1Element>Hello</h1>。
@ref
标识当前组件的成员或属性,该成员或属性应包含对将呈现的HTML元素或组件的引用。在使用JavaScript Interop时,这些可以用作引用,或者用于获取对嵌入式Blazor组件的引用,以便我们可以调用该组件上的方法。
@bind
允许我们将数据绑定(双向绑定)到正在使用的组件的属性或HTML元素的属性。
@attributes
将名称-值对输出为HTML属性。
@key
使我们能够为元素/组件提供唯一的标识符,这有助于在呈现为HTML时保持较小的变化增量。
@onmousemove@onclick@onkeypress@onscroll
指令属性允许我们将附加信息传递给指令。如果我们将指令看作一个类,那么指令属性就是它的成员。
要传递此附加信息,我们需要重复该指令,然后在后面附加一个:,后面跟该指令支持的属性的名称。
例如,为了防止事件向上传播到元素树,JavaScript在事件上使用了stopPropagation方法。Blazor使用指令属性 @onclick:stopPropagation阻止传播。
Component events
EventCallback<T>类是一个特殊的Blazor类,它可以公开为Parameter,以便组件可以在发生感兴趣的事情时轻松通知消费者。
一旦声明了类型为EventCallback<T>的公共属性并用[Parameter]属性进行了修饰,消费组件就可以在Razor标记中指定在触发事件时调用哪个方法。
Differences between EventCallback and .NET events
Single-cast vs. Multi-cast
最显著的区别在于,EventCallback<T>是单播事件处理程序,而.NET事件是多播事件处理程序。Blazor EventCallback<T>被赋予单个值,并且只能回调单个方法。
// Setting a Blazor EventCallback<MyComponent SomeEvent=@MyMethodToCall/>// Setting a .NET eventMyComponent.SomeEvent += MyMethodToCall;// Unscrubscribing from the eventMyComponent.SomeEvent -= MyMethodToCall;
Class vs. Struct
.NET事件(委托)是类,而Blazor EventCallback<T>是readonly struct。与.NET委托不同,EventCallback<T>不能为null,因此在发出事件时不需要执行任何NULL检查。
Awaitable callbacks
标准.NET事件是同步的,而Blazor EventCallback<T>是异步的。正如我们在前面的示例代码中看到的,EventCallback<T>.InvokeAsync返回一个可以等待的任务。
Razor mark-up compatibility
不可能使用[Parameter]装饰标准.NET事件并通过Razor标记使其可设置,而使用EventCallback<T>则可以。这使我们能够在视图标记本身中表达事件回调,这使得开发人员的意图更容易看到。
Automatic state change detection
每当从EventCallback<T>调用方法时,在该方法执行之后,Blazor将在消费组件上执行StateHasChanged(),以便在该方法调用altered state时可以重新呈现它。如果通过标准.NET事件、Action<T>或任何其他不是由EventCallback<T>发起的方法回调使用者的方法,则不会发生这种情况。
Callee method signatures
EventCallback
如果我们的方法不执行任何异步操作,则以下实现可能会开始变得单调乏味:
public Task SomethingHappenedInChildComponent(string value){// Do something with valuereturn Task.CompletedTask;}
因此,Blazor将允许我们设置EventCallback<T>以回调具有void返回类型的方法。
public void SomethingHappenedInChildComponent(string value){// Do something with value}
有时我们只想知道事件何时发生,而对随其传递的值不感兴趣。Blazor还将回调排除Value参数的方法。
// Eitherpublic void SomethingHappenedInChildComponent(){// Do something that doesn't need the value}// Orpublic Task SomethingHappenedInChildComponent(){// Do some asynchronous work that doesn't need the valuereturn SomeTask;}
Drowser DOM events
在呈现任何标记时,可以在呈现的HTML元素上分配标准JavaScript事件,以便执行我们自己的Blazor C#方法。例如,我们在其他地方的许多示例中都使用了@onclick指令。
警告:当编写完全在服务器上运行的Blazor应用程序时,Blazor将在浏览器中挂钩事件并将它们发送到服务器,以便可以调用我们的C#方法。这可能会导致频繁触发的事件(如
onousemove)的速度明显减慢。注意:由于C#方法的JavaScript调用是异步的,这意味着在C#方法中不能像在JavaScript中那样取消事件。这是因为取消浏览器DOM事件是一个同步操作,当异步调用我们的C#时,要取消该事件已经太晚了。
Two-way binding
Blazor中的双向绑定使用命名约定。如果要绑定到名为SomeProperty的属性,则需要名为SomeProperyChanged的事件回调。只要组件更新SomeProperty,就必须调用此回调。
<div>CurrentCounterValue in MyFirstComponent is @CurrentCounterValue</div><button @onclick=@UpdateCurrentCounterValue>Update</button>@code {[Parameter]public int CurrentCounterValue { get; set; }[Parameter]public EventCallback<int> CurrentCounterValueChanged { get; set; }async Task UpdateCurrentCounterValue(){CurrentCounterValue++;await CurrentCounterValueChanged.InvokeAsync(CurrentCounterValue);}}
生成的源码(obj\Debug\netstandard2.0\Razor\Pages*Counter.razor.gs*)中BuildRenderTree方法大致看起来像:
builder.OpenComponent<...MyFirstComponent>(10);builder.AddAttribute(11, "CurrentCounterValue",...TypeCheck<System.Int32>(...BindMethods.GetValue(currentCount)));builder.AddAttribute(12, "CurrentCounterValueChanged",...TypeCheck<...EventCallback<System.Int32>>(...EventCallback.Factory.Create<System.Int32>(this,...EventCallback.Factory.CreateInferred(this,__value => currentCount = __value,currentCount))));builder.CloseComponent();
Binding directives 绑定指令
我们之前介绍了指令和指令属性。在本节中,我们将通过演示在使用双向绑定时如何使用指令性属性来介绍指令性属性的赋值。
简单回顾一下,指令是以@符号开头的元素中的标识符。例如
<h1 @ref=OurReferenceToThisElement>Hello</h1>
指令属性是以@directive:attribute的形式提供给指令的附加信息。例如,应用于@onclick指令的preventDefault属性将阻止提交按钮实际提交表单。
<input type="submit" @onclick:preventdefault>
除此之外,还可以按以下形式为某些指令属性赋值:
<h1 @directive:attribute="someValue">Hello</h1>
尽管没有理由将这些属性值限制为特定的双向绑定,但碰巧Blazor框架中当前唯一使用此功能的位置恰好是双向绑定,这就是为什么本主题将在双向绑定一节中讨论的原因。
Getting started
首先,我们需要一个在@code部分中定义了以下成员的页面,因此我们有要绑定的内容:
@code{private string Name;private DateTime? DateOfBirth;private decimal? BankBalance;}
Standard two-way binding
首先,我们将从标准的双向绑定到Blazor页面的Name成员开始。
<label>Name = @Name</label><input @bind-value=Name/>
前面标记的重要部分是@bind-value=name。这将为<input>元素上名为value的HTML属性设置双向绑定,并将其绑定到Name成员。
如果我们现在运行我们的应用程序,我们将看到输入上方的name=@name文本不会更改以反映我们在<input>中键入的内容,直到input元素失去焦点,或者我们按Enter键。
Immediate change detection using directive attributes
@bind指令有一个名为event的指令属性。设置此指令表单的值采用以下格式:
<input @bind-value:event="x"/>
“x”的有效值为onchange或oninput。
onchange是假定的默认值,当未指定:event的值时。这是我们在运行示例时看到的行为-只有当控件失去焦点或用户按Enter键时,才会发生绑定。
oninput是:event的唯一其他可能值,它指示Blazor挂钩到HTML元素的JavaScript oninput事件,并在每次触发该事件时更新绑定成员。这会导致每次用户更改输入中的值时都会立即更新绑定成员。
注意:
-value是要绑定到的HTML属性或Blazor组件属性的名称。对于HTML元素,前导字母将是小写,对于组件属性,前导字母将是大写,指令名称和绑定目标名称由-符号分隔。
将以下标记添加到我们的页面并运行应用程序。
<label>Name = @Name</label><input @bind-value=Name @bind-value:event="oninput"/>
@bind-value:event="oninput"是指示Blazor使用即时更改检测的关键。首先,我们告诉Blazor我们希望将input的value HTML属性绑定到Name成员(@bind-value=name),然后告诉Blazor挂钩到HTML元素的oninput事件,这样每当元素的值发生变化(@bind-value:event="oninput")时,我们的绑定就会立即发生。
Specifying a custom binding format
指定要在用户界面中使用的自定义格式是通过为@bind指令的format属性指定值来实现的。
将以下标记添加到我们的页面并运行应用程序。
<label>Date of birth = @DateOfBirth?.ToString("MMMM d, yyyy")</label><input @bind-value=DateOfBirth @bind-value:format="yyyy-MM-dd"/>
当应用程序运行时,输入ISO格式的日期(如1969-07-21)。尽管日期在<label>中显示为July 21, 1969,但是<input>控件在@bind-value:format="yyyy-MM-dd"中指定的ISO中显示它。
注意:输入的任何与指定格式不匹配的值都将被丢弃。正因为如此,我们不能设置
@bind-value:event="oninput",因为Blazor将尝试在每次按键时解析输入,但是输入的值不可能只在一次按键之后就有效,因此输入值将简单地消失。这是我建议在编辑数据时在EditForm中使用Blazor<Input*>组件的原因之一,因为这使我们能够使用<InputDate>这样的组件。
How it works
@bind指令不会添加代码来直接绑定到我们的成员,也不会简单地将其转换为字符串值或从字符串值转换为字符串值。相反,它通过BindConverter重定向当前值的表示和输入值的解析。
如果我们查看Blazor为单向绑定(如class=@OurCssClass)生成的.cs文件,我们将看到类似以下内容的C#(为简明起见进行了编辑)。
protected override void BuildRenderTree(RenderTreeBuilder __builder){_builder.AddAttribute(1, "class", OurCssClass);}
现在,如果我们查看为双向绑定生成的文件,我们将看到类似以下(删节)的用于显示值的代码:
protected override void BuildRenderTree(RenderTreeBuilder __builder){_builder.AddAttribute(1, "value",...BindConverter.FormatValue(Name));
以及类似于以下(同样经过删节)的代码,用于将用户输入转换回绑定成员。
__builder.AddAttribute(11, "onchange",...EventCallback.Factory.CreateBinder(this, __value => Name = __value, Name));}
代码挂钩到HTML onchange事件,然后通过绑定器在事件触发时设置我们的成员值。
设置@bind-value:format指令属性值时的不同之处在于,我们提供的格式将生成的代码传递给BindConverter.Format和EventCallback.Factory.CreateBinder。
...BindConverter.FormatValue(Name, format: "yyyy-MM-dd");// andCreateBinder(...., format: "yyyy-MM-dd");
Specifying a custom culture
世界上的人们有不同的风俗习惯和文化,这是使世界变得如此有趣的原因之一。不幸的是,这也是使编写软件变得更加困难的原因之一。
将以下标记添加到我们的页面:
<label>Bank balance = @BankBalance</label><input @bind-value=BankBalance @bind-value:culture=Turkish/>
并确保将以下成员添加到页面的@code部分:
private CultureInfo Turkish = CultureInfo.GetCultureInfo("tr-TR");
输入值12.42可能会期望余额略高于12土耳其里拉,但是,正如我们所看到的,我们刚刚意外地给了某人1242土耳其里拉。当然,居住在土耳其的人可能知道要键入12,42-但这突出了当我们的应用程序打算在其他国家使用时,正确指定区域性的必要性。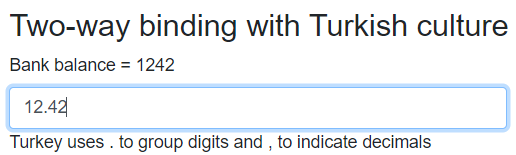
与format指令属性一样,指定的@bind-value:culture性将作为命名(可选)值传递给Binder和BindConverter。
Cascading values
我们已经看到Blazor如何允许我们使用参数将上下文从父组件传递给子组件。随着组件变得更加复杂,将其拆分为子组件的情况并不少见。在某些情况下,组件可能会要求它的使用者传递某些状态,而它自己却不会使用这些状态,但它的某个子组件需要的状态。随着我们的组件的结构随着时间的推移变得更加复杂,我们可能会发现我们自己的组件需要添加多个参数,它们并不使用这些参数,而只是简单地传递,因为它们在更深层的某个地方是必需的。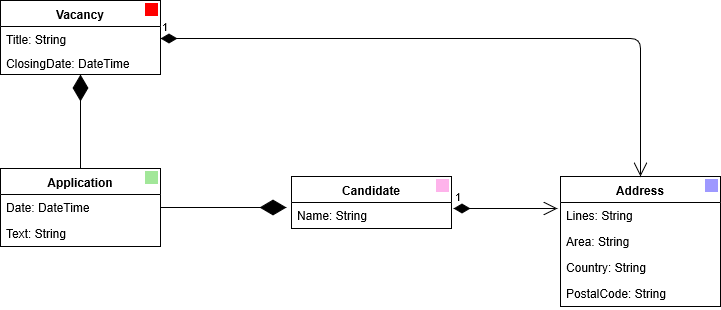
以一份求职申请为例。一个空缺Vacancy可以有多个申请Applications;每个申请Application都针对一个空缺Vacancy,并且属于一个候选人Candidate;空缺Vacancy和候选人Candidate都有一个地址。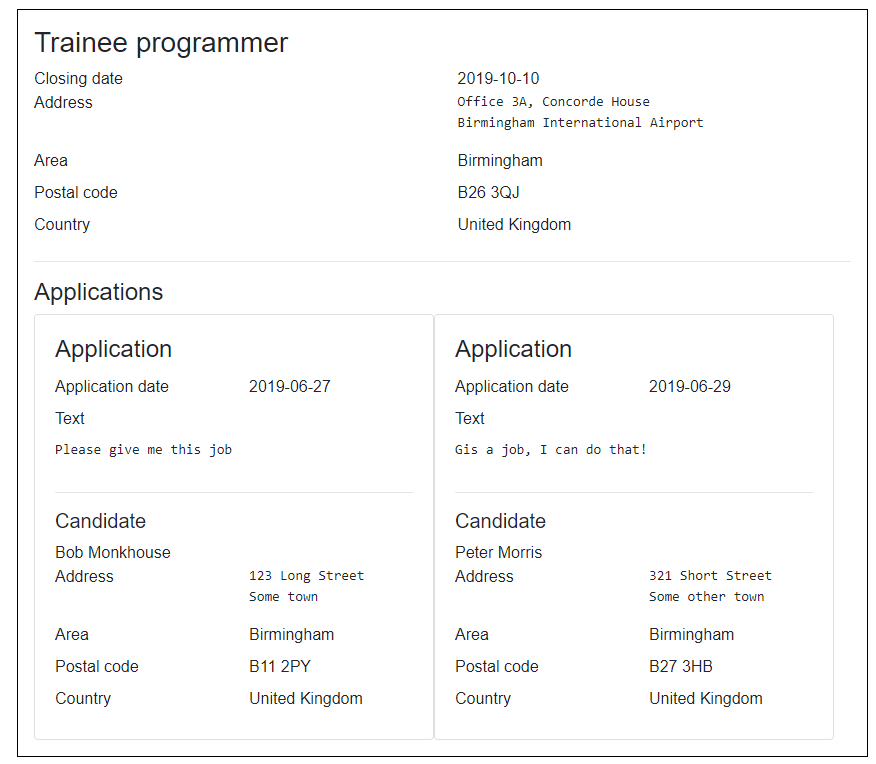
查看空缺Vacancy将显示所有申请Applications。在某一点上,确定了允许用户点击单个应用程序并在其自己的页面上详细查看它的要求,因此创建了一个新的ViewApplication.razor组件,该组件将在查看空缺或查看单个应用程序时使用。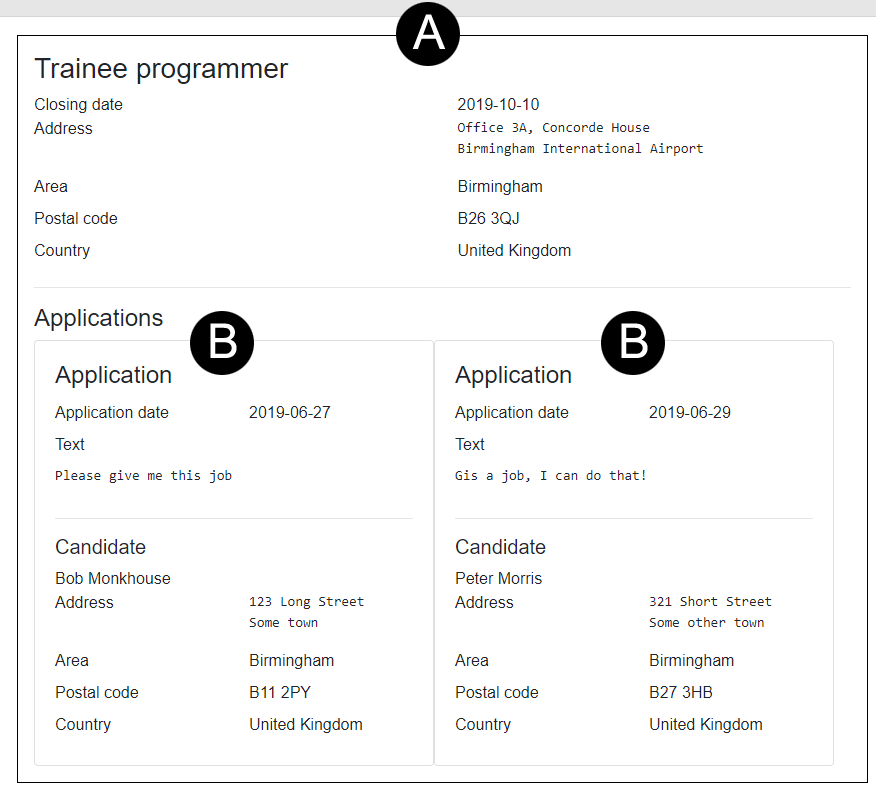
现在我们有一个ViewVacancy.razor组件(标记为A),它针对空缺在所有应用程序中循环,并为每个应用程序呈现一个ViewApplication.razor组件(标记为B)。
作为标准化应用程序的练习,我们决定应该使用ViewCandidate.razor组件(标记为C)来显示候选地址,并且应该使用ViewAddress.razor组件(标记为D)来显示所有地址。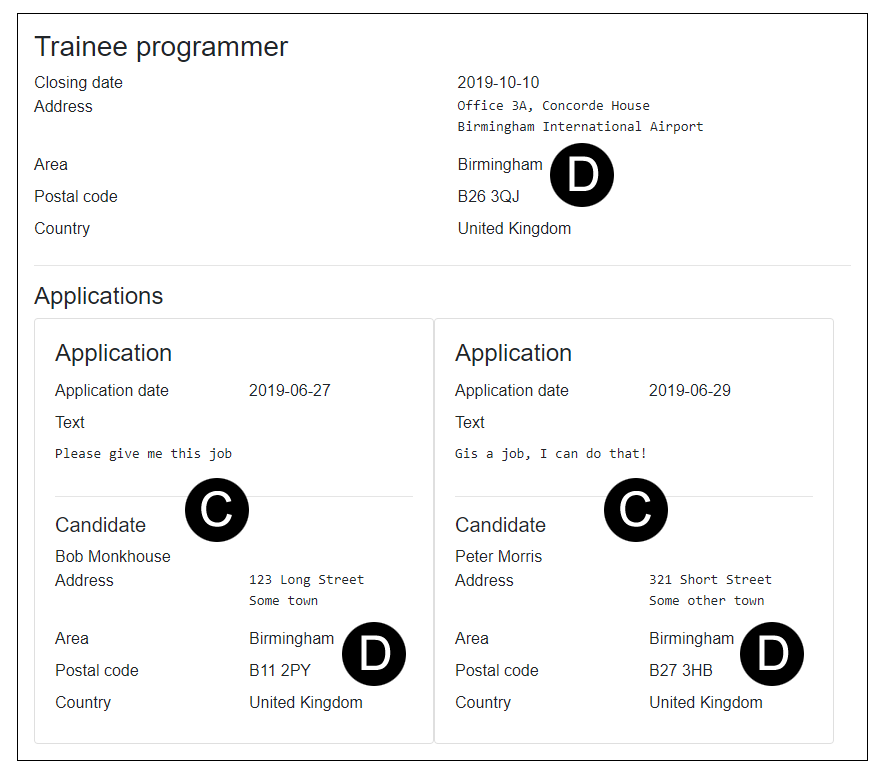
出于平等机会的考虑,显示空缺申请的页面需要在不透露候选人姓名或完整地址的情况下查看申请的选项,因此在“查看匿名数据View anonymized data”页面中增加了一个复选框。事实上,该特性被视为对应用程序非常重要,因此复选框被添加到MainLayout.razor页面,因此它在整个系统的任何地方都可用。
ViewVacancy.razor组件没有敏感数据,因此它不需要知道用户是否正在查看匿名数据。其中的ViewApplication.razor组件也没有敏感信息,因此也不需要知道;但是ViewCandidate.razor组件需要匿名候选人的名字,ViewCandidate.razor组件中的ViewAddress.razor组件也需要匿名数据。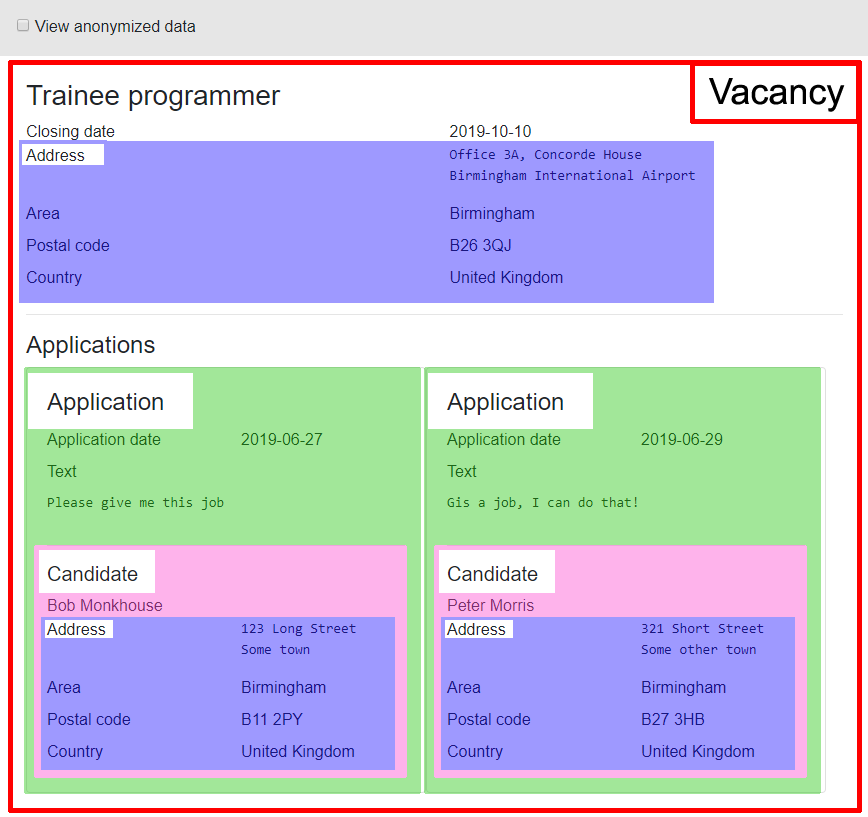
因为ViewAddress.razor和ViewCandidate.razor需要一个布尔参数来标识它们是否应该显示敏感信息,所以某些组件必须也需要相同的参数才能直接或间接地将其传递给它承载的任何组件。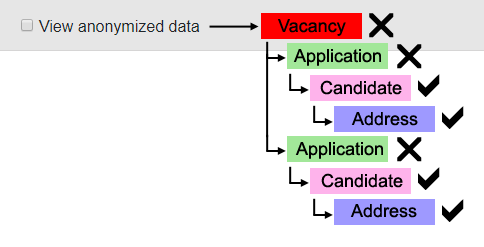
图示:仅为将数据传递给子对象而需要的参数的
这是级联值解决的挑战。
Cascading values by name
指定级联参数的值非常简单。在我们的Razor HTML标记中的任何点上,我们都可以创建一个CascadingValue元素。该元素中呈现的所有内容都可以访问指定的值。
@page "/"<h1>Toggle the options</h1><input @bind-value=FirstOptionValue type="checkbox" /> First option<br /><input @bind-value=SecondOptionValue type="checkbox" /> Second option<br /><CascadingValue Name="FirstOption" Value=@FirstOptionValue><CascadingValue Name="SecondOption" Value=@SecondOptionValue><FirstLevelComponent /></CascadingValue></CascadingValue>@code {bool FirstOptionValue;bool SecondOptionValue;}
使用该值也同样简单。任何组件,无论其嵌套在CascadingValue元素中有多深,都可以使用用CascadingParameter属性修饰的属性访问值。
<ul><li>FirstOption = @FirstOption</li><li>SecondOption = @SecondOption</li></ul>@code {[CascadingParameter(Name="FirstOption")]private bool FirstOption { get; set; }[CascadingParameter(Name="SecondOption")]private bool SecondOption { get; set; }}
请注意,我们使用该值的属性的名称是无关紧要的。Blazor不会查找与CascadingValue元素中指定的名称相同的属性;我们可以随意命名我们的属性,实际上是CascadingParameterAttribute上的Name标识应该注入哪个级联值。
最好将充当级联参数的属性的可见性设置为private。允许它们通过消费者的代码进行设置实际上并不合乎逻辑,因为该值实际上由设置级联值的父级拥有。
Cascading values by type
在前面,我们了解了如何按名称级联一个值。设置Name很重要,因为它用于通过匹配组件的名称将CascadingValue中指定的值推送到消费组件的正确属性中。另一个选项是指定CascadingValue而不指定Name,当Blazor遇到以这种方式指定的级联值时,如果该属性满足以下条件,它会将其值注入到组件的属性中。
- 该属性使用
CascadingPropertyAttribute进行修饰。 [CascadingProperty]未指定Name。- 该属性与在
CascadingValue中设置的Type相同(例如,布尔值)。 - 该属性有一个setter。
- 该属性是公有的。
例如,下面的CascadingValue将匹配SomeComponent中的两个CascadingParameter属性。
<CascadingValue Value=@true><SomeComponent/></CascadingValue>
Property1 = @Property1Property2 = @Property2@code{[CascadingParameter]private bool Property1 { get; set; }[CascadingParameter]private bool Property2 { get; set; }}
未命名的CascadingValue没有指定Name的CascadingValue那么具体,因为每个具有正确类型且没有名称的CascadingParameter修饰属性都将使用该值。在定义简单的.NET类型(如bool或int)的情况下,建议使用Name参数,但是,有时值的类型足以标识其用途;指定名称将是多余的,因此将其排除在外可以节省大量时间。
随着招聘应用程序的增长,我们可能最终会有多个级联参数,例如:
bool ViewAnonymizedData
指示是否应隐藏个人标识信息。
string DateFormat
使用组件可以使用它以统一的方式格式化日期。
string LanguageCode
组件可以使用它来显示翻译后的文本。
这里出现的清晰模式是,这些都与用户的偏好相关。与使用多个CascadingValue元素进行Razor标记不同,如下所示:
<CascadingValue Name="ViewAnonymizedData" Value=@ViewAnonymizedData><CascadingValue Name="DateFormat" Value=@DateFormat><CascadingValue Name="LanguageCode" Value=@LanguageCode>(Body goes here)</CascadingValue></CascadingValue></CascadingValue>
拥有一个定制类会更有意义(并且使用更少的代码):
public class UserPreferences{public bool ViewAnonymizedData { get; set; }public string DateFormat { get; set; }public string LanguageCode { get; set; }}
然后创建您的Razor标记,如下所示:
<CascadingValue Value=@UserPreferences></CascadingValue>
然后,使用组件只需要一个标记为[CascadingParameter]的属性,而不是三个。
@if (!UserPreferences.ViewAnonymizedData){<div><span>Name</span> @Candidate.Name</div><div><span>Date of birth</span> @Candidate.DateOfBirth.ToString(UserPreferences.DateFormat)</div><ViewAddress Address=@Candidate.Address/>}else{<span>[Anonmymized view]</span>}@code{[CascadingParameter]private UserPreferences UserPreferences { get; set; }}
Overriding cascaded values 重写级联值
级联值和级联参数允许它们的值级联呈现树,而无需在父级和子级之间显式传递。Blazor的另一个特性是,它允许我们覆盖呈现树下面的CascadingValue的值。
给定以下ViewSomeValue组件,该组件显示名为ValueToOverride的CascadingValue的值:
<div>Values are @SomeValue1 / @SomeValue2</div>@code{[CascadingParameter(Name = "CascadedValue")]private string SomeValue1 { get; set; }[CascadingParameter(Name = "ValueToOverride")]private string SomeValue2 { get; set; }}
以及使用该组件的以下页面:
@page "/overridden"<CascadingValue Name="CascadedValue" Value=@CascadedValue><CascadingValue Name="ValueToOverride" Value=@OuterValue><h2>First level</h2><ViewSomeValue /><CascadingValue Name="ValueToOverride" Value=@InnerValue><h2>Second level</h2><ViewSomeValue /></CascadingValue><h2>Back to first level</h2><ViewSomeValue /></CascadingValue></CascadingValue>@code{string CascadedValue = "CascadedValue";string OuterValue = "Outer value";string InnerValue = "Inner value";}
我们看到以下输出:
First level
Values are CascadedValue / Outer value
Second level
Values are CascadedValue / Inner value
Back to first level
Values are CascadedValue / Outer value
请注意,第三个组件的ValueToOverride的值如何自动恢复为“Outer value”。这是因为该值由元素的深度决定。第三个组件在最外层的CascadingValue中呈现,因此这是它找到的保存匹配值的最近父组件。
还要注意CascadedValue的值如何可用于所有组件。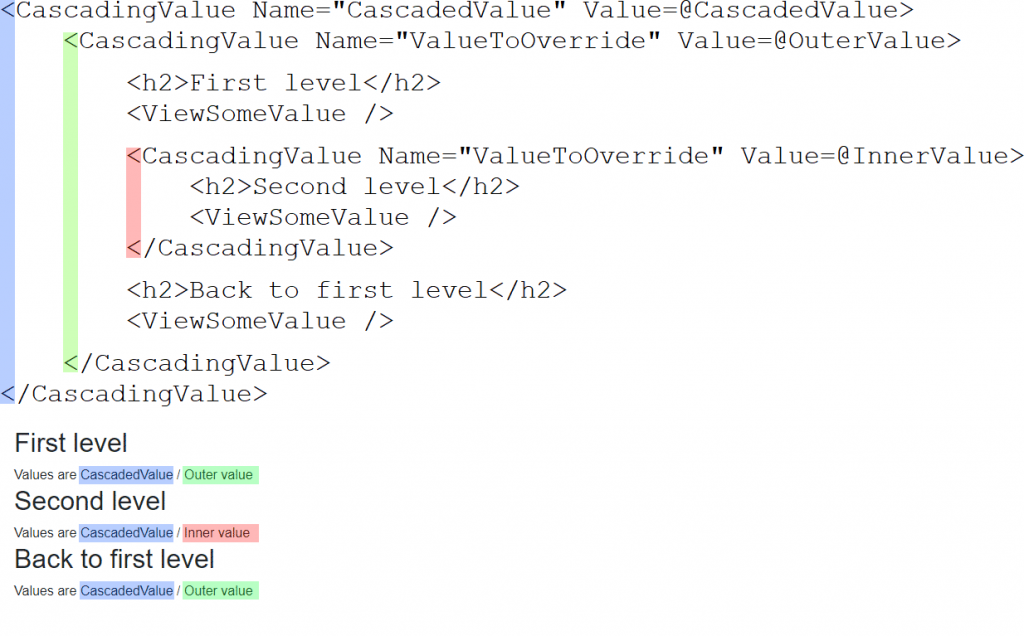
Code generated HTML attributes
当涉及到条件HTML输出时,或者在for循环中输出HTML时,Razor非常棒,但是当涉及到元素本身中的条件代码时,事情就有点棘手了。例如,下面的代码无法编译,因为您不能在元素的<和>内添加C#控制块。
<img@foreach(var nameAndValue in AdditionalAttributes){@nameAndValue.Key = @nameAndValue.Value}src="https://randomuser.me/api/portraits/lego/1.jpg" />@code{Dictionary<string, object> AdditionalAttributes;protected override void OnInitialized(){AdditionalAttributes = new Dictionary<string, object>{["id"] = "EmmetImage",["alt"] = "A photo of Emmet"};base.OnInitialized();}}
我们可能尝试的下一种方法是编写一个返回字符串的方法,并在<和>字符中调用该字符串。
<div @IfYouCanSeeThisTextThenTheCodeWasNotExecutedHere /><span>@IfYouCanSeeThisTextThenTheCodeWasNotExecutedHere</span>@code{string IfYouCanSeeThisTextThenTheCodeWasNotExecutedHere = "The code here was executed";}
但这也不管用。前面的示例将输出以下HTML。
<div @ifyoucanseethistextthenthecodewasnotexecutedhere=""></div><span>The code here was executed</span>
Razor将仅在以下位置执行C#代码:
- 在元素的内容区域内,例如
<span>@GetSomeHtml()</span>。 - 在确定要分配给元素属性的值时,例如
<img src=@GetTheImageForTheUrl()/>。 - 在
@code部分中。
我们需要用来为HTML元素生成一个或多个属性+值的技术称为“Attribute splatting(属性展开)”。Attribute splatting 涉及将Dictionary<string,object>分配给具有特殊名称@attributes的属性。
<div @attributes=MyCodeGeneratedAttributes/>@code{Dictionary<string, object> MyCodeGeneratedAttributes;protected override void OnInitialized(){MyCodeGeneratedAttributes = new Dictionary<string, object>();for(int index = 1; index <= 5; index++){MyCodeGeneratedAttributes["attribute_" + index] = index;}}}
前面的代码将输出一个具有5个属性的<div>。
<div attribute_1="1" attribute_2="2" attribute_3="3" attribute_4="4" attribute_5="5"></div>
Special cases 特殊情况
某些HTML属性(如readonly和disabled)不需要值-它们仅存在于元素上就足以使其有效。事实上,即使应用诸如false之类的值也会激活它们。以下<input>元素将是只读和禁用的。
<input readonly="false" disbabled="false"/>
在Razor视图中,规则略有不同。如果我们输出readonly=@IsReadOnly或Disabled=@IsDisabled-每当赋值为false时,razor将根本不输出属性;当赋值为true时,razor将输出元素而不赋值。<input readonly=@true disabled=@false/>将导致razor生成的HTML根本不包含disabled属性。
Capturing unexpected parameters
在前面,我们已经了解了如何使用特定名称声明参数和级联参数。例如,以将<img>元素包装在某个自定义HTML中的自定义组件为例。
<div class="row"><img src=@src/></div>@code{[Parameter]public string src { get; set; }}
在审查过程中指出,没有alt标签的图像对于视力有障碍的人来说是不太容易访问的,所以增加了另一个参数并更新了HTML。
<div class="row" role="img" aria-label=@alt><img src=@src/></div>@code{[Parameter]public string src { get; set; }[Parameter]public string alt { get; set; }}
随着时间的推移,需要更多属性:
- align
- width
- height
此时,您可能不再对图像组件有额外的要求,但是每次编写组件时都必须为每个可能的属性编写一个参数可能会很烦人,特别是当您并不实际处理这些值,而只是将它们传递给HTML元素的标记时。<input>控件大约有30个属性,需要我们为其编写参数代码。
Capturing values without coding parameters
在前面,我们了解了如何利用Attribute splatting以编程方式生成HTML属性及其值。这涉及到将Dictionary<string,object>的值赋给一个特别命名的@attributes属性。
在没有匹配参数的情况下捕获属性值的工作方式与此类似。我们只需创建一个Dictionary<string,object>类型的属性,将其修饰为[Parameter],但在Parameter中我们需要指定CaptureUnmatchedValues=true。
<div class="row" role="img" aria-label=@alt><img src=@src @attributes=AllOtherAttributes /></div>@code{[Parameter]public string src { get; set; }[Parameter]public string alt { get; set; }[Parameter(CaptureUnmatchedValues = true)]public Dictionary<string, object> AllOtherAttributes { get; set; }}
现在,当您的组件的使用者使用[Parameter]修饰的属性(正常行为)添加您没有显式允许的属性值时,Blazor不会抛出异常,而是将它们作为键/值对收集到字典中。
在前面的示例中,组件的使用者指定的任何attributes=value赋值都将添加到组件内的<img>元素中。
<MyCustomImage src="https://randomuser.me/api/portraits/lego/6.jpg" alt="A photo of Emmet" width=64 height=64 />
Replace attribtues on child components
到目前为止,我们已经了解了如何创建代码生成的属性,以及如何捕获意外参数。除了这两种技术之外,Blazor还允许我们覆盖/替换子组件中的现有属性。
使用以下页面标记:
<ChildComponent first="consumer-value-1" second="consumer-value-2" />
它使用以下子组件:
<div @attributes=AllOtherAttributes>Right-click and inspect the HTML for this element to see the results!</div>@code{[Parameter(CaptureUnmatchedValues=true)]public Dictionary<string, object> AllOtherAttributes { get; set; }}
正如我们以前在代码生成的属性中看到的那样,ChildComponent将把消费者提供的属性(第一个和第二个)捕获到我们的参数AllOtherAttributes中,并且对@attributes=AllOtherAttributes的调用将指示Blazor输出我们的Dictionary<string,object>中的名称/值对。前面的代码将输出以下HTML。
<div first="consumer-value-1" second="consumer-value-2">Right-click and inspect the HTML for this element to see the results!</div>
Replacing child attributes
如果我们希望在使用者不提供第一个和第二个输出时为它们指定默认值,该怎么办呢?如果没有设置SetParametersAsync和赋值,可能很容易覆盖它们,但是有一种简单得多的方法!
我们所要做的就是写出默认值作为子组件标记的一部分,@attributes=指令将用使用者传递的任何值覆盖它们。因此,如果我们更改子组件以指定一些默认属性值,如下所示:
<div first="1" second="2" third="3" fourth="4" @attributes=AllOtherAttributes>Right-click and inspect the HTML for this element to see the results!</div>
然后,我们可以替换来自消费者的这些默认值,如下所示:
<ChildComponent first="consumer-value-1" second="consumer-value-2" />
这将呈现以下HTML:
<div first="consumer-value-1" second="consumer-value-2" third="3" fourth="4">Right-click and inspect the HTML for this element to see the results!</div>
我们的子组件将始终呈现其所有四个HTML属性,但也将允许使用者替换它们的值。
Protecting attributes against being replaced 保护属性不被替换
在某些情况下,我们可能希望允许组件的使用者替换某些属性,但我们希望保护其他属性不被更改。例如:
<input class="form-control" type="number" @attributes=AllOtherAttributes />
在这个假设的InputNumber控件中,我们希望允许我们的使用者替换默认的CSS类属性,但又不希望他们意外地将type从number更改为checkbox。
在Blazor中,@attributes=指令的位置很重要。指令之前的任何属性(在其上方或其左侧)都可以由使用者替换其值,但其后面(其下方或其右侧)的所有属性都受到保护,以防其值被替换。
给定以下消费者标记:
<ChildComponentfirst="consumer-value-1"second="consumer-value-2"inserted="consumer-inserted-value" />
然后,调整ChildComponent中@attributes=的位置将得到以下输出:
// Example 1<div@attributes=AllOtherAttributesfirst="1"second="2" />// Generated HTML<divinserted="consumer-inserted-valuefirst="1"second="2" />
// Example 2<divfirst="1"@attributes=AllOtherAttributessecond="2" />// Generated HTML<divfirst="consumer-value-1"inserted="consumer-inserted-valuesecond="2" />
// Example 3<divfirst="1"second="2"@attributes=AllOtherAttributes />// Generated HTML<divfirst="consumer-value-1"second="consumer-value-2"inserted="consumer-inserted-value />
R.I.P. default values
记住哪些值优先的简单方法是使用“R.I.P.method”。@aAttributes=指令将始终插入来自消费者的附加值,因此可以将I视为inserted的含义。I之前的每个属性值都可以replaced,I之后的每个属性值都是受protected的。
<div first="1" second="2" @attributes=AllOtherAttributes third="3" fourth="4" />

Component lifecycles
Blazor组件有许多虚拟方法,我们可以重写它们来影响应用程序的行为。在组件的生命周期内,这些方法在不同的时间执行。下图概述了这些生命周期方法的流程。
Component lifecycle diagram
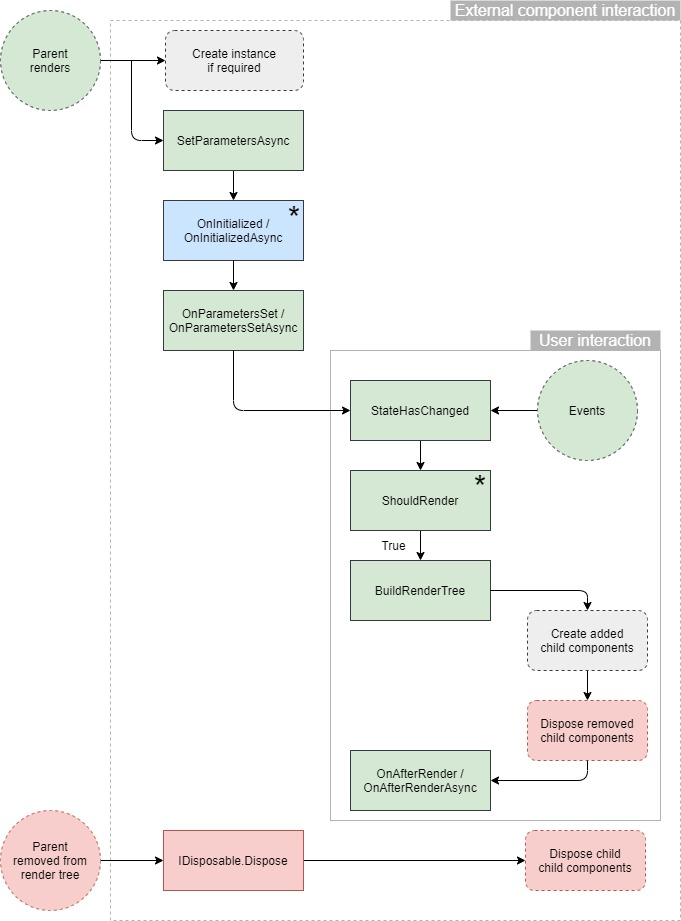
SetParametersAsync
每当父级呈现时,都会执行此方法。
传入组件的参数包含在ParameterView中。这是根据传入组件的状态对服务器进行异步调用(例如)的好时机。
在重写中调用base.SetParametersAsync(Parameters)时,会为组件的[Parameter]属性赋值。
它也是指定默认参数值的正确位置。有关完整说明,请参阅可选路由参数。
OnInitialized / OnInitializedAsync
将ParameterCollection中的状态分配给组件的[Parameter]属性后,将执行这些方法。这与SetParametersAsync的用法相同,不同之处在于可以使用组件的状态。
*该方法仅在组件首次创建时执行一次。如果父级稍后更改组件的参数,则跳过此方法。
注意:当组件是
@page,并且Blazor应用程序导航到呈现同一页面的新URL时,Blazor将为该页面重用当前对象实例。因为该对象是同一实例,所以Blazor不会对该对象调用IDisposable.Dispose,也不会再次执行其OnInitialized方法。
OnParametersSet / OnParametersSetAsync
如果这是组件的新实例,则此方法将在OnInitializedAsync之后立即执行。如果它是因为其父组件正在重新呈现而正在重新呈现的现有组件,则不会执行OnInitialized*方法,而是在SetParametersAsync之后立即执行此方法。
SetParameterAsync vs OnParametersSet* OnParametersSet在[Parameter]设置值之后触发。你可以重写SetParamnetersAsync,如果你想自定义参数应该如何应用于组件。它在设置[Parameter]之前由框架调用,并控制如何设置它们。
StateHasChanged
此方法标记要呈现的组件。
每当组件想要通知Blazor发生了会导致呈现输出不同的更改时,它都会调用此方法。例如,在时钟组件中,我们可能会设置一个重复的1秒计时器,然后执行StateHasChanged,以便用正确的时间重新呈现。
另一个用途是指示Blazor通过异步方法执行部分重新渲染。
private async Task GetDataFromMultipleSourcesAsync(){var remainingTasks = new HashSet<Task>(CreateTheTasks());while (remainingTasks.Any()){Task completedTask = await Task.WhenAny(remainingTasks);remainingTasks.Remove(completedTask);StateHasChanged();}}
当发生等待时(第6行)或方法完成时(第10行),将支持对StateHasChanged的调用。
ShouldRender
此方法可用于防止通过返回false来重新计算组件的RenderTree。请注意,第一次创建和呈现组件时不会执行此方法。
指示Blazor不执行BuildRenderTree过程可以节省处理时间,并且当我们知道我们的状态自上次呈现以来没有更改,或者仅以会导致呈现相同输出的方式更改时,可以改善用户体验。
BuildRenderTree
此方法将组件的内容呈现为应该呈现给用户的内存中表示形式(RenderTree)。
<h1>People</h1>@foreach(Person currentPerson in people){<ShowPersonDetails Person=@currentPerson/>}
前面的标记将向呈现树中添加一个h1,其内容为“People”。然后,它将为people中的每个Person创建ShowPersonDetails的新实例。
如果我们的组件稍后使用people中的其他项重新呈现,则将创建ShowPersonDetails组件的一个新实例,并将其添加到组件的RenderTree中。如果people中的项较少,则以前创建的一些ShowPersonDetails组件实例将从组件的RenderTree中丢弃,并且如果它们实现了IDiposable,则将对它们执行Dispose()。
注意:为了提高呈现效率,在任何类型的循环中呈现标记时,只要有可能,请始终使用
[@key](https://blazor-university.com/components/render-trees/)指令。
OnAfterRender / OnAfterRenderAsync
最后两个方法在Blazor每次重新生成组件的RenderTree时执行。这可能是因为组件的父级重新呈现、用户与组件交互(例如,鼠标单击),或者如果组件执行其StateHasChanged方法来调用重新呈现。
这些方法只有一个名为firstRender的参数。只有在当前组件上第一次调用该方法时,此参数才为true,从那时起,它将始终为false。在需要附加组件挂钩的情况下(例如,通过JavaScript),知道这是第一次呈现很有用。
只有在**OnAfterRender**方法执行之后,才能安全地使用对通过**@ref**指令设置的组件的任何引用。
<ChildComponent @ref=MyReferenceToChildComponent/>@code{// This will be null until the OnAfterRender* methods executeChildComponent MyReferenceToChildComponent;}
只有在将**firstRender**设置为**true**的情况下执行**OnAfterRender**方法之后,才能安全地使用通过**@ref**指令设置的对HTML元素的任何引用。
<h1 @ref=MyReferenceToAnHtmlElement>Hello</h1>@code{// This will be null until the OnAfterRender* methods execute// with firstRender set to trueElementReference MyReferenceToAnHtmlElement;}
Dispose
虽然严格来说这不是ComponentBase的生命周期方法之一,但是如果组件实现了IDisposable,那么一旦从其父组件的呈现树中删除该组件,Blazor就会执行Dispose。要实现IDisposable,我们需要将@Implements IDisposable添加到我们的razor文件中。
@implements IDisposable<h1>This is MyComponent</h1>@code {void IDisposable.Dispose(){// Code here}}
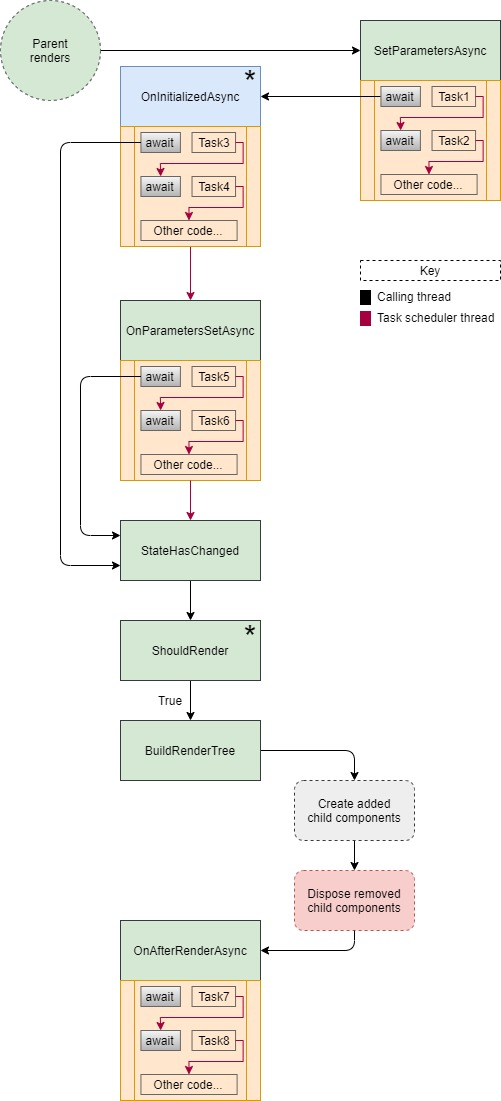
👍Awaiting within Async lifecycle methods 在异步生命周期内等待方法
需要注意的是,Blazor将尽可能快地触发呈现,而不是等待长时间运行的异步方法完成后才能呈现组件。
这使组件能够在执行后台任务(如从服务器检索数据)时呈现标记以供用户查看。
Individual method await behaviours 个体方法等待行为
SetParametersAsync
- Action on first await 等待第一次执行操作
继续生命周期流程
(如果是新实例,则为OnInitialized,否则为OnParametersSet)
- Action on exit method 退出方法上的操作
没有进一步的行动
注意:base.SetParametersAsync方法必须在该方法中的任何await指令之前执行,否则将引发InvalidOperationException。
OnInitializedAsync
- Action on first await
渲染组件
- Action on exit method
OnParametersSetAsync
- Action on first await
渲染组件
- Action on exit method
OnAfterRenderAsync
- Action on first await
没有进一步的行动
- Action on exit method
没有进一步的行动
简单的规则是,SetParametersAsync是唯一不能通过等待Task来挂起生命周期流程的方法。
所有其他异步方法都可以挂起生命周期过程,直到执行退出该方法,第一次await将导致通过BuildRenderTree呈现,以避免用户不得不等待查看更新。OnRenderAsync可能看起来像一个异常,因为它在这两种情况下都不执行进一步的操作。如果我们认为呈现是执行链的末端,那么我们可以认为它是完成了链,而不是什么都不做。至于在await时呈现,如果需要,这必须由程序员通过调用StateHasChanged显式完成,否则OnAfterRenderAsync中的等待将导致无穷无尽的循环。
👍Component lifecycle with asynchronous awaits
👍Asynchronous methods and multiple awaits
在异步方法中,Blazor在await时执行的代码将仅在第一次await时执行。后续等待不会导致多次渲染。例如
protected override async Task OnParametersSetAsync(){// Automatically renders when next line starts to awaitawait Task.Delay(1000);// No automatic render when next line starts to awaitawait Task.Delay(1000);// No automatic render when next line starts to awaitawait Task.Delay(1000);}
如果要在其他点呈现,则必须在所有其他等待语句之前调用StateHasChanged。
protected override async Task OnParametersSetAsync(){// Automatically renders when next line starts to awaitawait Task.Delay(1000);// Explicitly render when next line starts to awaitStateHasChanged();await Task.Delay(1000);// Explicitly render when next line starts to awaitStateHasChanged();await Task.Delay(1000);}
有关如何安全地使用在同一组件上运行的不同线程的详细信息,请参阅多线程渲染一节。
👍Multi-threaded rendering
因为在服务器端Blazor应用程序中有多个线程可用,所以完全有可能不同的组件可以由不同的线程在其上执行代码。
这在基于异步Task的操作中最为常见。例如,向服务器发送HTTP请求的多个组件将收到单独的响应。每个单独的响应都将使用系统从可用线程池中为我们选择的任何线程来恢复调用方法。
观察此行为的最简单方法是创建一些执行await的异步方法。对于本例,我们将使用OnInitializedAsync生命周期方法。
为了演示这一点,我们首先需要创建一个新的服务器端Blazor应用程序。然后,在/Shared文件夹中,创建一个名为SynchronousInitComponent的组件。此组件将在执行OnInitialized时捕获当前线程的Thread.ManagedThreadId。然后,当我们的组件呈现时,该值将显示在页面上。
<p>Sync rendered by thread @IdOfRenderingThread</p>@code{int IdOfRenderingThread;protected override void OnInitialized(){base.OnInitialized();IdOfRenderingThread = System.Threading.Thread.CurrentThread.ManagedThreadId;}}
- 第5行
声明一个字段以保存对线程ID的引用。
- 第7行
OnInitialized生命周期方法被重写。
- 第10行
当前线程的ID存储在IdOfRenderingThread中,因此可以呈现它。
- 第1行
呈现在第10行捕获的线程的ID。
最后,编辑/Pages/Index.razor页面以显示我们的新组件的5个实例。
@page "/"<h1>Components with synchronous OnInitialized()</h1>@for (int i = 0; i < 5; i++){<SynchronousInitComponent />}
运行应用程序将为每个组件显示相同的线程ID。显然,您的线程ID可能与我的不同。
Components with synchronous OnInitialized()
Sync rendered by thread 4
Sync rendered by thread 4
Sync rendered by thread 4
Sync rendered by thread 4
Sync rendered by thread 4
Asynchronous
接下来,我们将在/Shared文件夹中创建另一个名为AchronousInitComponent的新组件。此组件将与SynchronousInitComponent相同,但将在等待1秒后额外重新分配OnInitializedAsync中的IdOfRenderingThread的值。
<p>Async rendered by thread @IdOfRenderingThread</p>@code{int IdOfRenderingThread;protected override async Task OnInitializedAsync(){// Runs synchronously as there is no code in base.OnInitialized(), 因为base.OnInitialized()没有代码,所以同步运行// so the same thread is used 所以使用了相同的线程await base.OnInitializedAsync().ConfigureAwait(false);IdOfRenderingThread = System.Threading.Thread.CurrentThread.ManagedThreadId;// Awaiting will schedule a job for later, and we will be assigned 等待稍后会安排作业,我们会被分配// whichever worker thread is next available 下一个可用的工作线程await Task.Delay(1000).ConfigureAwait(false);IdOfRenderingThread = System.Threading.Thread.CurrentThread.ManagedThreadId;}}
- 第7行
OnInitializedAsync生命周期方法被重写。
- 第12行
与同步组件一样,当前线程的ManagedThreadId被分配给IdOfRenderingThread,因此它可以由组件呈现。(见附注)
- 第17行
在继续执行该方法之前,我们允许经过1秒。
- 第18行
IdOfRenderingThread再次更新,显示在第17行await1秒后重新呈现组件的线程的ID。
注意:第11行上的
await将异步运行似乎是有道理的。事实上,它是同步运行的。这是因为基方法不执行任何操作。不需要等待异步代码(如Task.Delay),因此相同的线程继续执行。
我们还需要另一个页面来呈现这个新组件。使用以下标记在/Pages中创建名为AsyncInitPage.razor的新页面。
@page "/async-init"<h1>Components with asynchronous OnInitializedAsync()</h1>@for (int i = 0; i < 5; i++){<AsynchronousInitComponent/>}
运行应用程序并导航到第二个页面将产生与第一个页面非常相似的输出,在第一个页面中,每个组件都由单个线程呈现。
Components with asynchronous OnInitializedAsync()
Async rendered by thread 4
Async rendered by thread 4
Async rendered by thread 4
Async rendered by thread 4
Async rendered by thread 4
但是,1秒后,每个组件的OnInitializedAsync方法中的Await Task.Delay(1000)将完成并更新IdOfRenderingThread,然后再为浏览器呈现HTML。这一次,我们可以看到使用了不同的线程来完成OnInitializedAsync方法。
Components with asynchronous OnInitializedAsync()
Async rendered by thread 7
Async rendered by thread 18
Async rendered by thread 10
Async rendered by thread 13
Async rendered by thread 11
What about ConfigureAwait(true)?
在await上指定ConfigureAwait(true)并不能保证我们将看到所有组件呈现在启动await的同一线程上。指定ConfigureAwait(true)仍将导致混合线程用于回调。
Components with asynchronous OnInitializedAsync()
Async rendered by thread 11
Async rendered by thread 11
Async rendered by thread 9
Async rendered by thread 13
Async rendered by thread 13
即使ConfigureAWait(true)确实保证我们可以在同一线程上继续,这仍然不能确保我们的UI只由单个线程呈现。导致组件重新呈现的原因有很多,包括(但不限于)。
- 来自System.Threading.Timer的回调
- 由多个用户共享的Singleton实例上的另一个线程触发的事件
-
Summary
在服务器端Blazor应用程序中,没有单个UI线程。当需要渲染工作时,可以使用任何可用的线程。
此外,如果任何方法在执行异步操作的代码上使用await,则分配来继续处理该方法的线程很可能与启动该方法的线程不同。
在Blazor WebAssembly应用程序(只有一个线程)中不存在线程问题,但是在服务器端应用程序中,当跨多个组件使用非线程安全依赖项时,这可能会导致问题。
此问题将在OwningComponentBase一节中解决。 👍Thread safety using InvokeAsync
在我们的代码被非UI事件调用的情况下(比如多线程呈现中概述的那些),如果我们想要操纵状态,通常需要实现某种线程锁定/同步。
概述:非UI事件包括: 来自System.Threading.Timer的回调
- 由多个用户共享的Singleton实例上的另一个线程触发的事件
- 来自我们通过Web套接字连接的另一台服务器的数据推送。
为了避免编写线程安全代码,编写WPF应用程序的人可以使用Dispatcher.Invoke来确保UI线程执行代码,WinForms开发人员可以使用窗体的Invoke方法。以这种方式调用的任何代码始终由特定线程(UI线程)执行,从而避免使用线程同步代码。
用于告诉Blazor重新呈现组件的StateHasChanged框架方法不允许多个线程同时访问呈现进程。如果辅助线程调用StateHasChanged,将抛出异常。
System.InvalidOperationException: The current thread is not associated with the Dispatcher. 当前线程未与调度程序关联。
在服务器端Blazor应用程序中,每个连接(每个浏览器选项卡)都有一个关联的调度程序。当我们使用InvokeAsync时,我们通过此调度程序执行操作(就像WPFDispatcher.Invoke或WinForms Control.Invoke一样)。
在前面概述的场景中调用StateHasChanged(从Thread执行代码等)时,有必要通过InvokeAsync()方法调用它。InvokeAsync将序列化工作,因此将避免StateHasChanged引发异常。
尽管方法将由任意数量的不同线程执行,但在任何给定时刻只有一个线程访问组件,从而消除了围绕共享状态编写线程锁定/同步代码的需要。
InvokeAsync example
为了演示直接从线程执行组件方法与通过InvokeAsync执行组件方法之间的行为差异,我们将创建一个服务器端应用程序,该应用程序将显示多个并发线程如何破坏共享状态。
创建新的Blazor服务器端应用程序后,添加一个静态类,该类将存储可由多个组件/线程访问的整数值。
public static class CounterState{public static int Value { get; set; }}
Displaying the state
我们将在组件中显示此状态的值,并每秒检查该值两次。为此,我们将在/Shared文件夹中创建一个名为ShowCounterValue.razor的组件。
@implements IDisposable<div>Counter value is: @CounterState.Value at @DateTime.UtcNow.ToString("HH:mm:ss")</div>@code{private System.Threading.Timer Timer;protected override void OnInitialized(){base.OnInitialized();Timer = new System.Threading.Timer(_ =>{InvokeAsync(StateHasChanged);}, null, 500, 500);}void IDisposable.Dispose(){Timer?.Dispose();Timer = null;}}
- Line 1
声明我们的组件实现IDisposable
- Line 3
显示CounterState.Value的当前值以及当前时间。
- Line 13
组件初始化时,会创建一个System.Threading.Timer,它将每500毫秒执行一次StateHasChanged。它通过InvokeAsync调用,以防止Blazor抛出异常,告诉我们我们正在从线程调用StateHasChanged。
- Line 21
在释放组件时释放计时器。
注意:如果未释放计时器,则在用户会话的生存期内它将保持活动状态。如果计时器保持活动状态,则不会对组件进行垃圾回收,因为计时器回调通过其
InvokeAsync和StateHasChanged方法保存对组件的隐式引用。
Modifying the state
现在,我们将创建一个将递增CounterState.Value字段的组件。每个组件将在线程中执行一次循环,并更新该Value1000次。然后,我们可以在主页上拥有该组件的多个实例,以确保多个线程正在更新状态。
注意:将向此组件传递
System.Threading.WaitHandle。组件的线程将被挂起,直到主页触发此WaitHandle,从而触发所有线程同时开始循环。
在/Shared文件夹中,创建一个名为IncrementCounter.razor的新文件。我们将从一些文本开始,以显示页面上存在该组件,一个参数用于接受所需的WaitHandle,另一个参数用于指示我们是否希望使用InvokeAsync递增该值。
<div>Incrementing...</div>@code{[Parameter]public bool ShouldUseInvokeAsync { get; set; }[Parameter]public System.Threading.WaitHandle Trigger { get; set; }// More to come}
要增加CounterState.Value,我们将在OnInitialized生命周期方法中创建一个线程。我们将立即启动线程,但线程中的第一条指令将是挂起自身,直到触发WaitHandle。
protected override void OnInitialized(){var thread = new System.Threading.Thread(_ =>{Trigger.WaitOne();for (int i = 0; i < 1000; i++){if (!ShouldUseInvokeAsync){CounterState.Value++;}else{InvokeAsync(() => CounterState.Value++);}}});thread.Start();}
- Line 1:重写
OnInitialized。 - Line 3:创建线程以修改共享状态。
- Line 5:线程应该做的第一件事是等待父页面的
WaitHandle被触发。 - Line 6:对共享状态执行1000次更改。
- Line 8:检查是否应该使用
InvokeAsync。 - Line 10:直接从线程更改共享状态。
- Line 14:使用
InvokeAsync在更改共享状态时确保顺序访问。 - Line 19:启动线程,以便它可以等待触发。
Using the components to demonstrate state conflict 使用组件演示状态冲突
最后一步是在我们的Index页中创建一些标记,它将创建这些组件中的5个。
为了使应用程序更有趣,我们还将
- 有一个复选框,允许用户指定是否希望通过
InvokeAsync执行状态更改。 - 允许用户重置应用程序的状态,然后通过单击按钮重试。
如果用户想要使用InvokeAsync,我们将需要Index页面中的一些组件状态来指示我们当前正在运行一个测试,并需要一个System.Threading.ManualReset对象,我们可以将该对象传递给IncrementCounter以触发对其线程的处理。
private bool IsWorking;private bool UseInvokeAsync;private System.Threading.ManualResetEvent Trigger = new System.Threading.ManualResetEvent(false);
对于标记,我们需要使用双向绑定将isworking字段绑定到HTML<input>元素。
<div><input type="checkbox" @bind=UseInvokeAsync id="UseInvokeAsyncCheckbox" /><label for="UseInvokeAsyncCheckbox">Use InvokeAsync</label></div>
后跟一个按钮,用户可以单击该按钮开始测试运行。在测试运行期间,应禁用该按钮。
<div><button @onclick=Start disabled=@IsWorking>Start</button></div>
我们还希望使用ShowCounterValue让我们的用户了解CounterState.Value的当前值。
<ShowCounterValue />
最后,对于标记,我们希望创建IncrementCounter组件的5个实例。这些组件将仅在测试运行开始后创建,并将在运行完成后释放。要实现这一点,我们只有在isworking为true时才渲染它们。
@if (IsWorking){for (int i = 0; i < 5; i++){<IncrementCounter Trigger=@Trigger ShouldUseInvokeAsync=@UseInvokeAsync />}}
- Line 1:如果
isworking为true,则仅呈现组件,指示测试运行正在进行。 - Line 3:创建
IncrementCounter组件的5个实例的循环。 - Line 5:创建一个
IncrementCounter实例,传入ManualResetEvent(触发器)和一个boolean,指示用户是否在UI中单击了Use InvokeAsync。
我们现在要编写的唯一代码是Start方法。这将简单地重置状态,将isworking设置为true,触发我们的组件开始递增,然后将isworking设置为false。Index现在应该如下所示:
@page "/"<div><input type="checkbox" @bind=UseInvokeAsync id="UseInvokeAsyncCheckbox" /><label for="UseInvokeAsyncCheckbox">Use InvokeAsync</label></div><div><button @onclick=Start disabled=@IsWorking>Start</button></div><ShowCounterValue />@if (IsWorking){for (int i = 0; i < 5; i++){<IncrementCounter Trigger=@Trigger ShouldUseInvokeAsync=@UseInvokeAsync />}}@code{private bool IsWorking;private bool UseInvokeAsync;private System.Threading.ManualResetEvent Trigger = new System.Threading.ManualResetEvent(false);private async Task Start(){CounterState.Value = 0;IsWorking = true;StateHasChanged();await Task.Delay(500);Trigger.Set();await Task.Delay(1000);IsWorking = false;Trigger.Reset();}}
- Line 3:将HTML
<input>绑定到UseInvokeAsync。 - Line 7:单击时执行
Start方法的按钮。如果isworking为true,则禁用该按钮。 - Line 9:使用
CounterState.Value的当前值更新UI。 - Line 14:渲染一些
IncrementCounter组件,但仅当isworking为true时。 - Line 26-28:将共享状态重置为零。
- Line 30:等待500毫秒,让所有组件中的线程有机会启动。
- Line 31:触发
ManualResetEvent(触发器),以便所有IncrementCounter组件的线程可以同时恢复并开始修改共享状态。 - Line 33-35:等待1秒,等待测试完成,然后重置
IsWorking和我们的ManualResetEvent,以便为下一次睡觉运行做好准备。Running the example application
Running without InvokeAsync
运行应用程序,对于第一个测试,取消选中Use InvokeAsync复选框。然后单击Start按钮,您将看到类似下图的内容。
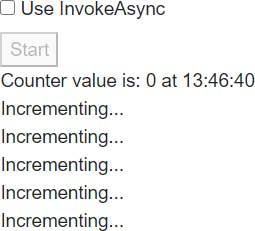
然后是1秒后的屏幕,如下图所示。请注意,在我的示例中,最终的CounterState.Value仅为1202。考虑到有5个组件,每个组件在1000次迭代循环中将值递增1,理想情况下我们应该看到5000作为最终值。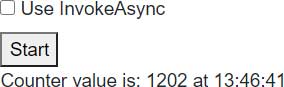
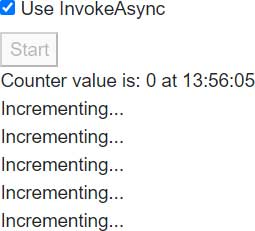
Running with InvokeAsync
接下来,勾选该复选框并再次单击Start按钮。
一秒钟后,剩下的将完成,我们看到一个更令人满意的结果。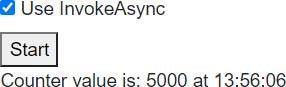
Summary
在处理UI触发的事件(按钮单击、导航事件等)时,我们不需要为线程安全做任何特殊考虑。Blazor将为我们管理这一点,并确保在任何时候只有一个线程执行组件代码。
当非UI事件触发我们的代码时,在服务器端Blazor应用程序中,此代码将在非同步线程中触发。不可能调用**StateHasChanged**,并且由于thread race conditions,对任何共享状态的访问都容易损坏。注意:Blazor WebAssembly应用程序是单线程的,因此不必考虑线程安全性。
在类ComponentBase上引入的Blazor InvokeAsync将通过同步每个用户的线程执行连接来确保不会出现争用情况。
Blazor能够通过用户连接到Blazor服务器端应用程序时创建的调度程序执行代码,从而确保在任何给定时间只有一个线程在执行代码。
需要考虑的一个可能的复杂情况是,Blazor调度程序不能确保在执行下一个调度的代码之前运行执行整个代码。如果所有分派的动作都是同步代码,则情况就是这样,顺序执行。但是,如果任何分派的动作是异步的,则该线程在对某些异步代码(如Task.Delay或HTTP请求)执行await时将立即放弃其执行时间。
这意味着,尽管Blazor的InvokeAsync可以保证线程在执行过程中是同步的,但这并不意味着我们在使用异步资源(如查询实体框架核心)时可以没有线程安全代码。
由两个单独的线程执行的以下代码将导致多个线程尝试同时使用同一实体框架核心DbContext,即使是在通过InvokeAsync调用时也是如此。
IsLoading = true;StateHasChanged();Person[] people = await ApplicationDbContext.Person.ToArrayAsync();IsLoading = false;
这是因为await语句放弃执行,并允许Blazor执行不同的逻辑代码块。
| First InvokeAsync | Second InvokeAsync |
|---|---|
| IsLoading = true; StateHasChanged(); … await |
|
| IsLoading = true; StateHasChanged(); … await |
|
| Person[] people = (result from await) |
|
| Person[] people = (result from await) |
在上图中,在步骤2中,ApplicationDbContext已由两个单独的线程指示执行异步操作。因为实体框架核心不支持线程可重入性,所以它将抛出一个异常,告诉我们在任何给定时间只有一个线程可以访问DbContext。
因此,尽管共享状态在通过InvokeAsync执行时在同步代码中是安全的,但请记住,一旦您的代码引入等待,它就允许其他线程有机会介入,直到等待完成。

若有收获,就点个赞吧
0 人点赞
