到目前为止,我们已经了解了三个依赖项注入作用域:单例、作用域和瞬态。我们还进行了实验,以了解这些不同的依赖项注入作用域如何相互比较,以及ASP.NETMVC和Blazor之间作用域的生存期有何不同。
在某些情况下,我们可能需要更多地控制注入依赖项的生命周期,并控制它们是跨组件共享还是仅供单个组件使用。以下各节将介绍一些场景及其可能的实现方式;其中一些已经内置到Blazor中,还有一些是根据我们在此过程中所学到的内容进行定制的。
OwningComponentBase
正如关于单例依赖项的部分所述,单例注册依赖项必须没有状态,或者应该只包含可以在同一服务器上的所有用户之间共享的状态。
而且,正如关于作用域依赖项一节中所提到的,作用域注册依赖项将单个用户的状态与其他所有人(甚至是在不同浏览器选项卡中访问同一网站的同一用户)隔离开来。
但是线程安全呢?在运行服务器端应用程序时,单例注册的依赖项很可能同时由多个线程使用。即使我们将依赖项注册为作用域,也完全有可能不同的组件将由不同的线程呈现,这在多线程呈现一节中有详细描述。
正因为如此,我们在编写服务时必须考虑线程安全。然而,有时我们并不拥有我们消费的服务的源代码,并且它们可能不是线程安全的(EntityFrameworkCore的DbContext类就是一个例子)。
Demonstrating the problem 演示问题
首先,我们将修改标准的服务器端Blazor项目,使WeatherForecastService不再是线程安全的。我们将检测是否有多个线程同时使用该服务,并抛出InvalidOperationException,就像DbContext类所做的那样。
我们将通过保留一个线程安全的Int32字段来实现这一点,我们可以在方法开始时递增,在方法完成时递减。如果当我们试图递增该值时,该值已经大于0,那么我们可以推断另一个线程已经在执行该方法,然后抛出异常。
创建项目后,编辑/data/WeatherForecastService.cs文件并添加新的volatile int字段:
private volatile int Locked;
在方法开始时,我们将使用Interlocked.CompareExchange框架方法来确保锁定的值当前为0,然后将其从0更改为1。在方法的末尾,我们将使用Interlockee.Decquires将锁定的值改回0。
我们还需要方法中的延迟,否则让两个线程完全同时执行它的机会太小了。GetForecastAsyc应更改为以下代码。
public class WeatherForecastService{private volatile int Locked;private static readonly string[] Summaries = new[]{"Freezing", "Bracing", "Chilly", "Cool", "Mild", "Warm", "Balmy", "Hot", "Sweltering", "Scorching"};public async Task<WeatherForecast[]> GetForecastAsync(DateTime startDate){if (Interlocked.CompareExchange(ref Locked, 1, 0) > 0)throw new InvalidOperationException("A second operation started on this context before a previous operation completed. Any "+ "instance members are not guaranteed to be thread-safe.");try{await Task.Delay(3000);var rng = new Random();return Enumerable.Range(1, 5).Select(index => new WeatherForecast{Date = startDate.AddDays(index),TemperatureC = rng.Next(-20, 55),Summary = Summaries[rng.Next(Summaries.Length)]}).ToArray();}finally{Interlocked.Decrement(ref Locked);}}}
- Line 3
添加了一个私有的volatile int字段,以跟踪当前正在执行同一方法的线程的数量。
- Line 12
Interlocked.CompareExchange用于将Locked值设置为1,但仅当值当前为0时。方法返回Locked的原始值,如果该值大于0,则抛出InvalidOperationException。
- Line 19
我们引入一个await Task.Delay,延迟3秒来模拟一个长时间运行的流程。这将增加两个线程冲突的风险,并确保我们的代码实际上异步运行。(请参见多线程渲染)。
- Line 30
方法完成后,将Locked计数从1减回0,以便另一个线程可以执行该方法,而不会收到异常。
现在运行应用程序,尝试同时在两个浏览器选项卡中打开/fetchdata页面,应该会抛出我们的InvalidOperationException。
Fix 1: Using a Scoped dependency
将WeatherForecastService从Singleton依赖项更改为Scoped依赖项(在Startup.cs中)将防止在我们的用户中发生线程重入问题。
public void ConfigureServices(IServiceCollection services){services.AddRazorPages();services.AddServerSideBlazor();services.AddScoped<WeatherForecastService>();}
再次运行应用程序,我们将看到我们能够打开许多选项卡,而不会导致线程冲突。如果您已经阅读过关于Scoped依赖项的部分,那么原因就很明显了。每个选项卡都接收自己唯一的WeatherForecastService实例,因此在任何时候都只有一个线程在使用每个服务。
但是,我们只能保证我们的服务不会被我们应用程序的其他用户的线程使用。它不能保证我们的组件根本不会被多个线程使用。多线程渲染一节解释了服务器端Blazor应用程序如何利用多线程来渲染用户界面
潜在地,让多个线程为单个用户呈现意味着我们仍然有可能在跨多个组件共享的服务实例上实现线程可重入性。
如果不可能使服务是线程安全的,则此场景中的一个选择是确保每个组件都注入了其自己的唯一服务实例。
Demonstrating the problem with scoped dependencies
创建一个名为Conflict.Razor的新页面,并为其添加以下简单标记。
@page "/conflict"<FetchData /><FetchData />
在我们的页面中呈现两次FetchData将需要两个组件来访问WeatherForecastService,这是因为GetForecastAsync方法中有一个等待。这意味着呈现第一个<FetchData/>的线程将能够在第一个<FetchData/>完成之前呈现第二个<FetchData/>。
再次运行应用程序并导航到/Conflict页面,我们将再次看到InvalidOperationException被抛出。
Fix 2: Descending from OwningComponentBase
Blazor有一个名为OwningComponentBase<T>的泛型组件类。创建此类的实例时,它将首先创建自己的IServiceProvider(用于解析依赖项),然后使用该服务提供程序创建T的新实例(然后将其存储在名为Service的属性中)。
因为OwningComponentBase<T>拥有自己唯一的IServiceProvider(因此命名为OwningComponentBase),这意味着从服务提供者解析的T对于我们的组件将是唯一的。
当我们的OwningComponentBase<T>组件被释放时,它的IServiceProvider(Service属性)也被释放,这反过来又将释放它创建的每个实例-在本例中是我们的WeatherForecastService。

在/Pages中创建一个名为OwnedFetchDataPage.razor的新组件,并输入以下标记。
@page "/owned-fetchdata"<OwnedFetchData/><OwnedFetchData />
在/Shared文件夹中,创建一个名为OwnedFetchData.razor的新组件,并从FetchData.razor文件复制标记。
目前,OwnedFetchData组件具有相同的缺陷,它注入了与当前浏览器选项卡中的其他组件共享的相同的WeatherForecastService实例。要解决此问题,请执行以下步骤。
- 在页面顶部删除
@Inject WeatherForecastService ForecastService
- 将删除的行替换为
@inherits OwningComponentBase<WeatherForecastService>
- 删除代码行
forecasts = await ForecastService.GetForecastAsync(DateTime.Now);
- 将其替换为
forecasts = await Service.GetForecastAsync(DateTime.Now);
再次运行应用程序并导航到/owner-fetchdata页面。因为OwnedFetchData组件的每个实例都拥有自己的WeatherForecastService实例,所以它们能够彼此独立地与服务交互,并且不会导致线程可重入性问题。
如果我们的服务器端应用程序正在访问数据库,我们可能会从OwningComponentBase<MyDbContext>下载组件,并将数据从数据库提取到一个数组中以进行呈现。
Owning multiple dependencies: The wrong way
OwningComponentBase
本小节将演示实现此目标的错误方法,然后下一小节将演示如何正确实现它。
Overview
使用OwningComponentBase<T>时需要记住的是,在组件拥有的注入容器内创建的只是T(存储在名为Service的属性中)。
在OwningComponentBase<T>的后代上使用@inject指令不会从组件自己的注入容器注入依赖项。
注意:如果您还没有这样做,如果您还不熟悉该类如何创建自己的注入容器,请阅读OwningComponentBase
一节。
Example
对于本练习,我们将创建一个新的Blazor应用程序,该应用程序将演示通过OwningComponentBase<T>中的T和@inject指令向我们的组件提供的服务的不同生存期。
首先,创建一个新项目,并添加以下服务。
public interface IOwnedDependency{public int InstanceNumber { get; }}public class OwnedDependency : IDependencyOne{private static volatile int PreviousInstanceNumber;public int InstanceNumber { get; }public OwnedDependency(){InstanceNumber =System.Threading.Interlocked.Increment(ref PreviousInstanceNumber);}}
该类只是根据递增静态字段为自己分配一个新的InstanceNumber,为每个实例提供一个序列号。
接下来,使用名称InjectedDependency创建一段相同的代码,并注册服务。
// Server-side apps, edit Startup.csservices.AddScoped<IOwnedDependency, OwnedDependency>();services.AddScoped<IInjectedDependency, InjectedDependency>();// WebAssembly apps, edit Program.csbuilder.Services.AddScoped<IOwnedDependency, OwnedDependency>();builder.Services.AddScoped<IInjectedDependency, InjectedDependency>();
Consuming the dependencies
现在在/Shared文件夹中创建一个名为MyOwningComponent的组件,如下所示:
@inherits OwningComponentBase<IOwnedDependency>@inject IInjectedDependency InjectedDependency<div>Service.InstanceNumber = @Service.InstanceNumber</div><div>InjectedDependency.InstanceNumber = @InjectedDependency.InstanceNumber</div>
- Line 1
从OwningComponentBase<IOwnedDependency>派生我们的组件,因此我们的组件将创建自己的注入容器,并从中解析IOwnedComponent的实例。
- Line 2
使用标准的@inject指令让Blazor将IInjectedDependency的实例注入我们的组件。
Displaying the result
最后,我们将编辑Index.razor文件。我们将创建一个boolean字段,并仅在该字段为true时呈现MyOwnedComponent。这将告诉Blazor在需要时创建组件的实例,并在不需要时释放它。我们将@bind 一个HTML复选框以允许用户切换组件。
@page "/"<input id="show-component" type=checkbox @bind=ShowComponent/><label for="show-component">Show component</label>@if (ShowComponent){<MyOwningComponent/>}@code{bool ShowComponent = false;}
运行应用程序并切换复选框的状态将显示以下内容。
| Step | Owned service | Injected service |
|---|---|---|
| 1 | InstanceNumber = 1 | InstanceNumber = 1 |
| 2 | InstanceNumber = 2 | InstanceNumber = 1 |
| 3 | InstanceNumber = 3 | InstanceNumber = 1 |
Conclusion
当使用@inject指令时,Blazor将从与当前用户的会话(当前浏览器选项卡)相关联的依赖项容器中注入限定Scoped的依赖项。只有OwnedComponentBase<T>中的T将从随OwningComponentBase<T>下降组件的实例一起创建和销毁的注入容器中解析。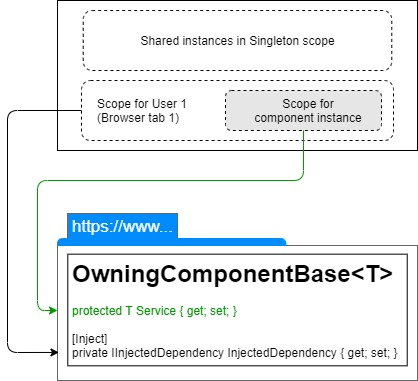
组件拥有多个依赖项的正确方式将在关于非泛型OwningComponentBase类的小节中介绍。
Owning multiple dependencies: The right way
在上一节中,我们看到了将多个拥有的依赖项注入一个组件的错误方式。本节将演示解决问题的正确方法。
如前所述,OwningComponentBase<T>类组件将创建自己的依赖项容器,并在该容器中解析T的实例,因此T的实例对于我们的组件是私有的。
如果我们需要我们的组件私有多种类型依赖项的实例,那么我们必须做更多的工作。要实现这一点,我们需要使用非泛型OwningComponentBase类。与泛型版本一样,此组件将创建其自己的依赖项容器,该依赖项容器将在组件的生存期内存在。但是,它不会为我们实际解析任何依赖项,而是让我们可以访问它的依赖项容器,这样我们就可以解析我们需要的任何类型的实例。
Example
首先,创建一个新的Blazor应用程序。然后,正如我们之前所做的那样,我们将创建一些可以注入的类,这些类将使用状态成员来跟踪创建了多少个类实例。
创建以下接口
public interface IOwnedDependency1{public int InstanceNumber { get; }}public interface IOwnedDependency2{public int InstanceNumber { get; }}
然后创建实现这些接口的类。我只展示第一个类的代码,第二个类将是相同的。
public class OwnedDependency1 : IOwnedDependency1{private static volatile int PreviousInstanceNumber;public int InstanceNumber { get; }public OwnedDependency1(){InstanceNumber =System.Threading.Interlocked.Increment(ref PreviousInstanceNumber);}}
将接口及其实现类注册为Scoped(如果需要提醒您如何操作,请参阅比较依赖作用域)。
接下来,编辑Index.razor页面,以便我们应用程序的用户可以通过单击复选框来切换组件。
@page "/"<input id="show-component" type=checkbox @bind=ShowComponent /><label for="show-component">Show component</label>@if (ShowComponent){<MyOwningComponent />}@code{bool ShowComponent = false;}
当ShowComponent为true时,我们的标记将创建一个MyOwningComponent实例并呈现它。接下来,我们将创建MyOwningComponent。
OwningComponentBase
在共享文件夹中,创建名为MyOwningComponent的新Razor组件。我们将从OwningComponentBase继承此组件。
@inherits OwningComponentBase
然后创建一些类字段来保存我们的依赖项。
@code{private IOwnedDependency1 OwnedDependency1;private IOwnedDependency2 OwnedDependency2;}
Resolving owned dependencies
OwningComponentBase创建的私有依赖项容器通过其ScopedServices属性提供给我们。
protected IServiceProvider ScopedServices { get; }
我们可以使用此IServiceProvider来解析组件拥有的私有依赖项容器中的依赖项实例。
@inherits OwningComponentBase@using Microsoft.Extensions.DependencyInjection<div>OwnedDependency1.InstanceNumber = @OwnedDependency1.InstanceNumber</div><div>OwnedDependency2.InstanceNumber = @OwnedDependency2.InstanceNumber</div>@code{private IOwnedDependency1 OwnedDependency1;private IOwnedDependency2 OwnedDependency2;protected override void OnInitialized(){OwnedDependency1 =ScopedServices.GetService<IOwnedDependency1>();OwnedDependency2 =ScopedServices.GetService<IOwnedDependency2>();}}
- Line 1
从OwningComponentBase派生,提供我们自己的私有依赖项容器。
- Line 2
使用DependencyInjection命名空间,因此我们可以在IServiceProvider上使用GetService<T>扩展方法。
- Lines 19 & 21
使用OwningComponentBase.ScopedServices属性解析组件需要的依赖项的实例。
- Lines 6 & 9
Running the example
如果我们运行示例应用程序并勾选复选框,我们将看到以下输出。
- OwnedDependency1.InstanceNumber=1
- OwnedDependency2.InstanceNumber=1
取消勾选该复选框以允许删除我们的组件,然后再次勾选该复选框以让Blazor创建MyOwningComponent的新实例。渲染的输出现在应该如下所示。
- OwnedDependency1.InstanceNumber=2
- OwnedDependency2.InstanceNumber=2
这表明,每次创建组件时,我们在组件的OnInitialized方法中解析的两个依赖项都是新实例。
Dependent lifetimes
OwningComponentBase类实现IDisposable接口。当不再呈现从OwningComponentBase派生的任何组件时,Blazor将在OwningComponentBase上执行Dispose方法。
组件上的Dispose方法将对其拥有的私有依赖项容器调用Dispose。反过来,此容器创建的实现IDisposable的任何对象实例也将执行其Dispose方法。
要演示此行为,请对我们的应用程序进行以下更改。
首先,覆盖组件上的Dispose(Bool IsDisposing),并让它在释放时记录一些输出。
public void Dispose(){System.Diagnostics.Debug.WriteLine("Disposing " + GetType().Name);}
然后,对于我们的每个依赖类(OwnedDependency1和OwnedDependency2),让它们实现IDisposable,并再次让它们在执行Dispose时记录一些输出。
public class OwnedDependency1 : IOwnedDependency1, IDisposable{... Other code omitted for brevity ...public void Dispose(){System.Diagnostics.Debug.WriteLine($"Created {GetType().Name} instance {InstanceNumber}");}}
我们还可以在类的构造函数中添加一些日志记录。
现在运行应用程序并选中复选框将输出类似以下内容的日志文本。
- Created MyOwningComponent
- Created OwnedDependency1 instance 1
- Created OwnedDependency2 instance 1
- Disposing OwnedDependency2 instance 1
- Disposing OwnedDependency1 instance 1
- Disposing MyOwningComponent
- Created MyOwningComponent
- Created OwnedDependency1 instance 2
- Created OwnedDependency2 instance 2
- Disposing OwnedDependency2 instance 2
- Disposing OwnedDependency1 instance 2
- Disposing MyOwningComponent
Conclusion
当组件只需要拥有一个依赖项时,从OwningComponentBase<T>派生,当需要组件拥有多个依赖项时,从非泛型OwningComponentBase类派生。
尽管解析组件依赖项实例的过程是一个手动过程,但不需要释放创建的任何依赖项,因为在执行OwningComponentBase.Dispose时,组件的依赖项容器将释放这些依赖项。

若有收获,就点个赞吧
0 人点赞
