InputBase<T>组件是各种Blazor输入控件的派生类。这个类在标准HTML<input>元素的基础上添加了额外的功能,比如验证-我们将在后面介绍。因此,如果我们想要将组件用作用户输入,建议我们从这个基类派生组件。
实现InputBase<T>仅仅是实现一个抽象方法,也可以实现一个虚拟方法。InputBase<T>是一个泛型类,它有一个名为Value的T类型属性。因为Web浏览器使用字符串值,所以该组件需要一种将T类型的值与字符串相互转换的方法。
protected abstract bool TryParseValueFromString(string value, out T result, out string validationErrorMessage);
TryParseValueFromString是一个抽象方法,为了将字符串值从HTML<input>元素(或其他使用字符串的源)转换为目标类型T,应重写该方法。如果无法进行转换,则应将validationErrorMessage设置为适当的消息,以指示转换失败。这用于提供验证错误消息以及可视的无效状态,以便用户知道设置该值的尝试失败。
protected virtual string FormatValueAsString(T value)
FormatValueAsString是TryParseValueFromString的反转。在简单的Value.ToString()不足以将T值转换回浏览器UI层的情况下,应重写此方法以正确执行任务。
Creating an InputColor component
首先,我们需要创建一个InputColor.razor文件。在该文件中,我们需要将InputBase<Color>指定为基类,并添加我们希望在HTML中呈现的标记。
@using System.Drawing@using System.Text.RegularExpressions@inherits InputBase<Color><input type="color" @attributes=AdditionalAttributes class=@CssClass @bind=CurrentValueAsString/>
为Color类添加了System.Drawing,并添加了System.Text.RegularExpressions以将hex代码中的输入解析为Color值。
我们要做的第一件事是实现FormatValueAsString。要实现这一点,我们只需将R、G和B值格式化为2位祸不单行值。
protected override string FormatValueAsString(Color value)=> $"#{value.R:x2}{value.G:x2}{value.B:x2}";
要将祸不单行字符串转换回颜色,我们首先需要将2个字符的祸不单行值转换为字节。
byte HexStringToByte(string hex){const string HexChars = "0123456789abcdef";hex = hex.ToLowerInvariant();int result = (HexChars.IndexOf(hex[0]) * 16) + HexChars.IndexOf(hex[1]);return (byte)result;}
接下来,我们需要实现TryParseValueAsString。
static Regex Regex = new Regex("^#([0-9a-f]{2}){3}$", RegexOptions.Compiled | RegexOptions.IgnoreCase);protected override bool TryParseValueFromString(string value, out Color result, out string validationErrorMessage){Match match = Regex.Match(value);if (!match.Success){validationErrorMessage = "Not a valid color code";result = Color.Red;return false;}byte r = HexStringToByte(match.Groups[1].Captures[0].Value);byte g = HexStringToByte(match.Groups[1].Captures[1].Value);byte b = HexStringToByte(match.Groups[1].Captures[2].Value);validationErrorMessage = null;result = Color.FromArgb(r, g, b);return true;}
代码使用正则表达式来确保值是6个hex字符格式的字符串,前面带有#字符。它捕获三组2位hex字符,并使用我们的HexStringToByte方法将它们转换为字节。最后,使用这些RGB值创建Color。
因为我们英国人喜欢单词colour拼写正确,所以我们真的应该向组件添加一个参数,以允许它的使用者在传递的值无效时指定要使用的自定义错误消息。添加[Parameter]属性。我们可以随心所欲地称呼它,但ParsingErrorMessage是Blazor中使用的标准名称。
[Parameter]public string ParsingErrorMessage { get; set; }
然后将TryParseValueFromString方法中设置validationErrorMessage的代码更改为使用该参数,而不是硬编码的错误消息。
if (!match.Success){validationErrorMessage = ParsingErrorMessage;result = Color.Red;return false;}
为了便于将颜色显示为文本,让我们重构FormatValueAsString方法以使用静态方法,这样我们就可以独立于InputColor的任何实例使用静电方法。
public static string ColorToString(Color value)=> $"#{value.R:x2}{value.G:x2}{value.B:x2}";protected override string FormatValueAsString(Color value)=> ColorToString(value);
我们的整个组件现在应该如下所示:
@using System.Drawing@using System.Text.RegularExpressions@inherits InputBase<Color><input type="color" @attributes=AdditionalAttributes class=@CssClass @bind=CurrentValueAsString/>@code {[Parameter] public string ParsingErrorMessage { get; set; }public static string ColorToString(Color value)=> $"#{value.R:x2}{value.G:x2}{value.B:x2}";protected override string FormatValueAsString(Color value)=> ColorToString(value);static Regex Regex = new Regex("^#([0-9a-f]{2}){3}$", RegexOptions.Compiled | RegexOptions.IgnoreCase);protected override bool TryParseValueFromString(string value, out Color result, out string validationErrorMessage){Match match = Regex.Match(value);if (!match.Success){validationErrorMessage = ParsingErrorMessage;result = Color.Red;return false;}byte r = HexStringToByte(match.Groups[1].Captures[0].Value);byte g = HexStringToByte(match.Groups[1].Captures[1].Value);byte b = HexStringToByte(match.Groups[1].Captures[2].Value);validationErrorMessage = null;result = Color.FromArgb(r, g, b);return true;}byte HexStringToByte(string hex){const string HexChars = "0123456789abcdef";hex = hex.ToLowerInvariant();int result = (HexChars.IndexOf(hex[0]) * 16) + HexChars.IndexOf(hex[1]);return (byte)result;}}
InputColor example
我们将制作一个简单的页面,让用户选择一个人最喜欢的颜色。
@page "/"@using System.Drawing<EditForm Model=CurrentPerson><InputColor @bind-Value=CurrentPerson.FavoriteColor/></EditForm>Favorite colour is @CurrentPerson.FavoriteColor<div style="width:100px;height:100px;background-color:@ColorAsHex"/>@code {Person CurrentPerson = new Person{FavoriteColor = Color.Green};string ColorAsHex => InputColor.ColorToString(CurrentPerson.FavoriteColor);class Person{public Color FavoriteColor { get; set; }}}
- Lines 19-22
创建EditForm将绑定到的类。
- Lines 12-15
创建此类的实例。
- Line 17
使用我们的静电InputColor.ColorToString将所选颜色转换为网络祸不单行颜色字符串。
- Line 9
创建具有内联样式的<div>元素,该元素将所选颜色显示为实心框。
- Line 4
创建EditForm,并将其Model绑定到页面的Person。
- Line 5
使用我们的InputColor组件,该组件将呈现一个type=color的HTML<input>元素,供用户交互。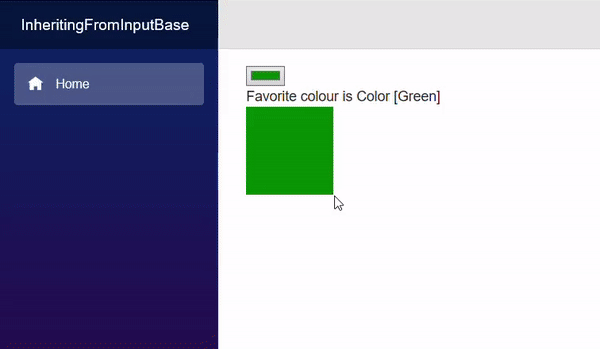

若有收获,就点个赞吧
0 人点赞
