本篇基于李建忠老师的《C++设计模式》课程,对设计模式进行再一次的深入理解,对应资源:
- 视频教程:https://www.bilibili.com/video/BV1c4411a7wk
- PPT与code:https://github.com/BarretRen/DesignPattern
1 设计模式总结
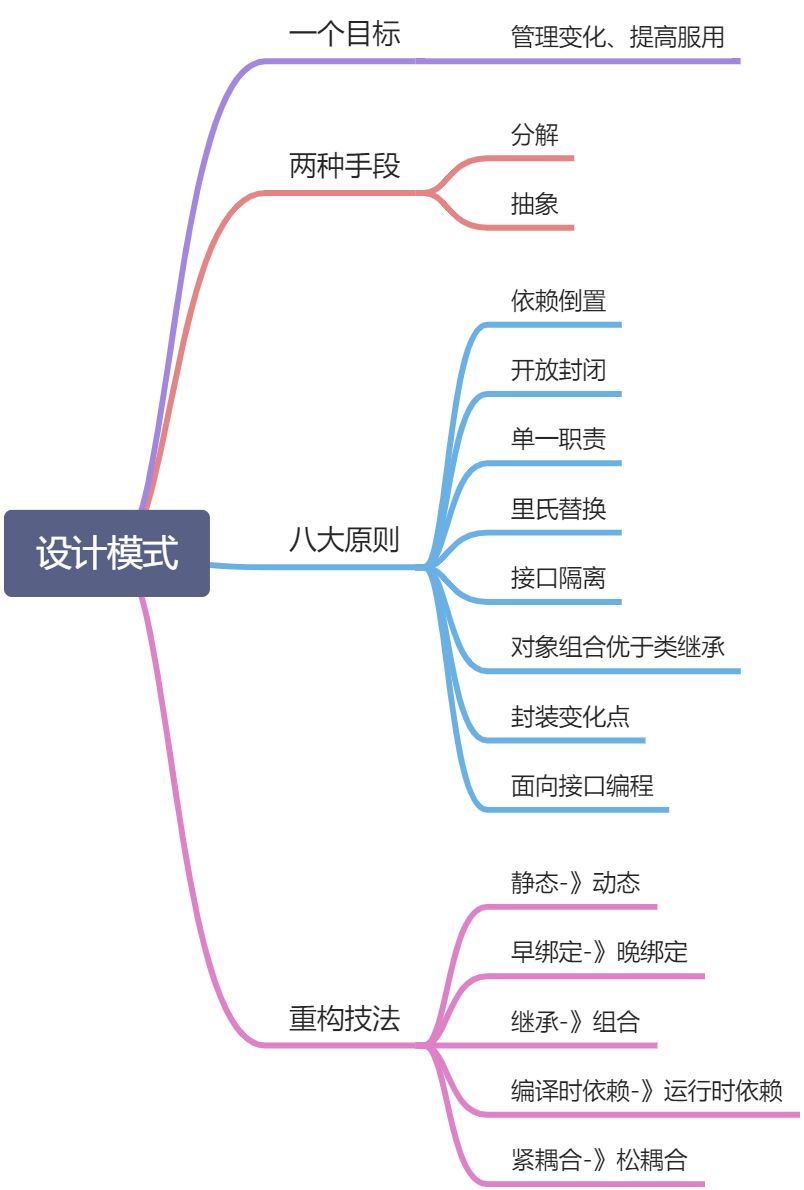
1.1 设计模式目标与手段
1.2 另一种分类方法
下图是设计模式的另一种分类,不同于经典的创建型、结构型和行为型分类: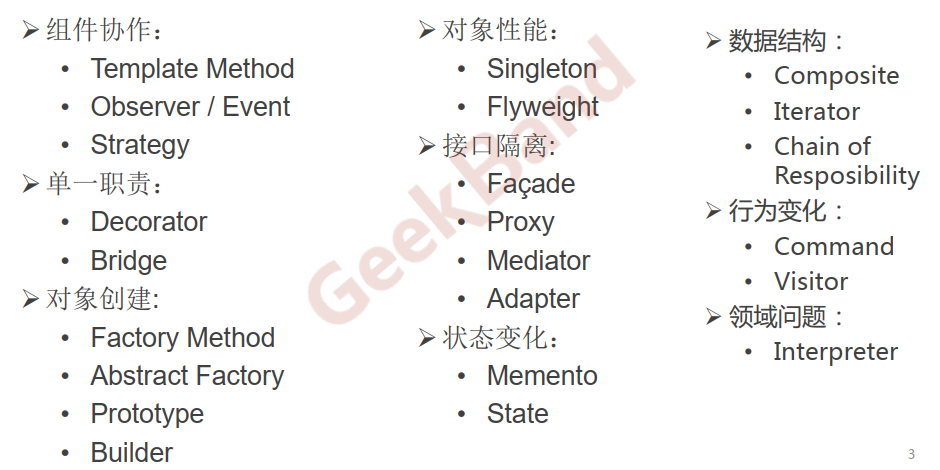
设计模式的应用不宜先入为主,一上来就使用设计模式是对设计模式的最大误用。没有一步到位的设计模式。敏捷软件开发实践提倡的“Refactoring to Patterns”是目前普遍公认的最好的使用设计模式的方法。2 组件协作
组件协作通过晚期绑定,来实现框架与应用程序之间的松耦合,是二者之间协作时常用的模式。2.1 模板方法
【定义】定义一个操作中的算法的骨架 (稳定的模板结构),而将一些步骤延迟(变化)到子类中(由子类实现virtual函数)。Template Method使得子类可以不改变(复用)一个算法的结构即可重定义(override 重写)该算法的某些特定步骤。
从定义看,对于模板方法来说,识别出稳定和变化的部分十分关键。
- 稳定的部分作为模板直接在基类中实现
- 变化的部分定义为virtual函数,由子类根据不同情况去实现
【类图结构】
【代码结构示例·算法多步骤问题】
class Library{public://稳定 template methodvoid Run(){Step1();if (Step2()) //֧支持变化-->虚函数的多态调用{Step3();}for (int i = 0; i < 4; i++){Step4(); //֧支持变化-->虚函数的多态调用}Step5();}virtual ~Library() {} //基类虚构函数要virtualprotected:void Step1(){ //稳定//.....}void Step3(){ //稳定//.....}void Step5(){ //稳定//.....}virtual bool Step2() = 0; //变化,交给子类实现virtual void Step4() = 0; //变化,交给子类实现};
2.2 策略模式
【定义】
定义一系列算法,把它们一个个封装起来,并且使它们可互相替换(变化)。该模式使得算法可独立于使用它的客户程序(稳定)而变化(扩展,子类化) 。
Strategy及其子类为组件提供了一系列可重用的算法,从而可以使得类型在运行时方便地根据需要在各个算法之间进行切换。含有许多条件判断语句的代码通常都需要Strategy模式。
【类图结构】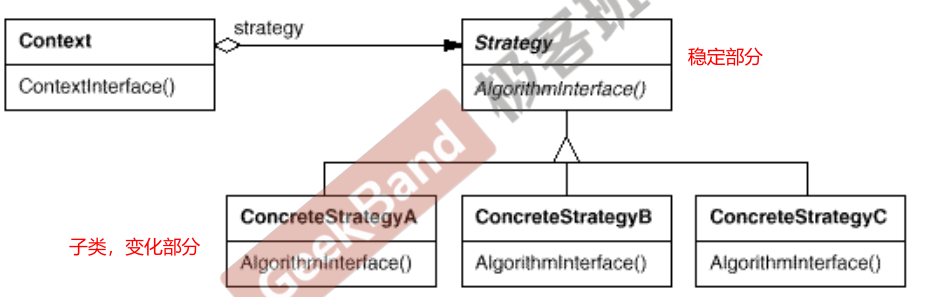
【代码结构示例·各国税率问题】
class Context;class TaxStrategy //基类{public:virtual double Calculate(const Context &context) = 0;virtual ~TaxStrategy() {}};class CNTax : public TaxStrategy{public:virtual double Calculate(const Context &context){//***********}};class USTax : public TaxStrategy{public:virtual double Calculate(const Context &context){//***********}};//扩展//*********************************class FRTax : public TaxStrategy{public:virtual double Calculate(const Context &context){//.........}};class SalesOrder{private:TaxStrategy *strategy;//基类指针,用于多态调用public:SalesOrder(StrategyFactory *strategyFactory){//赋值具体的子类对象this->strategy = strategyFactory->NewStrategy();}~SalesOrder(){delete this->strategy;}public:double CalculateTax(){//...Context context();double val = strategy->Calculate(context); //多态调用//...}};
2.3 观察者模式
【定义】
定义对象间的一种一对多(变化)的依赖关系,以便当一个对象(Subject)的状态发生改变时,所有依赖于它的对象都得到通知并自动更新。
目标发送通知时,无需指定观察者,通知(可以携带通知信息作为参数)会自动传播。
观察者自己决定是否需要订阅通知,目标对象对此一无所知。
【类图结构】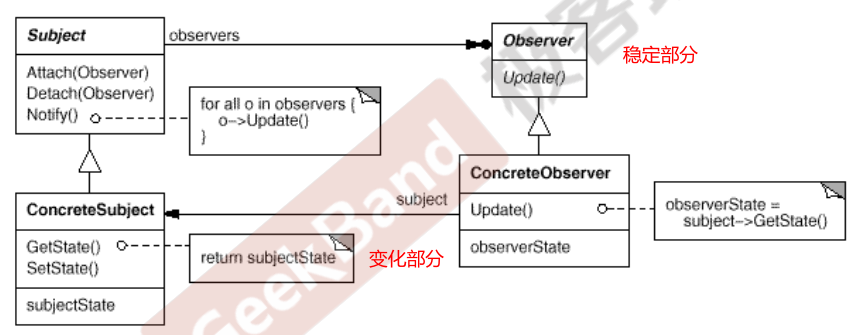
【代码结构示例·进度更新问题】
class IProgress //观察者基类{public:virtual void DoProgress(float value) = 0;virtual ~IProgress() {}};class FileSplitter{string m_filePath;int m_fileNumber;List<IProgress *> m_iprogressList; //抽象通知机制,观察者的核心public:FileSplitter(const string &filePath, int fileNumber) : m_filePath(filePath),m_fileNumber(fileNumber){}void split(){//1.读取大文件//...//2.分批次向小文件写入for (int i = 0; i < m_fileNumber; i++){//...float progressValue = m_fileNumber;progressValue = (i + 1) / progressValue;onProgress(progressValue); //更新进度}}void addIProgress(IProgress *iprogress){m_iprogressList.push_back(iprogress);}void removeIProgress(IProgress *iprogress){m_iprogressList.remove(iprogress);}protected:virtual void onProgress(float value){List<IProgress *>::iterator itor = m_iprogressList.begin();while (itor != m_iprogressList.end()){(*itor)->DoProgress(value);itor++;}}};
3 单一职责
在软件组件的设计中,如果责任划分的不清晰,使用继承得到的结果往往是随着需求的变化,子类急剧膨胀,同时充斥着重复代码,这时候的关键是划清责任。
3.1 装饰器模式
【定义】
动态(组合)地给一个对象增加一些额外的职责。就增加功能而言,Decorator模式比生成子类(继承)更为灵活(消除重复代码 & 减少子类个数)。
Decorator模式实现了在运行时动态扩展对象功能的能力,而且可以根据需要扩展多个功能。避免了使用继承带来的“灵活性差”和“多子类衍生问题” 。
装饰器模式的要点在于解决“主体类在多个方向上的扩展功能”。
【类图结构】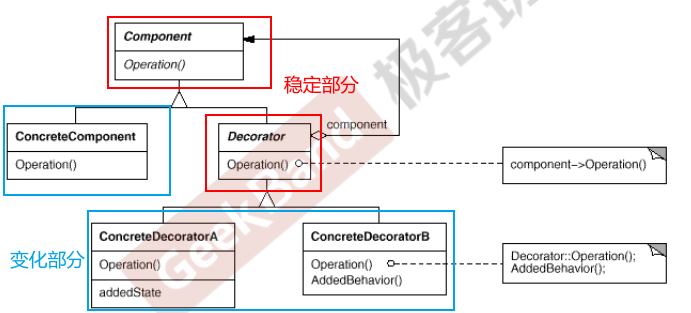
【代码结构示例·数据流加密问题】
//业务操作class Stream{public:virtual char Read(int number) = 0;virtual void Seek(int position) = 0;virtual void Write(char data) = 0;virtual ~Stream() {}};//主体类class FileStream : public Stream{public:virtual char Read(int number){//读文件流}virtual void Seek(int position){//定位文件流}virtual void Write(char data){//写文件流}};class NetworkStream : public Stream{public:virtual char Read(int number){//读网络流}virtual void Seek(int position){//定位网络流}virtual void Write(char data){//写网络流}};//用装饰器类扩展流的操作class DecoratorStream : public Stream //装饰器基类{protected:Stream *stream; //组合代替继承,该模式的核心DecoratorStream(Stream *stm) : stream(stm){}};class CryptoStream : public DecoratorStream{public:CryptoStream(Stream *stm) : DecoratorStream(stm){}virtual char Read(int number){//额外的加密操作...stream->Read(number); //读文件流}virtual void Seek(int position){//额外的加密操作...stream->Seek(position); //定位文件流//额外的加密操作...}virtual void Write(byte data){//额外的加密操作...stream->Write(data); //写文件流//额外的加密操作...}};class BufferedStream : public DecoratorStream{Stream *stream; //...public:BufferedStream(Stream *stm) : DecoratorStream(stm){}//...};void Process(){//运行时装配FileStream *s1 = new FileStream();CryptoStream *s2 = new CryptoStream(s1);//加密流BufferedStream *s3 = new BufferedStream(s1);//缓存流BufferedStream *s4 = new BufferedStream(s2);//加密缓存流,不同的装饰器进行组合装载}
3.2 桥模式
【定义】
将抽象部分(业务功能)与实现部分(平台实现)分离,使它们都可以独立地变化。
Bridge模式的应用一般在“两个非常强的变化维度”,将两个方向上的变化分离开来(两个类),利用组合(抽象指针)再装载再一起完成功能。
【类图结构】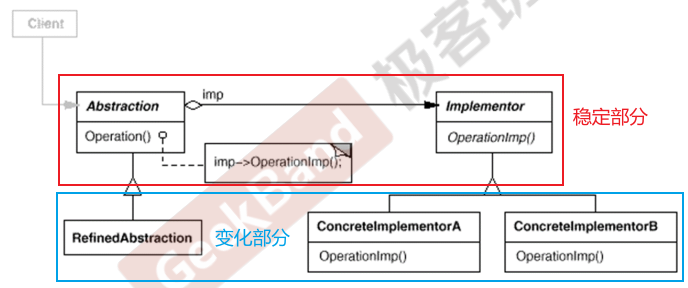
【代码结构示例·各平台messager问题】
//不同的变化方向,分成不同的类:Messager和MessagerImpclass Messager{protected:MessagerImp *messagerImp; //运行时再确定public:virtual void Login(string username, string password) = 0;virtual void SendMessage(string message) = 0;virtual void SendPicture(Image image) = 0;virtual ~Messager() {}};class MessagerImp{public:virtual void PlaySound() = 0;virtual void DrawShape() = 0;virtual void WriteText() = 0;virtual void Connect() = 0;virtual ~MessagerImp() {}};//PC平台实现class PCMessagerImp : public MessagerImp{public:virtual void PlaySound(){//**********}virtual void DrawShape(){//**********}virtual void WriteText(){//**********}virtual void Connect(){//**********}};//移动平台实现class MobileMessagerImp : public MessagerImp{public:virtual void PlaySound(){//==========}virtual void DrawShape(){//==========}virtual void WriteText(){//==========}virtual void Connect(){//==========}};//业务抽象//类的数目:1+n+mclass MessagerLite : public Messager{public:virtual void Login(string username, string password){messagerImp->Connect();//........}virtual void SendMessage(string message){messagerImp->WriteText();//........}virtual void SendPicture(Image image){messagerImp->DrawShape();//........}};class MessagerPerfect : public Messager{public:virtual void Login(string username, string password){messagerImp->PlaySound();//********messagerImp->Connect();//........}virtual void SendMessage(string message){messagerImp->PlaySound();//********messagerImp->WriteText();//........}virtual void SendPicture(Image image){messagerImp->PlaySound();//********messagerImp->DrawShape();//........}};void Process(){//运行时装配MessagerImp *mImp = new PCMessagerImp();Messager *m = new Messager(mImp);}
4 对象创建
绕开new,来避免对象创建(new)过程中所导致的紧耦合(依赖具体类),从而支持对象创建的稳定。
4.1 工厂模式
【定义】
定义一个用于创建对象的接口(工厂基类),让子类(具体工厂子类)决定实例化哪一个类。Factory Method使得一个类的实例化延迟(目的:解耦,手段:虚函数)到子类。
工厂模式用于隔离类对象的使用者和具体类型之间的耦合关系。 工厂模式解决的是“单个对象”的需求变化,缺点是要求创建方法/参数相同。
【类图结构】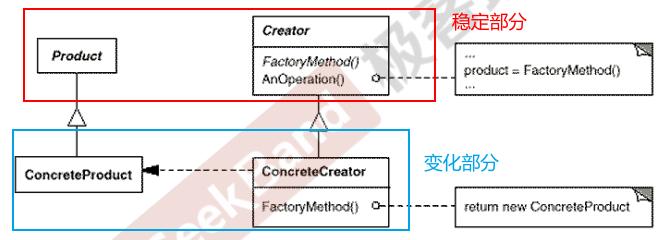
【代码结构示例·生成多类型子类对象】
//抽象类class ISplitter{public:virtual void split() = 0;virtual ~ISplitter() {}};//工厂基类class SplitterFactory{public:virtual ISplitter *CreateSplitter() = 0;virtual ~SplitterFactory() {}};//具体类class BinarySplitter : public ISplitter{};class TxtSplitter : public ISplitter{};//具体工厂class BinarySplitterFactory : public SplitterFactory{public:virtual ISplitter *CreateSplitter(){return new BinarySplitter();}};class TxtSplitterFactory : public SplitterFactory{public:virtual ISplitter *CreateSplitter(){return new TxtSplitter();}};//在使用时,可以直接指定具体的工厂子类,继而获取需要的对象class MainForm : public Form{SplitterFactory *factory; //工厂public:MainForm(SplitterFactory *factory){this->factory = factory;}void Button1_Click(){ISplitter *splitter = factory->CreateSplitter(); //多态newsplitter->split();}};
4.2 抽象工厂
【定义】
提供一个接口,让该接口负责创建“一系列相关或者相互依赖的对象”,无需指定它们具体的类。
“系列对象”指的是在某一特定系列下的对象之间有相互依赖、或作用的关系。
抽象工厂(或者叫家族工厂更贴切)主要在于应对“新系列”的需求变动。其缺点在于难以应对“新对象”的需求变动。
【类图结构】
【代码结构示例·多数据库连接器】**
//数据库访问有关的基类class IDBConnection{};class IDBCommand{};class IDataReader{};//一个统一的工厂类,可以创建多个对象class IDBFactory{public:virtual IDBConnection *CreateDBConnection() = 0;virtual IDBCommand *CreateDBCommand() = 0;virtual IDataReader *CreateDataReader() = 0;};//支持SQL Serverclass SqlConnection : public IDBConnection{};class SqlCommand : public IDBCommand{};class SqlDataReader : public IDataReader{};class SqlDBFactory : public IDBFactory{public:virtual IDBConnection *CreateDBConnection() = 0;virtual IDBCommand *CreateDBCommand() = 0;virtual IDataReader *CreateDataReader() = 0;};//支持Oracleclass OracleConnection : public IDBConnection{};class OracleCommand : public IDBCommand{};class OracleDataReader : public IDataReader{};class OracleBFactory : public IDBFactory{public:virtual IDBConnection *CreateDBConnection() = 0;virtual IDBCommand *CreateDBCommand() = 0;virtual IDataReader *CreateDataReader() = 0;};class EmployeeDAO{IDBFactory *dbFactory;public:vector<EmployeeDO> GetEmployees(){IDBConnection *connection = dbFactory->CreateDBConnection();connection->ConnectionString("...");IDBCommand *command = dbFactory->CreateDBCommand();command->CommandText("...");command->SetConnection(connection); //关联性IDBDataReader *reader = command->ExecuteReader(); //关联性while (reader->Read()){}}};
4.3 原型模式
【定义】
使用原型实例指定创建对象的种类,然后通过拷贝构造这些原型来创建新的对象。
【类图结构】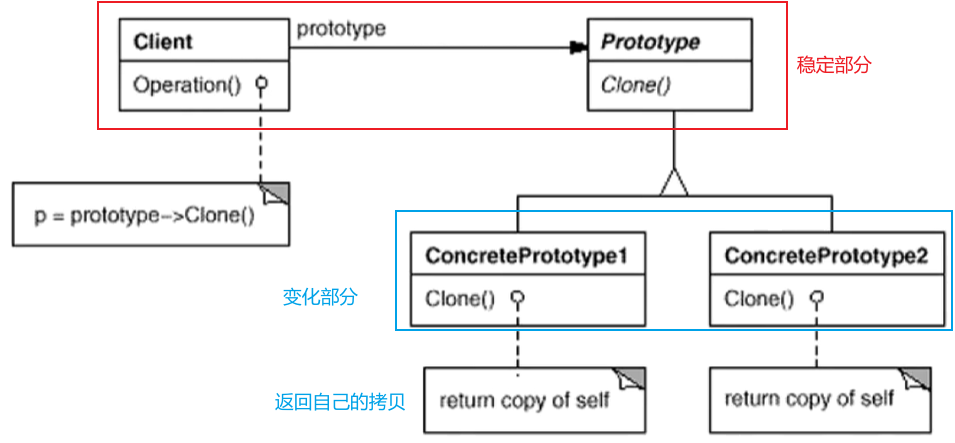
【代码结构示例】
//抽象类class ISplitter{public:virtual void split() = 0;//通过克隆自己来创建对象,不需要单独的工厂类virtual ISplitter *clone() = 0;virtual ~ISplitter() {}};//具体类class BinarySplitter : public ISplitter{public:virtual ISplitter *clone(){return new BinarySplitter(*this);//需要拷贝构造函数正确实现}};class TxtSplitter : public ISplitter{public:virtual ISplitter *clone(){return new TxtSplitter(*this);}};//clientclass MainForm : public Form{ISplitter *prototype; //原型对象public:MainForm(ISplitter *prototype){this->prototype = prototype;}void Button1_Click(){ISplitter *splitter = prototype->clone(); //克隆原型splitter->split();}};
4.4 构建器模式
【定义】
将一个复杂对象的构建与其表示相分离,使得同样的构建过程(稳定)可以创建不同的表示(变化) 。
其基本思路(步骤顺序不变,步骤内容在变)是:
- 将构建的步骤过程从实际的Product中分离
- 将构建的各个步骤放在Builder中,子类继承去实现步骤的不同内容
- 将构建的步骤顺序放在Director中,这个顺序一般是不会变化的。
Builder模式主要在于应对“复杂对象各个部分”的频繁需求变动,其缺点在于难以应对“分步骤构建算法”的需求变动。
【类图结构】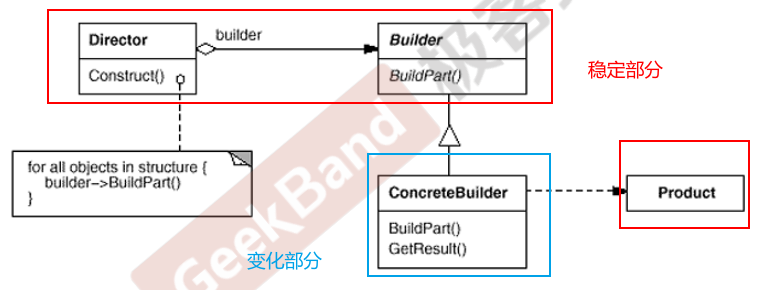
【代码结构示例·建造房子问题】
class House{//....};class HouseBuilder{public:House *GetResult()//返回一个House对象{return pHouse;}virtual ~HouseBuilder() {}protected:House *pHouse;virtual void BuildPart1() = 0;virtual void BuildPart2() = 0;virtual void BuildPart3() = 0;virtual void BuildPart4() = 0;virtual void BuildPart5() = 0;};//稳定的部分class HouseDirector{public:HouseBuilder *pHouseBuilder;HouseDirector(HouseBuilder *pHouseBuilder)//注入实际的子类对象{this->pHouseBuilder = pHouseBuilder;}House *Construct()//按照确定的顺序执行构建过程{pHouseBuilder->BuildPart1();for (int i = 0; i < 4; i++){pHouseBuilder->BuildPart2();}bool flag = pHouseBuilder->BuildPart3();if (flag){pHouseBuilder->BuildPart4();}pHouseBuilder->BuildPart5();return pHouseBuilder->GetResult();}};//子类继承,自定义构建的步骤class StoneHouseBuilder : public HouseBuilder{protected:virtual void BuildPart1(){//pHouse->Part1 = ...;}virtual void BuildPart2(){}virtual void BuildPart3(){}virtual void BuildPart4(){}virtual void BuildPart5(){}};
5 对象性能
5.1 单例模式
【定义】
保证一个类仅有一个实例,并提供一个接口函数返回唯一的对象
【类图结构】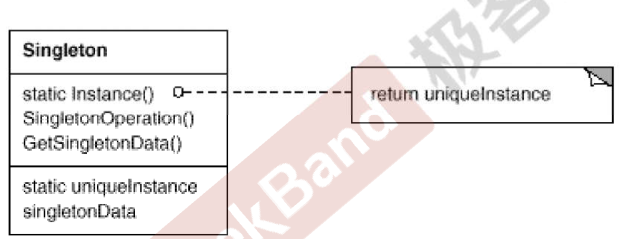
【代码结构示例】
class Singleton{private://构造函数和拷贝构造函数私有Singleton();Singleton(const Singleton &other);static Singleton *m_instance;public:static Singleton *getInstance();};Singleton *Singleton::m_instance = nullptr;//线程非安全版本Singleton *Singleton::getInstance(){if (m_instance == nullptr){m_instance = new Singleton();}return m_instance;}//线程安全版本,但读操作太多,锁的代价过高Singleton *Singleton::getInstance(){//lock加锁if (m_instance == nullptr){m_instance = new Singleton();}//unlock解锁return m_instance;}//双检查锁,但由于编译乱序会导致双检查锁失效Singleton *Singleton::getInstance(){if (m_instance == nullptr){//lock加锁if (m_instance == nullptr){m_instance = new Singleton();}//unlock解锁}return m_instance;}//C++ 11版本之后的跨平台实现,内存栅栏std::atomic<Singleton *> Singleton::m_instance;std::mutex Singleton::m_mutex;Singleton *Singleton::getInstance(){Singleton *tmp = m_instance.load(std::memory_order_relaxed);std::atomic_thread_fence(std::memory_order_acquire); //获取内存fenceif (tmp == nullptr){std::lock_guard<std::mutex> lock(m_mutex); //加锁,lock_guard会自动解锁tmp = m_instance.load(std::memory_order_relaxed);if (tmp == nullptr){tmp = new Singleton;std::atomic_thread_fence(std::memory_order_release); //释放内存fencem_instance.store(tmp, std::memory_order_relaxed); //保存到m_instance中}}return tmp;}

5.2 FlyWeight对象池
【定义】
运用共享技术(对象池)有效地支持大量细粒度的对象
【类图结构】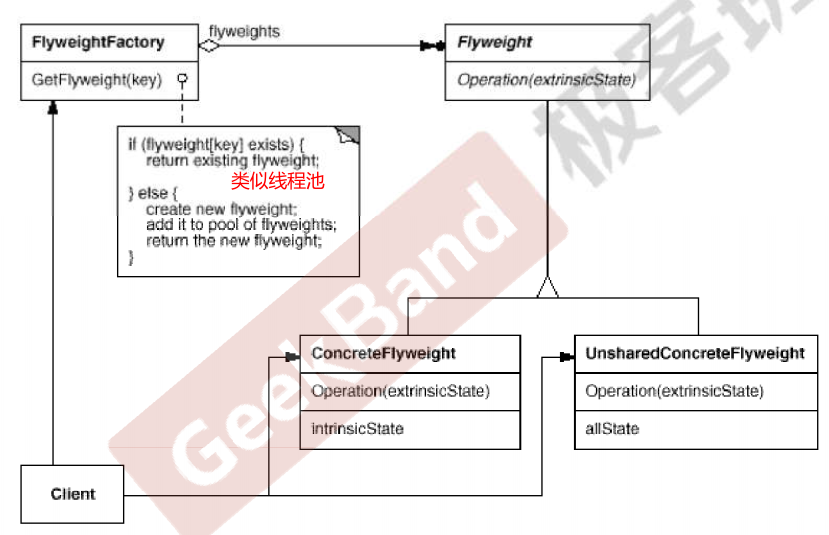
【代码结构示例·字体对象】
class Font
{
private:
    //unique object key,用于查找指定对象
    string key;
    //object state
    //....

public:
    Font(const string &key)
    {
        //...
    }
};

class FontFactory
{
private:
    map<string, Font *> fontPool; //对象池
public:
    Font *GetFont(const string &key)
    {
        map<string, Font *>::iterator item = fontPool.find(key);
        if (item != footPool.end())
        {
            return fontPool[key];//对象池存在,直接返回
        }
        else
        {//找不到对象,创建新对象返回
            Font *font = new Font(key);
            fontPool[key] = font;
            return font;
        }
    }

    void clear()
    {
        //...
    }
};
6 接口隔离
6.1 门面模式
【定义】
为子系统中的一组接口提供一个一致稳定的高层接口,这个接口使得这一子系统更加容易被复用
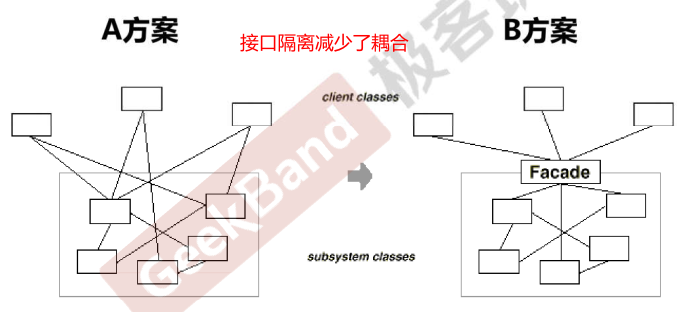
门面模式更注重从架构层次去看整个系统,而不是单个类的层次。
【类图结构】
6.2 Proxy模式
【定义】
为其他对象提供一种代理以控制(隔离、使用接口)对这个对象的访问。
【类图结构】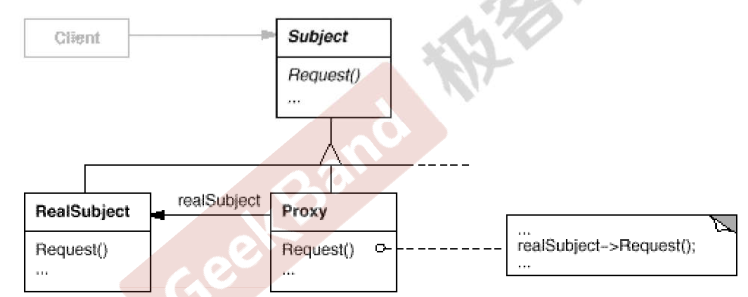
【代码结构示例】
class ISubject
{
public:
    virtual void process();
};

//Proxy的设计
class SubjectProxy : public ISubject
{
public:
    virtual void process()
    {
        //对RealSubject的一种间接访问
        //....很多操作
    }
};

class ClientApp
{
private:
    ISubject *subject;

public:
    ClientApp()
    {
        subject = new SubjectProxy();
    }

    void DoTask()
    {
        //...
        subject->process();
        //....
    }
};
6.3 适配器
【定义】
将一个类的接口转换成用户希望另一个接口,使得原本由于接口不兼容二不能一起工作的类可以协调工作。
适配器模式主要用于服用一些现存的类,使接口兼容新的要求。分为对象适配器和类适配器,推荐使用对象适配器。
【类图结构】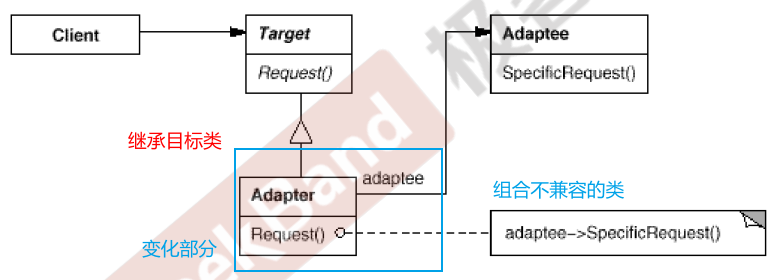
【代码结构示例】
//目标接口(新接口)
class ITarget
{
public:
    virtual void process() = 0;
};

//遗留接口(老接口)
class IAdaptee
{
public:
    virtual void foo(int data) = 0;
    virtual int bar() = 0;
};

//遗留类
class OldClass : public IAdaptee
{
    //....
};

//对象适配器
class Adapter : public ITarget //继承目标类
{
protected:
    IAdaptee *pAdaptee; //组合遗留不兼容类

public:
    Adapter(IAdaptee *pAdaptee)
    {
        this->pAdaptee = pAdaptee;
    }

    virtual void process()
    { //兼容转换代码部分
        int data = pAdaptee->bar();
        pAdaptee->foo(data);
    }
};

int main()
{
    IAdaptee *pAdaptee = new OldClass();

    ITarget *pTarget = new Adapter(pAdaptee);
    pTarget->process();
}

//另一种:类适配器
class Adapter : public ITarget,
                protected OldClass
{
    //多继承,重载类方法
};
6.4 mediator中介者
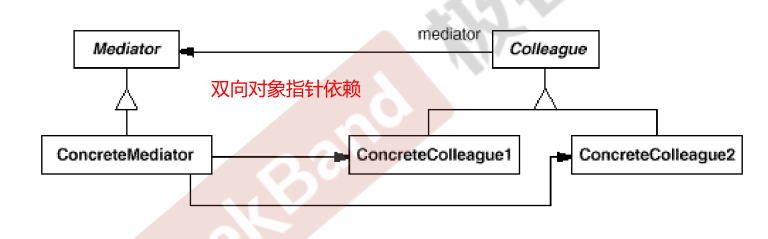
【定义】
用一个中介对象来封装(封装变化)一系列的对象交互。中介者使个对象不需要现实的相互引用(编译时依赖->运行时依赖),从而使其松耦合,并且可以独立的改变他们之间的交互。
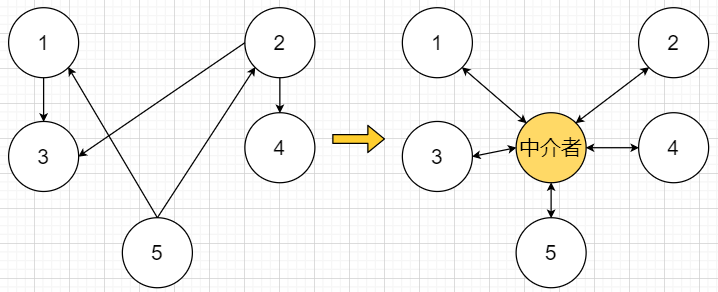
中介者模式是将对各对象的控制逻辑进行集中管理,简化了系统的维护。
- 门面模式是解耦系统内和系统外(单向)的关联关系
- 中介者模式是解耦系统内各个对象之间(双向)的关联关系
7 状态变化
7.1 状态机
【定义】
允许一个对象在其内部状态改变时改变它的行为,从而使对象看起来似乎修改了其行为。
【类图结构】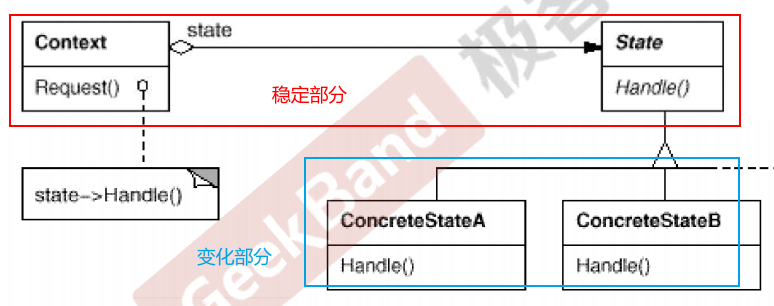
【代码结构示例`文件打开关闭状态】
class NetworkState
{
public:
    NetworkState *pNext;
    virtual void Operation1() = 0;
    virtual void Operation2() = 0;
    virtual void Operation3() = 0;

    virtual ~NetworkState() {}
};

class OpenState : public NetworkState
{
    static NetworkState *m_instance;

public:
    static NetworkState *getInstance()
    {
        if (m_instance == nullptr)
        {
            m_instance = new OpenState();
        }
        return m_instance;
    }

    void Operation1()
    {
        //**********
        pNext = CloseState::getInstance();
    }

    void Operation2()
    {
        //..........
        pNext = ConnectState::getInstance();
    }

    void Operation3()
    {
        //$$$$$$$$$$
        pNext = OpenState::getInstance();
    }
};

class CloseState : public NetworkState
{
};

class NetworkProcessor
{
    NetworkState *pState;

public:
    NetworkProcessor(NetworkState *pState)
    {
        this->pState = pState;
    }

    void Operation1()
    {
        //...
        pState->Operation1();
        pState = pState->pNext;
        //...
    }

    void Operation2()
    {
        //...
        pState->Operation2();
        pState = pState->pNext;
        //...
    }

    void Operation3()
    {
        //...
        pState->Operation3();
        pState = pState->pNext;
        //...
    }
};
7.2 memento备忘录
【定义】
在不破坏封装性的前提下,捕获一个对象的内部状态,并在该对象之外保存这个状态(备份),这样在以后就可以将该对象恢复到原先保存的状态
在今天,对象序列化技术更加高级有效,可以代替备忘录模式
【类图结构】
【代码结构示例】
//备忘录类
class Memento
{
private:
    string state;
public:
    Memento(const string &s) : state(s) {}
    string getState() const { return state; }
    void setState(const string &s) { state = s; }
};

class Originator
{
private:
    string state;
public:
    Originator() {}
    Memento createMomento()
    {
        Memento m(state);
        return m;
    }
    void setMomento(const Memento &m)
    {
        state = m.getState();
    }
};

int main()
{
    Originator orginator;
    //捕获对象状态,存储到备忘录
    Memento mem = orginator.createMomento();
    //... 改变orginator状态
    //从备忘录中恢复
    orginator.setMomento(mem);
}
8 数据结构
将组件内部特定的数据结构封装,在外部提供统一的接口,来实现与特定数据结构无关的访问
8.1 组合模式
【定义】
将对象组合成树形结构以表示“部分-整体”的层次结构。组合对象使得用户对单个对象和组合对象的使用具有一致性(稳定)
组合模式将一对多的关系转化为一对一的关系,使得客户代码无需关系单个对象还是组合的对象容器
【类图结构】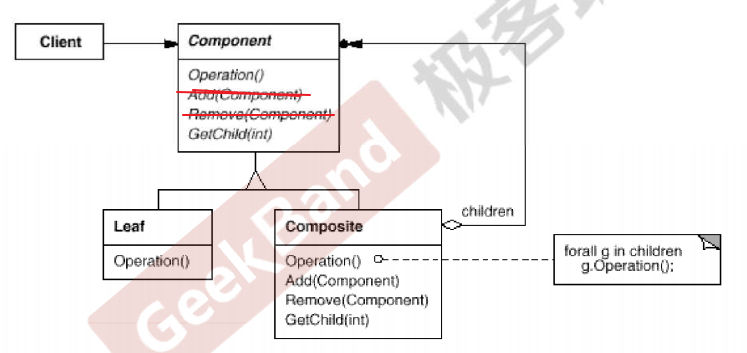
【代码结构示例·树和叶子】
#include <iostream>
#include <list>
#include <string>
#include <algorithm>

using namespace std;

class Component
{
public:
    virtual void process() = 0;
    virtual ~Component() {}
};

//树节点
class Composite : public Component
{
private:
    string name;
    list<Component *> elements;

public:
    Composite(const string &s) : name(s) {}

    void add(Component *element)
    {
        elements.push_back(element);
    }
    void remove(Component *element)
    {
        elements.remove(element);
    }
    void process()
    {
        //1. process current node
        //2. process leaf nodes
        for (auto &e : elements)
            e->process(); //多态调用
    }
};

//叶子节点
class Leaf : public Component
{
private:
    string name;

public:
    Leaf(string s) : name(s) {}

    void process()
    {
        //process current node
    }
};

void Invoke(Component &c)
{
    //...
    c.process();
    //...
}

int main()
{
    Composite root("root");
    Composite treeNode1("treeNode1");
    Composite treeNode2("treeNode2");
    Composite treeNode3("treeNode3");
    Composite treeNode4("treeNode4");
    Leaf leat1("left1");
    Leaf leat2("left2");

    root.add(&treeNode1);
    treeNode1.add(&treeNode2);
    treeNode2.add(&leaf1);

    root.add(&treeNode3);
    treeNode3.add(&treeNode4);
    treeNode4.add(&leaf2);

    Invoke(root);
    Invoke(leaf2);
    Invoke(treeNode3);
}
8.2 迭代器
【定义】
提供一种方法顺序访问一个聚合对象中的各个元素,又不暴露该对象的内部表示
【类图结构】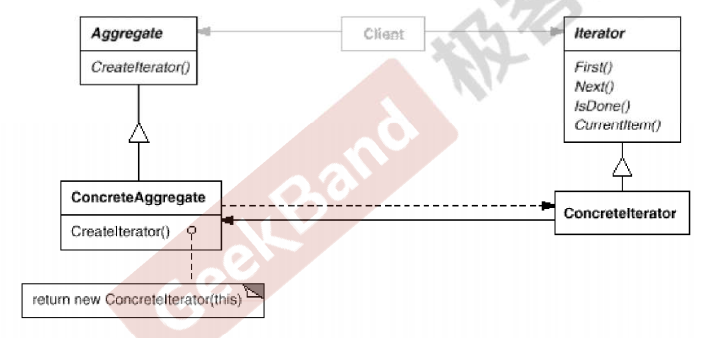
【代码结构示例】
//这种实现已经过时了
template <typename T>
class Iterator
{
public:
virtual void first() = 0;
virtual void next() = 0;
virtual bool isDone() const = 0;
virtual T ¤t() = 0;
};
template <typename T>
class MyCollection
{
public:
Iterator<T>* GetIterator()
{
return new CollectionIterator<T>(this);
}
};
template <typename T>
class CollectionIterator : public Iterator<T>
{
private:
MyCollection<T> mc;
public:
CollectionIterator(const MyCollection<T> &c) : mc(c) {}
void first() override
{
}
void next() override
{
}
bool isDone() const override
{
}
T ¤t() override
{
}
};
int main()
{
MyCollection<int> mc;
Iterator<int>* iter = mc.GetIterator();
//虚函数运行时多态,耗时
for (*iter.first(); !*iter.isDone(); *iter.next())
{
cout << *iter.current() << endl;
}
}
8.3 责任链
【定义】
将多个对象连成一条链路(链表),并沿着这个链路传递请求,直到有一个对象处理它为止
两个主要函数需要不同的子类实现:
- 当前对象释放可以处理消息
- 处理请求消息
【类图结构】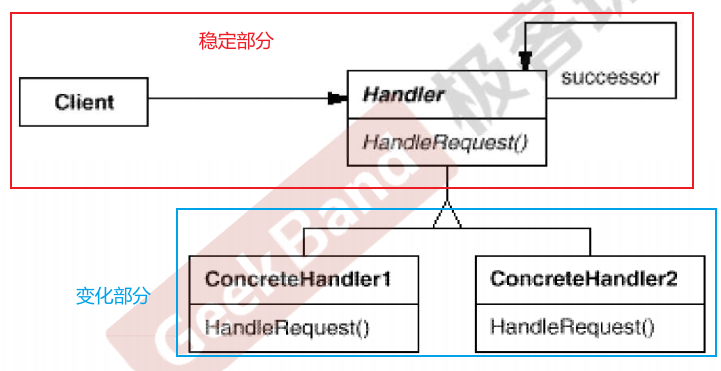
【代码结构示例·消息处理】
#include <iostream>
#include <string>

using namespace std;

enum class RequestType
{
    REQ_HANDLER1,
    REQ_HANDLER2
};
//消息请求类
class Reqest
{
private:
    string description;
    RequestType reqType;
public:
    Reqest(const string &desc, RequestType type) : description(desc), reqType(type) {}
    RequestType getReqType() const { return reqType; }
    const string &getDescription() const { return description; }
};

class ChainHandler
{
private:
    ChainHandler *nextChain;//处理请求的对象链表
    void sendReqestToNextHandler(const Reqest &req)
    {//发生请求到下一节点
        if (nextChain != nullptr)
            nextChain->handle(req);
    }
protected:
    //当前对象释放可以处理请求
    virtual bool canHandleRequest(const Reqest &req) = 0;
    virtual void processRequest(const Reqest &req) = 0;

public:
    ChainHandler() { nextChain = nullptr; }
    void setNextChain(ChainHandler *next) { nextChain = next; }
    void handle(const Reqest &req)
    {
        if (canHandleRequest(req))
            processRequest(req);
        else
            sendReqestToNextHandler(req);
    }
};
//子类实现两个虚函数
class Handler1 : public ChainHandler
{
protected:
    bool canHandleRequest(const Reqest &req) override
    {
        return req.getReqType() == RequestType::REQ_HANDLER1;
    }
    void processRequest(const Reqest &req) override
    {
        cout << "Handler1 is handle reqest: " << req.getDescription() << endl;
    }
};
class Handler2 : public ChainHandler
{
protected:
    bool canHandleRequest(const Reqest &req) override
    {
        return req.getReqType() == RequestType::REQ_HANDLER2;
    }
    void processRequest(const Reqest &req) override
    {
        cout << "Handler2 is handle reqest: " << req.getDescription() << endl;
    }
};

int main()
{
    Handler1 h1;
    Handler2 h2;
    h1.setNextChain(&h2);

    Reqest req("process task ... ", RequestType::REQ_HANDLER2);
    h1.handle(req);
    return 0;
}
9 行为变化
9.1 命令模式
【定义】
将一个请求封装成一个对象,使你可以用不同的请求对客户进行参数化、对请求排队或记录请求日志,以及支持可撤销操作
命令模式将行为抽象成对象,和C++函数对象(应用更广)有些类似。
【类图结构】
【代码结构示例·宏命令请求】
#include <iostream>
#include <vector>
#include <string>
using namespace std;

class Command
{
public:
    virtual void execute() = 0;
};
//请求类,可以填充各种信息参数
class ConcreteCommand1 : public Command
{
private:
    string arg;

public:
    ConcreteCommand1(const string &a) : arg(a) {}
    void execute() override
    {
        cout << "#1 process..." << arg << endl;
    }
};

class ConcreteCommand2 : public Command
{
private:
    string arg;

public:
    ConcreteCommand2(const string &a) : arg(a) {}
    void execute() override
    {
        cout << "#2 process..." << arg << endl;
    }
};

class MacroCommand : public Command
{
private:
    vector<Command *> commands;//多个命令组合成宏

public:
    void addCommand(Command *c) { commands.push_back(c); }
    void execute() override
    {
        for (auto &c : commands)
        {
            c->execute();
        }
    }
};

int main()
{
    ConcreteCommand1 command1(receiver, "Arg ###");
    ConcreteCommand2 command2(receiver, "Arg $$$");

    MacroCommand macro;
    macro.addCommand(&command1);
    macro.addCommand(&command2);

    macro.execute();
}
9.2 访问者
【定义】
表示一个作用于某类结构中各元素的操作,可以在不修改类(稳定)的前提下扩展作用域这些类元素的新操作(变化)
解决从基类到子类需要依次添加新函数的问题,避免沉重的变更负担,使用双重分发为类的各层次子类添加新的操作。Visitor模式的缺点是:Element类和子类结构不能改变,需要稳定。
【类图结构】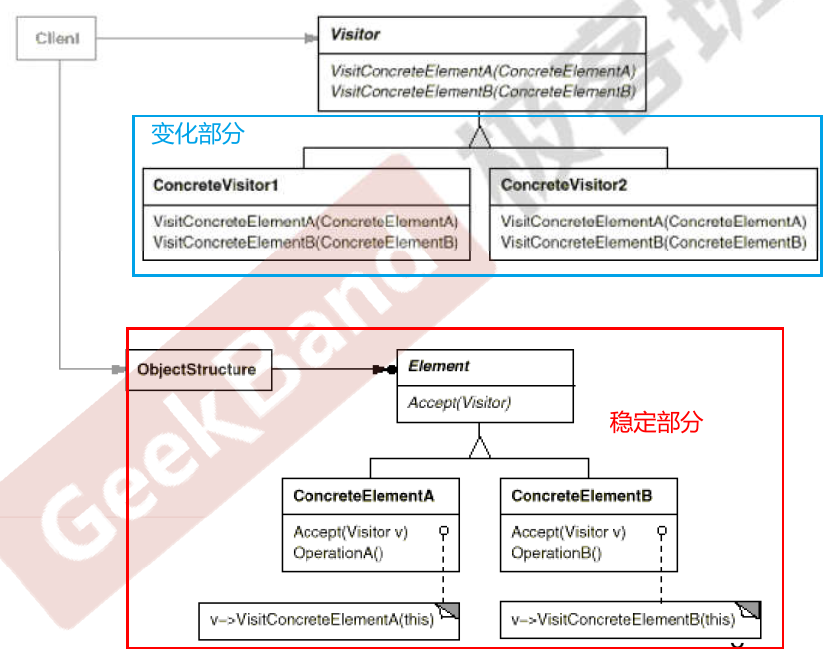
【代码结构示例】
#include <iostream>
using namespace std;

class Visitor;

class Element
{
public:
    virtual void accept(Visitor &visitor) = 0; //第一次多态辨析

    virtual ~Element() {}
};

class ElementA : public Element
{
public:
    void accept(Visitor &visitor) override
    {
        visitor.visitElementA(*this);
    }
};

class ElementB : public Element
{
public:
    void accept(Visitor &visitor) override
    {
        visitor.visitElementB(*this); //第二次多态辨析
    }
};
//=======上面的基类和子类不改变,由Visitor来添加新的处理===
class Visitor
{
public:
    virtual void visitElementA(ElementA &element) = 0;
    virtual void visitElementB(ElementB &element) = 0;

    virtual ~Visitor() {}
};
//扩展1,添加新的处理
class Visitor1 : public Visitor
{
public:
    void visitElementA(ElementA &element) override
    {
        cout << "Visitor1 is processing ElementA" << endl;
    }

    void visitElementB(ElementB &element) override
    {
        cout << "Visitor1 is processing ElementB" << endl;
    }
};
//扩展2,添加新的处理
class Visitor2 : public Visitor
{
public:
    void visitElementA(ElementA &element) override
    {
        cout << "Visitor2 is processing ElementA" << endl;
    }

    void visitElementB(ElementB &element) override
    {
        cout << "Visitor2 is processing ElementB" << endl;
    }
};

int main()
{
    Visitor2 visitor;
    ElementB elementB;
    elementB.accept(visitor); //两次多态辨析

    ElementA elementA;
    elementA.accept(visitor);//两次多态辨析

    return 0;
}
10 领域规则
结合特定领域,将问题抽象为语法规则,从而给出该领域下的一般性解决方案
10.1 interpreter解析器
【定义】
给定一个语言,定义它的文法表示,并定义一种解释器,这个解释器使用该表示来解释语言中的句子
【类图结构】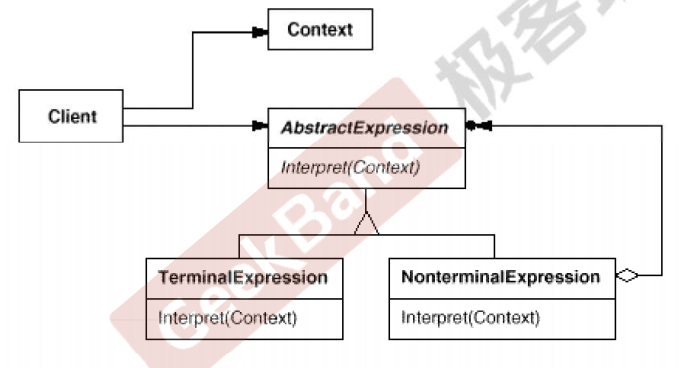
【代码结构示例·计算器】
#include <iostream>
#include <map>
#include <stack>

using namespace std;

class Expression
{
public:
    virtual int interpreter(map<char, int> var) = 0;
    virtual ~Expression() {}
};

//变量表达式
class VarExpression : public Expression
{
private:
    char key;

public:
    VarExpression(const char &key)
    {
        this->key = key;
    }

    int interpreter(map<char, int> var) override
    {
        return var[key];
    }
};
//符号表达式
class SymbolExpression : public Expression
{
    // 运算符左右两个参数
protected:
    Expression *left;
    Expression *right;

public:
    SymbolExpression(Expression *left, Expression *right) : left(left), right(right)
    {
    }
};
//加法运算
class AddExpression : public SymbolExpression
{
public:
    AddExpression(Expression *left, Expression *right) : SymbolExpression(left, right)
    {
    }
    int interpreter(map<char, int> var) override
    {
        return left->interpreter(var) + right->interpreter(var);
    }
};
//减法运算
class SubExpression : public SymbolExpression
{
public:
    SubExpression(Expression *left, Expression *right) : SymbolExpression(left, right)
    {
    }
    int interpreter(map<char, int> var) override
    {
        return left->interpreter(var) - right->interpreter(var);
    }
};
//解析字符串,转换成表达式对象
Expression *analyse(string expStr)
{
    stack<Expression *> expStack;
    Expression *left = nullptr;
    Expression *right = nullptr;
    for (int i = 0; i < expStr.size(); i++)
    {
        switch (expStr[i])
        {
        case '+': // 加法运算
            left = expStack.top();
            right = new VarExpression(expStr[++i]);
            expStack.push(new AddExpression(left, right));
            break;
        case '-': // 减法运算
            left = expStack.top();
            right = new VarExpression(expStr[++i]);
            expStack.push(new SubExpression(left, right));
            break;
        default: // 变量表达式
            expStack.push(new VarExpression(expStr[i]));
        }
    }
    Expression *expression = expStack.top();
    return expression;
}

void release(Expression *expression)
{
    //释放表达式树的节点内存...
}

int main(int argc, const char *argv[])
{
    string expStr = "a+b-c+d-e";
    map<char, int> var;
    var.insert(make_pair('a', 5));
    var.insert(make_pair('b', 2));
    var.insert(make_pair('c', 1));
    var.insert(make_pair('d', 6));
    var.insert(make_pair('e', 10));

    Expression *expression = analyse(expStr);
    int result = expression->interpreter(var);
    cout << result << endl;
    release(expression);//释放所有new的对象
    return 0;
}

若有收获,就点个赞吧
0 人点赞
