- 一:Spring框架功能整体介绍
- 二:Spring IOC 容器底层注解使用
- 2.1)xml配置文件的形式 VS 配置类的形式
- 2.2)在配置类上写@CompentScan注解来进行包扫描
- 2.3)配置Bean的作用域对象
- 2.4)Bean的懒加载@Lazy(主要针对单实例的bean 容器启动的时候,不创建对象,在第一次使用的时候才会创建该对象)
- 2.5)@Conditional进行条件判断等.
- 2.6)往IOC 容器中添加组件的方式 (四种方式)
- 2.7)Bean的初始化方法和销毁方法.
- 2.8)通过@Value +@PropertySource来给组件赋值
- 2.9)自动装配
- 3.0) 我们自己的组件 需要使用spring ioc的底层组件的时候,比如 ApplicationContext等
图灵架构师第三期(笔记).doc -> zip
一:Spring框架功能整体介绍
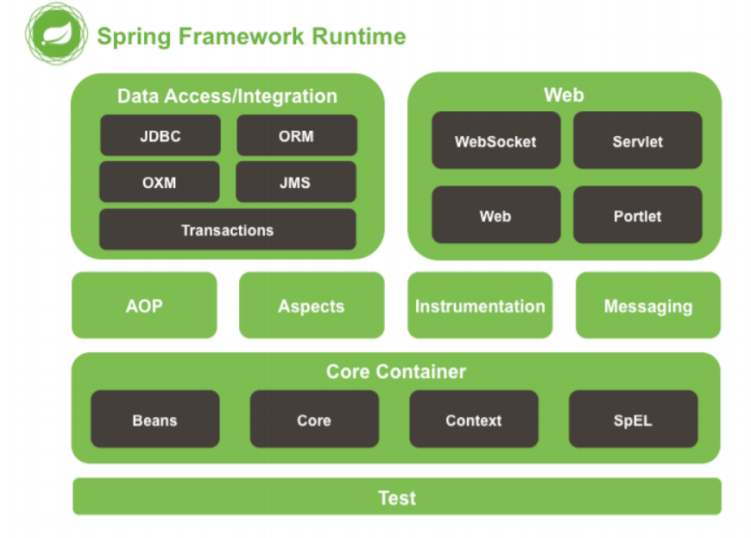
1: Spring Core Container:
模块作用:Core和Beans模块是框架的基础部分,提供 IoC (转控制)和依赖注入特性。 这里的基础概念是BeanFactory,它提供对 Factory 模式的经典实 现来消除对程序单例模式的需要,并真正地允许你从程序逻辑中分离出依赖关系和配置
1.1) Core
主要包含 Spring 框架基本的核心工具类,Spring 的其他组件都要用到这个包里的类 Core 模块是其他组件的基本核心。
1.2)Beans (BeanFacotry的作用)
它包含访问配直文件、创建和管理 bean 以及进行 Inversion of Control / Dependency Injection ( IoC/DI )操作相关的所有类
1.3) Context(处理BeanFactory,以下还是ApplicationContext的作用)
模构建于Core 和 Beans 模块基础之上,提供了一种类似JNDI 注册器的框 架式的对象访问方法。 Context 模块继承了Beans的特性,为Spring核心提供了大量扩展,添加了国际化(例如资源绑定)、事件传播、资源加载和对 Context 的透明创 建的支持。 Context 模块同时 也支持 J2EE 的一些特 性, ApplicationContext 接口是 Context 模块的关键
本质区别:(使用BeanFacotry的bean是延时加载的,ApplicationContext是非延时加载的)
1.4)Expression Language
模块提供了强大的表达式语言,用于在运行时查询和操纵对象。 它是JSP 2.1规范中定义的 unifed expression language 的扩展。该语言支持设直/获取属 性的值,属性的分配,方法的调用,访问数 组上下文( accessiong the context of arrays )、容器和索引器、逻辑和算术运算符、命名变量以及从Spring的 IoC 容器中根据名称检索对象。 它也支持 list 投影、选择和一般的 list 聚合.
2: Spring Data Access/Integration
2.1)JDBC
模块提供了一个 JDBC 抽象层,它可以消除冗长的 JDBC 编码和解析数据库厂 商特有的错误代码。 这个模块包含了 Spring 对 JDBC 数据访问进行封装的所有类
2.2)ORM 模块为流行的对象-关系映射 API
如 JPA、 JDO、 Hibernate、 iBatis 等,提供了 一个交互层。 利用 ORM 封装包,可以混合使用所 有 Spring 提供的特性进行 O/R 映射, 如前边提到的简单声 明性事务管理。
2.3)OXM 模块提供了一个对 ObjecνXML 映射实现的抽象层, Object/XML 映射实现包括 JAXB、 Castor、 XMLBeans、 JiBX 和 XStrearn
2.4)JMS ( Java Messaging Service )
模块主要包含了 一些制造和消 费消息的特性。
2.5) Transaction
支持编程和声明性的事务管理,这些事务类必须实现特定的接口,并 且对所有的 POJO 都适用
3: Spring Web Web 模块
提供了基础的面向 Web 的集成特性c 例如,多文件上传、使用 servlet listeners 初始化 IoC 容器以及一个面向 Web 的应用上下文。 它还包含 Spring 远程支持中 Web 的相关部分。
4: Spring Aop
4.1)Aspects 模块提供了对 AspectJ 的集成支持。
4.2)Instrumentation 模块提供了 class instrumentation 支持和 classloader 实现,使得可以在特 定的应用服务器上使用
5:Test Test
模块支持使用 JUnit 和 TestNG 对 Spring 组件进行测试
6:Spring 容器继承图: 
7:控制反转和依赖注入
7.1)什么是控制反转?我觉得有必要先了解软件设计的一个重要思想:依赖倒置原则(Dependency Inversion Principle )
①:什么是依赖倒置原则?假设我们设计一辆汽车:先设计轮子,然后根据轮子大小设计底盘,接着根据底 盘设计车身,最后根据车身设计好整个汽车。这里就出现了一个“依赖”关系:汽车依赖车身,车身依赖 底盘,底盘依赖轮子
IOC容器的最最最最核心思想..
ioc的思想最核心的地方在于,资源不由使用资源的双方管理,而由不使用资源的第三方管理,这可以带来很多好处。第 一,资源集中管理,实现资源的可配置和易管理。第二,降低了使用资源双方的依赖程度,也就是我们说的耦合度
二:Spring IOC 容器底层注解使用
2.1)xml配置文件的形式 VS 配置类的形式
①:基于xml的形式定义Bean的信息
<?xml version="1.0" encoding="UTF-8"?><beans xmlns="http://www.springframework.org/schema/beans"xmlns:xsi="http://www.w3.org/2001/XMLSchema-instance"xsi:schemaLocation="http://www.springframework.org/schema/beanshttp://www.springframework.org/schema/beans/spring-beans.xsd">//定义一个Bean的信息<bean id="car" class="com.tuling.compent.Car"></bean></beans>
去容器中读取Bean
public static void main( String[] args ){ClassPathXmlApplicationContext ctx = new ClassPathXmlApplicationContext("beans.xml");System.out.println(ctx.getBean("person"));}
②:基于读取配置类的形式定义Bean信息
@Configurationpublic class MainConfig {@Beanpublic Person person(){return new Person();}}
注意: 通过@Bean的形式是使用的话, bean的默认名称是方法名,若@Bean(value=”bean的名称”) 那么bean的名称是指定的,可以指定多个name
去容器中读取Bean的信息(传入配置类)
public static void main( String[] args ){AnnotationConfigApplicationContext ctx = new AnnotationConfigApplicationContext(MainConfig.class);System.out.println(ctx.getBean("person"));}
2.2)在配置类上写@CompentScan注解来进行包扫描
@Configuration@ComponentScan(basePackages = {"com.tuling.testcompentscan"})public class MainConfig {}
①:排除用法 excludeFilters(排除@Controller注解的,和TulingService的)
@Configuration@ComponentScan(basePackages = {"com.tuling.testcompentscan"},excludeFilters = {@ComponentScan.Filter(type = FilterType.ANNOTATION,value = {Controller.class}),@ComponentScan.Filter(type = FilterType.ASSIGNABLE_TYPE,value = {TulingService.class})})public class MainConfig {}
②:包含用法 includeFilters ,注意,若使用包含的用法,需要把useDefaultFilters属性设置为false(true表示扫描全部的)
@Configuration@ComponentScan(basePackages = {"com.tuling.testcompentscan"},includeFilters = {@ComponentScan.Filter(type = FilterType.ANNOTATION,value = {Controller.class, Service.class})},useDefaultFilters = false)public class MainConfig {}
使用@ComponentScan,排除不扫描的使用excludeFilters,如下面中的
@ComponentScan(basePackages = {"com.tuling.testcompentscan"},excludeFilters = {// 不扫描带Controller注解的@ComponentScan.Filter(type = FilterType.ANNOTATION,value = {Controller.class}),// 不扫描 类 TulingService@ComponentScan.Filter(type = FilterType.ASSIGNABLE_TYPE,value = {TulingService.class})})
③ @ComponentScan.Filter type的类型
a)注解形式的FilterType.ANNOTATION @Controller @Service @Repository @Compent
b)指定类型的 FilterType.ASSIGNABLE_TYPE @ComponentScan.Filter(type = FilterType.ASSIGNABLE_TYPE,value = {TulingService.class})
c)aspectj类型的 FilterType.ASPECTJ(不常用)
d)正则表达式的 FilterType.REGEX(不常用)
e)自定义的 FilterType.CUSTOM
使用@ComponentScan,添加自定义扫描,使用FilterType.CUSTOM,如下面的
@ComponentScan(basePackages = {"com.tuling.testcompentscan"},excludeFilters = {//@ComponentScan.Filter(type = FilterType.ANNOTATION,value = {Controller.class, Service.class}),@ComponentScan.Filter(type = FilterType.CUSTOM,value = TulingFilterType.class)},includeFilters = {@ComponentScan.Filter(type = FilterType.ANNOTATION,value = Repository.class)})
③.①FilterType.CUSTOM 自定义类型如何使用
import org.springframework.core.io.Resource;import org.springframework.core.type.AnnotationMetadata;import org.springframework.core.type.ClassMetadata;import org.springframework.core.type.classreading.MetadataReader;import org.springframework.core.type.classreading.MetadataReaderFactory;import org.springframework.core.type.filter.TypeFilter;import java.io.IOException;/*** Created by smlz on 2019/5/19.*/public class TulingFilterType implements TypeFilter {@Overridepublic boolean match(MetadataReader metadataReader, MetadataReaderFactory metadataReaderFactory) throws IOException {//获取当前类的注解源信息AnnotationMetadata annotationMetadata = metadataReader.getAnnotationMetadata();//获取当前类的class的源信息ClassMetadata classMetadata = metadataReader.getClassMetadata();//获取当前类的资源信息Resource resource = metadataReader.getResource();System.out.println("类的路径:"+classMetadata.getClassName());if(classMetadata.getClassName().contains("dao")) {return true;}return false;}}
@ComponentScan(basePackages = {"com.tuling.testcompentscan"},includeFilters = {@ComponentScan.Filter(type = FilterType.CUSTOM,value = TulingFilterType.class)},useDefaultFilters = false)public class MainConfig {}
2.3)配置Bean的作用域对象
①:在不指定@Scope的情况下,所有的bean都是单实例的bean,而且是饿汉加载(容器启动实例就创建好了)
@Beanpublic Person person() {return new Person();}
②:指定@Scope为 prototype 表示为多实例的,而且还是懒汉模式加载(IOC容器启动的时候,并不会创建对象,而是 在第一次使用的时候才会创建)
@Bean@Scope(value = "prototype")public Person person() {return new Person();}
③:@Scope指定的作用域方法取值
a) singleton 单实例的(默认)b) prototype 多实例的c) request 同一次请求d) session 同一个会话级别
2.4)Bean的懒加载@Lazy(主要针对单实例的bean 容器启动的时候,不创建对象,在第一次使用的时候才会创建该对象)
@Bean@Lazypublic Person person() {return new Person();}
2.5)@Conditional进行条件判断等.
场景,有二个组件TulingAspect 和TulingLog ,我的TulingLog组件是依赖于TulingAspect的组件
应用:自己创建一个TulingCondition的类实现Condition接口
import org.springframework.context.annotation.Condition;import org.springframework.context.annotation.ConditionContext;import org.springframework.core.type.AnnotatedTypeMetadata;public class TulingCondition implements Condition {/*** @param context* @param metadata* @return*/@Overridepublic boolean matches(ConditionContext context, AnnotatedTypeMetadata metadata) {//判断容器中是否有tulingAspect的组件if (context.getBeanFactory().containsBean("tulingAspect")) {return true;}return false;}}
public class MainConfig {@Beanpublic TulingAspect tulingAspect() {return new TulingAspect();}//当容器中有tulingAspect的组件,那么tulingLog才会被实例化.@Bean@Conditional(value = TulingCondition.class)public TulingLog tulingLog() {return new TulingLog();}}
2.6)往IOC 容器中添加组件的方式 (四种方式)
①:通过@CompentScan +@Controller @Service @Respository @compent
适用场景: 针对我们自己写的组件可以通过该方式来进行加载到容器中。
②:通过@Bean的方式来导入组件(适用于导入第三方组件的类)
③:通过@Import来导入组件 (导入组件的id为全类名路径)
@Configuration@Import(value = {Person.class, Car.class})public class MainConfig {}
通过@Import 的ImportSeletor类实现组件的导入 (导入组件的id为全类名路径)
public class TulingImportSelector implements ImportSelector {/可以获取导入类的注解信息@Overridepublic String[] selectImports(AnnotationMetadata importingClassMetadata) {return new String[]{"com.tuling.testimport.compent.Dog"};}}@Configuration@Import(value = {Person.class, Car.class, TulingImportSelector.class})public class MainConfig {}
④:通过实现FacotryBean接口来实现注册组件
package com.tuling.testfactorybean;import org.springframework.beans.factory.FactoryBean;/*** 通过实现factoryBean接口往容器中注册组件*/public class CarFactoryBean implements FactoryBean<Car> {@Overridepublic Car getObject() throws Exception {return new Car();}@Overridepublic Class<?> getObjectType() {return Car.class;}@Overridepublic boolean isSingleton() {return false;}}
2.7)Bean的初始化方法和销毁方法.
①:什么是bean的生命周期?
bean的创建——->初始化——->销毁方法
由容器管理Bean的生命周期,我们可以通过自己指定bean的初始化方法和bean的销毁方法
@Configurationpublic class MainConfig {//指定了bean的生命周期的初始化方法和销毁方法.@Bean(initMethod = "init",destroyMethod = "destroy")public Car car() {return new Car();}}
针对单实例bean的话,容器启动的时候,bean的对象就创建了,而且容器销毁的时候,也会调用Bean的销毁方法 针对多实例bean的话,容器启动的时候,bean是不会被创建的而是在获取bean的时候被创建,而且bean的销毁不受 IOC容器的管理.
②:通过 InitializingBean和DisposableBean 的二个接口实现bean的初始化以及销毁方法
@Componentpublic class Person implements InitializingBean,DisposableBean {public Person() {System.out.println("Person的构造方法");}@Overridepublic void destroy() throws Exception {System.out.println("DisposableBean的destroy()方法 ");}@Overridepublic void afterPropertiesSet() throws Exception {System.out.println("InitializingBean的 afterPropertiesSet方法");}}
③:通过JSR250规范 提供的注解@PostConstruct 和@ProDestory标注的方法
@Componentpublic class Book {public Book() {System.out.println("book 的构造方法");}@PostConstructpublic void init() {System.out.println("book 的PostConstruct标志的方法");}@PreDestroypublic void destory() {System.out.println("book 的PreDestory标注的方法");}}
④:通过Spring的BeanPostProcessor的 bean的后置处理器会拦截所有bean创建过程
postProcessBeforeInitialization 在init方法之前调用
postProcessAfterInitialization 在init方法之后调用
/*** 后置处理器 在bean调用初始化方法前后进行调用*/@Componentpublic class TulingBeanPostProcessor implements BeanPostProcessor {@Overridepublic Object postProcessBeforeInitialization(Object bean, String beanName) throws BeansException {System.out.println("TulingBeanPostProcessor...postProcessBeforeInitialization:"+beanName);return bean;}@Overridepublic Object postProcessAfterInitialization(Object bean, String beanName) throws BeansException {System.out.println("TulingBeanPostProcessor...postProcessAfterInitialization:"+beanName);return bean;}}
2.8)通过@Value +@PropertySource来给组件赋值
public class Person {//通过普通的方式@Value("司马")private String firstName;//spel方式来赋值@Value("#{28-8}")private Integer age;通过读取外部配置文件的值@Value("${person.lastName}")private String lastName;}@Configuration@PropertySource(value = {"classpath:person.properties"}) //指定外部文件的位置public class MainConfig {@Beanpublic Person person() {return new Person();}}
2.9)自动装配
@AutoWired的使用
自动注入:
//一个Dao@Repositorypublic class TulingDao {}@Servicepublic class TulingService {@Autowiredprivate TulingDao tulingDao;}
结论:
a:自动装配首先时按照类型进行装配,若在IOC容器中发现了多个相同类型的组件,那么就按照属性名称来进行装配
比如,我容器中有二个TulingDao类型的组件,一个叫tulingDao,一个叫tulingDao2
那么我们通过@AutoWired 来修饰的属性名称时tulingDao,那么拿就加载容器的tulingDao组件,若属性名称为 tulignDao2 那么他就加载的时tulingDao2组件
b:假设我们需要指定特定的组件来进行装配,我们可以通过使用@Qualifier(“tulingDao“)来指定装配的组件 或者在配置类上的@Bean加上@Primary注解
@Autowired@Qualifier("tulingDao")private TulingDao tulingDao2;
3.0) 我们自己的组件 需要使用spring ioc的底层组件的时候,比如 ApplicationContext等
我们可以通过实现XXXAware接口来实现
@Componentpublic class TulingCompent implements ApplicationContextAware,BeanNameAware {private ApplicationContext applicationContext;@Overridepublic void setBeanName(String name) {System.out.println("current bean name is :【"+name+"】");}@Overridepublic void setApplicationContext(ApplicationContext applicationContext) throws BeansException {this.applicationContext = applicationContext;}}

若有收获,就点个赞吧
0 人点赞
