https://zhuanlan.zhihu.com/p/295451397
当我们运行SpringBootApplication的时候,调用静态方法run,总体步骤大致可以分为如下几步
把启动类分解一下,实际上就是两部分:
- @SpringBootApplication注解
- 一个main()方法,里面调用SpringApplication.run()方法。
一、@SpringBootApplication注解
查看@SpringBootApplication 的时候就回发现它是一系列注解的组合,分别有@SpringBootConfiguration、@EnableAutoConfiguration、@ComponentScan
1.1@ComponentScan
@ComponentScan:这个注解的作用是告诉Spring扫描哪个包下面类,加载符合条件的组件(比如@Component和@Repository等的类)或者bean的定义。
- 所有它有一个basePackages的属性,如果默认不写,则从声明@ComponentScan所在类的package进行扫描。所以启动类最好定义在Root package下,因为一般我们使用@SpringBootApplication时,都不指定basePackages的。
1.2@EnableAutoConfiguration
@EnableAutoConfiguration,也是一个复杂注解,关键在于@Import,会加载AutoConfigurationImportSelector.class,会触发 selectImports这个方法,根据返回的String数组(配置类Class的名称)加载配置类
通过getAutoConfigurationEntry()方法点进去,找到getCandidateConfigurations()方法,最后发现 SpringFactoriesLoader.loadFactoryNames()方法。就是SpringFactoriesLoader类,通过loadSpringFactories()方法加载META-INF/spring.factories中的配置类。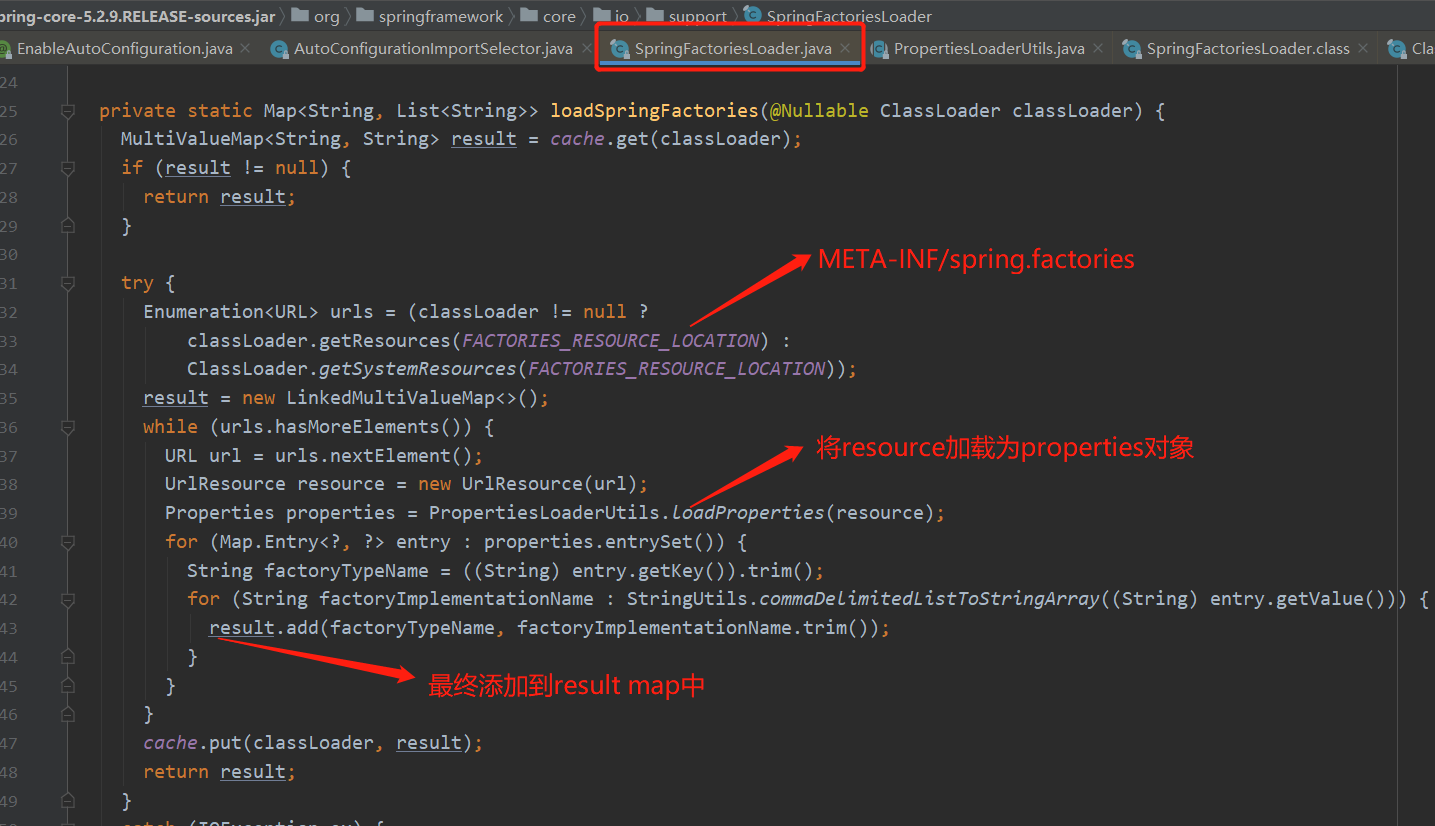
这里使用了spring.factories文件的方式加载配置类,提供了很好的扩展性。
所以@EnableAutoConfiguration注解的作用其实就是开启自动配置,自动配置主要则依靠这种加载方式来实现。
1.3 @SpringBootConfiguration
标注当前类是配置类,并且会将当前类内声明的一个或者多个@Bean注解标记的方法的实例纳入到Spring容器中,并且实例名就是方法名。
1.4小结
使用下面的图片把@SpringBootConfiguration、@EnableAutoConfiguration、@ComponentScan描述一下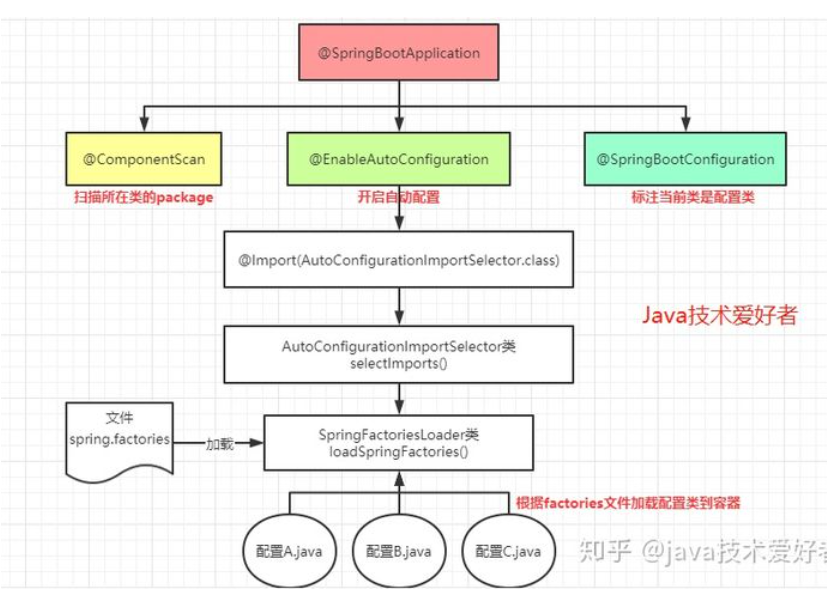
二、SpringApplication类
接下来讲main方法里执行的这句代码,这是SpringApplication类的静态方法run()。
//启动类的main方法public static void main(String[] args) {SpringApplication.run(WorkflowManagementServer.class, args);}// 启动类调用的run方法public static ConfigurableApplicationContext run(Class<?> primarySource, String... args) {return run(new Class<?>[] { primarySource }, args);}// 和上面的方法区别在于第一个参数是一个数组public static ConfigurableApplicationContext run(Class<?>[] primarySources, String[] args) {return new SpringApplication(primarySources).run(args);}
通过跟着源码进去,发现最后调用并不是一个静态方法,而是一个实例方法。需要new一个SpringApplication实例,这个构造器还带有一个primarySources的参数。所以我们直接定位到构造器。
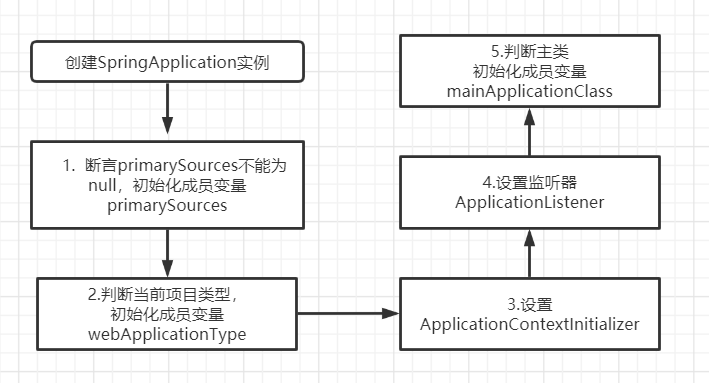
public SpringApplication(ResourceLoader resourceLoader, Class<?>... primarySources) {this.resourceLoader = resourceLoader;//断言primarySources不能为null,如果为null,抛出异常提示Assert.notNull(primarySources, "PrimarySources must not be null");//启动类传入的Classthis.primarySources = new LinkedHashSet<>(Arrays.asList(primarySources));//判断当前项目类型,有三种:NONE、SERVLET、REACTIVEthis.webApplicationType = WebApplicationType.deduceFromClasspath();//设置ApplicationContextInitializersetInitializers((Collection) getSpringFactoriesInstances(ApplicationContextInitializer.class));//设置监听器setListeners((Collection) getSpringFactoriesInstances(ApplicationListener.class));//判断主类,初始化入口类this.mainApplicationClass = deduceMainApplicationClass();}// 判断主类private Class<?> deduceMainApplicationClass() {try {StackTraceElement[] stackTrace = new RuntimeException().getStackTrace();for (StackTraceElement stackTraceElement : stackTrace) {if ("main".equals(stackTraceElement.getMethodName())) {return Class.forName(stackTraceElement.getClassName());}}}catch (ClassNotFoundException ex) {// Swallow and continue}return null;}
以上就是创建SpringApplication实例做的事情,下面用张图来表示一下。
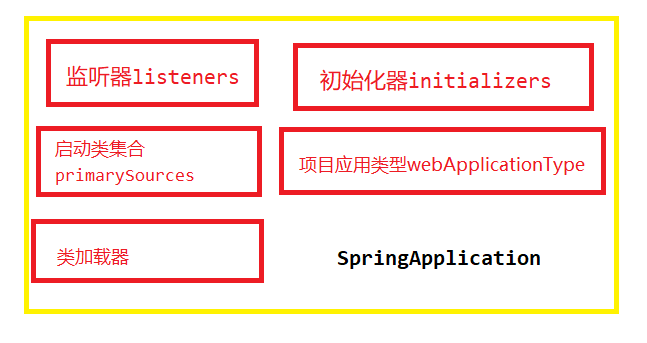
创建SpringApplication实例之后,就完成了SpringApplication类的初始化工作。这个实例里面包括监听器
、初始化器、项目应用类型,启动类集合,类加载器。如下图
得到SpringApplication实例后,接下来就调用实例方法run()。继续看。
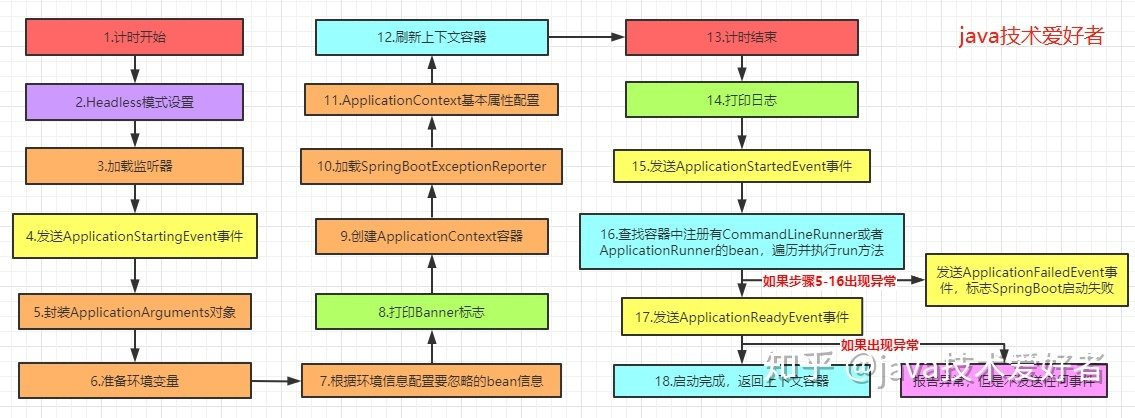
public ConfigurableApplicationContext run(String... args) {//创建计时器StopWatch stopWatch = new StopWatch();//开始计时stopWatch.start();//定义上下文对象ConfigurableApplicationContext context = null;Collection<SpringBootExceptionReporter> exceptionReporters = new ArrayList<>();//Headless模式设置configureHeadlessProperty();//加载SpringApplicationRunListeners监听器SpringApplicationRunListeners listeners = getRunListeners(args);//发送ApplicationStartingEvent事件listeners.starting();try {//封装ApplicationArguments对象ApplicationArguments applicationArguments = new DefaultApplicationArguments(args);//配置环境模块ConfigurableEnvironment environment = prepareEnvironment(listeners, applicationArguments);//根据环境信息配置要忽略的bean信息configureIgnoreBeanInfo(environment);//打印Banner标志Banner printedBanner = printBanner(environment);//创建ApplicationContext应用上下文context = createApplicationContext();//加载SpringBootExceptionReporterexceptionReporters = getSpringFactoriesInstances(SpringBootExceptionReporter.class,new Class[] { ConfigurableApplicationContext.class }, context);//ApplicationContext基本属性配置prepareContext(context, environment, listeners, applicationArguments, printedBanner);//刷新上下文refreshContext(context);//刷新后的操作,由子类去扩展afterRefresh(context, applicationArguments);//计时结束stopWatch.stop();//打印日志if (this.logStartupInfo) {new StartupInfoLogger(this.mainApplicationClass).logStarted(getApplicationLog(), stopWatch);}//发送ApplicationStartedEvent事件,标志spring容器已经刷新,此时所有的bean实例都已经加载完毕listeners.started(context);//查找容器中注册有CommandLineRunner或者ApplicationRunner的bean,遍历并执行run方法callRunners(context, applicationArguments);}catch (Throwable ex) {//发送ApplicationFailedEvent事件,标志SpringBoot启动失败handleRunFailure(context, ex, exceptionReporters, listeners);throw new IllegalStateException(ex);}try {//发送ApplicationReadyEvent事件,标志SpringApplication已经正在运行,即已经成功启动,可以接收服务请求。listeners.running(context);}catch (Throwable ex) {//报告异常,但是不发送任何事件handleRunFailure(context, ex, exceptionReporters, null);throw new IllegalStateException(ex);}return context;}
结合注释和源码,其实很清晰了,为了加深印象,画张图看一下整个流程。

若有收获,就点个赞吧
0 人点赞
