谷粒商城
版本:V 2.0
单点登录

1 单点登录业务介绍
早期单一服务器,用户认证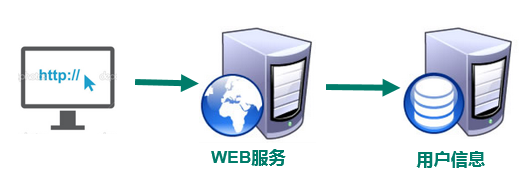
缺点:单点性能压力,无法扩展
WEB应用集群,session共享模式
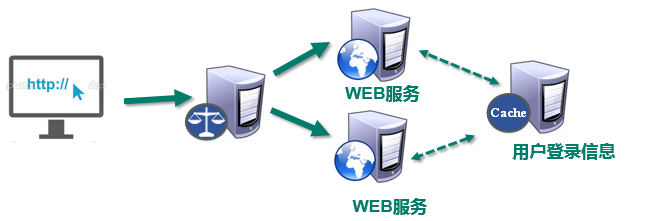
解决了单点性能瓶颈。
问题:
- 多业务分布式数据独立管理,不适合统一维护一份session数据。
- 分布式按业务功能切分,用户、认证解耦出来单独统一管理。
- cookie中使用jsessionId 容易被篡改、盗取。
- 跨顶级域名无法访问。
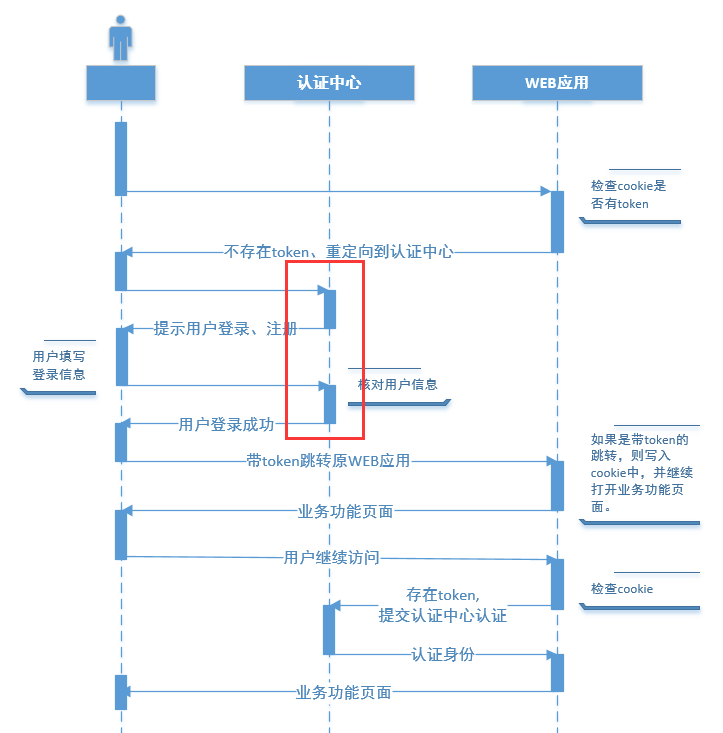
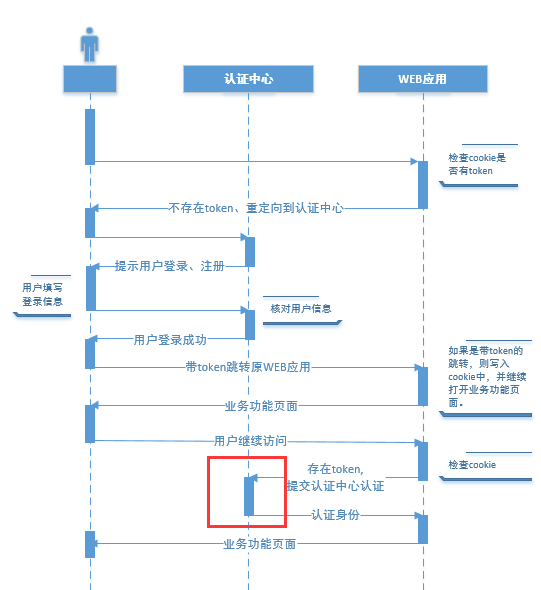
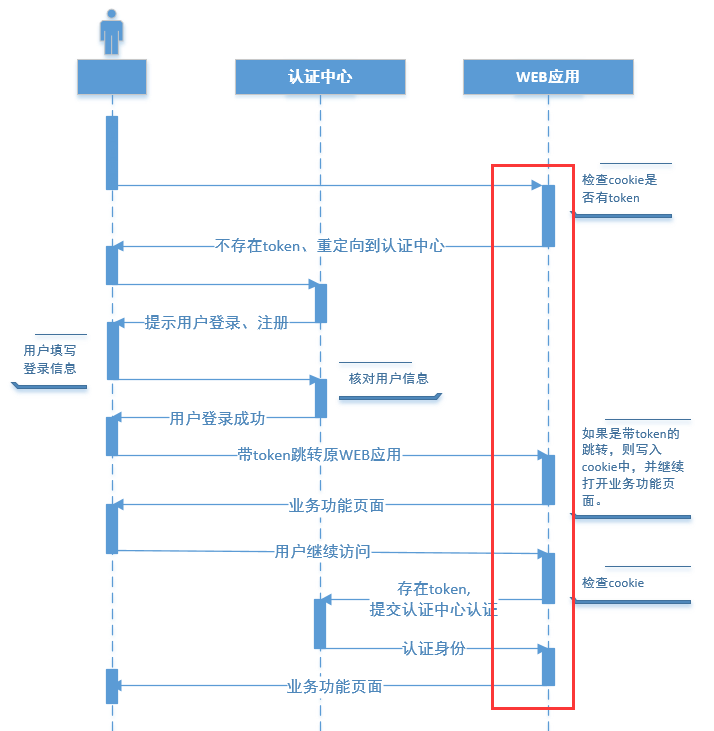
分布式,SSO(single sign on)模式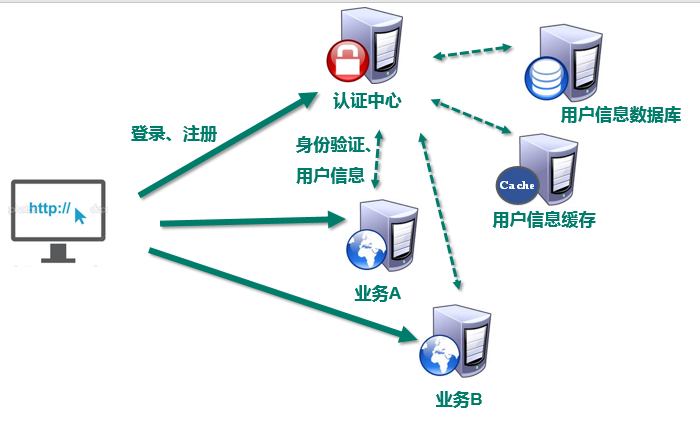
解决 :
用户身份信息独立管理,更好的分布式管理。
可以自己扩展安全策略
跨域不是问题
缺点:
认证服务器访问压力较大。
业务流程图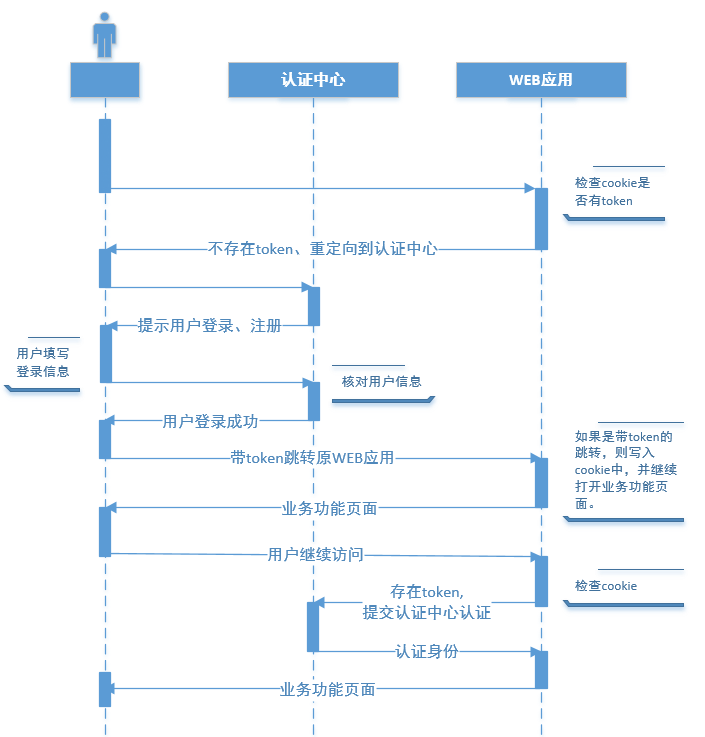
2 认证中心模块搭建(passport)

1 搭建认证中心模块
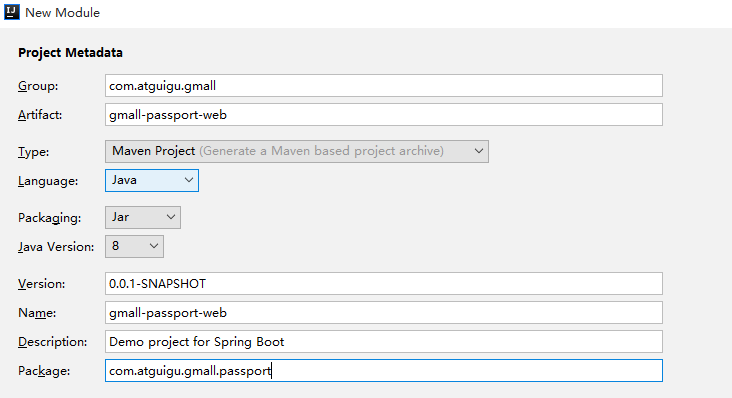
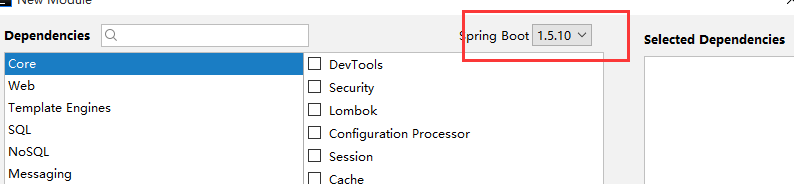

pom.xml
| <?_xml version=”1.0” encoding=”UTF-8”?>_
<dependency><br /> <groupId>com.atguigu.gmall</groupId><br /> <artifactId>gmall-interface</artifactId><br /> <version>1.0-SNAPSHOT</version><br /> </dependency><dependency><br /> <groupId>com.atguigu.gmall</groupId><br /> <artifactId>gmall-web-util</artifactId><br /> <version>1.0-SNAPSHOT</version><br /> </dependency>
| | —- |
application.properties
| server.port=8086 spring.thymeleaf.cache=false spring.thymeleaf.mode=LEGACYHTML5 spring.dubbo.application.name=passport-webspring.dubbo.registry.protocol=zookeeperspring.dubbo.registry.address=192.168.67.163:2181spring.dubbo.base-package=com.atguigu.gmallspring.dubbo.protocol.name=dubbospring.dubbo.consumer.timeout=100000spring.dubbo.consumer.check=false |
|---|
导入静态资源和登录页面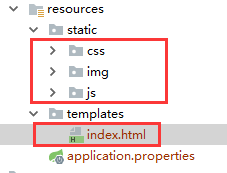
把index.html中的路径从 ../static/ 换成 /
2 登录页面html
|
请输入账户名和密码
页面中的js
| btn2.onclick=function(){
if(user.value == ‘’ || pass.value ==’’){
err.style.display=’block’;
user.style.border=’1px solid red’;
pass.style.border=’1px solid red’;
err_img1.src=’img/img11.png’;
err_img2.src=’img/img22.png’;
}else{
$.post(“/login”,$(“#loginForm”).serialize(),function (data) {
if(data&&data!=’fail’){
var originUrl = $(“#originUrl”).val();
originUrl = decodeURIComponent(originUrl);
var idx=originUrl.indexOf(‘?’);
if(idx<0){<br /> originUrl+='?'<br /> }else{<br /> originUrl+='&'<br /> }<br /> window.location.href=originUrl+"newToken="+data;<br /> }else{<br /> $(".error").text("用户名密码错误!");<br /> $(".error").show();<br /> }<br /> } );
}user.onfocus=function(){
err_img1.src=’img/grow1.png’;
user.style.border=’1px solid #999’;
}
} | | —- |
3 登录功能(生成token)
3.1 思路:passport只负责认证和token的颁发
- 用接受的用户名密码核对后台数据库
- 将用户信息加载到写入redis,redis中有该用户视为登录状态。
- 用userId+当前用户登录ip地址+密钥生成token
- 重定向用户到之前的来源地址,同时把token作为参数附上。
3.2 核对后台登录信息+用户登录信息载入缓存
UserManageServiceImpl
| public UserInfo login(UserInfo userInfo){ String passwd = DigestUtils.md5Hex(userInfo.getPasswd()); userInfo.setPasswd(passwd); UserInfo userInfoResult = userInfoMapper.selectOne(userInfo); if(userInfoResult!=null){ String userInfoKey=“user:”+userInfoResult.getId()+“info”; Jedis jedis = redisUtil.getJedis(); String userInfoJson = JSON.toJSONString(userInfoResult); jedis.setex(userInfoKey,UserConst.sessionExpire,userInfoJson); return userInfoResult ; }else{ return null; } } |
|---|
3.3 生成token
JWT工具
JWT(Json Web Token) 是为了在网络应用环境间传递声明而执行的一种基于JSON的开放标准。
JWT的声明一般被用来在身份提供者和服务提供者间传递被认证的用户身份信息,以便于从资源服务器获取资源。比如用在用户登录上
JWT 最重要的作用就是对 token信息的防伪作用。
JWT的原理,
一个JWT由三个部分组成:公共部分、私有部分、签名部分。最后由这三者组合进行base64编码得到JWT。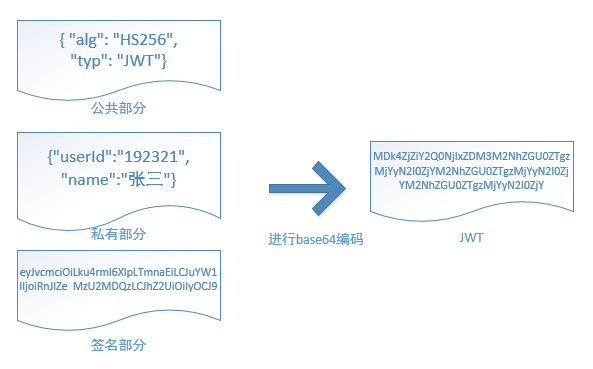
- 公共部分
主要是该JWT的相关配置参数,比如签名的加密算法、格式类型、过期时间等等。
- 私有部分
用户自定义的内容,根据实际需要真正要封装的信息。
- 签名部分
根据用户信息+盐值+密钥生成的签名。如果想知道JWT是否是真实的只要把JWT的信息取出来,加上盐值和服务器中的密钥就可以验证真伪。所以不管由谁保存JWT,只要没有密钥就无法伪造。
- base64编码,并不是加密,只是把明文信息变成了不可见的字符串。但是其实只要用一些工具就可以吧base64编码解成明文,所以不要在JWT中放入涉及私密的信息,因为实际上JWT并不是加密信息。
pom依赖 放到gmall-web-util中
| <dependency> <groupId>io.jsonwebtoken</groupId> <artifactId>jjwt</artifactId> <version>0.9.0</version> </dependency> |
|---|
3.4 制作 JWT的工具类(JwtUtil)
| public class JwtUtil { public static String encode(String key,Map if(salt!=null){ key+=salt; } JwtBuilder jwtBuilder = Jwts.builder().signWith(SignatureAlgorithm.HS256,key); jwtBuilder = jwtBuilder.setClaims(param); String token = jwtBuilder.compact(); return token; } public static Map Claims claims=null; if (salt!=null){ key+=salt; } try { claims= Jwts.parser().setSigningKey(key).parseClaimsJws(token).getBody(); } catch ( JwtException e) { return null; } return claims; } } |
|---|
3.5 passport模块Controller示例
PassportControler
| @RequestMapping(value =“login”,method = RequestMethod.POST) @ResponseBodypublic String login(UserInfo userInfo,HttpServletRequest httpServletRequest){ String remoteAddr = httpServletRequest.getHeader(“x-forwarded-for”); String userId = userManageService.login(userInfo); if(userId==null){ return **“fail”; }else{ Map map=new HashMap(); map.put(“userId”,userId); map.put(“nickName”,userInfoResult.getNickName()); String token = JwtUtil.encode(signKey, map, remoteAddr); return **token; } } |
|---|
4 验证登录(token)功能,用jwt解析
功能:当业务模块某个页面要检查当前用户是否登录时,提交到认证中心,认证中心进行检查校验,返回登录状态、用户Id和用户名称。
4.1 思路:
- 利用密钥和IP检验token是否正确,并获得里面的userId
- 用userId检查Redis中是否有用户信息,如果有延长它的过期时间。
- 登录成功状态返回。
4.2 代码示例
UserController
| @RequestMapping(value =“verify”,method = RequestMethod.POST) @ResponseBodypublic String verify(HttpServletRequest httpServletRequest){ String token = httpServletRequest.getParameter(“token”); String curIp=httpServletRequest.getParameter(“currentIp”); Map JSONObject jsonObject=new JSONObject(); String userId =(String) map.get(“userId”); boolean verify = userManageService.verify(userId); return Boolean.toString(verify) ; } |
|---|
UserManageServiceImpl
| public boolean verify(String userId){ Jedis jedis = redisUtil.getJedis(); String userInfoKey=“user:”+userId+“info”; Boolean exists = jedis.exists(userInfoKey); if(exists) { jedis.expire(userInfoKey, UserConst.sessionExpire); } return exists; } |
|---|
3 业务模块的登录检查(@注解与拦截器)
问题:
1 、由认证中心签发的token如何保存?保存到浏览器的cookie中
2 、难道每一个模块都要做一个token的保存功能? 拦截器
3 、如何区分请求是否一定要登录?自定义注解
1 加入拦截器(登录检查拦截器)
首先这个验证功能是每个模块都要有的,也就是所有web模块都需要的。在每个controller方法进入前都需要进行检查。可以利用在springmvc中的拦截器功能。
因为咱们是多个web模块分布式部署的,所以不能写在某一个web模块中,可以一个公共的web模块,就是gmall-web-util中。
位置: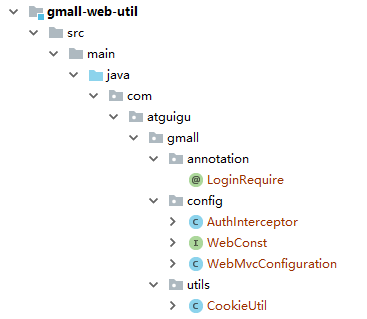
首先自定义一个拦截器,继承成springmvc的HandlerInterceptorAdapter
,通过重新它的preHandle方法实现,业务代码前的校验工作
| @Configurationpublic class WebMvcConfiguration extends WebMvcConfigurerAdapter{
@Autowired
AuthInterceptor authInterceptor;
@Override<br /> **public void **addInterceptors(InterceptorRegistry registry){<br /> registry.addInterceptor(**authInterceptor**).addPathPatterns(**"/**"**);<br /> **super**.addInterceptors(registry);<br /> }<br />} |
| —- |
4 登录成功后跳转回来的处理
登录成功后写入cookie。
| @Componentpublic class AuthInterceptor extends HandlerInterceptorAdapter public boolean preHandle(HttpServletRequest request, HttpServletResponse response, Object handler) throws Exception { String newToken = request.getParameter(“newToken”); if(newToken!=null&&newToken.length()>0){ CookieUtil.setCookie(request,response,”token”,newToken,WebConst.cookieExpire,false); } return true; } } |
|---|
其中用到了CookieUtil的工具。代码如下:
主要三个方法:从cookie中获得值,把值存入cookie, 设定cookie的作用域。
3 又一个CookieUtil工具类
| public class CookieUtil { public static String getCookieValue(HttpServletRequest request, String cookieName, boolean isDecoder) { Cookie[] cookies = request.getCookies(); if (cookies == null || cookieName == null){ return null; } String retValue = null; try { for (int i = 0; i < cookies.length; i++) { if (cookies[i].getName().equals(cookieName)) { if (isDecoder) {//如果涉及中文 _retValue = URLDecoder._decode(cookies[i].getValue(), “UTF-8”); } else { retValue = cookies[i].getValue(); } break; } } } catch (UnsupportedEncodingException e) { e.printStackTrace(); } return retValue; } public static void setCookie(HttpServletRequest request, HttpServletResponse response, String cookieName, String cookieValue, int cookieMaxage, boolean isEncode) { try { if (cookieValue == null) { cookieValue = “”; } else if (isEncode) { cookieValue = URLEncoder.encode(cookieValue, “utf-8”); } Cookie cookie = new Cookie(cookieName, cookieValue); if (cookieMaxage >= 0) cookie.setMaxAge(cookieMaxage); if (null != request)// 设置域名的cookie _cookie.setDomain(_getDomainName(request)); cookie.setPath(“/“); response.addCookie(cookie); } catch (Exception e) { e.printStackTrace(); } } /* 得到cookie的域名 */ private static final String getDomainName(HttpServletRequest request) { String domainName = null; String serverName = request.getRequestURL().toString(); if (serverName == null || serverName.equals(“”)) { domainName = “”; } else { serverName = serverName.toLowerCase(); serverName = serverName.substring(7); final int end = serverName.indexOf(“/“); serverName = serverName.substring(0, end); final String[] domains = serverName.split(“**\\**.”); int len = domains.length; if (len > 3) { // www.xxx.com.cn _domainName = domains[len - 3] + “.” + domains[len - 2] + “.” + domains[len - 1]; } else if (len <= 3 && len > 1) { // xxx.com or xxx.cn domainName = domains[len - 2] + “.” + domains[len - 1]; } else { domainName = serverName; } } if (domainName != null && domainName.indexOf(“:”) > 0) { String[] ary = domainName.split(“**\\**:”); domainName = ary[0]; } System.**_out.println(“domainName = “ + domainName); return **domainName; } } |
|---|
5 检查cookie中是否有token
要做的工作:
- 检查cookie中是否有token,如果有把cookie中的昵称取放入页面request属性中.
- 检查是否需要验证登录。
如果需要,调用认证模块接口
如果认证通过程序照常执行
如果认证不通过,跳转到登录页面。
- 检查是否是登陆页面跳转回来的,如果附带新的token则把token保存到cookie中。
思路:
。
AuthInterceptor
| public boolean preHandle(HttpServletRequest request, HttpServletResponse response, Object handler) throws Exception { String newToken = request.getParameter(“newToken”); if(newToken!=null&&newToken.length()>0){ CookieUtil.setCookie(request,response,”token”,newToken,WebConst.cookieExpire,false); } //1 进行如果能从cookie把token取出来,进行解析,显示页面上。_String token = CookieUtil._getCookieValue(request, “token”, false); String userId=null; if(token!=null){ Base64UrlCodec base64UrlCodec=new Base64UrlCodec(); // 两个“.”之间的部分是实际内容 _String tokenForDecode= StringUtils._substringBetween(token, “.”); byte[] tokenByte = base64UrlCodec.decode(tokenForDecode); String tokenJson=new String(tokenByte,“UTF-8”); System.out.println(“tokenJson = “ + tokenJson); JSONObject jsonObject = JSON.parseObject( tokenJson); userId = jsonObject.getString(“userId”); String nickName = jsonObject.getString(“nickName”); request.setAttribute(“nickName”,nickName); } return true; } } |
|---|
5 通过注@ LoginRequie解来检验方法是否需要验证
为了方便程序员在controller方法上标记,可以借助自定义注解的方式。
比如某个controller方法需要验证用户登录,在方法上加入自定义的@LoginRequie。
像这样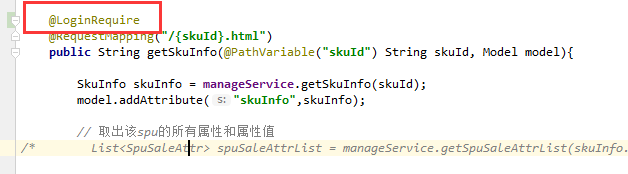
如果方法被加了注解,在拦截器中就可以捕捉到。
添加自定义注解
| @Target(ElementType.METHOD) @Retention(RetentionPolicy.RUNTIME) public @interface LoginRequire { boolean autoRedirect() default true; } |
|---|
在拦截方法preHandle方法中继续添加,检验登录的代码。
| //检查是否需要验证用户已经登录_HandlerMethod handlerMethod =(HandlerMethod) handler; LoginRequire methodAnnotation = handlerMethod.getMethodAnnotation(LoginRequire.class); if(methodAnnotation!=null){ String currentIp = request.getHeader(“x-forwarded-for”); Map map=new HashMap(); map.put(“currentIp”,currentIp); map.put(“token”,token); String result=null; if(token !=null) { result = HttpclientUtil._doPost(WebConst.VERIFY_URL, map); } if(result!=null&&result.equals(“true”)){ request.setAttribute(“userId”,userId); //只有验证过才能取到userId return true; }else{ if(methodAnnotation.autoRedirect()) { String url = URLEncoder.encode(request.getRequestURL().toString(), “utf-8”); response.sendRedirect(WebConst.LOGIN_URL + “?originUrl=” + url); return false; } } } |
|---|
以上方法,检查业务方法是否需要用户登录,如果需要就把cookie中的token和当前登录人的ip地址发给远程服务器进行登录验证,返回的result是验证结果true或者false。如果验证未登录,直接重定向到登录页面。
以上使用到了一个自定义的HttpclientUtil工具类,放在gmall-common-util模块中。专门负责通过restful风格调用接口。
位置: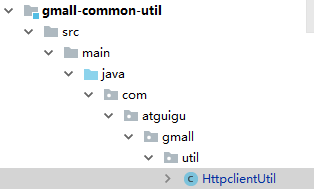
6 Http工具类(HttpclientUtil)
| public class HttpclientUtil { public static String doGet(String url) { // 创建Httpclient对象 _CloseableHttpClient httpclient = HttpClients._createDefault(); // 创建http GET请求 _HttpGet httpGet = new HttpGet(url); CloseableHttpResponse response = null; try { // 执行请求 response = httpclient.execute(httpGet); // 判断返回状态是否为200 if (response.getStatusLine().getStatusCode() == HttpStatus.**_SC_OK) { HttpEntity entity = response.getEntity(); String result = EntityUtils.toString(entity, “UTF-8”); EntityUtils.consume(entity); httpclient.close(); return result; } httpclient.close(); }catch (IOException e){ e.printStackTrace(); return null; } return null; } public static String doPost(String url, Map // 创建Httpclient对象 _CloseableHttpClient httpclient = HttpClients._createDefault(); _// 创建http Post请求 _HttpPost httpPost = CloseableHttpResponse response = null; try { List for (Map.Entry list.add( } HttpEntity httpEntity=new UrlEncodedFormEntity(list,“utf-8”); httpPost.setEntity(httpEntity); // 执行请求 _response = httpclient.execute(httpPost); // 判断返回状态是否为200 _if (response.getStatusLine().getStatusCode() == HttpStatus.SC_OK) { HttpEntity entity = response.getEntity(); String result = EntityUtils.toString(entity, “UTF-8”); EntityUtils.consume(entity); httpclient.close(); return result; } httpclient.close(); }catch (IOException e){ e.printStackTrace(); return null; } return null**; } } |
|---|
6 base64UrlCodec测试效果
64
| // 64_String tokenUserInfo = StringUtils._substringBetween(encode, “.”); Base64UrlCodec base64UrlCodec = new Base64UrlCodec();byte[] tokenBytes = base64UrlCodec.decode(tokenUserInfo); String tokenJson = null;try { tokenJson = new String(tokenBytes, “UTF-8”); } catch (UnsupportedEncodingException e) { e.printStackTrace(); } Map map = JSON.parseObject(tokenJson, Map.class); System.out.println(“64=”+map); |
|---|

若有收获,就点个赞吧
0 人点赞
