4.4 图像卷积
卷积在图像处理中经常用到,其会根据每个像素周围的像素点修改当前像素点的值。卷积核就是用来描述每个像素点如何被附近的像素点所影响。例如,模糊滤波中,使用平均的权重方式来进行计算,这样差异比较大的像素点会减少差异。对于相同的图像,如果想要做不同的操作,我们只需要变化滤波器即可,这样就能做锐化、模糊、边缘增强和图像压花。
卷积算法会遍历原始图像中的每一个像素点。对于每个原始像素点,滤波器中心点会为于像素点的上方,然后将中心点以及周围点的像素点与滤波器中对应的权重值相乘。然后将乘积的结果值相加后,产生出新的值作为输出。图4.3中就展示了该算法的具体过程。
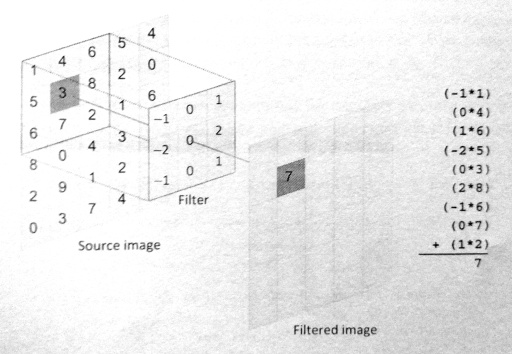
图4.3 卷积滤波如何对原图像进行处理。
图4.4a是原始图,图4.4b中展示了原图经过模糊滤波后的结果,图4.4c展示了经过一个压花滤波器处理后的结果。

图4.4 不同卷积核对同一张图像进行处理:a)为原图;b)为模糊处理;c)为压花处理。
程序清单4.6中使用C/C++实现了一个串行的卷积操作。两层外部循环以遍历原始图像中所有的像素点。每一次滤波操作,每个原始点和其附近的点都要参与计算。需要注意的是,滤波器有可能访问到原始图像之外的区域。为了解决这个问题,我们在最内层循环中添加了四个显式的检查,当滤波器对应的坐标点位于原始图像之外,我们将使用与其最近的原始图像的边界值。
{%ace edit=false, lang=’c_cpp’%} / Iterate over the rows of the source image / for (int i = 0; i < rows; i++) { / Iterate over the columns of the source image / for (int j = 0; j < cols; j++) { / Reset sum for new source pixel / int sum = 0;
/* Apply the filter to the neighborhood */for (int k = -halfFilterWidth; k <= halfFilterWidth; k++){for (int l = -halfFilterWidth; l <= halfFilterWidth; l++){/* Indices used to access the image */int r = i+k;int c = j+l;/* Handle out-of-bounds locations by clamping to* the border pixel*/r = (r < 0)? 0 : r;c = (c < 0)? 0 : c;r = (r >= rows)? rows - 1: r;c = (c >= cols)? cols - 1: c;sum += Image[r][c] *Filter[k+halfFilterWidth][l+halfFilterWidth];}}/* Write the new pixel value */outputImage[i][j] = sum;
} } {%endace%}
程序清单4.6 图像卷积的串行版本
OpenCL中,使用图像内存对象处理卷积操作要比使用数组内存对象更有优势。图像采样方式会自动对访问到图像之外的区域进行处理(类似于上节图像转换中所提到的),并且访问缓存中二维数据在硬件上也会有所优化(将会在第7章讨论)。
OpenCL上实现卷积操作几乎没有什么难度,并且写法类似于卷积操作的C版本。OpenCL版本中,我们为每一个输出的像素点创建了一个工作项,使用并行的方式将最外层两个循环去掉。那么每个工作项的任务就是完成最里面的两个循环,这两个循环完成的就是滤波操作。前面的例子中,读取源图像数据,需要配置一个OpenCL结构体,来指定数据的类型。本节的例子中,将继续使用read_imagef()。完整的内核代码将在代码清单4.7中展示。
{%ace edit=false, lang=’c_cpp’%} kerenl void convolution( read_only image2d_t inputImage, write_only image2d_t outputImage, int rows, int cols, consetant float filter, int filterWidth, sampler_t sampler) { / Store each work-item’s unique row and column */ int column = get_global_id(0); int row = get_global_id(1);
/* Half the width of the filter is needed for indexing
memory later */ int halfWidth = (int)(filterWidth / 2);
/* All accesses to images return data as four-element vectors
- (i.e., float4), although only the x component will contain
meaningful data in this code */ float4 sum = {0.0f,0.0f,0.0f,0.0f};
/ Iterator for the filter / int filterIdx = 0;
/* Each work-item iterates around its local area on the basis of the
size of the filter*/ int2 coords; // Coordinates for accessing the image
/ Iterate the filter rows/ for (int i = -halfWidth; i <= halfWidth; i++) { coords.y = row + i; / Iterate over the filter columns / for (int j = -halfWidth; j <= halfWidth; j++) { coords.x - column + 1;
/*Read a pixel from the image. A single-channel image
- stores the pixel in the x coordinate of the reatured
- vector. / pixel = read_imagef(inputImage, sampler, coords); sum.x += pixel.x filter[filterIdx++];
} }
/ Copy the data to the output image / coords.x = column; coords.y = row; write_imagef(outputImage, coords, sum); } {%endace%}
程序清单4.7 使用OpenCL C实现的图像卷积
访问图像总会返回具有四个值的向量(每个通道一个值)。前节例子中,我们加了.x来表示只需要返回值的第一个元素。本节例子中,我们会申明pixel(图像访问之后返回的值)和sum(存储结果数据,以拷贝到输出图像),其类型都为float4。当然,我们仅对x元素进行累加滤波像素值的计算(第45行)。
卷积核很适合放置到常量内存上,因为所有工作项所要用到的卷积核都是相同的。简单的添加关键字”__costant”在函数参数列表中(第7行),用于表示卷积核存放在常量内存中。
之前的例子中,我们是直接在内核内部创建了一个采样器。本节例子中,我们将使用主机端API创建一个采样器,并将其作为内核的一个参数传入。同样,本节例子中我们将使用C++ API(C++采样器构造函数需要相同的参数)。
主机端创建采样器的API如下所示:
cl_sampler clCreateSampler(cl_context context,cl_bool normalized_coords,cl_addressing_mode addressing_mode,cl_filter_mode filter_mode,cl_int *errcode_ret)
其C++ API如下所示:
cl::Sampler::Sampler(const Context &context,cl_bool normalized_coords,cl_addressing_mode addressing_mode,cl_filter_mode filter_mode,cl_int *err = NULL)
使用C++创建采样器的方式如下所示:
cl::Sampler sampler = new cl::Sampler(context, CL_FALSE, CL_ADDRESS_CLAMP_TO_EDGE, CL_FILTER_NEAREST);
图像旋转例子中,采样器使用非标准化坐标。这里我们将展示不同于内部使用时的另外两个采样器参数:滤波模式将使用最近的像素点的值,而非进行差值后的值(CL_FILTER_NEAREST),并且寻址模式将在访问到图像区域之外时,将其值置为最接近的图像边界值(CL_ADDRESS_CLAMP_TO_EDGE)。(注:这里要注意一下CL和CLK的区别。CL开头的是使用在主机端API上,CLK则直接使用在OpenCL内核代码中。)
使用C++ API,创建二维图像使用image2D类进行创建,创建这个类需要一个ImageFormat对象作为参数。C API则不需要图像描述器的传入。
Image2D和ImageFormat的构造函数如下:
cl::Image2D::Image2D(Context& context,cl_mem_flags flags,ImageFormat format,::size_t width,::size_t height,::size_t row_pitch = 0,void *host_ptr = NULL,cl_int *err = NULL)cl::ImageFormat::ImageFormat(cl_channel_order order,cl_channel_type type)
这样我们就能创建卷积所需要的输入和输出图像,其调用方式如下所示:
cl::ImageFormat imageFormat = cl::ImageFormat(CL_R, CL_FLOAT);cl::Image2D inputImage = cl::Image2D(context, CL_MEM_READ_ONLY, imageFormat, imageCols, imageRows);cl::Image2D outputImage = cl::Image2D(context, CL_MEM_WRITE_ONLY, imageFormat, imageCols, imageRows);
使用C++ API实现图像卷积的主机端代码在代码清单4.8中展示。主程序中,使用了一个5x5的高斯模糊滤波核用于卷积处理。
{%ace edit=false, lang=’c_cpp’%}
define __CL_ENABLE_EXCEPTIONS
include
include
include
include
include “utils.h”
include “bmp_utils.h”
static const char *inputImagePath = “../../Images/cat.bmp”;
static float gaussianBlurFilter[25] = { 1.0f / 273.0f, 4.0f / 273.0f, 7.0f / 273.0f, 4.0f / 273.0f, 1.0f / 273.0f, 4.0f / 273.0f, 16.0f / 273.0f, 26.0f / 273.0f, 16.0f / 273.0f, 4.0f / 273.0f, 7.0f / 273.0f, 26.0f / 273.0f, 41.0f / 273.0f, 26.0f / 273.0f, 7.0f / 273.0f, 4.0f / 273.0f, 16.0f / 273.0f, 26.0f / 273.0f, 16.0f / 273.0f, 4.0f / 273.0f, 1.0f / 273.0f, 4.0f / 273.0f, 7.0f / 273.0f, 4.0f / 273.0f, 1.0f / 273.0f }; static const int gaussianBlurFilterWidth = 5;
int main() { float hInputImage; float hOutpueImage;
int imageRows; int imageCols;
/ Set the filter here / int filterWidth = gaussianBlurFilterWidth; float *filter = gaussianBlurFilter;
/ Read in the BMP image / hInputImage = readBmpFloat(inputImagePath, &imageRows, &imageCols);
/ Allocate space for the output image / hOutputImage = new float[imageRows * imageCols];
try
{
/ Query for platforms /
std::vector
/* Get a list of devices on this platform */std::vector<cl::Device> device;platforms[0].getDevices(CL_DEVICE_TYPE_GPU, &devices);/* Create a context for the devices */cl::Context context(devices);/* Create a command-queue for the first device */cl::CommandQueueu queue = cl::CommandQueue(context, devices[0]);/* Create the images */cl::ImageFormat imageFormat = cl::ImageFormat(CL_R, CL_FLOAT);cl::Image2D inputImage = cl::Image2D(context, CL_MEM_READ_ONLY,imageFormat, imageCols, imageRows);cl::Image2D outputImage = cl::Image2D(context,CL_MEM_WRITE_ONLY,imageFormat, imageCols, imageRows);/* Create a buffer for the filter */cl::Buffer filterBuffer = cl::Buffer(context, CL_MEM_READ_ONLY,filterWidth * filterWidth * sizeof(float));/* Copy the input data to the input image */cl::size<3> origin;origin[0] = 0;origin[1] = 0;origin[2] = 0;cl::size<3> region;region[0] = 0;region[1] = 0;region[2] = 0;queue.enqueueWriteImage(inputImage, CL_TRUE, origin, region,0, 0,hInputImage);/* Copy the filter to the buffer*/queue.enqueueWriteBuffer(filterBuffer, CL_TRUE, 0,filterWidth * filterWidth * sizeof(float), filter);/* Create the sampler */cl::Sampler sampler = cl::Sampler(context, CL_FALSE,CL_ADDRESS_CLAMP_TO_EDGE, CL_FILTER_NEAREST);/* Read the program source */std::ifstream sourceFile("image-convolution.cl");std::string sourceCode(std::istreambuf_iterator<char>(sourceFile),(std::istreambuf_iterator<char>()));cl::Program::Source source(1,std::make_pair(sourceCode.c_str(),sourceCode.length() + 1));/* Make program form the source code */cl::Program program = cl::Program(context, source);/* Create the kernel */cl::Kernel kernel(program, "convolution");/* Set the kernel arguments */kernel.setArg(0, inputImage);kernel.setArg(1, ouputImage);kernel.setArg(2, filterBuffer);kernel.setArg(3, filterWIdth);kernel.setArg(4, sampler);/* Execute the kernel */cl::NDRange global(imageCols, imageRows);cl::NDRange local(8, 8);queue.enqueueNDRangeKernel(kernel, cl::NullRange, global,local);/* Copy the output data back to the host */queue.enqueueReadImage(outputImage, CL_TRUE, origin, region,0, 0,hOutputImage);/* Save the output BMP image */writeBmpFloat(hOutputImage, "cat-filtered.bmp", imageRows, imageCols, inputImagePath);
} catch(cl::Error error){ std::cout << error.what() << “(“ << error.err() << “)” << std::endl; }
free(hInputImage); delete hOutputImage; return 0; } {%endace%}
程序清单4.8 图像卷积主机端完整代码

若有收获,就点个赞吧
0 人点赞
